


Lobo
-
Posts
1,065 -
Joined
-
Last visited
Content Type
Profiles
Forums
Events
Blogs
Gallery
Store
Everything posted by Lobo
-
Looking for feed back and advice
Lobo replied to CedarCreek's topic in Gun Holsters, Rifle Slings and Knife Sheathes
For my standard production items, made for the more commonly used handguns, I am happy to produce them first, send photos to the customer for approval, then deal with payment and delivery. This seems to prevent most disappointments, and I don't like to have unhappy customers. For one-of-a-kind orders, produced to customer design, etc, I request a non-refundable deposit of 50% of the order prior to beginning the work. Customer may reject the end result and that is the end of the process. When you have a bad feeling about a customer, that is the time to apply the brakes. There are nice ways to do it, such as "Well, for such an unusual piece I will have to request a deposit of (name your number) before we begin". When the customer calls with multiple changes, it is time to request that all change orders be done in writing, with appropriate adjustments in price. If you have a bad feeling about the customer, it is way past time to say "No thank you" to Mr. Customer and do something else with your time and materials. Holding his guns? No way you will get away with keeping those if he chooses to initiate a small claims action in court. And no way in the world that you can convince any judge that you did what Mr. Customer ordered, especially after taking multiple change orders without documentation. Best of luck with this one! -
I've experienced delays with distributors in getting dummy guns. Just got off the phone with Rings Manufacturing. It seems that few distributors actually carry the items, just order from Rings when they have an order. Rings will accept direct orders. Telephone: 321-951-0407. Credit card over the phone works. Also, Rings doesn't keep large inventories. They make the pieces to fill orders as received. Ordering direct might trim a little time off. So, if you have a good relationship with a supplier keep working with them. If not, here is an alternative for you.
-
Nicely formed, good looking stitching job, good clean edges. Excellent first job.
-
Right on, Monica.
-
Chrome tanned leather sheaths
Lobo replied to JamesR's topic in Gun Holsters, Rifle Slings and Knife Sheathes
Agreed. But the customers demand it, so I will keep providing it along with some guidance to avoid problems (which the customer can pay attention to or ignore at his discretion). -
Chrome tanned leather sheaths
Lobo replied to JamesR's topic in Gun Holsters, Rifle Slings and Knife Sheathes
TwinOaks: Your observations on the flesh sides of hides match my own. Some tanneries actually do "paste" the flesh side to make it smooth and firm. I have done the same with pieces that have a lot of loose fiber on the flesh side (Elmer's Glue All, fairly heavily diluted with water, brushed on, then rolled out with a wooden dowel, allow to dry) with pretty good results. Even then, items made with those pieces go into my "seconds", sold at bargain prices with no warranty, as I think it is likely that at least some of the fibers will work loose after a period of use. I have not received any complaints on those pieces, and have actually received some very good comments on them from customers (lots of people like a bargain price more than anything else). For the "stiff and abrasive" flesh sides, I have found that neatsfoot oil attenuates those qualities quite a bit. I apply a neatsfoot oil finish to all of my holsters, pouches, and belts anyway. It is readily absorbed into the leather, infusing all of the fibers, provides long-term protection against moisture infiltration, and provides flexibility to prevent cracking. With a good acrylic surface sealant applied after the neatsfoot oil has "settled in", I think the resulting finish is about as good as anything for most applications. -
Chrome tanned leather sheaths
Lobo replied to JamesR's topic in Gun Holsters, Rifle Slings and Knife Sheathes
Jim: No, I don't use chrome tanned leathers for holsters. Re-tanned latigo type would probably be all right for carrying, but I would try to make sure that the customer knew what steps to take to protect his prized shootin' iron (maybe a package label or insert "Not intended for long-term storage of weapon. All leather items may attract and retain moisture which may interact with tanning chemicals and may cause corrosion of steel and other metals", or something similar). I also like to advise all customers ordering IWB holsters about proper weapon care and storage. The IWB's are exposed to lots of moisture when in use, so the weapon should be removed daily, wiped down, holster allowed to air out overnight. Give the paying customer what he wants, but make sure he understands what he has. Otherwise you might just be hearing from an angry customer somewhere down the line. Good luck! -
Chrome tanned leather sheaths
Lobo replied to JamesR's topic in Gun Holsters, Rifle Slings and Knife Sheathes
Jim: All chrome tanned leathers retain chemical salts from the tanning process. Those salts will, with long-term exposure, have an effect on finished steel. Not only will it cause corrosion on blued steel, I have seen it cause what I call "freckling" on stainless steel guns. "Stainless steel" is a marketing term, describing steel alloys having higher content of chromium, nickle, etc. The metal is far more resistant to corrosion than other alloys, but is not rust proof. I advise my customers to never store a handgun in any holster or leather case, as all leather will attract and hold moisture. Also, it is a good idea to get into the habit of removing the handgun from the holster overnight, wiping it down with a cloth treated with oil or silicone, and leave the holster in an area with good air flow to wick away any residual moisture. -
You are on the right track by wetting the items prior to sanding. I saturate everything thoroughly and when on the sander there is no dust, just a pile of damp muck that is easy to clean up. This also raises a ridged edge that, when dried, can be easily cut off cleanly using the edge beveler. Another benefit is that wet-sanding imparts a burnishing effect to the edges, so final burnishing is easily done. Avoid that dust! It will ruin your lungs.
-
Hobby Tom sent me a PM, which I attempted to reply to without success. Tom's inquiry dealt with sewing holsters on a machine. It seems that he is forming the holster first, sewing around the edges without much difficulty, but when sewing the outline of the handgun finds that the machine chews up the leather. Tom, if you see this: Sewing after forming is just about impossible to do on a machine without the problems you mentioned. I do my sewing first, then do my wet-forming. To lay out the stitch lines we must take into consideration the thickness of the handgun so that the leather will mold around the piece as closely as possible. Measure the handgun thickness, then allow one-half of that measurement around the outline of the handgun on your pattern, and this will set your stitch pattern. Some stretching during forming is normal, and this allows the leather to fully encase the handgun as closely as possible for a nice snug fit. When laying out a new pattern I start with a close trace of the outline of the handgun, marking the position of safeties, ejection ports, revolver cylinders and other features onto the pattern. Next, I draw parallel lines through the pattern where I want the belt to be, this also allows us to determine holster cant (angle of carry on the belt). Next I lay out stitching lines for the outline of the handgun, as described above. Then I draw in the overall outline of the holster, making sure that what I want enclosed is enclosed and what I want clear (safeties, etc) is clear of the leather. The pattern than can be laid out onto the leather, traced and cut, pieces assembled, stitch lines transfered onto the leather, sewn and be ready to form. If the holster is a pancake style the pattern can simply be reversed for the rear panel (a separate pattern for the rear panel will be needed if there are features there that differ from the front side). If the holster pattern requires a fold to enclose the handgun (Avenger style, etc), the cut leather can be dampened then folded over as flat as possible, allowed to dry, then sewn and be ready for wet-forming. Needless to say, any exterior attachments (like belt loops, mouth reinforcements, etc) that won't be accessible after the holster is sewn must be sewn prior to assembly of the pieces and final sewing. I hope this helps you.
-
I have "dummy guns" from Rings, ASP, and Duncan. Rings blue guns and ASP red guns (intended for law enforcement training) are cast polymer material. Both are very good. Duncan makes cast aluminum dummies. Details are not as sharp and there can be some rough areas to the casting, but usable for the purpose. Prices for any are in the same range, about $38 to $45 each. Basically, one holster order will pay for the forming piece, so when I receive an inquiry for a holster to fit one that I don't have (but can get) I go ahead and buy it. Each company has its own selection of models available. Rings and ASP seem to concentrate on the later models of popular handguns. Duncan has molds for many of the older models and lower production pieces. Duncan will also produce to order, with a minimum order requirement for set up, etc. As noted, one forming piece can make several different models. 1911 Colt Government 5" will form for Commander 4.25", Officer 3.5", Defender 3", and also for copies/clones by Kimber, Springfield, etc. Glock 17/22 will form for the 19, 23, etc. Springfield's XD and S&W M&P autos each have multiple barrel/slide lengths available and each can be formed on the full-size versions of the respective piece. This applies only to open-bottom holsters, of course. Stop by the book store, or go on-line and order a copy of "Modern Guns" or comparable illustrated books on available makes and models, this will help you determine what will work with what. Gun store owners can be helpful with information on most popular handguns being purchased in your area. There is a niche market out there for some of the older, out of production handgun models. Major manufacturers gear their production to items in demand, so after a period of no production of a handgun that will result in the model no longer being offered by the major holster makers. Example: S&W Model 39 pistol (several million produced from the 1950's until about 1980), last year I had 3 customers wanting holsters for their M-39's, no dummy guns available, so I located and purchased a used pistol for $320, since then that pistol has paid for itself several times with other orders, and it is useful for forming the 3913, 3914, 3953, and CS9 models still in production. Since then I have added several more out of production handguns. What the heck, a guy can't have too many guns, can he? Can't think of another business where the cost of adding to your collection is actually tax deductible! Hope this helps.
-
Newbie holster maker
Lobo replied to ebarber's topic in Gun Holsters, Rifle Slings and Knife Sheathes
Eric: I think you are doing very well. Basic design work looks good, forming and stitching are coming along very nicely. Within a very short period of time your products will be much better as you fine-tune your methods. When I first started about half of my production made good chew toys for the dogs. Good luck. -
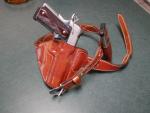
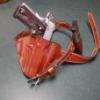
I finally made one for me.
Lobo replied to Randyc's topic in Gun Holsters, Rifle Slings and Knife Sheathes
Beautiful work, RandyC. Excellent design and fine execution. I also have a hard time getting around to equipping myself properly. Every time I make one for myself someone comes along and buys it. Hope you can hang onto this one for a while. -
Generally speaking, either a LLC (limited liability company) or a subchapter S corporation provides an arms' length between the individual and the business operation; either one treats income as essentially a pass-through, personal income taxed at regular rates. There might be some benefit to having more than one, with assets owned in one entity and leased to the other, but I would imagine that an attorney looking for blood in the water would find arguments to the effect that all that really exists is a proprietorship. EVERY STATE IS DIFFERENT, SO IF IN ANY DOUBT CONSULT A REPUTABLE ATTORNEY IN YOUR AREA FOR COMPETENT ADVICE. Offer to make him/her a nice holster rig as a retainer! I have made several holsters for attorneys (they seem to deal with some elements that cause them to be cautious). The whole idea is to avoid the courtroom, and that is where insurance becomes most important. The insurance company has a vested interest in defending your business, so they will pay competent legal talent to deal with claims (whether or not they have any merit). In short, what we are paying for is legal defense, whether or not the plaintiff can prove a claim or not is of little consideration, legal defense is very costly. Ugly thoughts about this whole line of discussion. We live in an country wherein nothing is ever anyone's fault until they find a deep pocket to blame it all on.
-
Randy: I would imagine that what you have as a business liability rider deals with customers coming and going from your premises. The focus of this thread is around product liability, claims that your "inferior" or "dangerous" product resulted in some damage or injury elsewhere. Please speak with your Farm Bureau agent to clarify what coverage you may have.
-
Cementing leather during holster assembly
Lobo replied to Lobo's topic in Gun Holsters, Rifle Slings and Knife Sheathes
Thanks for all the responses, positive and negative. I wish all of you the best life can offer. There are those who would prefer to attack and antagonize. There are those who would prefer to impose their opinions as the only authority on any subject. All I can say is to review the original title of this post in context with all the garbage that has followed, then you will see what all of this nonsense is about. The thing that I lack right now is an emoticon that will depict a dog and a fire hydrant. That would express it quite well. -
Cementing leather during holster assembly
Lobo replied to Lobo's topic in Gun Holsters, Rifle Slings and Knife Sheathes
Interesting. I write a post, sharing an experience that others might find useful. Then I get "in your face" responses, to which I reply (admittedly, a little off the cuff). Notwithstanding Texas Rangers (well known for fancy gear, part of the tradition and image) and General George S. Patton (a brilliant mind coupled with an ego out of proportion to the world he was born in, either in the Patton incarnation or the previous warrior-kings he believed himself to have been in prior lives), there a few practical realities to the discussion. 1. The primary purpose of cementing holsters during assembly is simply to hold everything in place until it has been sewn. The stitching is what holds everything together over the life of the piece. While there may be certain applications in which the cement serves a more long-term purpose, those are very limited and of no consequence in most applications. In fact, in my original post I pointed out that the glued piece survived saturation with water and the wet-forming process with no problems, so the following responses to the contrary were obviously opinion rather than experience talking. 2. Squeaking leather results from either (a) a piece that has not been broken in as yet, or ( a piece that was never properly finished. All holsters go through a break-in period (some designs more than others) during which the holster adjusts to the belt, to the contours of the user's body, to the weapon, etc., and during that break-in period there will be some minor movement that can involve stressing at seams and friction between leather panels; this is normal and must be expected. In the other vein (, quite a few holsters (including several well-known makers) are formed and surface-treated "for pretty", with little or no attempt to provide for long-term protection of the leather. Leather consists of fibrous material throughout its structure that can readily absorb moisture from the atmosphere, from the user's body, etc., and the fibers will swell and contract repeatedly during moisture absorption and drying. Treating the leather with a product that will prevent, or minimize, these tendencies is essential to the long-term usefulness of the piece (the most commonly used product is neatsfoot oil, which infuses the fibers and voids, remaining there for the life of the piece, protecting against moisture absorption while also providing a degree of flexibility and in most applications minimizing friction that results in squeaking). There are members of this forum ranging from new hobbyists, to full-time leather craftsmen, to serious artists. There are degrees of expertise in every aspect of the craft, and we can all learn something from each other. For anyone to say that a particular method or technique is the "only" way to accomplish the task might be absolutely right, it might be ignorance of other methods or techniques, or it might be simple arrogance. There are many fine products available from the supply houses, and most will do a very good job when used as intended. However, many of those products are (as most specialty items are) overpriced for the purpose, and some are undoubtedly nothing more than re-labeled products presented as leather-crafting specialties when they are in use under other trade names in other industries. When I started my little hobby/business there was no internet, there was no Leatherworker.net forum, and there was very little available to guide the beginner. Most of us learned by trial and error, working through each aspect of every project again and again until we learned what worked and what didn't work. I am still learning, especially as I receive orders for products and designs that I have never dealt with before. Frequently, right in the middle of a project I will have a thought on design or on methods, and I keep a notepad handy (if I don't write things down my old grampa brain doesn't always retain the thought for long). If I had had the opportunity to apprentice myself to a master craftsman, or even hang around his shop and help, I might have jumped at it. Such opportunities never arose in my life. So, here I am, semi-retired with a little hobby/business that has grown to a point at which it is now strictly a business. I have leased a shop in which to work, I am shipping about a hundred units per month (not on the scale of some makers, but nothing to sneeze at), and my products are featured in a few stores. I am not an artist; I cannot compete with the producers of some of the beautiful work we see on this forum. I do not delude myself into thinking that I am a master of this craft. I am nothing more than a reasonably well-experienced practicioner of the craft with modestly well-developed skills and a reasonably good understanding of what works in certain applications and what doesn't. I produce several standard designs and I produce to customer designs when requested. I produce a good quality product at a reasonable price and deliver it to the customer in a matter of a few weeks, rather than months, which has resulted in a following of customers that order again and again and refer others to me. Occasionally I find an opportunity to share a thought or two with others, which they may accept or reject. They may even question my thoughts legitimately, but when it becomes "in your face" I have been known to respond in kind. Enough said. -
Cementing leather during holster assembly
Lobo replied to Lobo's topic in Gun Holsters, Rifle Slings and Knife Sheathes
My point exactly, sir. It doesn't have to cost a fortune to do a good job. Don't it? -
Oiling method? Dead simple! When the piece is ready for finishing I take a 1-inch paint brush, dip it into neatsfoot oil and slather oil over all exterior surfaces, as much as the leather will absorb in ONE and ONLY ONE application. Set the piece aside overnight for the oil to settle (it doesn't dry, it is absorbed into the fibers and voids in the leather, remaining there as lasting protection against moisture infiltration). When the oil has settled for a day or so, apply final coatings. I use Fiebings Bag Kote, an old saddlemakers' favorite that imparts a wonderful eggshell luster to the finished piece. Resolene is fine as well. Note: neatsfoot oil compound is a fine product for providing long-term protection to leather; it will darken the finish somewhat; TOO MUCH NEATSFOOT OIL WILL LEAVE ANY LEATHER ITEM LIMP AND USELESS. Do not over-apply the oil! One time, liberal application, let it absorb into the leather, and be done with it. Hope this helps you.
-
Cementing leather during holster assembly
Lobo replied to Lobo's topic in Gun Holsters, Rifle Slings and Knife Sheathes
Boomstick: I sell everything I make, so no I don't have it on hand now. Heck, I have a hard time keeping a holster for myself because someone keeps ordering it and paying for it. Squeaking? Every new leather item will squeak a bit until it breaks in. I finish my items with a moderately heavy application of neatsfoot oil, so flexibility is assured without undue stiffness or tendency to crack, and the squeaking stops when the item has finished adapting to its new home and application in use. I don't do exotics, and I don't do carving or stamping, as almost all of my production is for concealed carry (not intended as a fashion statement, not even intended to be seen), so I can't comment on such applications. With all due respect to you, your craftsmanship, and your clientele, I recall very clearly from 24 years in law enforcement that pimps (and rookie cops) carried fancy, engraved, and plated guns, so there is probably a good market for fancy holsters out there; my customers want function, comfort, and durability rather than "pretty" or "fashionable". For securing multiple layers (including linings) during assembly and making sure that everything is where is should be when it is sewn, I will stand by my endorsement of good old Elmer's Glue. No offense intended, sir. Just tried to offer a suggestion that others might find helpful, useful, economical. Please continue with your artwork, I will continue with my business. No, Bruce, I'm not kidding. I'm just running a business and trying to share some thoughts on what I have found to work. If you gentlemen would prefer that I not post in good faith what my 37 years of experience have taught me, please feel free to say so. -
Just addressed a post in the "sewing leather" category dealing with cementing leather prior to sewing, and I thought I would pass on another little time-and-money-saving item I discovered. For years I used Fiebings Tanners Bond cement. Very strong stuff indeed! Well, I ran out of cement one time and rather than hold up production for a week waiting for a shipment from the supplier, I picked up a bottle of Elmer's Glue All (white stuff in the bottle with the applicator spout), tried it on that week's production batch. It worked just great! I like the pull-top applicator. You can run a tiny little thin bead of cement exactly where you want it to secure edges or set a welt in place, line up all the pieces and clamp them together, let it set for a few minutes and it is ready for sewing. An example of how well this works: I once made a pancake holster this way, but when sewing I failed to sew one side of the holster. I went on to the forming process and didn't immediately notice that one side hadn't been sewed, so I inserted the forming gun and started the fitting. Even with the stretching caused by wet-forming, the pieces held together perfectly. Of course, I had to set that piece aside and sew it properly, but this illustrates just how well Elmer's works with leather. Works very well installing lining leathers also, just apply a glob and brush it out, lay in the lining material, set a weight on the piece while it sets up. Good old Elmer's! Who would've thought it? Excellent results and as cheap as can be.
-
For years I used Fiebings Tanners Bond cement, very strong stuff indeed. I ran out and, rather than hold up production while waiting for a shipment, I bought a bottle of Elmer's Glue All (the white stuff in the applicator tip bottle) and used it on several items. It worked just great! I have never seen any indication that the glue will do anything to the sewing machine or needle. Of course, the glue has thoroughly dried before I start sewing (I make 20 to 30 items per week, so I do everything in stages: cutting, assembly--includes gluing, sewing, forming, finishing, etc) and it is usually at least a day or two after gluing that it goes on to sewing. Good old Elmer's! Stuff doesn't have to come from a leather supply company, or with a big price tag, to do a good job.
-
Here is a method that has worked pretty well for me. For the basic "color" dying I use Fiebings Leather Dye diluted 50% with isopropyl (rubbing) alcohol, one quart dye, one quart alcohol. Mix it in a container with lid (to avoid evaporation losses), making one-half gallon of liquid. I dip the finished piece in the dye, allowing it to remain for about 30 seconds. This will thoroughly saturate the item, and the interior surfaces, edges, and stitching will have good color penetration, exterior less so. Set the piece aside for about 10 or 15 minutes, and the alcohol will begin evaporating pretty quickly. While still damp, you can begin the wet-forming process if you like. After the piece has thoroughly dried (you can tell because there will no longer be an alcohol scent) you can dampen with water to complete the forming/boning. When finished, apply another coat of undiluted dye to the exterior surfaces (a 1-inch paint brush works quite well for this and is faster than the dauber method). Let it dry thoroughly overnight and it is ready for oiling and final finishing. Cost per one-half gallon of the solution described is about $15, and will dye about 50 or 60 holsters, pouches, belts, etc., so unit cost to dye is about $0.30, which I find acceptable. Dying by the dauber method requires not only more dye (higher unit cost), but a lot more time. I'm making 20 to 30 units per week, about evenly split between classic oiled tan finish, cordovan brown, and black; so I am usually dying about 8 or 10 items at a time in each color. Using this method, I keep my dying time down to about 1 to 2 hours per week (or about 5 minutes per piece). I use a one-gallon sealed container, so each batch lasts for several weeks. When it gets down to where I can't submerge a piece in the solution I just add another quart of dye and another quart of alcohol. I also keep a set of rubber gloves for each color used, avoids unwanted color transfer from the gloves. This method also contains the dye very well. No mess from spraying, no equipment to clean up every time. Take an item out of the dye, let it drip for a few seconds, transfer onto a tray lined with newspaper to dry. If you are going to try this, I'd suggest testing a small amount of the dye you wish to use to see if it will mix well with the alcohol. Some of the water-based dyes could be used the same way, diluted with water.
-
Stich spacing for holster?
Lobo replied to adaman04's topic in Gun Holsters, Rifle Slings and Knife Sheathes
As already noted, 5 or 6 stitches per inch works well with most projects. I will add one consideration, and that is the danger of stitches pulling through the leather, especially during wet forming. A lot of stretching goes on during the forming process, and this can cause the thread to cut through the leather between stitch holes. The closer the stitch holes are, the more danger there is of this occuring. I have switched over to machine sewing (and my machine is set at 6 per inch), but if I were hand-sewing now I think I would stick with 5 or 6 stitches per inch. -
Re: dying nylon thread; I use white bonded nylon on everything. It will take black dye very well, but browns do not penetrate as well, leaving the thread partially colored. I like the effect personally and will continue this way. Re: waxing/lubricating; bonded nylon requires no lubrication.