Lobo
-
Posts
1,065 -
Joined
-
Last visited
Content Type
Profiles
Forums
Events
Blogs
Gallery
Store
Everything posted by Lobo
-
first photos posted...critiques please
Lobo replied to carljc72's topic in Gun Holsters, Rifle Slings and Knife Sheathes
Well, I seem to see here a craftsman who has been to the east, as I have been (by way of the south). I see a good basic design. I see very nice stitching, apparently done by hand. To my eye, the leather appears to be somewhat unfinished; I can't discern anything more than a surface coating. The edges could use some improvement, but so can some of my own. Suggestion for dressing and burnishing edges: 1. Where you have two layers sewn together, dampen the leather, then use a belt or drum sander to blend the two (or more) edges smoothly together. This will kick up a bead of leather on the outer shell, which can be allowed to dry, then cut smoothly and easily with the edge beveling tool. Nice smooth result every time. 2. Burnishing: After final finish has been applied, try either (a) a hardwood dowel or sewing thread spool chucked into a drill press, grooves cut to similar widths as the finished edges; or ( a wool felt polishing wheel chucked into the drill press. Apply either (a) beeswax; or ( a 50/50 mixture of beeswax and parafin wax to the finished edges (can be rubbed on easily). Then polish the edges thoroughly on the burnishing tool as it turns in the drill press. The burnishing tool will compress and polish the edges nicely. The wax will be heated by friction on the tool being used and spread evenly, filling all the fibers nicely as they are compressed and polished. The finished result will be a highly polished edge with no discernable lumps, bumps, or roughness. Practice will make this perfect quite quickly. Very nice workmanship. I am sure that you will make progress on the details with just a little practice and experimentation on methods. Suggestions on leather finishing: although a surface coating can provide an appealing finish, blocked and cased holsters require some additional treatment for long-term protection against moisture infiltration. I recommend a thorough application of neatsfoot oil to the finished piece, which will infuse the leather fibers and provide a degree of flexibility to the finished piece to prevent drying, cracking, splitting, etc. The neatsfoot oil should be applied following thorough drying, and application of any dyes or stains to be used. Then a final surface treatment can be applied (Bag Kote, Resolene, Leather Sheen, etc). Note that neatsfoot oil will ALWAYS darken dyed or stained leather significantly, so some experimentation on scrap pieces is needed prior to application to your prized project. The way you wear your apron will announce your progress (to some of us). -
In my experience, when listing fees, final value fees, and PayPal fees are added up, it generally costs about 10% (varying with item prices, lower-priced items will be somewhat higher than higher-priced items due to the tiered structure of eBay fees). Since what I do on eBay is limited to a few items at a time, and done mostly for advertising to connect with customers who want other items, I consider the cost to be acceptable.
-
On the topic of belts, a belt constructed of 2 layers of 7-8 oz. cowhide will have a finished thickness of nearly 1/4". I have been making belt regularly only for a few months, so my experience is limited. However, a couple of things have come up that bear some consideration. First, the bulk caused by the leather thickness requires a belt dimension that is usually different from trouser waist size. For example, I wear a size 34 trouser, but a double-layer belt must provide 37" between buckle tip and tongue hole to be used. This has come up a couple of times, so I make it a practice to ask the customer to measure a belt that he normally wears, from buckle tip to tongue hole being used, then I make sure that the new belt will accomodate that dimension (plus at least 2 or 3 inches). Second, a belt that thick can cause problems with holster attachments. We have to make sure that belt slots and tunnel loops are formed to accept the thickness of the belt. Pouches and other accessories may or may not have adequate clearance. Third, many trousers have belt loops that will not accomodate such a belt. While a standard 1.5" width belt might go through the loops on my Dockers just fine, a double thickness belt will not. The second thickness of leather will require an additional clearance of 1/8" multiplied by 2 in order to fit around the belt. As we all know, the fit of the holster to the belt is critical to achieving a stable platform for the handgun, so this can cause problems for the customer. So, those are my thoughts.
-
gun molds for holster makers
Lobo replied to troop's topic in Gun Holsters, Rifle Slings and Knife Sheathes
Dennis: You are willing to do a whole lot of work, just to save about $40 or $50. I admire your willingness! Personally, I will keep on buying the dummy guns. Best regards! -
Kahr T9 holster maker or mold maker?
Lobo replied to Jackawala's topic in Gun Holsters, Rifle Slings and Knife Sheathes
Mike: Your T9 Kahr is brand new on the market. It could be several months, perhaps a year before we see dummy guns available to make holsters for it. I am receiving orders for the T9 and I'm now making IWB and OWB holsters, utilizing K&P 9/40 forming pieces, extending the length, and forming accordingly using the barrel/slide group extended through an open holster bottom. So, closed-bottom holsters are not an option at this point, but I can acommodate some needs now pending availability of T9 forming pieces. Actually, demand seems to be pretty hot at present, so I may just buy a T9 pistol to add to my collection! Send a PM if you would like to see examples of my work. -
gun molds for holster makers
Lobo replied to troop's topic in Gun Holsters, Rifle Slings and Knife Sheathes
Yes, I have. I understand that each manufacturer has a substantial investment, and that there needs to be a reasonable return on that investment to continue doing business. I was not intimating that there was any over-pricing going on, only commenting on the casual observer's though process when looking at the end result, and the price tag for it. Every item having a limited market will have a price reflecting the cost of production, promotion, and delivery. I don't have a problem with that, and I am willing to pay for the service provided by those who give me what I need when I need it. That said, every week I respond to customer inquiries explaining that it might take several weeks to obtain the forming piece for what they want, that I will gladly buy it if they will place the order; and every week I have customers who make the decision one way or the other. Also, every week I respond to customer inquiries for holsters to fit handguns that I doubt I will ever receive another order for, so I apologize and decline the order. I'm sure you have had similar experiences. I have on hand several dozen forming pieces (dummy guns or actual handguns). Some I use every week, others I use only a few times per year. When the opportunities seem to be worth the investment, I acquire more. When what the customer wants is on the fringe, I decline the order. -
gun molds for holster makers
Lobo replied to troop's topic in Gun Holsters, Rifle Slings and Knife Sheathes
My line of thought exactly, Tom. Here is what I would suggest: Someone needs a forming piece, they send you $50 (enough to cover replacement, if necessary, plus postage to get it there). When finished with it, he returns it to you (postage at his expense), then you refund $40. Your risk is covered. You make a few bucks (about $5 after postage expense). The forming piece pays for itself in about 7 or 8 rentals. The rental user gets to fill his order(s) for about $15 net cost (including return postage) rather than $45 to $50 to buy a dummy gun. This could work out quite nicely for the hobbyist or part-time maker on a tight budget. Also, not a bad idea for the dummy guns to make low-demand holsters. Of course, taking orders, receiving deposits, packing, shipping, receiving returns, issuing refunds, this all seems like a fair amount of effort for relatively little return on investment. I remember looking at Georg Lawrence catalogs many years ago, with photos of their "gun room" filled with hundreds of real handguns they used every day as forming pieces. Today, that kind of investment would be astronomical to have any hope of filling most orders. -
I have noticed several postings here regarding eBay, usually focusing on the rather steep costs involved in listing and selling on eBay. I have another thought or two to share. I utilize eBay pretty regularly. The items that I list include "seconds" (items with minor flaws, tool marks, irregular stitching, etc), the occasional unclaimed special order item, and the occasional customer return (yes, I do get one now and then). I make holsters and firearms accessories. When I list on eBay I generally set a starting bid of about one-half of my usual retail price. I also make it plain in the auction listing that I make holsters for other makes and models of handguns, different finish colors and options, etc. Every time I list an item it results in several messages from eBay members, asking for information on my other products (typical inquiries: "I like your holster, but I need one in left-hand", "Can you make this in black?", "I have a Smith & Wesson with a 6" barrel, can you make one like this for my gun?"). So, I generally sell my listed item for 50 to 60% of what I usually charge. I pay listing fees, final value fees, and PayPal fees adding up to about 10% of sale price. But, I usually get at least 2 or 3 orders for other items at my regular prices, generating a good profit overall. I also have several regular customers that I "met" on eBay, then they started ordering other items directly from me. My opinion (always free and worth every penny of the price) is that eBay is not a good selling venue for every item, but it can be a very good avenue to develop other business.
-
gun molds for holster makers
Lobo replied to troop's topic in Gun Holsters, Rifle Slings and Knife Sheathes
This subject seems to come up pretty frequently. Rings, ASP, Duncan's, they all share certain qualities: none is perfect, no one seems to be able to deliver within a reasonable time, they seem to be rather expensive (considering what they are, how they are made). For the smaller-volume holster makers what seems to be needed is a rental service, or perhaps a cooperative formed to acquire and share dummy guns to members as needed. Interesting concept there. Personally, I would be happy to loan out a forming piece, except that while it is loaned out I don't have it on hand to use, so this could actually cost me business. I suppose I'll just continue ordering additional dummies as I need them. After all, the first holster sold pays for the dummy, so the cost isn't all that big a deal. Actually, for some older out-of-production handguns (for which no one makes dummies, and for which many holster-makers no longer make holsters) I have purchased used handguns in the $250 to $400 price range to use for forming holsters. I have done this several times, and in each case the cost of the handgun was recovered in holster sales within a few months. So, I have added to my gun collection while writing off the cost as a business expense. -
I have had several experiences with different suppliers, so I went direct to Rings Manufacturing. I learned that very few of their distributors (those advertising the products) actually stock the products, simply accept orders and forward to Rings for production and drop shipping. Thus, the long waits and generally poor service. Rings will accept direct orders. Contact them and they will be happy to take your business. 321-951-0407, credit card over the phone works. The down side of this is that you will pay suggested retail prices (minimum order for wholesale pricing is about $20K). My last order was for 4 pieces, and with delivery costs the invoice came to about $185, which is more than some suppliers advertise. The up side to this is that delivery was made in about 2 weeks. Generally speaking, the first holster made pays for the dummy gun. I am willing to pay a little more and get what I need in a timely manner so I can keep filling my customers' orders as quickly as possible. I now have over 30 dummies, about evenly split between Rings, ASP, and Duncans. Each has its good points and less-than-good points. The only thing I really care about is getting what I need when I need it. On older, out-of-production, handguns it is generally impossible to get a dummy gun. I have also added several real handguns to my collection and produce holsters that most other makers are no longer making. This is actually a profitable niche market, and the added plus is that I can add to my gun collection and take the expense as a tax deduction!
-
dye and neatsfoot oil ???
Lobo replied to carljc72's topic in Gun Holsters, Rifle Slings and Knife Sheathes
Thank you, sir. Most of my holsters are based on designs in common use for many years, so I can't claim bragging rights on the designs. Occasionally an idea comes along for a little different application of the basics but, even then, I usually find that it's been done before by someone else. Having carried a handgun just about every day for over 40 years, and having been a cop for 24 years, I learned a little bit about what works and what doesn't. Most of my holsters are work horses, not show horses, meant to get the job done. A couple of weeks ago I produced an old favorite design, the Tom Threepersons belt holster, one that has been around for about 90 years or so. That was fun, as I hadn't made one for years.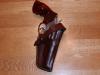

-
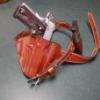
Gun holster shoulder harness
Lobo replied to Rayban's topic in Gun Holsters, Rifle Slings and Knife Sheathes
The man in the photo is a retired friend of mine. The holster was made by me as a prototype, tested, modified, and I now have them in production for revolvers and autos (one size harness fits from size 36 to size 56 men's jacket sizes). The project originated with a customer unable to wear a belt due to an old back injury. I used the alligator-style suspender clips to anchor to the trouser waistline so no belt is required. The shoulder pad is suede leather to support the weight nicely over the left shoulder. The strap drops to the holster are nylon webbing. The support strap over the off-side shoulder is 1.5" elastic. Very comfortable to wear. If you need elastic, webbing, hardware, etc., let me know. I have plenty on hand and will send you some. I purchase in bulk, which results in far better prices than any small quantity you might find for a single project. Happy to help you out if I can. -
Belt Straps instead of belt slots/loops
Lobo replied to ArcherBen's topic in Gun Holsters, Rifle Slings and Knife Sheathes
My first approach to this also utilized a T-nut loop attachment with screw through the snap for OWB and screw/trim washer for the IWB strap. Not happy with the results yet, but I think we are moving in the right direction. Just need some time to build the next iteration of the idea, then evaluate the results for fit, function, comfort, etc. One thing for sure: making the straps as additional pieces, then attaching them to the holster body, is a lot easier when cutting the holster and there is far less wasted leather than there is when cutting the holster and straps as a single piece. -
Ankle Hoster Pattern and tutoral
Lobo replied to Randy Cornelius's topic in Gun Holsters, Rifle Slings and Knife Sheathes
Excellent post, Randy. Very well presented. Looks like a very good design for the purpose. -
dye and neatsfoot oil ???
Lobo replied to carljc72's topic in Gun Holsters, Rifle Slings and Knife Sheathes
Thanks, Tom. The process is pretty simple, following it can be difficult at first. There is a tendency to try and make the color you want happen, rather than just letting it happen. When neatsfoot oil is first applied to the piece it is absorbed rather quickly at the surface level, causing a very dark blotchy looking color, and absorption appears to be very uneven, especially at edges and seams. The key is to then set the piece aside, at least overnight. This allows the oil to "settle" in, migrating through the fibers and finding a "level" (even distribution throughout), and the color/shading will mellow out to the level seen in the photos that I included above. Then your final finish can be applied (it will accept Bag Kote, Resolene, Leather Sheen and most others that I have tried). To apply the oil I use a 1-inch paint brush, dipping the brush into the neatsfoot oil about an inch or so, then immediately swabbing onto the leather, transfering just as much as the leather will take in ONE AND ONLY ONE application. The finished result continues to hold its shape very well. The holster will flex sufficiently to conform to the contours of the wearer's hip and belt. Belt slots and loops will flex readily. The weapon can be inserted and withdrawn easily. I'm adding a photo showing 3 holsters completed last week. The upper two are for a customer wanting holsters for his S&W J-frame and K-frame revolvers in a darker tan color. The bottom is a IWB holster in my usual oiled tan. The top two holster were treated with a diluted tan dye which, when applied, was somewhat lighter than the finished plain oiled tan holster shown. After oiling, the dyed holsters came out as shown. Final finish on all 3 is Bag Kote. As you can see the dye and oiling really does result in a much darker finish. Some experimentation is necessary to get the desired result. Also, when making sets (holster, belt, pouch) we are almost always using leather of different weights cut from different hides, and I've found that diluted dye applied very lightly in multiple applications and allowed to dry in between applications is necessary to obtain a color/shading match. It can be a challenge.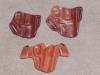
-
dye and neatsfoot oil ???
Lobo replied to carljc72's topic in Gun Holsters, Rifle Slings and Knife Sheathes
Neatsfoot oil is the classic, natural finish for leather. It infuses the fibers, fills the voids, and provides some flexibility, thus avoiding cracking, splitting and other problems. It provides long-term protection to the finished piece. That said, there are other effects possible. First, excessive neatsfoot oil will leave any piece limp and useless, so one should avoid over-applying. One application, fully absorbed by the piece, should be sufficient for a lifetime of wear. Second, neatsfoot oil will definitely darken a dyed piece, there is no avoiding this, so one must experiment with the dying and oiling to achieve the desired result. Dark brown dye can be turned almost black by neatsfoot oil. A tan dye can be turned dark brown by neatsfoot oil. All said and done, I still stand by neatsfoot oil as the standard for a quality finish to a piece that can be expected to accept the stresses and strains of daily use for a lifetime. All of my holsters, belts, and pouches receive a treatment of neatsfoot oil in the finishing process so that they have a degree of flexibility without having to worry about cracking or splitting, and the leather will withstand moderate infusions of moisture without having to worry about mildew or mold. By the way, the sequence (in my shop) is (1) dye, (2) oil, (3) final finish (usually Bag Kote, occasionally other products, depending upon degree of luster desired). I prefer a rich, deep, eggshell luster to a high gloss. Sometimes Mr. Customer has another preference, which I try to accomodate. Many of the old-time classic saddlers used nothing but neatsfoot oil. Others used neatsfoot oil, heated until a small lump of beeswax infused with it, then rubbing the warmed mixture into the freshly-formed leather, resulting in a warm and subdued satin sheen. There is something to be said for a holster that retains its shape, as wet-molded and formed. There is something else to be said about leather that is left without protection against moisture absorption from the atmosphere and wearer's body. And leather left without significant defenses against moisture absorption will almost certainly develop stress cracking, surface splits, and/or mold and mildew problems. I try to make holsters that will outlive their owners, and I have several long-term customers still using holsters that I made back in the 1970's. My personal favorite finish? Easy! After forming and thorough drying, apply neatsfoot oil with a brush or swab ONE TIME ONLY, allowing to settle into the leather overnight, then apply Fiebings Bag Kote using a swab or sponge, allowing the leather to absorb all it will take. Set the finished product aside for an hour and you will have what is shown in the attached photos, a classic oiled tan finish. Never the same from one piece to the next, difficult to replicate when making a set from different cuts of hide, but always warm and deep in appearance, nice to hold in your hand, and capable of lasting a lifetime with little care.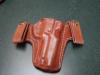
-
Belt Straps instead of belt slots/loops
Lobo replied to ArcherBen's topic in Gun Holsters, Rifle Slings and Knife Sheathes
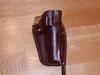
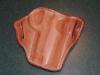
ArcherBen: Thanks for noticing this old thread. I make OWB holster both ways now, as might suit my customers' wishes. Personally, I find that the straps extending up, then behind the belt, then up to snap onto the holster shell extenion, are a little easier to put on and take off. Some of my customers, however, like the more stylized presentation of the straps going up underneath the belt, then over the top, then down to snap onto the holster shell extension. Either way, I'm happy to make them. I think that many civilian CCW permit holders need to have the ability to put on and take off the holstered weapon easily, without unfastening the belt, threading the belt loops, etc., when going into and out of places where firearms are not permitted or advisable. That was the impetus of the project, and I have had very good feedback from a lot of customers on this concept and associated projects. I am now working on another project which will utilize interchangeable belt loops, making the holster convertible from a OWB carry to a IWB carry simply by removing the OWB straps and installing the IWB straps. Never fear, I have no doubt that someone else has done it before, but I will continue my project and see what my customers think of it. Here are a couple of photos to illustrate the difference described when the belt strap goes over the top or under the bottom. Either way, the holster functions just as a classic pancake holster, pulling the holstered weapon in high and tight. I think that the minor difference between the two is simply a matter of personal preference, which I am happy to accomodate for my customers.
-
For all you Holster makers
Lobo replied to ABC3's topic in Gun Holsters, Rifle Slings and Knife Sheathes
Tom: Pancake style holsters usually require no reinforcement of the belt slot areas (assuming the leather being used is of sufficient weight and thickness for the job). If you are not already doing so, try cementing those areas securely during the assembly process. This allows the slots to be cut and formed without the leather shifting and the end result should be just fine. -
A Couple Recent Projects
Lobo replied to ArcherBen's topic in Gun Holsters, Rifle Slings and Knife Sheathes
Given the parameters set by the customer, I can't see where you could have done better. Very nice workmanship, sir. -
I guess I've been lurking long enough..
Lobo replied to Rock76's topic in Gun Holsters, Rifle Slings and Knife Sheathes
Exceptionally nice work, sir. Thank you for posting. -
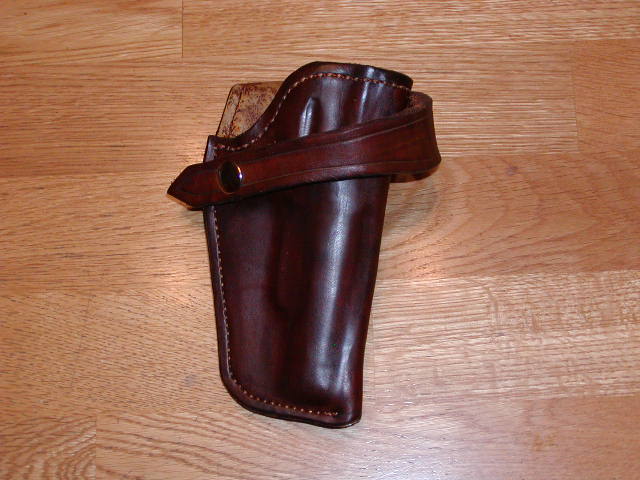
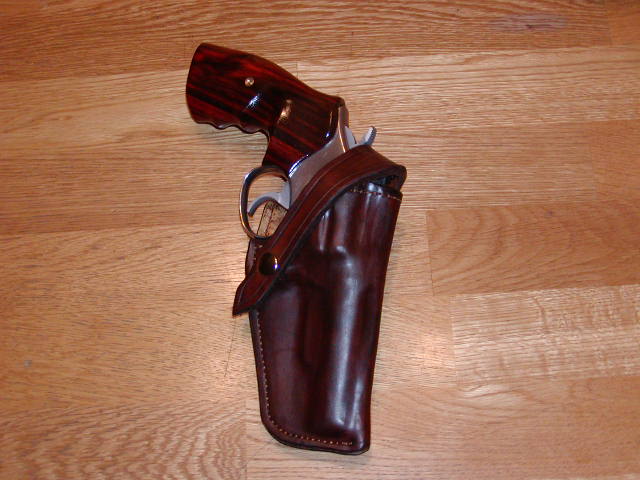
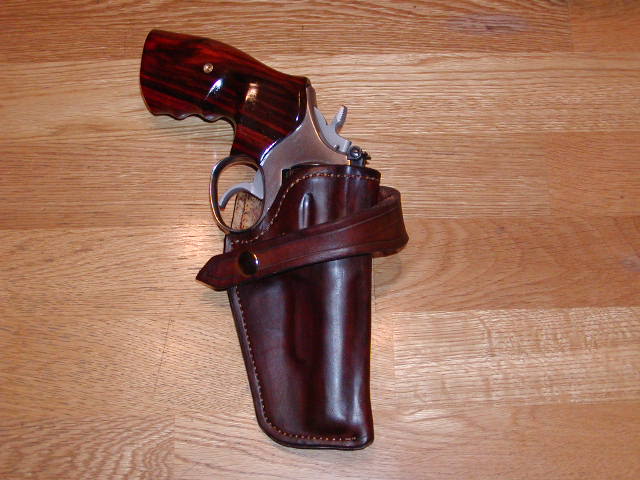
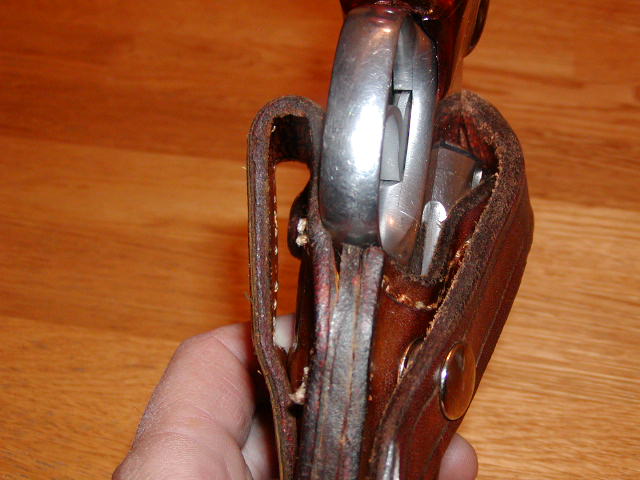
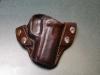
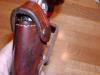
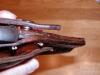
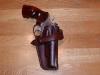
Tom Threepersons, a Cherokee Indian born Vinita, OK 1889, family moved Alberta, Canada c. 1900. 1910 father killed by rustlers, Tom followed to a saloon and shot both dead. Joined Northwest Mounted Police, served near Calgary, Alberta, killed 3 bank robbers at Calgary. 1912 returned to ranching, "World Champion Cowboy" on rodeo circuit. Took world trip including South America, Europe, Asia, Japan, China, complained about the food! 1916 enlisted to serve under General "Black Jack" Pershing on punitive expedition to Mexico in response to Pancho Villa's raids into the US. Discharged 1920. Served as patrolman and detective in San Antonio and El Paso, TX. 1923 appointed US Customs agent at El Paso. As early as 1925 the SD Myres Saddle Co. advertised the "Threepersons style" holster. Late 1920's offered a movie contract, declined. Ranched in Gila, New Mexico, passed away in 1969. Offering a little biography here on a remarkable man, one who served as a law enforcement officer and soldier on behalf of two countries during the early 20th century, engaged in numerous battles, and lived to tell the tale. Tom Threepersons designed a holster and had it made to his specifications by the SD Myres Saddle Company in the early 1920's. Since that time the basic design has evolved into a style that dominated the law enforcement market until late in the 20th Century. High ride, exposed trigger guard, open top, minimal leather. The design has been marketed by Myres, El Paso Saddlery, Don Hume, and a dozen other makers, and evolved into the designs including thumb-break retention by Safariland and Bianchi. The original is not known to remain in existence. If it had any retention device, it was probably a hammer thong or something similar. Several makers still make this style with a hammer strap and snap. Looking at a "Threepersons" style holster you will see the evolution of law enforcement holsters over a period of at least 70 years. I have not done justice to the man in question, or to his contributions to our nation. Just wanted to give a little background to the post. Two or three times per year I have people inquire about a Threepersons-style holster. While I made any number of variations back in the 1970's and 1980's, I had nothing to show them, no photographs or demo pieces. So, I decided to make one up as my personal interpretation of the style, as much for the sake of nostalgia as anything else! Here are some photos. Basic features of this style: mid-ride, tunnel loop belt attachment, open top, welted seam, blocked and cased construction. In my interpretation of this type I have incorporated a lining of brain-tanned deerskin (don't know when I'll ever get any more, so I'll just hoard my little supply), a retention strap featuring a widened portion over the rear sight as protection against damage (also allows a "ready" position), and hand-boned finished (instead of simple block and casing), with a pre-formed sight channel. Holster body is Wicketts & Craig 7-8 oz. cowhide, lining estimated at 3 oz. weight (Native American made brain tanned deerskin), seam welted with a piece of 9-10 oz. cowhide, tunnel loop pre-formed to 1.75" width X 0.25" thickness belt, retention strap of 9-10 oz. cowhide (can be rotated forward to permit a "ready" position for quick access, forward cant estimated at 7-8 degrees. Shown with a Smith & Wesson Model 66 and rosewood grips in the "combat" style. I hope you enjoy seeing this old-fashioned piece as much as I have enjoyed making it! At least now I will have something to show the occasional customer who wants a traditional style!


-
Fiebings Oil Dye & Bag Kote
Lobo replied to ABC3's topic in Dyes, Antiques, Stains, Glues, Waxes, Finishes and Conditioners.
Hi, Tom. I just started using some color dyes last year, having done everything for years only in the classic oiled tan finish or black. I noticed right away that the oil dyes will react as you describe when finished with other products (neatsfoot oil in particular will significantly darken the dyed piece). Personally, I have switched over to spirit-based dyes, and have been diluting those with isopropyl alcohol for a little better control in getting the shading that I want. I've also been dying by immersion rather than by surface application methods. I like the deeper color penetration that this provides. On a recent project I was using several weights of veg-tanned leather (9-oz. belt, 7-8 oz holster with 3 oz. lining, 6 oz. pouch), all from different hides. Customer wanted a dark tan shade. After some experimentation on small pieces cut from the stock to be used, I ended up with a dye mixture made up using a single 4-oz. bottle of Fiebings British Tan diluted with about 1.5 pints of isopropyl alcohol. The pouch took one application, the holster took two, and the belt took three, at which point I had a good color match when dried. Final finish of neatsfoot oil, allowed to settle in overnight, followed by the Bag Kote, and the end result was a very nice dark tan right on the verge of a light brown. I still have that batch of dye, with enough left for several more similar projects, so the cost per piece is acceptable ($5 for small bottle of dye and about $3 worth of alcohol, $8 total for enough to dye a dozen pieces or more). I seldom go to this much effort for any single project, but this customer has given me his business for a long time so I wanted to make him happy. For my usual production I stick with classic oiled tan (undyed), dark cordovan brown, and black. These are easy to repeat, so it speeds up the whole process considerably for general production. -
Fiebing's Bag-Kote
Lobo replied to ABC3's topic in Dyes, Antiques, Stains, Glues, Waxes, Finishes and Conditioners.
I have used Bag Kote for final finish on nearly all of my products (holsters, belts, pouches). I like the satin finish that Bag Kote imparts on veg-tanned leather. My primary finish is neatsfoot oil, which infuses the leather fibers for long-term protection. I have found that it is best to allow the neatsfoot oil to "settle" into the piece for about 24 hours prior to applying the Bag Kote. I think the dilution instructions on the bottle are intended primarily for spray application, to get a consistency that will work with your spraying equipment. I apply it as it comes from the bottle using a sponge loaded with enough liquid to thoroughly wet all surfaces, set it aside to dry. Not the product for those who want a glossy finish. -
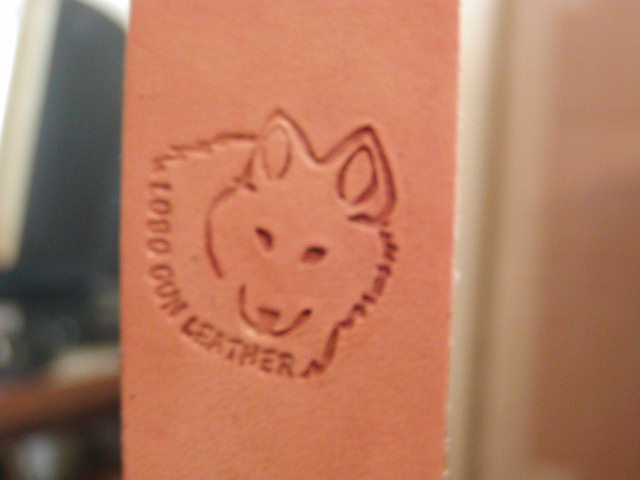
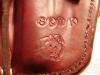
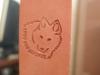
Found a thread in the forum that mentioned a company that makes leather working stamps to order. Laser Gift Creations (lasergiftcreations.com) creates these from delrin material (very durable, has been used by S&W and others for backstraps & mainspring housings on their semi-auto pistols for years), stamp cut with a laser. I made contact via the website, received a response from Brenda the same day, sent a couple of photos with general ideas of what I was looking for. Brenda created the artwork that night and sent to me for review and any input for changes to be made. I responded with an order for two stamps and received my order by priority mail within 3 days. Very impressive service by a very talented and helpful lady! The stamps are available up to 1.5" diameter. The stamps I ordered are 1" diameter stock with an image about 0.7" wide by 0.8" high, allows me to put it anywhere on an item. Cost? $35 and up, and no additional charges for the design work. A bargain, I think. Here is a photo of mine. I asked for a general profile of a wolf's head, face view, emphasizing the eyes, with my trade name worked into the stamp. This is what Brenda created for me.
-
Need T-Nut Size Information and sources.
Lobo replied to Randyc's topic in Gun Holsters, Rifle Slings and Knife Sheathes
RandyC: Two thicknesses of 6-7 oz. leather will be about 3/16" to 7/32" finished thickness. Adding in your belt loop at 7-9 oz. would mean a total thickness to be fastened at about 5/16" to 3/8". I would recommend a tee-nut of #6 X 1/4" shaft length, with a #6 machine screw of 3/8" length to secure the snap base through the belt loop and to the underlying tee-nut. This should provide a secure fastening of hardware to leather with some compression fit. The #6 machine screw is just about perfect for the diameter of the fastening hole in the snap stud with no worries about screw head interfering with snap engagement. Try boltdepot(dot)com for good service and reasonable prices. Don't know about colors, so you may have to shop around for that aspect of your project, or finish those parts separately to match your other hardware. I use the zinc-plated tee-nuts and screws as provided, at very reasonable prices, with no problems reported. Hope this helps.