DonInReno
-
Posts
794 -
Joined
-
Last visited
Content Type
Profiles
Forums
Events
Blogs
Gallery
Store
Everything posted by DonInReno
-
That's a nice looking new toy! I just barely started paying attention to this type of older long arm machine, but it's impressive how the various models/brands in working condition seems to hold their value quite well even when they've obviously been rode hard. It would be interesting to know where the demand is that keeps the low end prices up so high. DIY boat sails? Tarps? Upholstery shops with an occasional wide sun shade? The lowest price I've seen on what appeared to be a complete head, but no guarantee of anything, was on eBay a few weeks ago - $500.
-
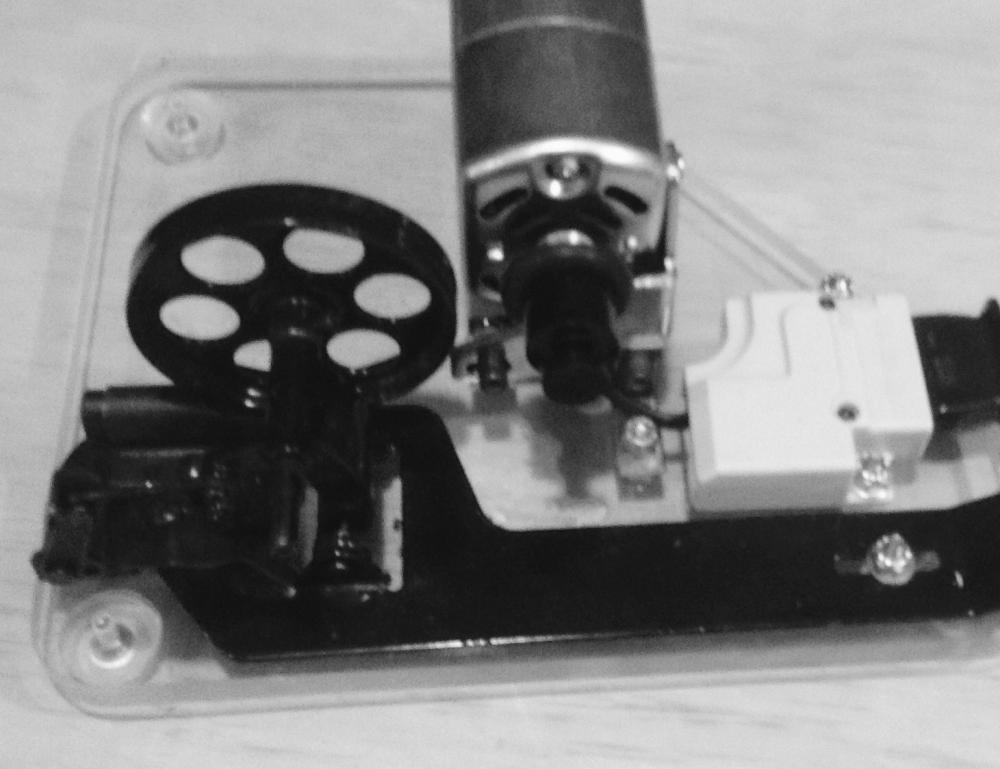
....and the acrylic matched the bobbin winder.....and here's the shaft on a rough speed reducer mockup
-
Lol - thanks guys - I was looking at a machined and ground shaft and thought that looked cool so I spun these rods with some fine sandpaper.
-
Thanks again - I'm looking forward to the drive to pick them up!
-
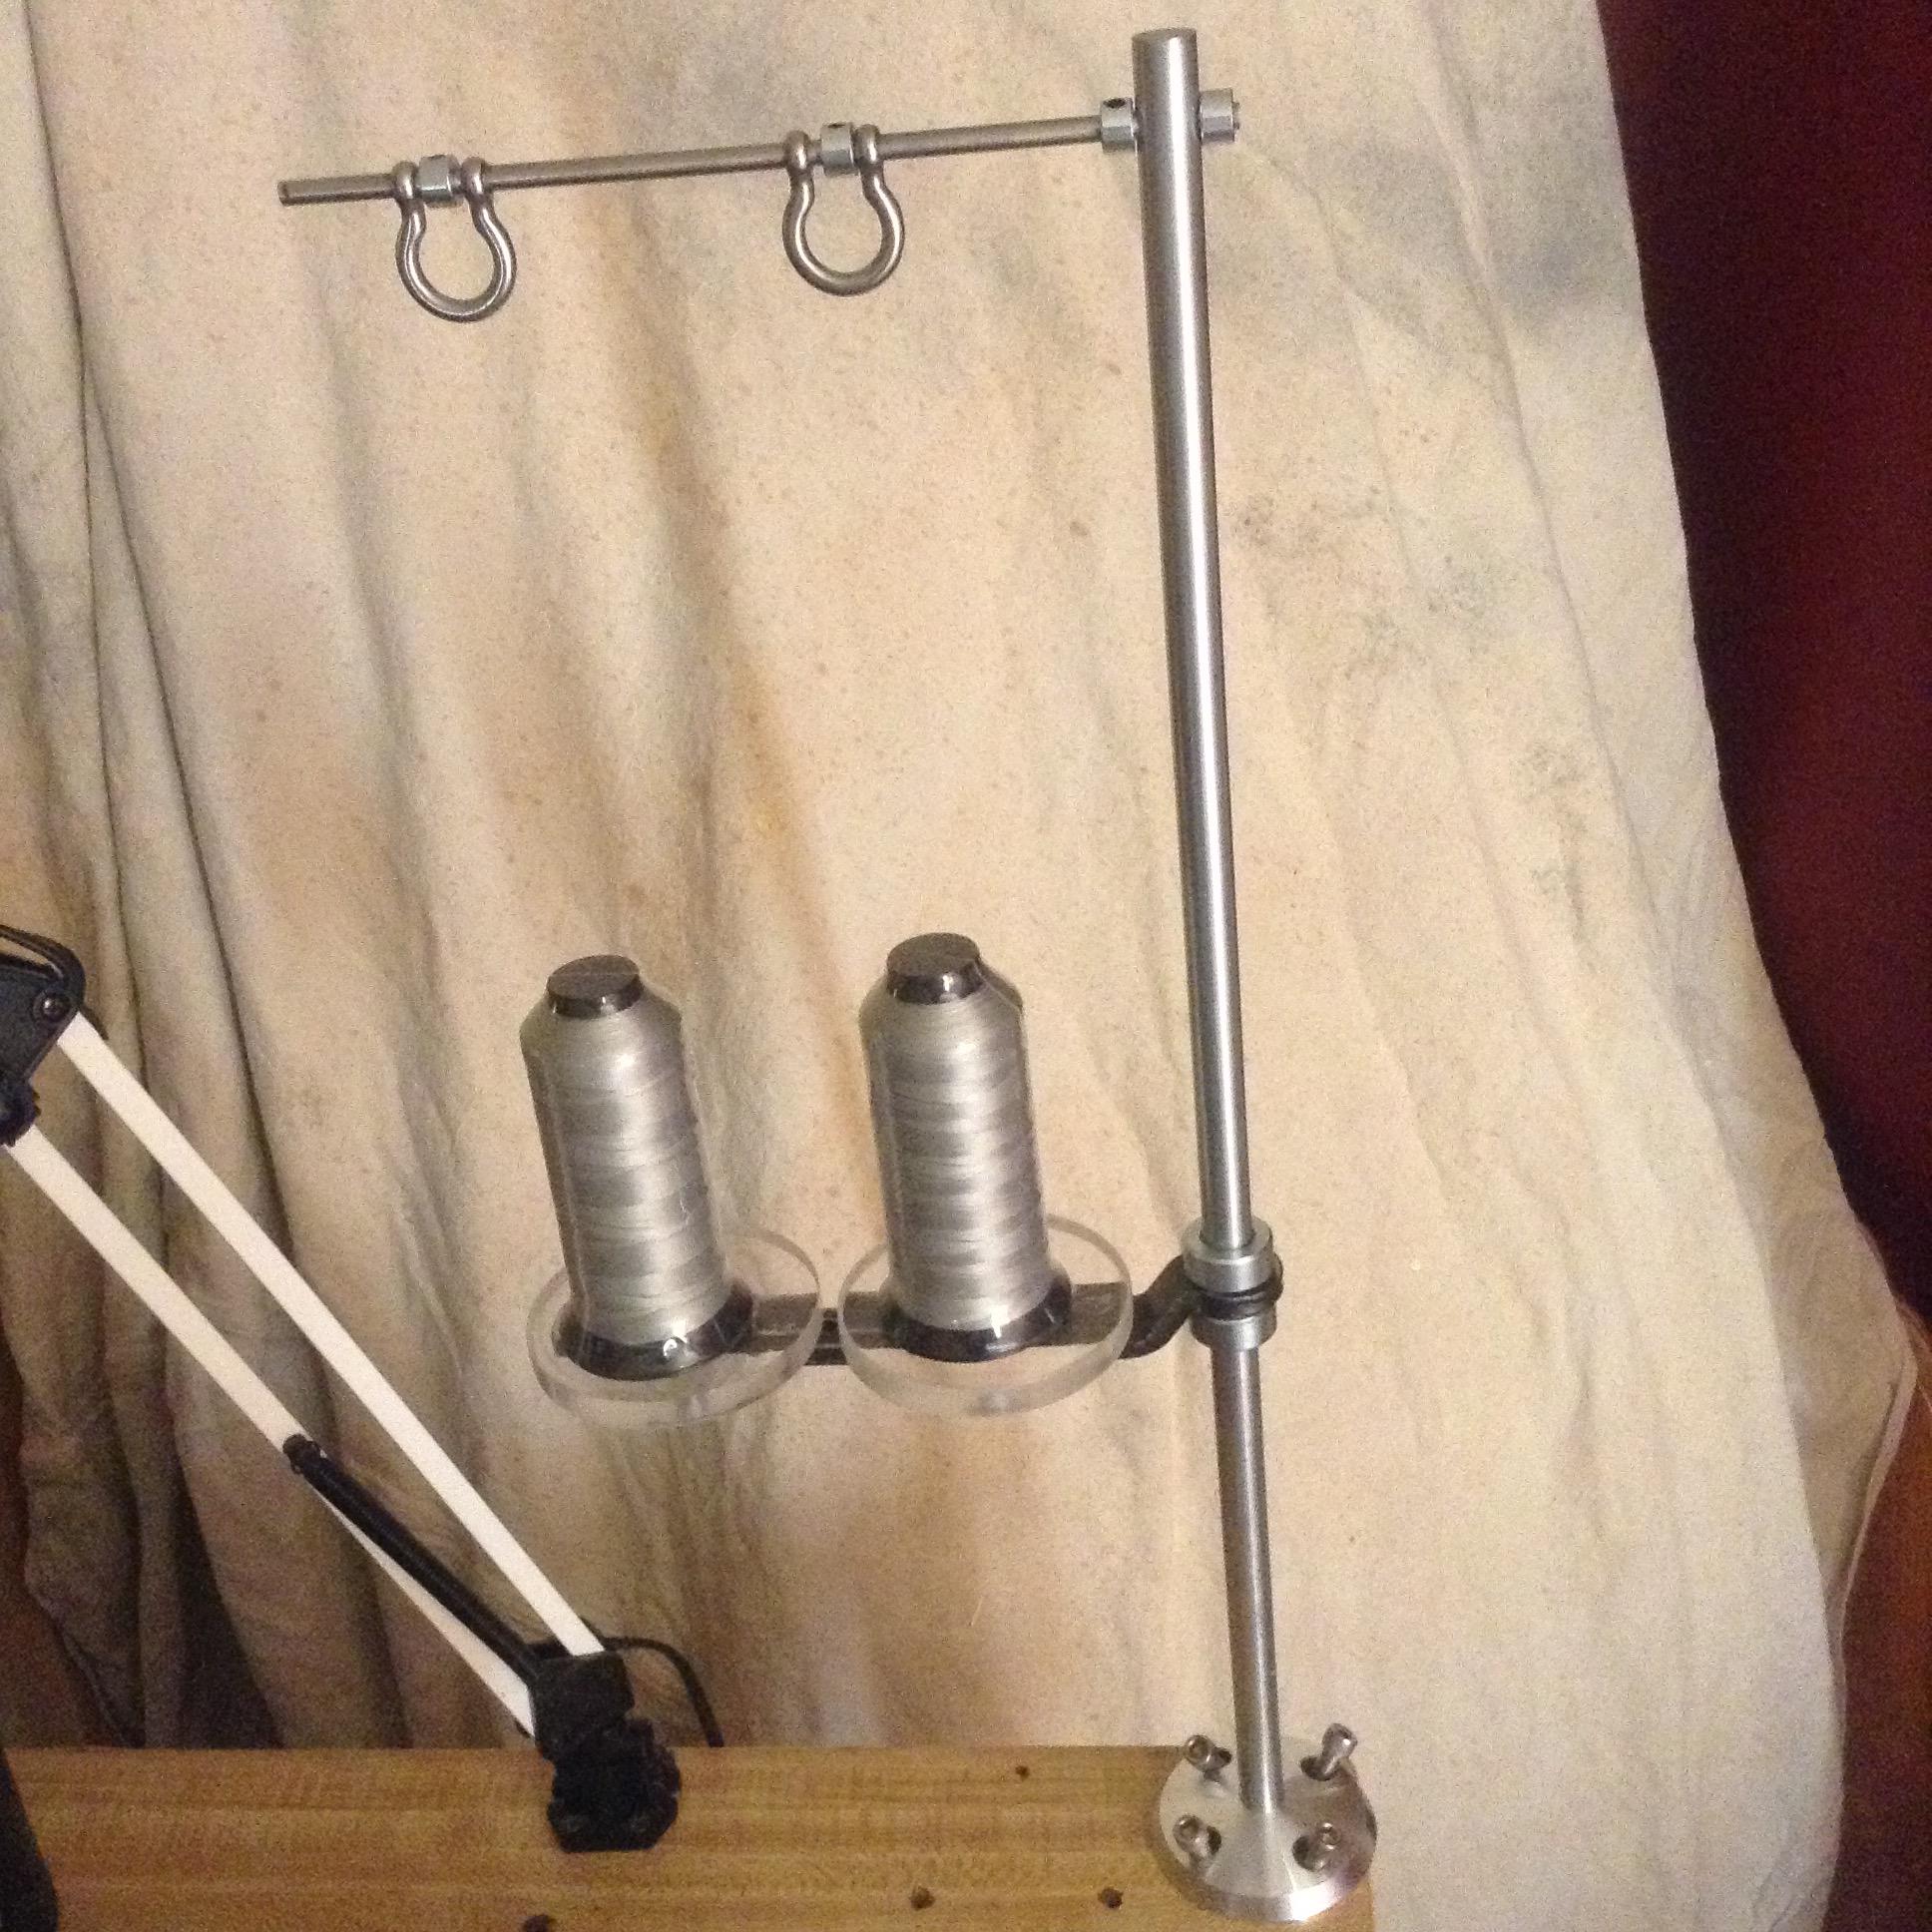
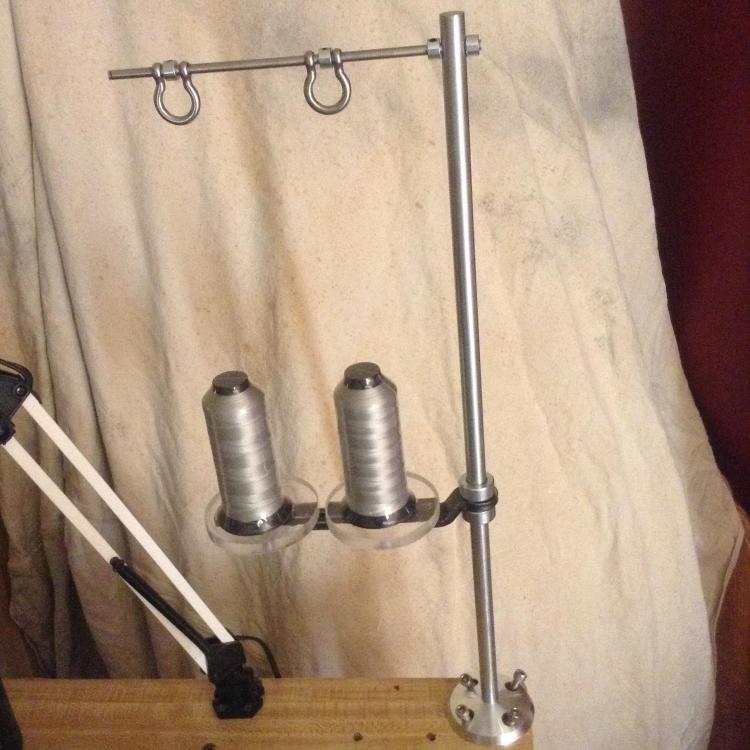
Sitting in front of a well built machine, cutting super nice materials with scissors that rival the quality of 99% of the best finish carpentry tools, one thing always seemed out of place - that dang stamped out thread stand that seemed like it came out of a Walmart box. I searched for a few hours online before giving up and starting to gather parts. Most thread stand projects are more "build a thread stand for less than $1" and less focused on something good looking and solid. Some 1/2" plexiglas from a buffet sneeze guard, two 1/4" diameter hinge pins, 1/4" steel rod, some shaft collars, a couple of 1/4" shackles, a 5/8" steel rod, an arm off a commercial door closer and a polished aluminum water pump pulley cover from the clearance bin at a hotrod supply shop. Lol This is the first version - it's solid, but there are stop collars with much better looks and I'd probably use roll pins in place of the 1/4" collars next time. The arm could be brazed to a collar eliminating the second one. I heated the sides of the plexiglass too much and that caused the bubbles - I should have polished the plexiglass more and the edges would be nearly clear. Anyone have a thread stand project they want to share?
-
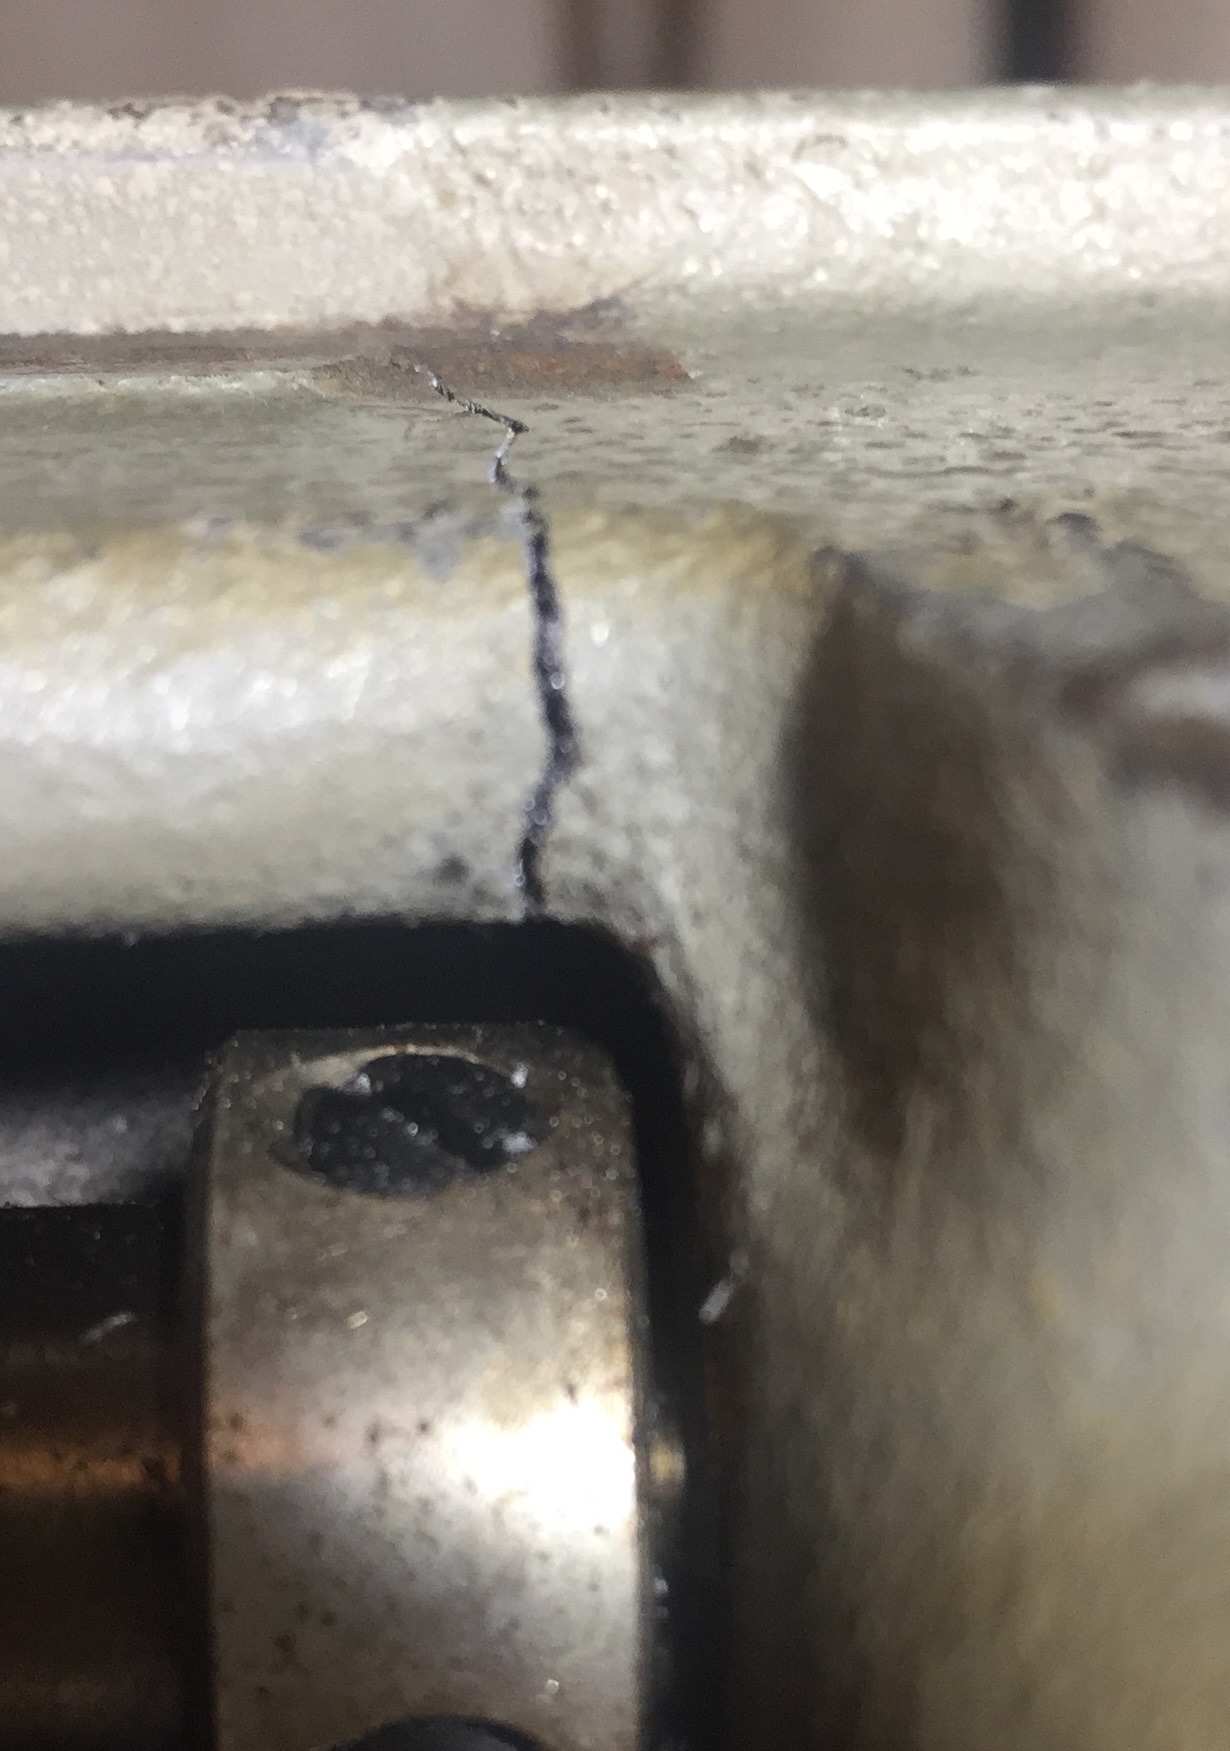
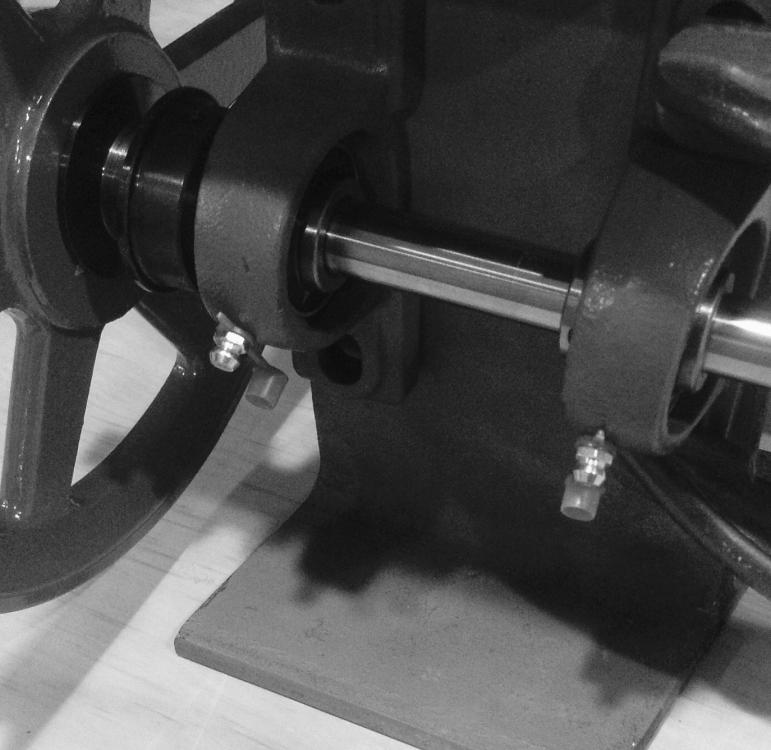
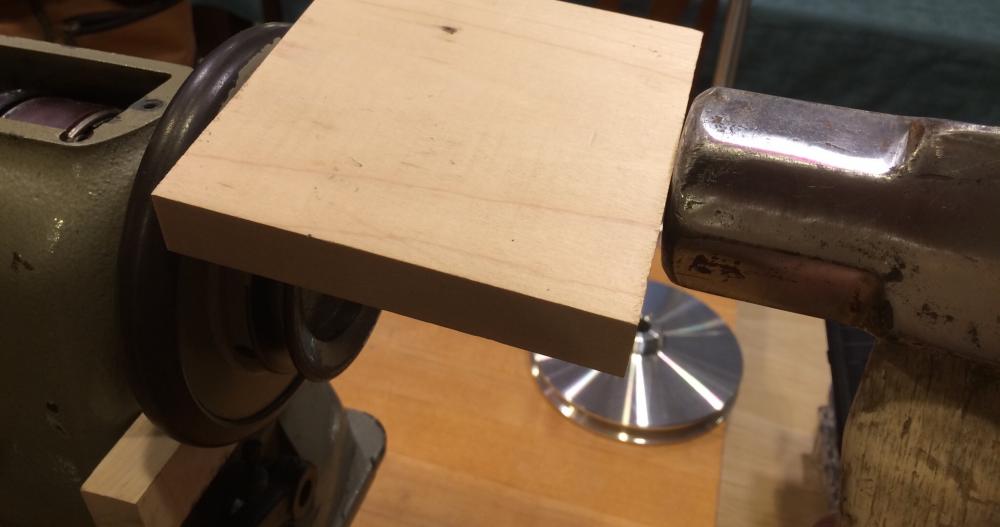
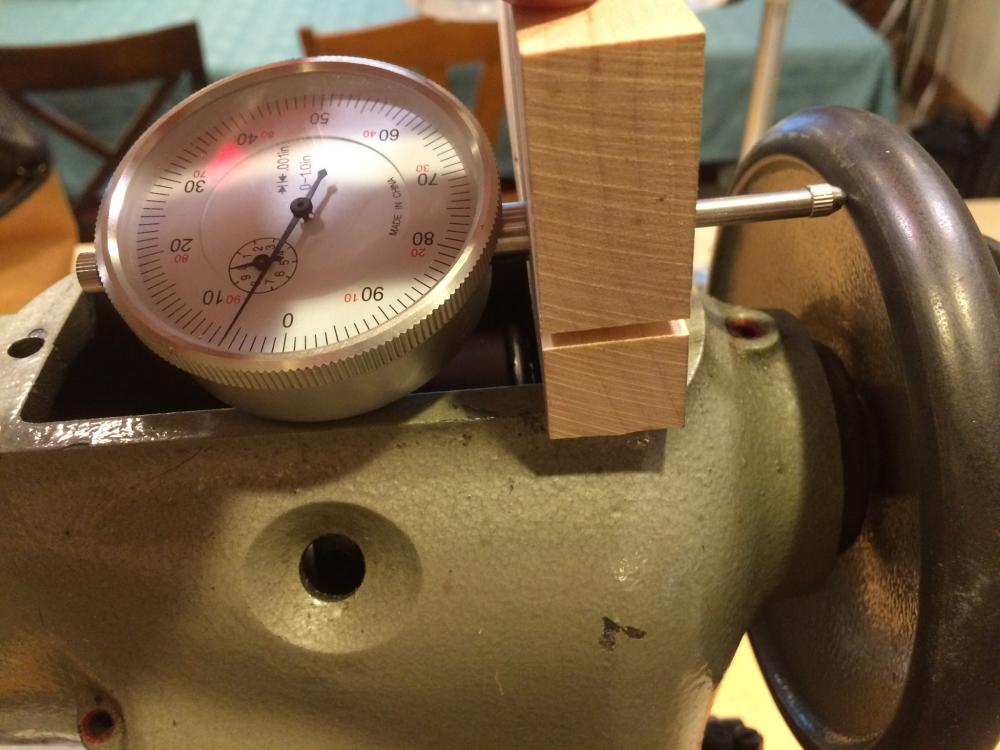
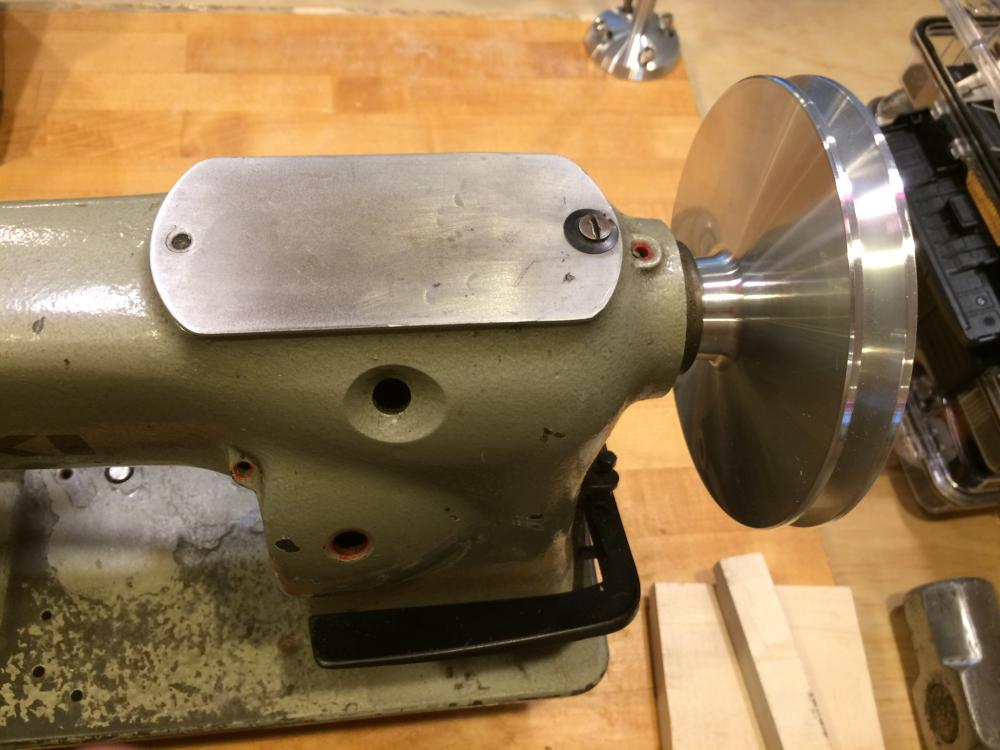
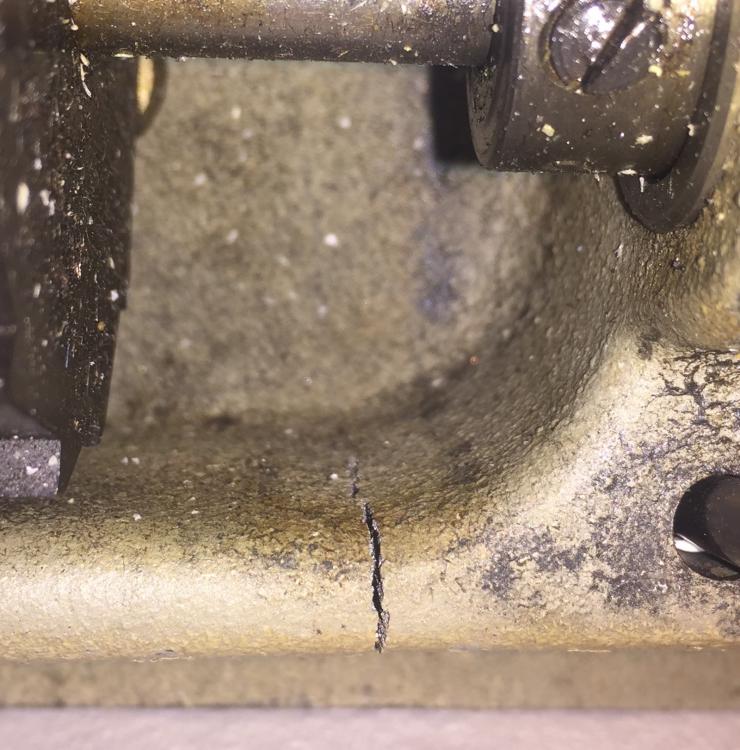
Well I finally had a few hours to play around with the machine and discovered the input shaft was a little bent, but on a happier note the binding in the lower end completely goes away when the bed is clamped halfway to being flat so I'm optimistic that grinding out the crack and brazing it will solve all the lower end problems :-) Now about the input shaft - if you are squeamish it's better to stop reading now, because what I did to fix it is a little ugly! I'm guessing whatever happened to crack the bed also put enough pressure on the hand wheel to bend the shaft. The 562 has a beefy enough hand wheel that it wasn't damaged other than a newish looking scuff on the rim. Again keep in mind the Juki isn't being sold to anyone and I'm not suggesting the following as a best practice. I figured if the hand wheel is tough enough to bend the shaft in one direction it will most likely survive a tweak in the other to straighten things out. It also seemed that it could be done in a way that doesn't put as much pressure on the rear bearing as the original damage did. I held a dial indicator up to the rim to both accurately tell how much it's out and where the bend is. Then two screws holding the wheel to the shaft were loosened and it was backed off the rear bearing 1/16" or so. The screws were tightened little more than finger tight so any impact wouldn't get fully transmitted to the bearing or down the shaft. A block of hard maple was cut to be a firm fit between the hand wheel rim and the head. Another chunk of hard maple was held to the top and gently tapped with a rather large hammer. At least for me it's easier to judge a gentle tap with a big one rather than a big hit with a small hammer. After a hit the wedge block was removed and the rim checked for movement....after three or four increasingly stiff taps a little movement showed up - maybe only .002", but it moved. I kept tapping with about the same force, checking the movement each time, until the hand wheel rim was within .005" runout - close enough that it can't be easily felt or noticed. Spinning the wheel on the shaft it seems none the worse for wear. I also wasn't going to be heartbroken if it didn't survive since a replacement pulley was found in the return/scratch and dent rack at the local Summit Racing wearhouse. For $30 this aftermarket power steering pulley feels good in my hand, is clear powder coated, and provides about a 60% speed reduction. I'll press in a steal sleeve, drill it out to shaft diameter and tap holes for two new set screws. Now the biggest decision is what color and texture to repaint everything. Hammered Juki green like the original finish? A high gloss cream or off white color looks good to me....that's a long weekend of sanding and filling the body just to prep it....Idonno. It looks like some resellers on eBay are mixing Rustoleum hammered silver and a little black - doesn't look bad, but reminds me of a drill press. Lol
-

Need help timing a double needle machine
DonInReno replied to Kd0afk's topic in Leather Sewing Machines
The iPhone idea is awesome - thanks for mentioning it! -
I feel much better since you guys have some track records fixing this kind of crack! I did pick up a $10 thrift store machine to break and practice on. Lol In a kitchen remodel we removed enough maple butcher block for my three machines - a nice stiff table seems to add something intangible. Having said that, I'm always amazed at how durable high pressure laminate (like Formica) is on even a sagging table.

-
I wonder if it's more prudent to cut through the bed completely or just grind until the crack stops and leave the top surface intact? Hmm...
-
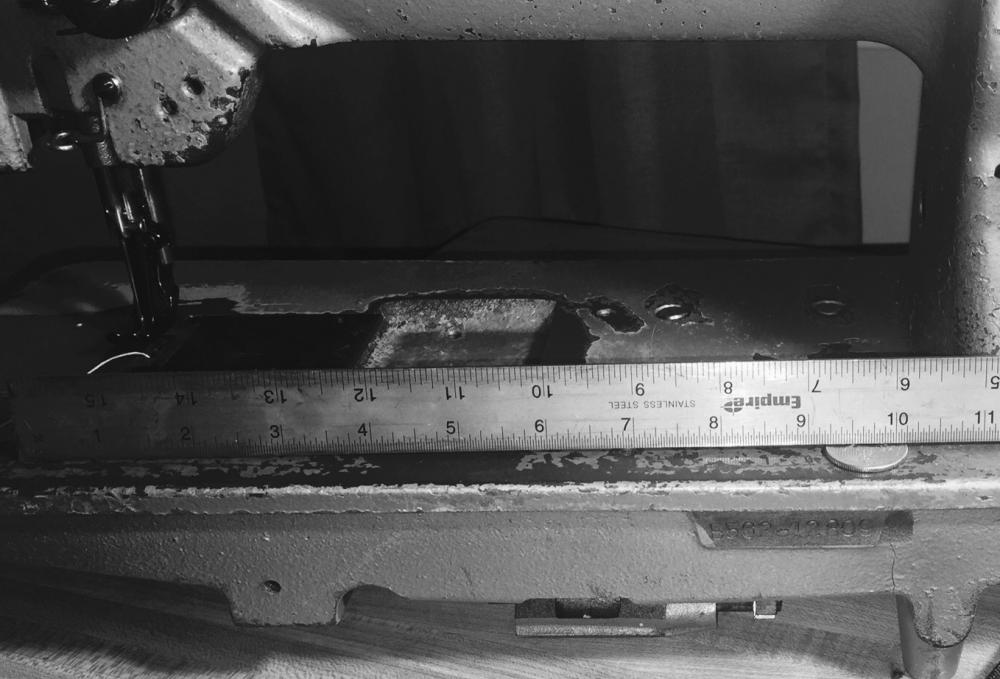
I picked up a damaged Juki lu-562 as a project...keep in mind this is a project machine and not a mission critical money maker. It seems to have been squished under something heavy and the underside of the bed has a crack running the entire width of the bed, but not completely through to the top. The nose of the bed is bent upward about 1/8", which not surprisingly, has the shafts half bound up. On the plus side the shafts do not appear to be bent since rotating them by hand produces even resistance. Its easy to argue the most proper fix is replacing the bed and or entire head from a donor machine. Are beds and upper portions matched and/or machined as a unit? Im sure there are some damaged upper heads with intact beds that would be free or nearly so. Even if they are mated early in the manufacturing process it doesn't seem outrageously complicated to machine off a little to shrink the neck, or cut a shim to raise it. Along the same lines are all 562's the same? How about 563's - do they share most parts with the 562 other than the larger hook, or have a number of other bits been upgraded? The crack doesn't cross any bearing bosses or other spots that might omit welding or brazing as options. Proper welding techniques on cast iron are well documented by all the big venders - a lot of preheat, nickel rods, long drawn out post heat slowly bringing the temperature down over many hours. I've never heard if arc or TIG produces better odds of success? Brazing options seem to be either lower strength silicone bronze (doable with a dc TIG, which I have), or much stronger aluminum bronze (requires AC TIG similar to what's required for aluminum welding). I'm not a huge fan of brazing since it has to be built up more than the original iron and will always look like a repair every time the head is tilted back for oiling or cleaning.
-
I'll also add that simply searching for "felt wick" turns up multiple sources - machinery of all types have used felt wicks for a hundred years - it's usage is not limited to sewing machines.
-
If there ever was a stereotypical perfect first walking foot machine - that would probably be it. If you don't know exactly what you'll enjoy making - who knows, the flatbed might be as good or better than another variant. One month spent with this machine and you'll know what type your next will be.
-
If you already own a drone, this may be for you. Lol
-
I love it! If it was available locally I'd gladly pay $500 and play around converting it to more conventional uses - cool, big, and unique! edit: (since it's already missing book related parts makes me bet it's been sewing other materials for a while....)