DonInReno
-
Posts
794 -
Joined
-
Last visited
Content Type
Profiles
Forums
Events
Blogs
Gallery
Store
Everything posted by DonInReno
-
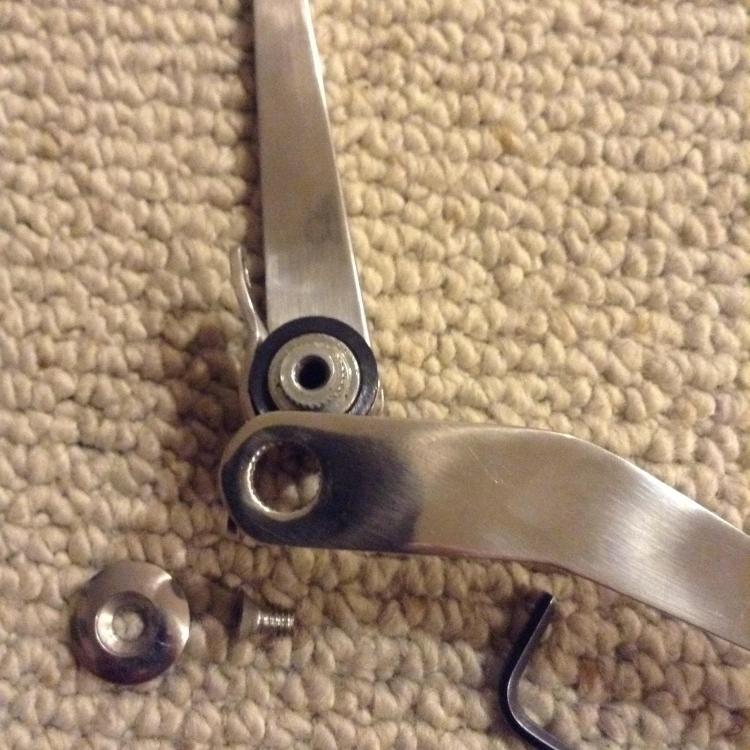
Finally a relaxing weekend to play with the reducer! Since it's usually best to start with easy stuff. The factory spacer was removed and a little duct tape became a temporary coupling to make sure the initial motor torque could overcome the grip the oil seals have on the input and output shafts - at least with no additional resistance the motor didn't seem to notice the reducer was attached. Another potential problem was an additional source of noise. However, these reducers are nearly silent - or at least the motor hum drowned out any sound the planetaries may have made. The cool part is right off the reducer on the lowest 200 to 500 RPM speed range it's roughly 30 to 70 RPM so even directly coupled to the head 1:1 it's a nice slow granny-gear range, albeit maybe a little too slow. At 3000 motor RPM's the reducer puts out 410 RPM's - (edit - this is about the speed I like to sew most things at). The higher the reduction the harder the hand wheel on the sewing machine will be to turn so my gut feeling is the reducer needs a slightly larger pulley than the machine for that reason as well.
-
Awesome!
-
Cheap carburetor cleaner is often just acetone and a propellant. Depending on what flavor of paint your machine has been touched up with over the years the paint may or may not peel off with it. Keep in mind acetone is used to remove fingernail polish - even the UV cured gel. If you really like your paint I wouldn't use it. At least some black Singers aren't touched by it, while a silver 212g140 had the paint bubble and/or just come off completely down to bare metal. I sprayed a LU-562 with it - removing excess with compressed air and it didn't lose any paint, although it might have dulled the finish in spots. I have a friend who experienced a flash fire while using flammable solvents and an acquaintance who passed out from lack of oxygen as solvent fumes pooled in an enclosed area so don't take warnings lightly. wd-40 is so easy to use and it's so harmless that's what I would clean it with. I don't understand why normal oil doesn't keep everything freed up - squirt a little extra oil on everything with metal to metal movement and run it a few minutes and wipe up the drips.
-
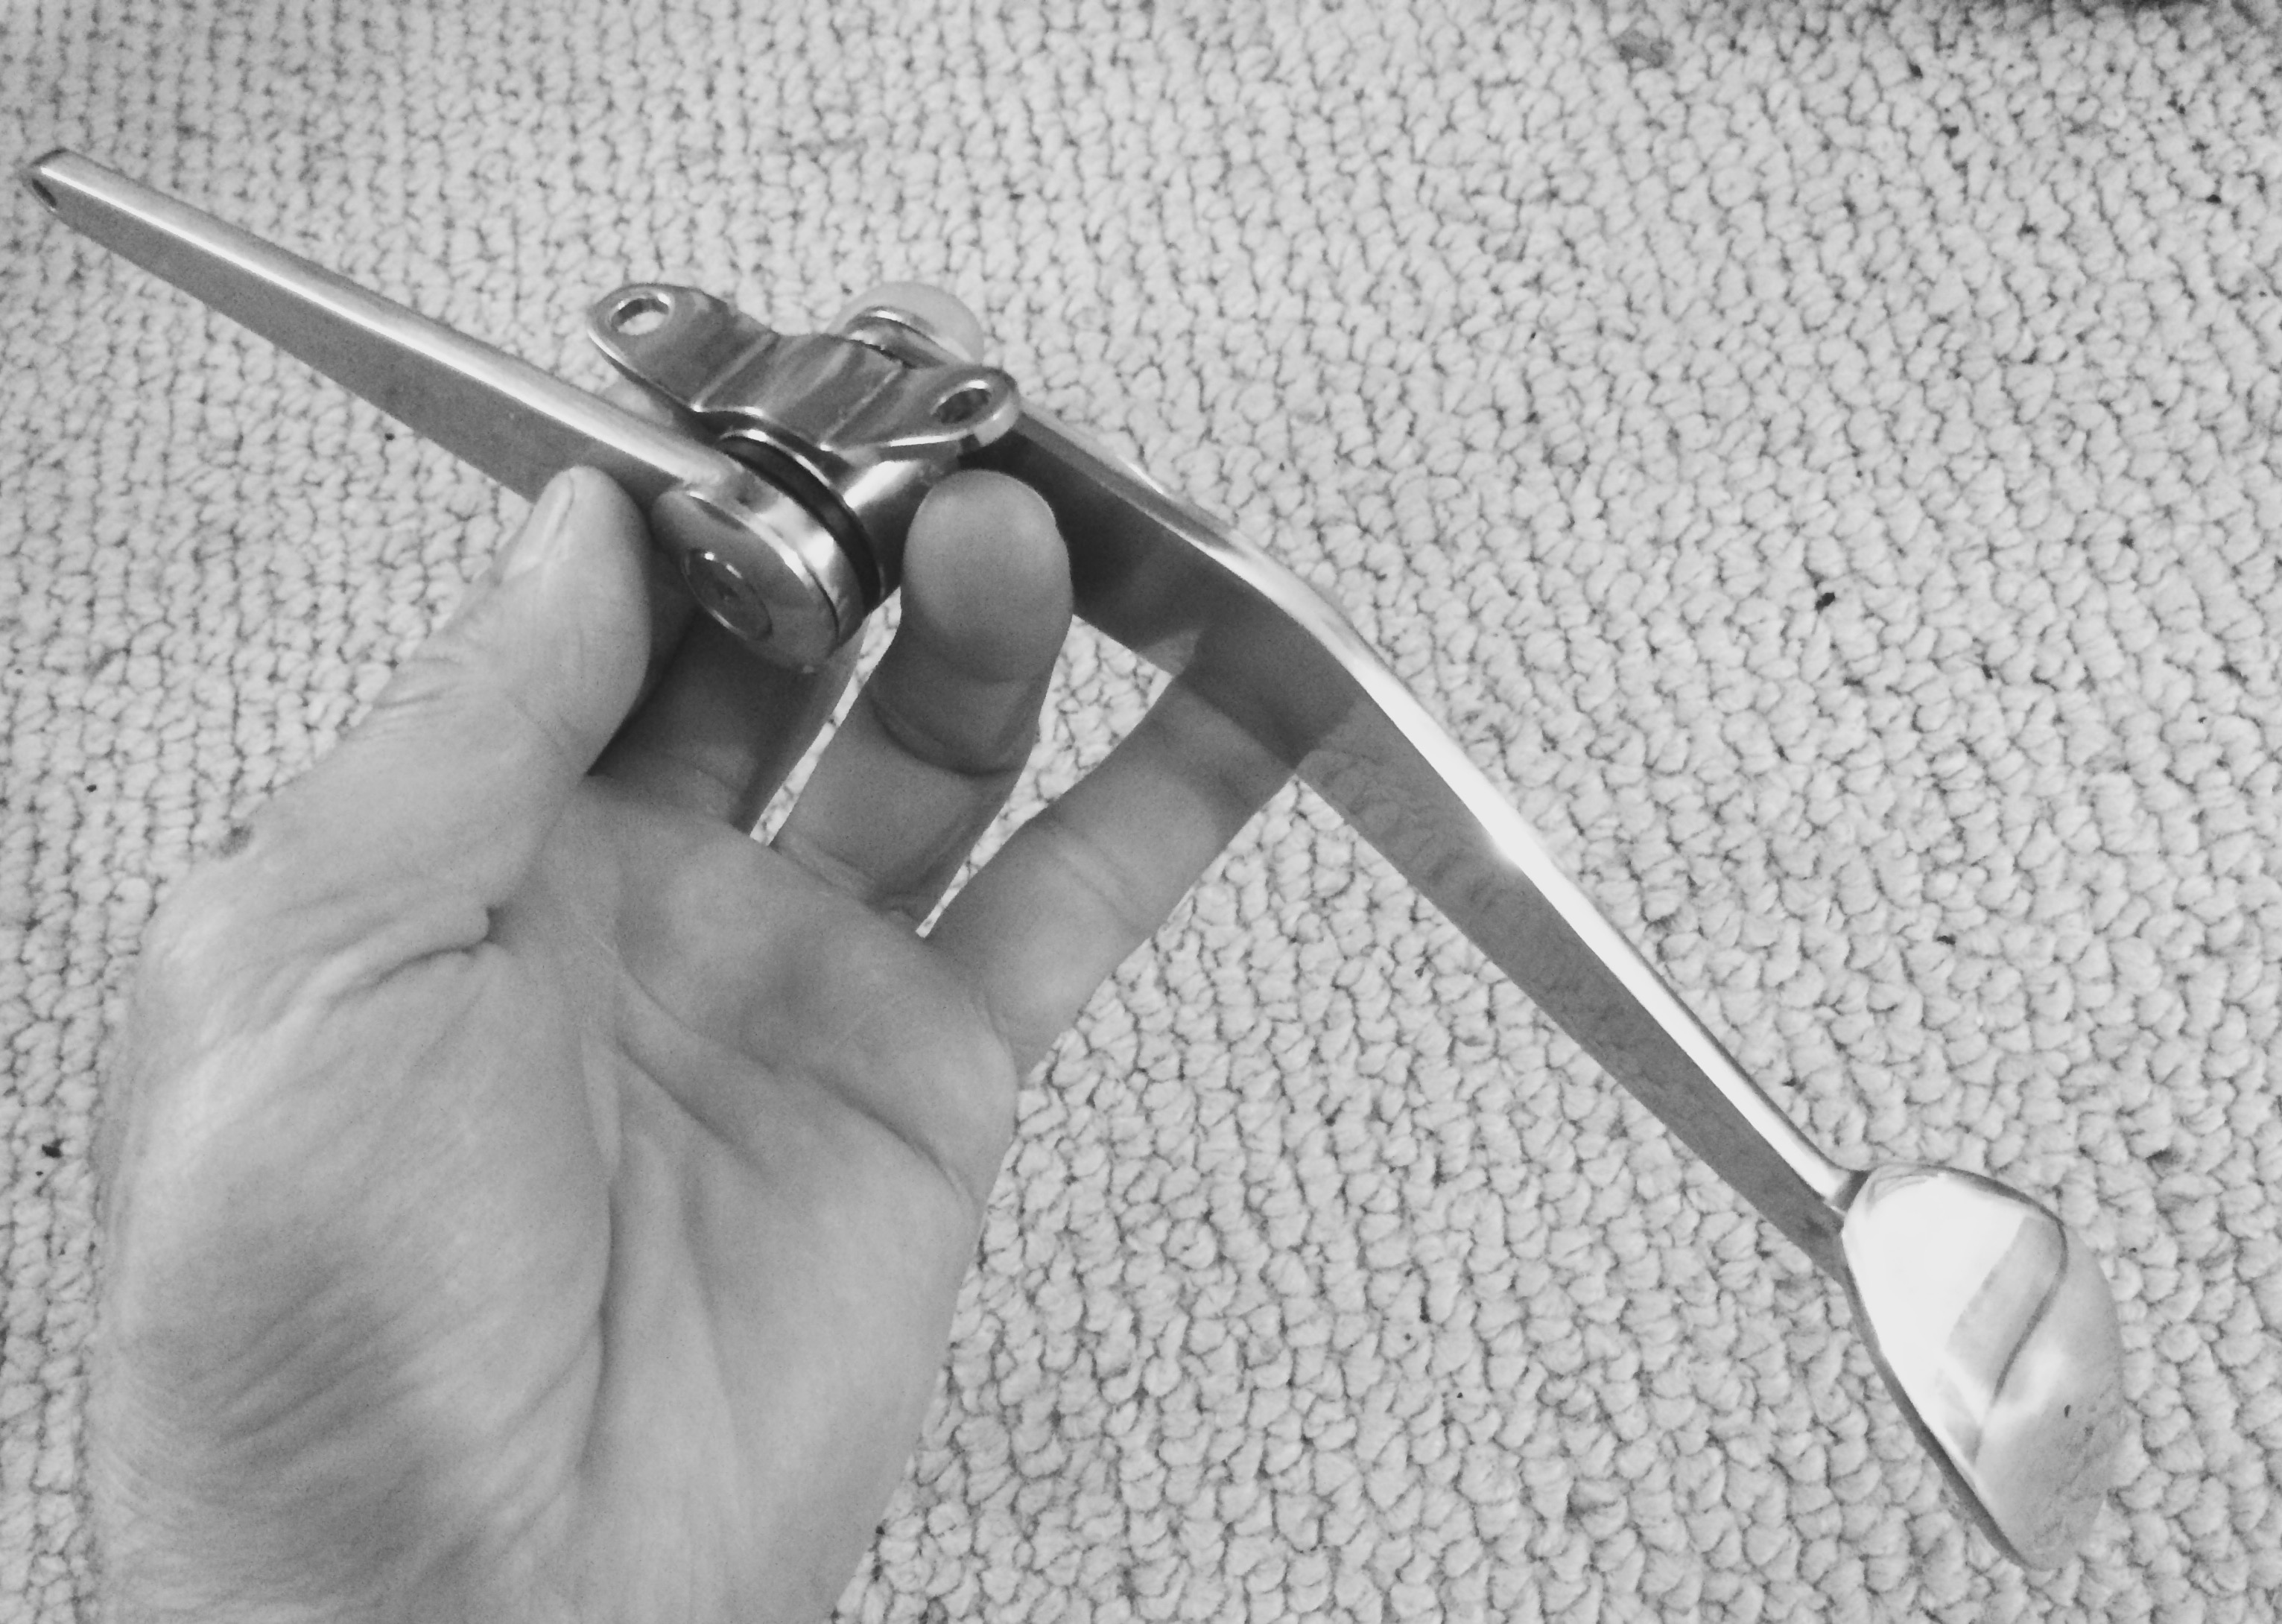
Nice! Here's a pic showing the simple splined pivot allowing the foot pedal and arm to be adjusted to any angle relative to each other. JEGS probably has a similar variety of this style of pedal in various forms - there just happens to be a Sumit Racing warehouse in Reno.
-
The Thread Exchange also has very good information on thread pro's and con's http://www.thethreadexchange.com/miva/merchant.mvc?Store_Code=TTE&Screen=CTGY&Category_Code=Information
-
It's kind of funny that the "fastest" pedals for drag cars and boats looks the most like an aluminum commercial sewing machine pedal! It's good for all the way on or all the way off. Lol I'm such a slow sewer - even on long canvas seams - that there's no need for racing stripes so far.
-
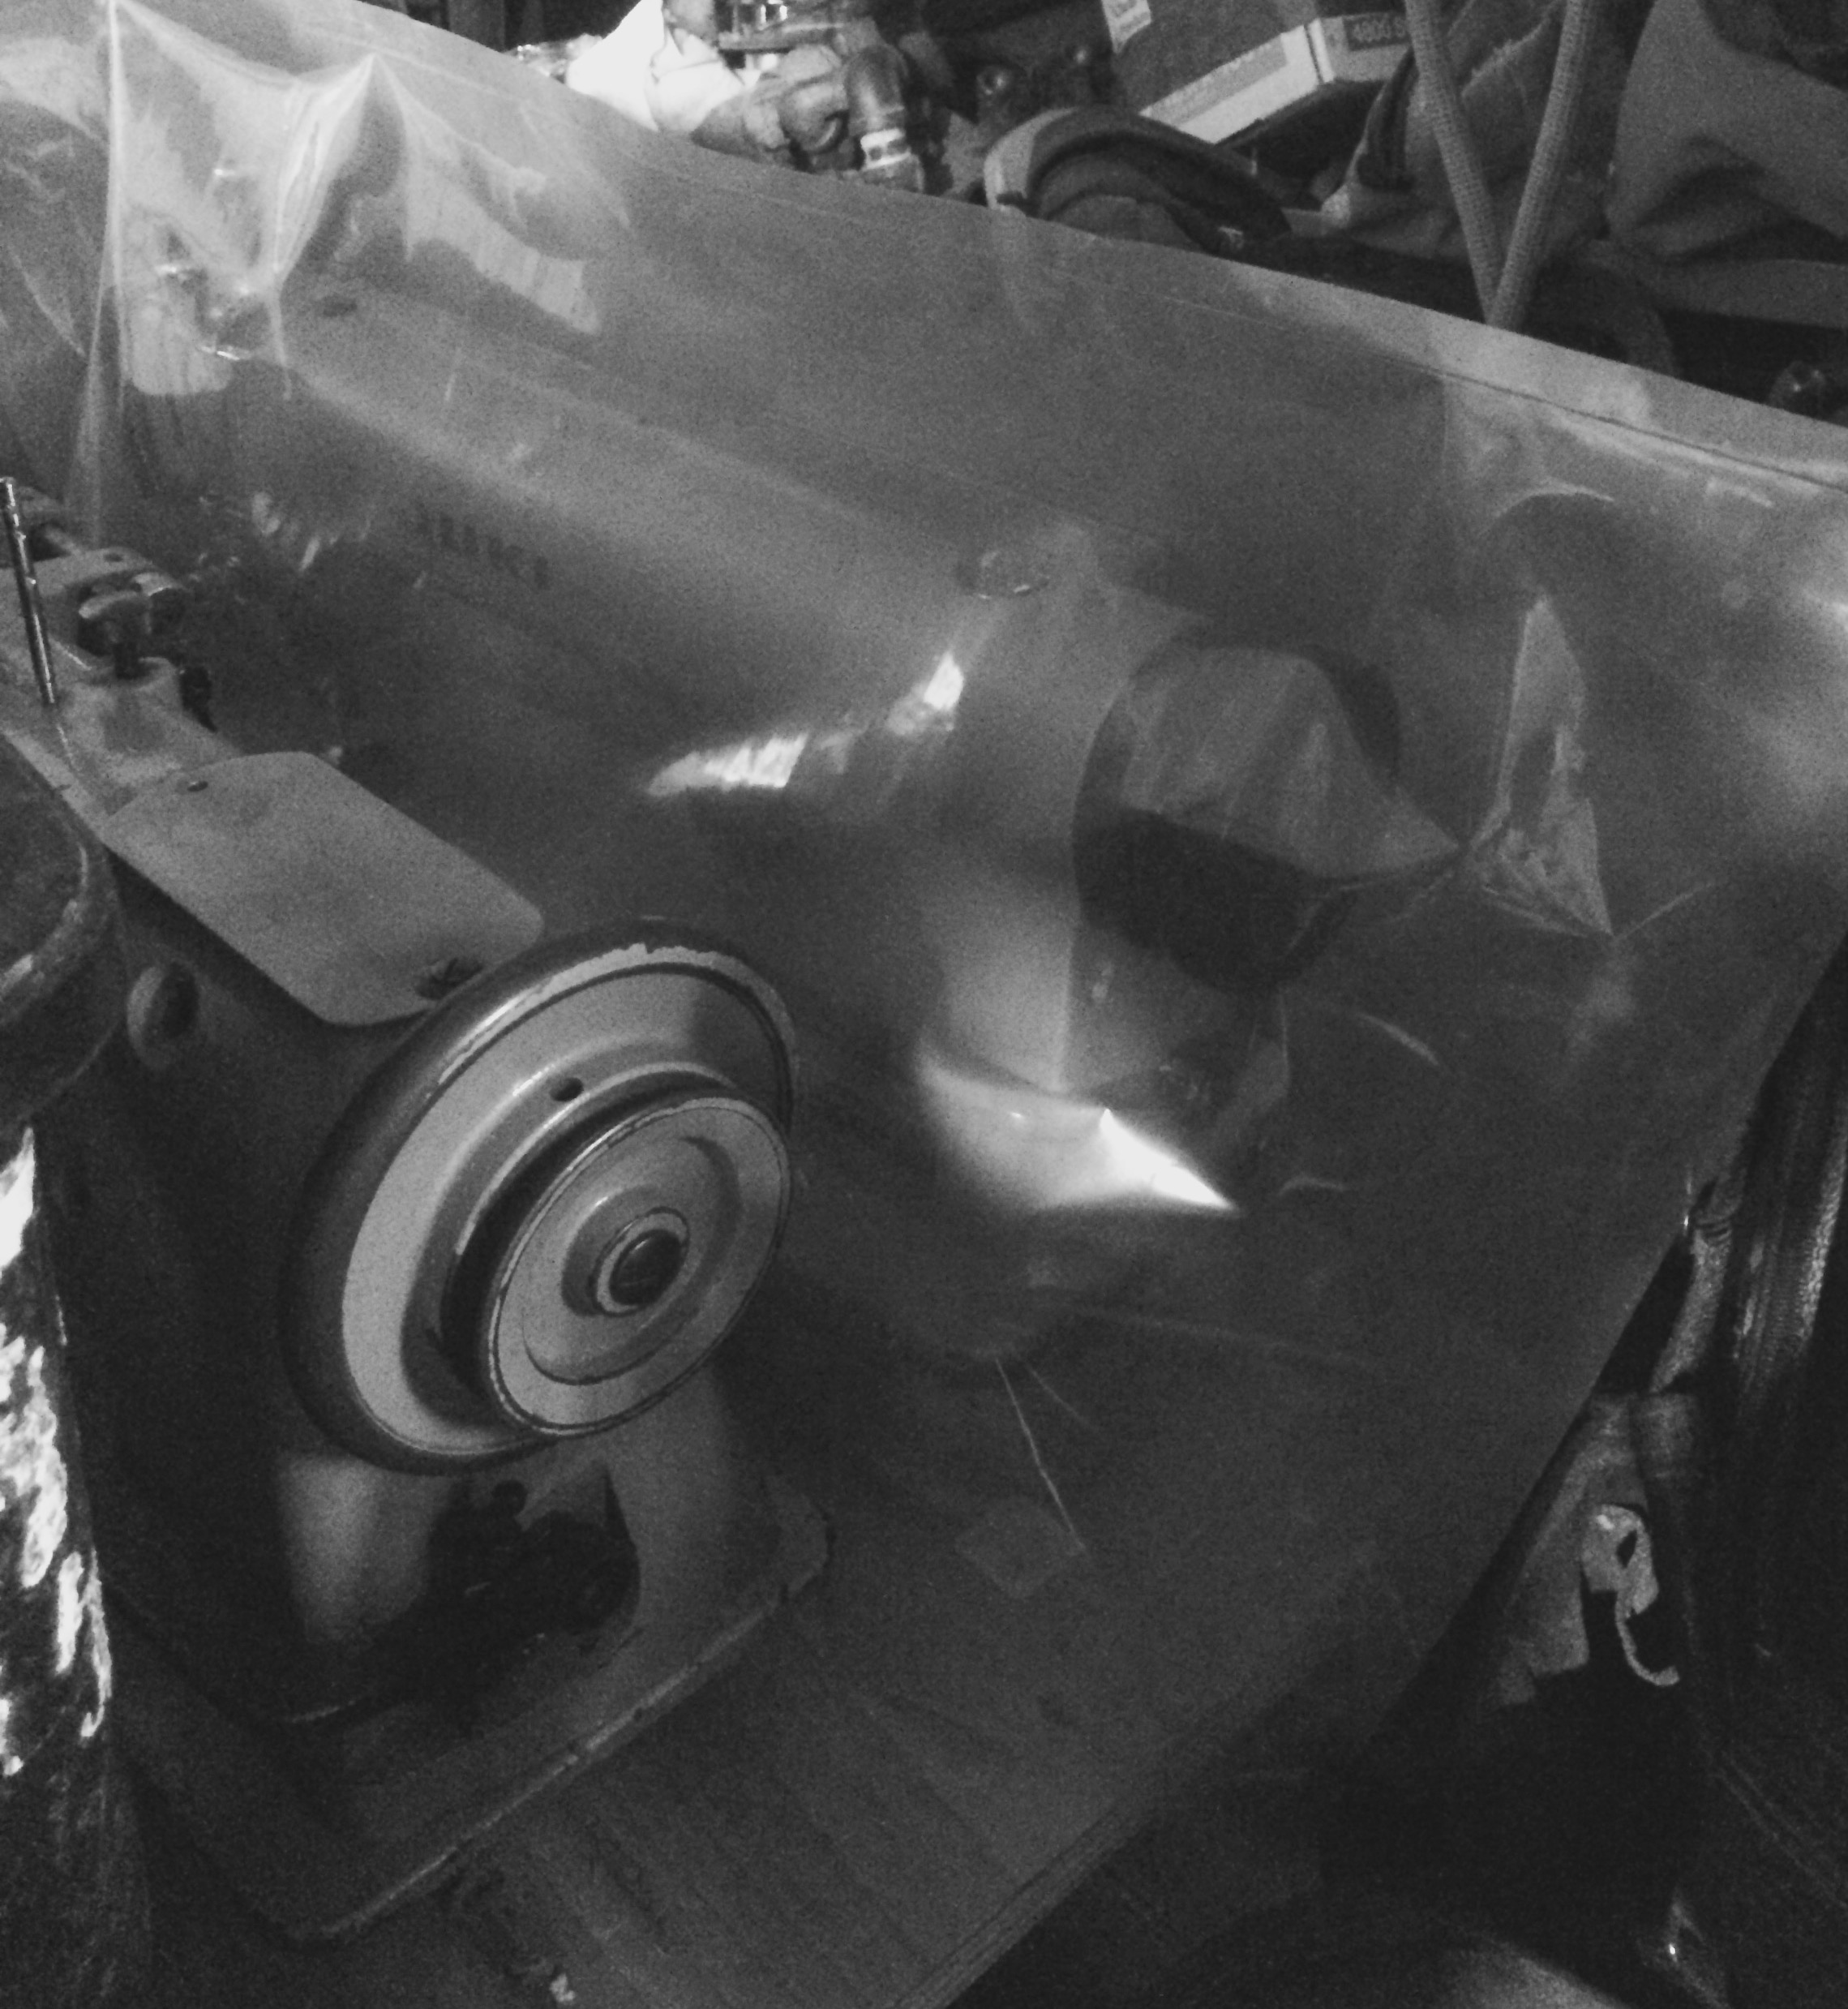
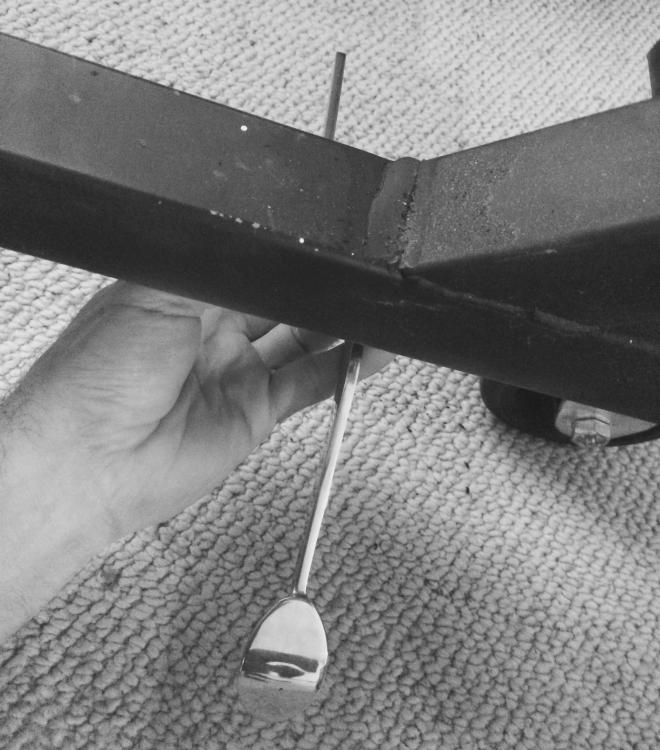
While many/most can't imagine anything other than a heavy cast iron sewing machine pedal with a tiny range of motion, I spend more time driving than sewing and more than once I've wished for the feel of an automotive version. The frame I'm working on now has a square tube in the right place for a pedal intended for hot rods....so here's a new toy - stainless steel and about $35 from Summit Racing. Mounted under the tube requires the linkage to push up rather pull down, but that's simply a matter of turning the servo controller speed input upside down.

-

Ferdinand 900b check it out
DonInReno replied to Old Coach Saddlery's topic in Leather Sewing Machines
Nice! -
The table contrasts nicely with the machine - good looking combination! Did you use wood veneer or a high pressure laminate (like Formica)?
-
Is there an advantage to using a wax pot for silicone over simply spraying the thread still on the cone with silicone spray? I've been spraying down each cone as I get them and forgetting about it, but this has me wondering which is a best practice? Hmm.
-
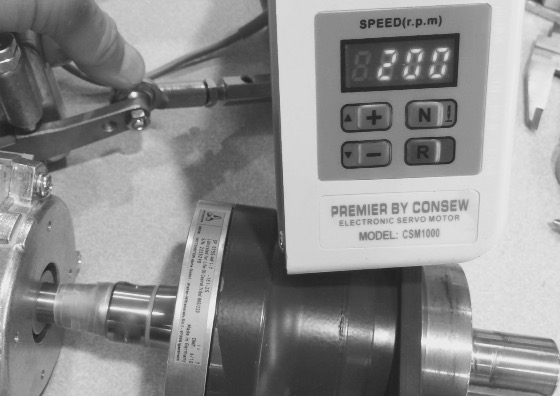
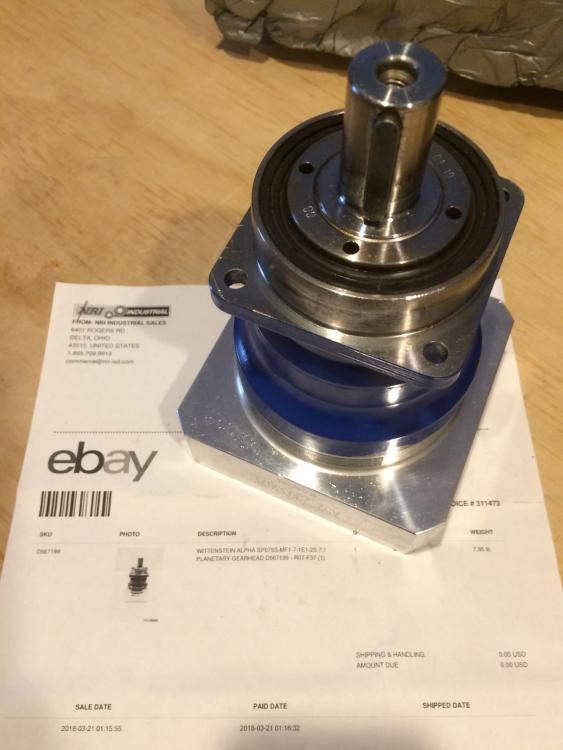
My darling significant other bought a nice little Wittenstein 75 series 7:1 planetary gear reduction unit as a birthday present! To be honest I have no idea if this will somehow work in place of big pulleys and extra belts let alone be a better solution, but it's cool and in my hands so we're gonna try! Nothing in any google searches comes up regarding planetary reduction and sewing machines of any kind, but doesn't it seem reasonable that something like this could make a cleaner way to slow things down? If anyone's gone down this road it would be interesting to see what worked and what didn't. Rather than start with a marginal reduction and have to use a really small drive pulley, 7:1 can be sped up easily or kept super slow. This unit has .866" (22mm) input and output, with the input sleeved to .754" or so. A different sleeve will need to be whipped up fitting a servo motor and some kind of plate to mate the motor securely. How noisy are these? The other potential downside is how significant the extra rotational friction is and how it affects manually using the hand wheel. This might be the downfall of the unit since the rubber seals have quite a good grab on the shafts, but it can be spun backwards with about the force it takes to turn over a Juki LU-562 type of machine.
-
Changing out a handwheel with a motor pulley
DonInReno replied to leecopp's topic in Leather Sewing Machines
Dikman, I like your pulley choice - and honestly I have never liked the feel and function of the factory lu-562/111w hand wheel. To me it's more comfortable having a deep rim to wrap fingers around. A double groove pulley seems even better, but I haven't tried one on a machine yet. Lol -
Uwe - I love that big zig zag! Dave - I'll throw this out there - if you don't mind tinkering a little the Rex 607 is a sailrite clone that's a huge bargain. As it ships it may or may not function properly - these are not fine tuned and I had a minor issue every day for a week straight. Nothing huge, but you'll know the machine inside and out by the time it's broken in. The only new machine purchase of any kind with a manual that doesn't even attempt to suggest they make replacement parts let alone a service department. You really are on your own.....sort of. Sailrite has parts and all the machines of this type are very basic and easy to figure out. The strangest quirk is a oil point that can't be reached unless the motor and cover its mounted to is removed - I must have spent 8 hrs tracking down a slight bind that turned out to be lubrication related. Lol If that doesn't scare you off the second big issue is the machine doesn't have a lot of grunt out of the box - in fact I wouldn't recommend it at all if you don't upgrade it somehow. You'll definitely need to either upgrade the hand wheel to a sailrite monster wheel and/or add a v belt pulley and servo motor. The clogged belts are standard "XL 8mm wide" type available on amazon or eBay so it's inexpensive to track down pulleys and long belts. I have the monster wheel and it will easily sew through 8 layers of thick marine vinyl with 92 weight thread. The feed dogs are too aggressive for leather unless smoothed down a bit. As a lot of owners of these machines have done, a user quickly outgrows them....it fills a limited niche that I describe as home sewers afraid of commercial machines and others that have bought into Sailrite's marketing, parts, and service. Even on a sailboat or RV with minimal storage I'd rather have a full size machine set up for table top use. I keep it around for teaching new sewers and when one of the kids takes an interest I'll gift it.
-
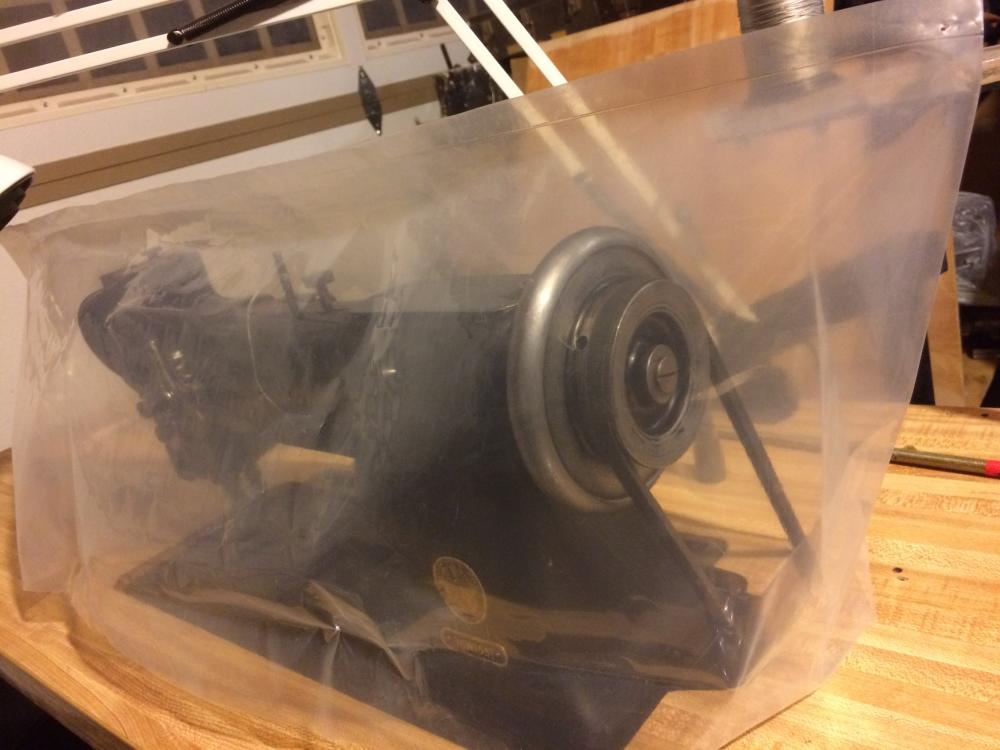
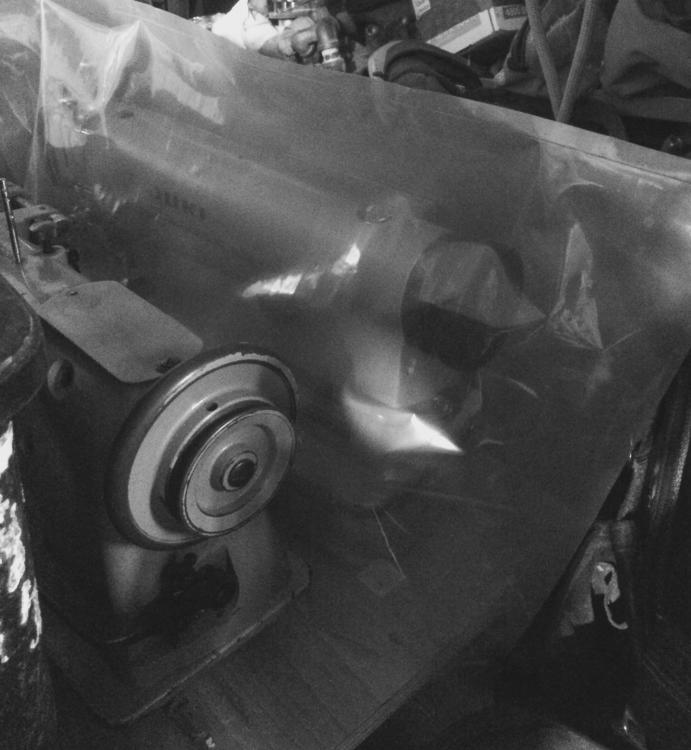
This will be the most trivial post of the month, but it's one of those strange things that just works better than it should! Lol Thinking they were normal construction cleanup trash bags, albeit clear, I picked up a handful of these and stowed them away in the work truck. It must have taken a year to actually open one up and wow these are cool! They are 10 mil clear plastic with a simple heat seam across the bottom. I cut 16" off the bottom of one as a temp dust cover for a machine being stored in the garage and forgot about it. A month later and after taking the machine down a half dozen times I'm now in love with these! They are stiff enough to hold a nice shape, clear enough to see what's inside, and so simple it's stupid! Throw 'em on the floor, sit on 'em - 10 mil poly is pretty tough. Honestly I have no idea where these came from, but they are probably over priced, and it's so easy to make a few of any custom size you want there's no reason to buy a box. A normal clothes iron can be used to seal clear poly to itself - simply use parchment paper between the iron and poly and it won't stick.
-
I just changed out the needle plate last night on a walking foot 111w and noticed a slight bind just as the inner presser foot touched down - similar to what you described. In this case it was the feed dog binding against the bottom of the needle plate - the feed dog peaks about the same time the presser foot touches down. Loosening the needle plate screws a bit is an easy way to check for that.
-
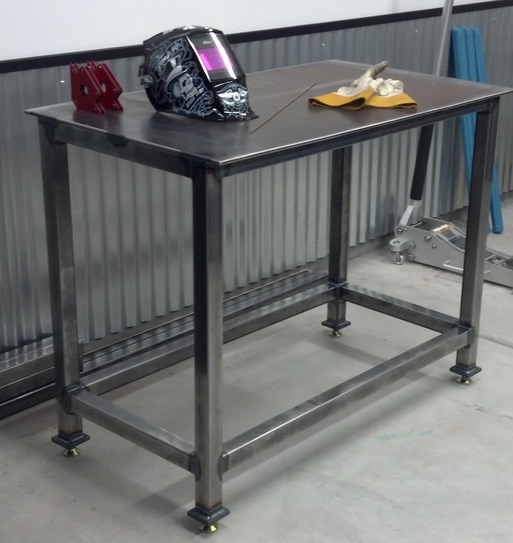
Yes, the coolness to the touch appears to be the major drawback during the cooler months. (About half the year Reno is on the warm side so feeling a little cool would be a plus!) Perhaps warming the steel top with an electric heater of some kind would make it more comfortable than wood in the cooler months? I looked at a thin automotive battery warmer that would tuck away from sight quite nicely - still a requires remembering to turn it on a while before use - not ideal. With 1/2" steel being about 20 lbs/sqft the top will be around 90 lbs, which seems manageable for the 20 yr old boys I'll talk into helping! Lol
-
Has anyone else liked the solid feel of a nice welding table and used a fairly thick (1/2"ish) steel plate for a sewing table top? 1/2" x 18"x 42" piece is less than $100 so it's not a huge investment other than time to fit and finish it. This is for a heavier than normal welded stand with casters that's on a concrete floor so weight isn't a problem. It seems kind of cool to have a top with the same familiar edge curve, thickness and hammered paint surface finish as the machine. The attached pic isn't my table - it's just one that got me thinking :-)
-
A 1/4" set up with a zipper foot is pretty useful with one needle - any more narrow and the feet dogs get smaller and smaller.
-
Uwe's table top for 441 machines!!!!!!!!!!!!!!!!
DonInReno replied to OLDNSLOW's topic in Leather Sewing Machines
Uwe, fit and finish look great - good job on the design and execution of the table! -
That's great news!
-
135x16 and 135x17 are the shank type/needle system - what size of needle are you using? Have you successfully sewed with this machine before or is it new to you? If it's sewed fine until just recently was anything adjusted or changed on the machine? Things I'd check: - Needle size? - Is it threaded correctly? - Does the knee lifter fully disengage the tension disk release and allow normal tension?
-
Being twice the normal length, isn't that a skipped stitch rather than a stretched out normal stitch? I can't tell from the pic if there is an empty hole under there.
-
servo motor Servo motor with syncro and speed reducer
DonInReno replied to Reacher10's topic in Leather Sewing Machines
Wow - pulley printing is really cool! I'm a big fan of the Rex 607 - easily the most bang for the buck in a new walking foot if a person doesn't mind adding a larger hand wheel of some sort and tinkering a little to work out the kinks. I added the monster wheel, but a better use of money would have been a servo motor and adapting a generic xl clogged pulley. Although the underpowered Rex doesn't get used much nowadays, it's a great machine to teach on so I'll never get rid of it. -
Wow - that is nice nice nice!
-
Finally Took The Plunge Juki 1541s
DonInReno replied to AdamPCain's topic in Leather Sewing Machines
Nice!