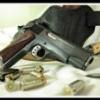
Members Shooter McGavin Posted February 5, 2013 Members Report Posted February 5, 2013 So this is my first time messing with Rattlesnake. Actually was easier to work with than I expected, you just need to be very gentle with it when it's wet. I was afraid the scales might fall off when wet but thank goodness they held on. 7-8oz W&C and 3-4oz HO were used in the 5 piece construction. Fiebings Pro Oil Black and Springfield Leather Pro-Clear finish. And a Coonan with matching grips. Quote Zlogonje Gunleathers
Contributing Member SooperJake Posted February 5, 2013 Contributing Member Report Posted February 5, 2013 Awesome, as always, Dan! Quote Once you know what the magician know.... it isn't magic anymore.
Members dickf Posted February 5, 2013 Members Report Posted February 5, 2013 Damn fine job! Your exotic work is always so clean. Quote US GUNLEATHER www.usgunleather.com twitter.com/usgunleather facebook.com/USGUNLEATHER
Members olds cool Posted February 5, 2013 Members Report Posted February 5, 2013 Nice work. Did you do the grips too or can you buy them that way? I'm not really familiar with that brand. Quote
Members Haystacker Posted February 5, 2013 Members Report Posted February 5, 2013 I second. AWESOME! Quote haysholsters@hotmail.com NRA Life Member
Members mikesmith648 Posted February 5, 2013 Members Report Posted February 5, 2013 nice................now I know what I want to do with all them rattlesnakes around me.......gotta catch em first though Quote Emergency Room Nurse by profession.......Leatherworker at heart!! Hoping to reverse the order in that one of these days!!
Members renegadelizard Posted February 5, 2013 Members Report Posted February 5, 2013 You got to love that...excellent work as always Dan. Ive got a pile of snake that im not ready to play with yet. Ive got a ring lizard crust that is waiting on dye though..full panel for a 1911 SOB for a buddy of mine at the local gun shop...if i can nail the od green dye, it should look killer with the sig scorpion...did you have to dye the snake to get it just right?..im really digging those double stitch lines... Quote Havoc Holsters
Members Shooter McGavin Posted February 5, 2013 Author Members Report Posted February 5, 2013 Thanks guys. The Coonan is based off of the 1911 pattern but is chambered in .357 Magnum. It's pretty cool. Not sure where the owner got the grips. Finding a rattlesnake skin wide enough for this build was fairly difficult. I hooked up with a seller on ebay and he went through all his stock and sent me photos of the widest ones he had available. Other than the sealant I made no changes in color. The innermost stitch lines are there to hold the front panel and the snake to the main layer. The layout and planning of these builds is always a bit challenging but get a little easier each time. I am delivering it to the owner oin Friday and he is super excited to be getting it! Dan Quote Zlogonje Gunleathers
Members Sixer Posted February 5, 2013 Members Report Posted February 5, 2013 SWEEEEET! Quote http://www.hoppcustomleather.com https://www.facebook.com/HoppCustomLeather


Recommended Posts
Join the conversation
You can post now and register later. If you have an account, sign in now to post with your account.
Note: Your post will require moderator approval before it will be visible.