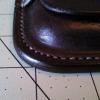
BobW Report post Posted December 1, 2014 (edited) I picked up a new phone on Black Friday. I made a new sleeve for it Saturday. It was made from 3-4oz veg tan leather. I put a celtic symbol on the front. The symbol was treated to medium brown gel antique and covered with acrylic finisher. I dyed the remainder of the exterior with Fiebing's black oil dye. It was stitched with light brown Tiger thread. The edges were burnished with glycerin then saddle soap and finished with parafin. I apply the parafin with a wool disc I made for my Dremel. This heats the parafin and the leather and allows penetration. The inside surfaces were treated with Tan Kote to make the phone slide easily. The exterior surfaces of the sleeve were treated with a home made beeswax based conditioner/protector. The combination of the conditioner and edge treatments leaves the sleeve with the smell of leather and a soft touch. Edited December 1, 2014 by BobW Quote Share this post Link to post Share on other sites
Northmount Report post Posted December 1, 2014 Really nice job! Making me jealous. Tom Quote Share this post Link to post Share on other sites
bgl500 Report post Posted December 1, 2014 Sharp! Quote Share this post Link to post Share on other sites
Basically Bob Report post Posted December 1, 2014 Now, that's one sweet little case! Quote Share this post Link to post Share on other sites
Basically Bob Report post Posted December 1, 2014 Bob, did you use a "mask" on the knot before dying the case black? How did you do that? Quote Share this post Link to post Share on other sites
BDAZ Report post Posted December 1, 2014 Nice Case..Nice phone. A technique I use with Feibings Oil dye is to paint liquid latex on the stamp area as a resist. Use a couple of coats and then spray with impunity. Once dry, peel off the latex and you have almost virgin leather. The latex will darken the leather just slightly but much more effective than the resists typically used. Cya! Bob Quote Share this post Link to post Share on other sites
BobW Report post Posted December 1, 2014 Thanks guys for the kind words. I'm happy with the way it turned out. Basically Bob, I did not use a mask, I simply used a fine line brush and a (mostly) steady hand around the knot. I applied the rest of the black dye with a rag. With a nearly dry rag I brushed lightly one time over the knot, catching the high spots. Thanks again, BobW Quote Share this post Link to post Share on other sites
Rohn Report post Posted December 1, 2014 Beautiful job!!! Quote Share this post Link to post Share on other sites
retiredff Report post Posted December 1, 2014 Nice case, your stitching is great! what size thread and the SPI? Tony Quote Share this post Link to post Share on other sites
Wild Bill46 Report post Posted December 1, 2014 Bob ------------------------ I gotta say, That is a super beautiful job , especially in such a short span of time. color, stitching exicution, all are beautiful, Congratulations ! Thanx for posting --------------------- Wild Bill46 Quote Share this post Link to post Share on other sites
narrowsuch Report post Posted December 1, 2014 Beautiful work, did you wet mould the case ? Quote Share this post Link to post Share on other sites
BobW Report post Posted December 2, 2014 Nice case, your stitching is great! what size thread and the SPI? Tony Thanks Tony. The Tiger Thread is 1.0. I think the SPI is 8. Bob ------------------------ I gotta say, That is a super beautiful job , especially in such a short span of time. color, stitching exicution, all are beautiful, Congratulations ! Thanx for posting --------------------- Wild Bill46 Thanks Wild Bill! Beautiful work, did you wet mould the case ? Thanks NS. The front was wet molded. Bob Quote Share this post Link to post Share on other sites
Double Daddy Report post Posted December 3, 2014 Fine work...excellent finish techniques...impeccable stitching...that case belongs in a museum, Bob! Great leatherworking! Very inspiring... Quote Share this post Link to post Share on other sites
BobW Report post Posted December 4, 2014 (edited) Thanks Double, either I got lucky or I'm getting the hang of it. Bob Edited December 4, 2014 by BobW Quote Share this post Link to post Share on other sites
greighson Report post Posted December 5, 2014 Hey Bob! I was wondering if you would share a more in-depth description of how you made your edges so thick and amazing. Quote Share this post Link to post Share on other sites
snubbyfan Report post Posted December 5, 2014 Very nice, looks great. Quote Share this post Link to post Share on other sites
BobW Report post Posted December 5, 2014 (edited) Hey Bob! I was wondering if you would share a more in-depth description of how you made your edges so thick and amazing. Thanks greighson! 3 to 4 oz leather is pretty thin, but I have three layers of it on the bottom half of the case. The combined thickness is 9 to 12 oz of leather! On the three layer edges I used a #3 edger and on the single and double layer edges I used a #2 edger. As far as the burnishing goes, if you haven't read Bob Park's pdf titled Finishing Edges, stop reading right now and go find it! When I started using his techniques and materials my leather working changed 1000%! Mr. Park uses Fiebings glycerin soap followed by Fiebings yellow saddle soap and finishes the edges up with plain old paraffin and a little Neat-Lac. He also recommends using heavy canvas as his primary contact in the burnishing process. Look for pictures of his work, the edges look like glass rods! My burnishing technique evolved from Mr. Park's choice of materials. My three step process is the same glycerin followed by saddle soap and finishing up with paraffin. I don't have a power burnisher to achieve the heat, which is a critical component. I use a combination of lots of elbow grease with the pad of my thumb, heavy canvas and a $1.50 wood burnisher I ordered from China. For the occasional "hair" that pops up I use 400 grit wet/dry sandpaper. I apply four or five coats each of the soaps, really packing it into the edge. At this point, I am tempted to stop because the edge is beautiful! Instead I apply three or four coats of paraffin. I skip the Neat-Lac. This gives the piece an edge that will age beautifully. I was not able to get the wax heated up enough initially to have it penetrate and flow into the leather. I was able to achieve this with the use of a small 100% wool disc cut from a saddle blanket attached to my Dremel. Now I apply a layer of paraffin and in a single pass with the Dremel on the lowest speed and it is melted in. After three or four application of paraffin I am done. Initially it has a satin appearance but after a couple days in my pocket it's shiny. When I started leather working a few years ago I wanted to make items that were good looking, last a life time and would be practical in everyday life. This simple case embodies those desires. I am not into anything that makes the leather smell like or appear to be made of vinyl or plastic. I've got a bottle of super shiny leather finisher and some gum trag that I will never use! This is probably more information than you wanted but you got me started! Thanks again, Bob Edited December 5, 2014 by BobW Quote Share this post Link to post Share on other sites
BobW Report post Posted December 5, 2014 Very nice, looks great. Thanks, Snubby! Quote Share this post Link to post Share on other sites
Craftsman Made Report post Posted December 6, 2014 Lovely work!! That is one very nice case I love the colour of the thread. Quote Share this post Link to post Share on other sites
Ol Bill Report post Posted December 6, 2014 I really like the way you started and finished the stitching on the open end. Quote Share this post Link to post Share on other sites
BobW Report post Posted December 6, 2014 Lovely work!! That is one very nice case I love the colour of the thread. I really like the way you started and finished the stitching on the open end. Thanks guys! Quote Share this post Link to post Share on other sites