Members Red Cent Posted August 8, 2017 Members Report Posted August 8, 2017 Quote https://www.facebook.com/redcentcustomleather?ref=bookmarks http://www.redcentcustomleather.com/
Members YinTx Posted August 8, 2017 Members Report Posted August 8, 2017 Hello indeed. Beautiful craftsmanship as always, really enjoy seeing your finished works. Something for me to aspire to! YinTx Quote YinTx https://www.instagram.com/lanasia_2017/ https://www.youtube.com/playlist?list=PLK6HvLWuZTzjt3MbR0Yhcj_WIQIvchezo
garypl Posted August 8, 2017 Report Posted August 8, 2017 Looks very nice - do you freehand the decorative stitching or use a template? Quote Cowboy 4500, Consew 206RB-4
Members dikman Posted August 8, 2017 Members Report Posted August 8, 2017 NIce (as usual). Interesting ideas, sewing the holsters along the front and back edges, and sewing the cartridge loops onto a leather strap first and then sewing that to the belt is neat. I've been putting off making a cartridge belt as I just couldn't come up with a design that appealed to me, but your idea has possibilities. Quote Machines wot I have - Singer 51W59; Singer 331K4; Seiko STH-8BLD; Pfaff 335; CB4500. Chinese shoe patcher; Singer 201K (old hand crank)
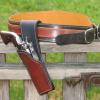
Members plinkercases Posted August 9, 2017 Members Report Posted August 9, 2017 Someone is doing cowboy action in style with that rig. Beautiful work as always. Are the holster pouch parts just formed or is there a little steel in there? Pouch and or shanks? Quote "Oh my God....I beseech thee grant me the grace to remain in Thy Presence; and to this end do Thou prosper me with Thy assistance, receive all my works, and possess all my affections" Brother Lawrence c.1614-1691 plinkercases.ca
Members AA3JW Posted August 12, 2017 Members Report Posted August 12, 2017 Very nice. That looks like the "walk and draw" holster that Steve McQueen wore in the Magnificent Seven. Did you put a steel shank in it like the original? Quote
Members Red Cent Posted August 13, 2017 Author Members Report Posted August 13, 2017 "do you freehand the decorative stitching or use a template?" Sort of a template. I use a quilters half circle "ruler". https://www.bing.com/images/search?view=detailV2&ccid=la2XiLQ5&id=53EEAF736C7617816614FF30652D6A126E0808BF&thid=OIP.la2XiLQ5KtuOfOT_ftEYuwEsCk&q=quilters+half+circle+ruler&simid=607996237826490443&selectedIndex=2&qpvt=quilters+half+circle+ruler&ajaxhist=0 Easy to do. Draw imaginary parallel stitch lines. Measure a point 1/2 way between stitch lines. Make a light pencil line that runs from where you want to start to where you want to end down the middle of the lines. With a pencil, make an indentation at your starting point. Lay anyone of the half circle slots over this indentation and place your pencil tip in the indentation. Slide the ruler so that the top of that particular half circle is almost touching top stitch line. Hold ruler in place and make light half circle stopping at the middle pencil line. The size of the slot chosen will determine the length of the football shaped stitch. On the belt determine the total distance. Figure out how many will fit your space. You can finagle the use of the total space by interjecting a couple of short figures somewhere. "Are the holster pouch parts just formed or is there a little steel in there? Pouch and or shanks?" No steel requested yet. The holsters are two ply made up of a layer of 8-9 ounce and a layer of 6-7 ounce. Cased, lightly molded, and sundried makes for a super strong holster. I don't use steel unless forced to do so. If so, I use two layers of 11 gauge. If you tap the outside of the holster with a pencil it sounds hard as fiberglass. I mold lightly by hand. The speed rigs I make can't be molded too close for the smooth draw sake. The placement of three screws holding the holster to the back flap makes for a very sturdy and fixed position. "That looks like the "walk and draw" holster that Steve McQueen wore in the Magnificent Seven. Did you put a steel shank in it like the original? " McQueen used an Andy Anderson walk n draw holster. Something like this. Quote https://www.facebook.com/redcentcustomleather?ref=bookmarks http://www.redcentcustomleather.com/
garypl Posted August 13, 2017 Report Posted August 13, 2017 Thanks for the explanation about the quilter's half circle ruler - I might have to get one and give it a try! Quote Cowboy 4500, Consew 206RB-4


Recommended Posts
Join the conversation
You can post now and register later. If you have an account, sign in now to post with your account.
Note: Your post will require moderator approval before it will be visible.