Members Viking Posted March 22, 2020 Members Report Posted March 22, 2020 Hello - I’m asking for help on my first pancake, cross draw attempt for a Ruger SP 101. This Is my first cross draw and I’m encountering some snags ... Normally, I sew the straight stitch line first - then wet form to get my stitch line nice and tight to the outline of the gun. Will I Have any retention (or other?) issues with an irregular stitch line around the design I started to carve? It seems to me that moulding will provide a decent amount of fit? This holster will include a thumb break, for additional security. Or should I just sew through the carving? What will look better? thanks for your help! Quote
Members Josh Ashman Posted March 23, 2020 Members Report Posted March 23, 2020 Hello Viking, I personally don't like to have stitching run through the tooling, although sometimes when I see it done the item still looks good. If it were me I'd go ahead and sew your "top" line then mold it to form the "bottom" stitch line and see how it falls. Maybe try to have the bulk of the molding on the front to see if you can get the stitch line to keep from crossing the tooling. With the thumb break the pistol will stay in the holster but if the stitch line is very loose you could end up with a loose fit. Good luck with it! Josh Quote
Members Hildebrand Posted March 23, 2020 Members Report Posted March 23, 2020 I would mold and stitch this one the way you normally would. Then I would look at the stitch line vs the carving and modify the carving to allow proper fit of the stitch line and make a new holster. Longer process but probably have better odds of ending up with what you were shooting for. Todd Quote
Members dikman Posted March 23, 2020 Members Report Posted March 23, 2020 Running a stitch line through a carving would look very amateurish. Not a good look and would spoil the effect of the carving (which you've put a bit of work into). In my opinion the only option is to shift the stitch line to match the carving and hope for the best. Quote Machines wot I have - Singer 51W59; Singer 331K4; Seiko STH-8BLD; Pfaff 335; CB4500. Chinese shoe patcher; Singer 201K (old hand crank)
Members Dwight Posted March 23, 2020 Members Report Posted March 23, 2020 One thing you always have to remember about holsters and revolvers, . . . with the hammer thong holding it in place, . . . it does not have to be "molded" to fit the weapon for retention like is done for a semi-auto, . . . especially when it is a Western style rig. Run your outside stitch line, . . . mold it in a bit, . . . see where you are. My bet is you can sew that dude far enough out to not make the bull mad, . . . and yet make a decent holster. And the worst that can happen, . . . it don't work, . . . and you're out what, . . . 15 to 20 minutes??? Would be worth a try in my book. May God bless, Dwight Quote If you can breathe, . . . thank God. If you can read, . . . thank a teacher. If you are reading this in English, . . . thank a veteran. www.dwightsgunleather.com
Members Viking Posted March 24, 2020 Author Members Report Posted March 24, 2020 Thanks for all the advice! I think I am going to run the stitch line “Partially” outside of the design. I did a looser molding last night & I think I can find a way to make it semi-reasonable with the carving. I find that pancake holsters retain pretty well even without a thumb break because the belt slots pull them tight to the body. I agree if it was for a customer, I would start over, and modify the carving location/size. But this is just a field holster for personal use. Call it “practice.” I learn a lot from trying a new style of holster, and it usually takes me a couple try’s to make something professional... which is why I have a bunch of rough “mistake” holsters, that while perfectly functional are ugly ducklings, for sure. Quote
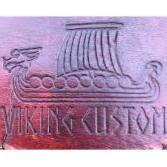
Members Viking Posted March 26, 2020 Author Members Report Posted March 26, 2020 I definitely learned a lot on this one ... bit super happy about the final result, but it is functional... Quote
Members dikman Posted March 26, 2020 Members Report Posted March 26, 2020 That came out ok. Glad you didn't stitch across the carving, that would have looked bad! Quote Machines wot I have - Singer 51W59; Singer 331K4; Seiko STH-8BLD; Pfaff 335; CB4500. Chinese shoe patcher; Singer 201K (old hand crank)
CFM chuck123wapati Posted March 28, 2020 CFM Report Posted March 28, 2020 very nice Quote Worked in a prison for 30 years if I aint shiny every time I comment its no big deal, I just don't wave pompoms. “I won’t be wronged, I won’t be insulted, and I won’t be laid a hand on. I don’t do these things to other people, and I require the same from them.” THE DUKE!


Recommended Posts
Join the conversation
You can post now and register later. If you have an account, sign in now to post with your account.
Note: Your post will require moderator approval before it will be visible.