rktaylor Posted September 29, 2021 Report Posted September 29, 2021 My plan was to sweat this cover on without a welt or lacing. It's a leg cut Olin Young, 12.5". The leather is from the belly near the shoulder and about 11/12 oz. I wrestled with it more than two hours and was making progress. However, I didn't think I could get all the wrinkles out. Any advice is appreciated. Randy Quote
Members gk68 Posted October 4, 2021 Members Report Posted October 4, 2021 Maybe skived too much? Quote
Members FrenchMich Posted October 4, 2021 Members Report Posted October 4, 2021 Personally, I never use belly for a swell cover. But in any case, you need to obtain lengthening in this area and in this area only, without lengthen the bottom (a leather lengthened can no longer shrink, the necking is not possible). For that, I work my leather by the reverse by pushing back the material with round tool. Moreover I don't work the gullet (front and rear) at the beginning, it allows to distribute and absorb a few of folds. But, this is my technic and there is several schools for that and it depend too of the leathers used which may behave differently. I'm not a big saddle maker I only made a few western saddles and a lot of good repairs during the 10 last years. So if some real saddle makers pass here thanks to be cool and forgiving. Mich' Quote To pass for an idiot in the eyes of an imbecile is a voluptuousness of fine foodie. Georges Courteline
Members oltoot Posted October 4, 2021 Members Report Posted October 4, 2021 (edited) Best (but not without struggle) place for a swell cover is in the front leg crease. Horn hole right at the firm/stretchy break. (Transition from firm to belly, not either/or) Start at the horn hole, then the gullet and hand hole, then pull the front down starting where welts would be and then 'splitting' the gaps around and there will be no second trys, it will work the first time or go in the scrap box, and best shot is well cased, not real wet. I have even seen Little Wonders without welts but why? Welts are better on swells over 11" IMHO Edited October 4, 2021 by oltoot Quote
Members kseidel Posted October 14, 2021 Members Report Posted October 14, 2021 This style of rubber hammer is very effective for forming swell covers over undercut swells. It really helps to work out those wrinkles. It works best to pull as much slack into the hand hole and front gullet as possible before trying to sweat the cover over the rest of the swell. Quote Keith Seidel Seidel's Saddlery www.seidelsaddlery.com
rktaylor Posted October 18, 2021 Author Report Posted October 18, 2021 Thanks for all the tips. I have been distracted from this task for a while, but hope to tackle it sometime this week. Randy Quote
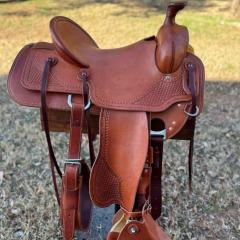
rktaylor Posted November 4, 2021 Author Report Posted November 4, 2021 I thought it would be nice to finish this thread. It's not perfect, but it'll do. Randy Quote
Members DrmCa Posted November 5, 2021 Members Report Posted November 5, 2021 You, people who can take a piece of leather and turn it into a saddle, have my deepest respect. I only ever rode in the fruits of your work but never even dreamed of making anything as complex and involved. Quote Machines: Mitsubishi DB-130 single needle, Kansai Special RX-9803/UTC coverstitch, Union Special 56300F chainstitch, Pfaff 335-17 cylinder arm walking foot, Bonis Type A fur machine, Huji 43-6 patcher, Singer 99 hand cranked, Juki DDL-553 single needle (for sale)
Members Goldshot Ron Posted November 5, 2021 Members Report Posted November 5, 2021 Randy, It looks like it came out fairly well; but, I can now see the "leg cuts" on the swell. I'd like to see how you deal with them installing the final seat. It looks like it will be another challenge. Good luck. Quote
rktaylor Posted November 6, 2021 Author Report Posted November 6, 2021 Thanks for the comments. I've had the seat in the back of my mind as well. I'll try to post a picture when it's fit. Randy Quote


Recommended Posts
Join the conversation
You can post now and register later. If you have an account, sign in now to post with your account.
Note: Your post will require moderator approval before it will be visible.