All Activity
- Past hour
-
I've made that mistake . . . I take a deep breath . . . get out the razor knife . . . cut the stitches . . . pull out the thread pieces . . . Sew the belt piece . . . go get a coffee . . . and double check to see that I sewed it. I don't use that greasy kid stuff glue . . . I use Weldwood contact cement . . . Start at the toe end . . . stick a needle in that end hole . . . down into a piece of rigid foam . . . come up about 10 holes . . . stick another needle . . . and squeeze that piece between the needles together . . . move up 10 more . . . squeeze together . . . and so forth. Take it to the same sewing machine I did it with the first time . . . stick that needle down in the first hole . . . and VERY CAREFULLY sew it back together again. So far it has worked every time. May God bless, Dwight
-
No idea why. I ll delete this post
-
Great advice and information!!! Thank you all! Cutting them open and using pins to align the holes it shall be! Thank you!

- Today
-

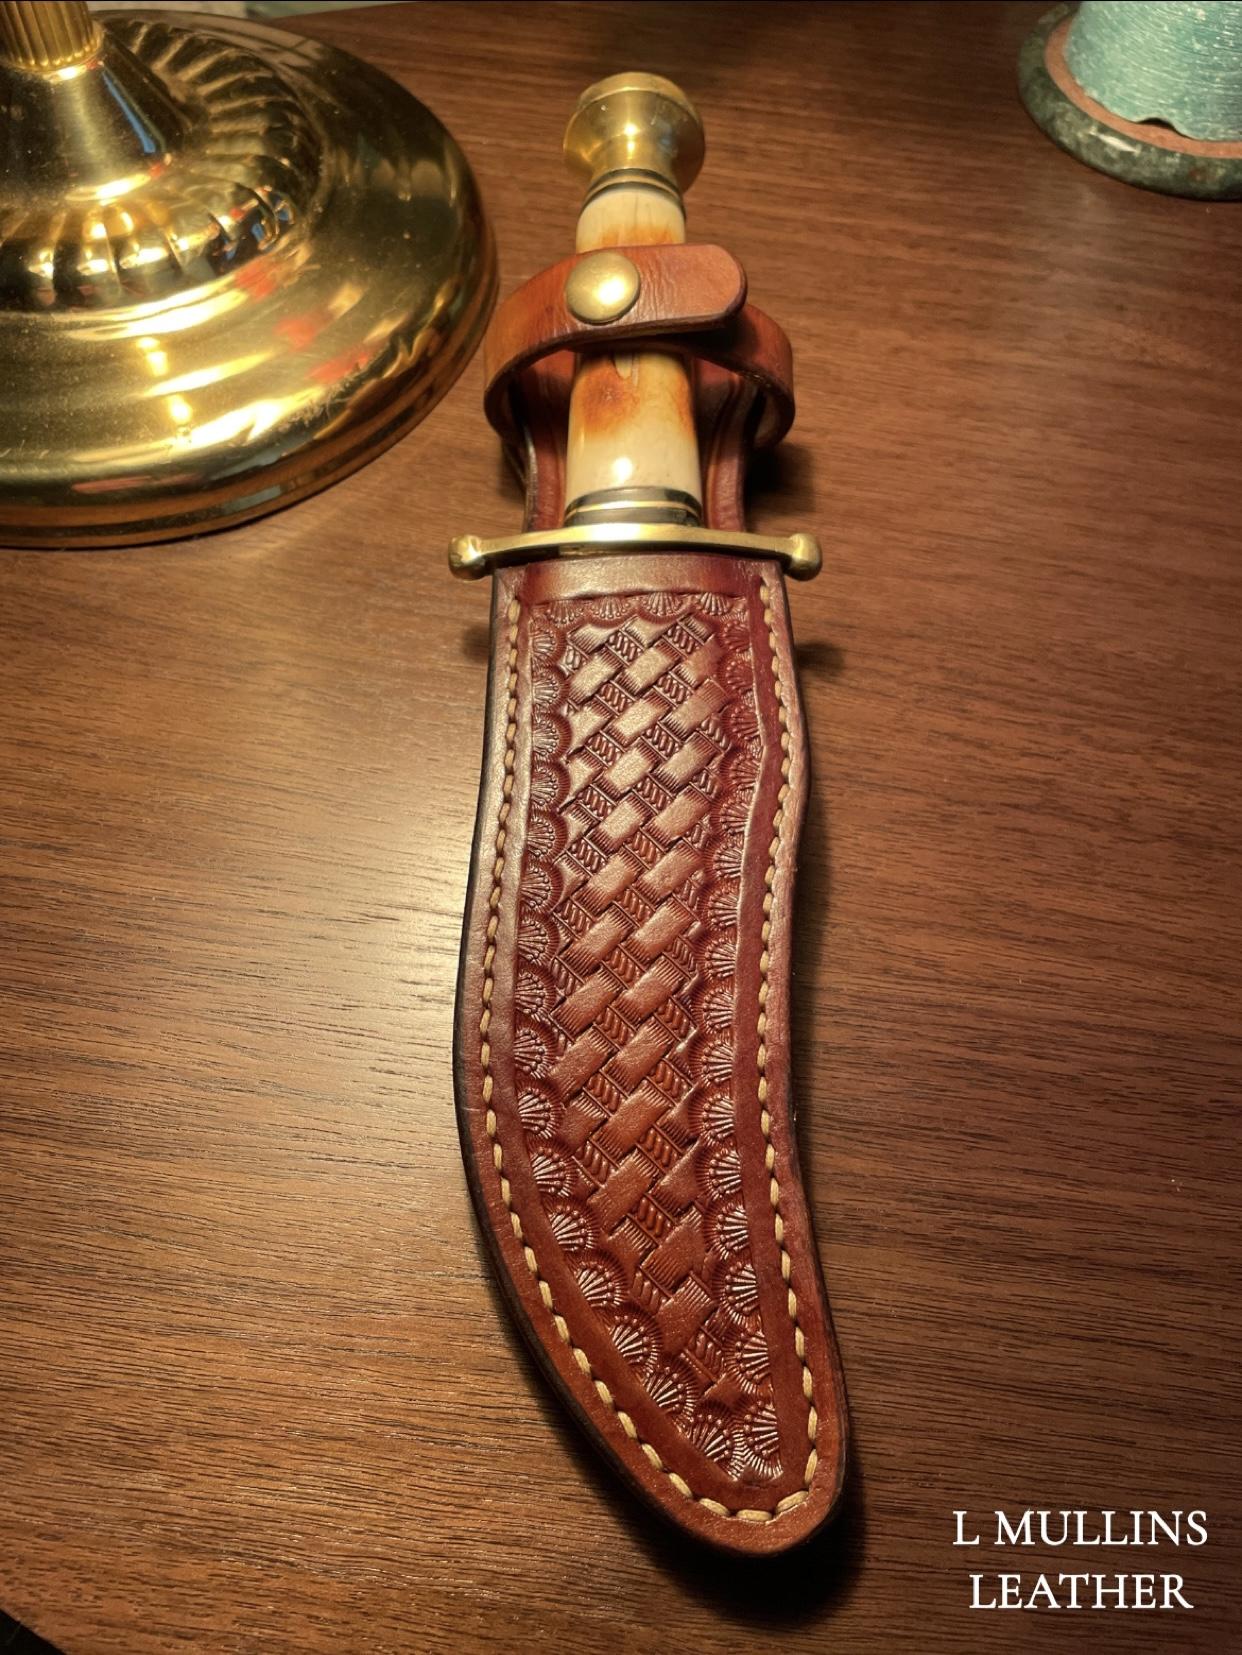
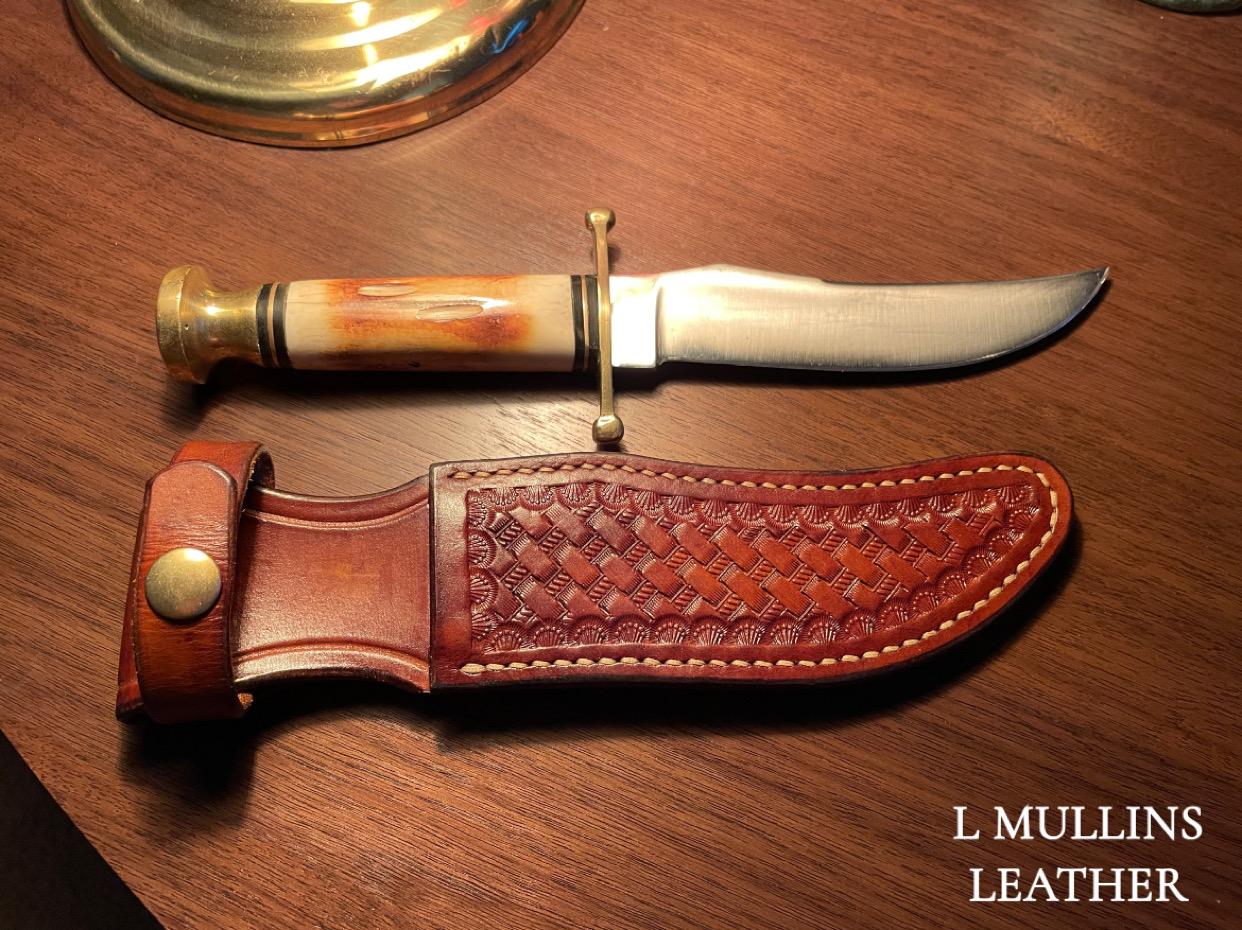
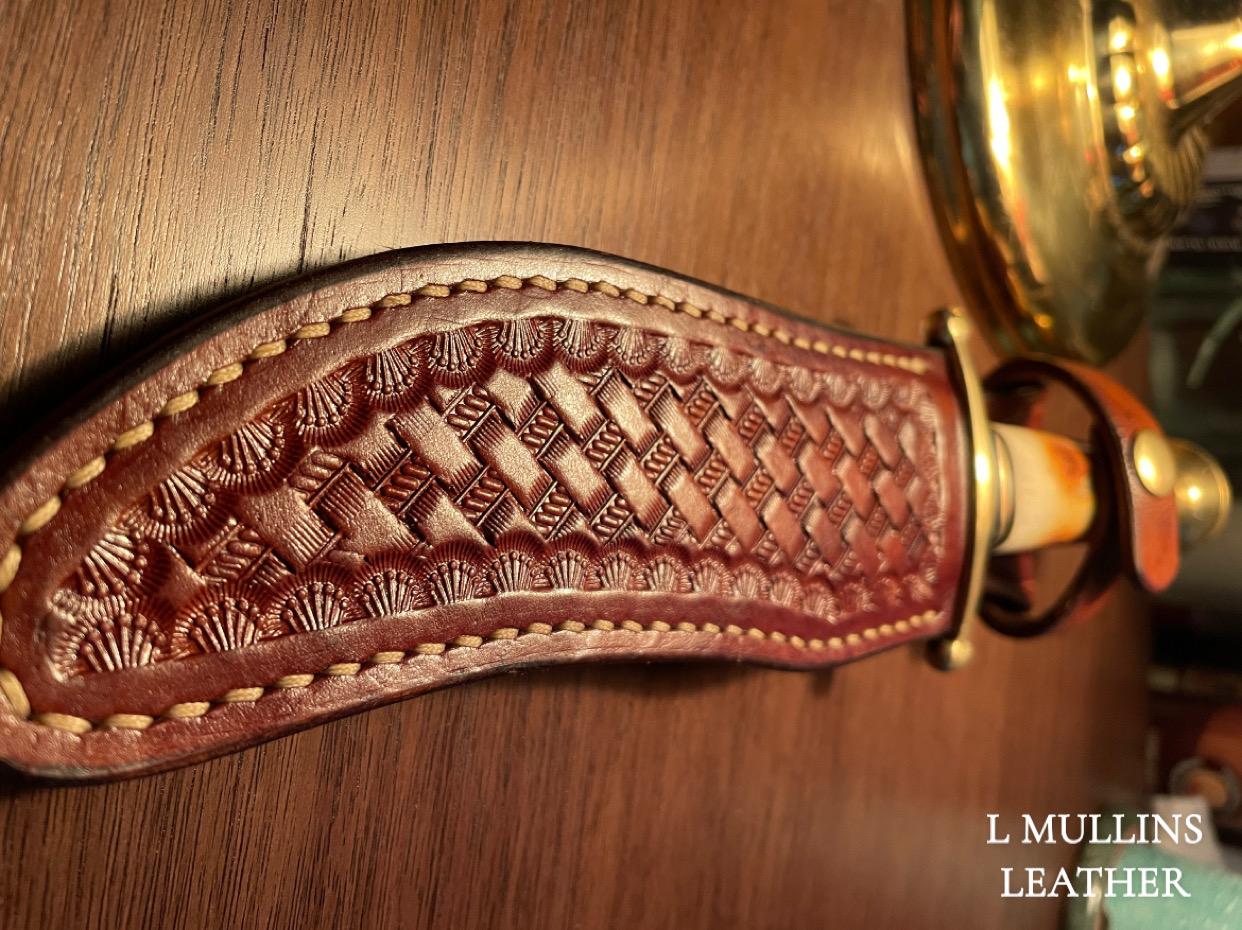
Basketweave Knife Sheathe (Large Hunting Knife)
BlackDragon replied to LMullins's topic in Show Off!!
Great job! -
Nice job. That’s really clean. I dig it.
-
The alignment pins that Fred posted work great. Another option would be to use a bunch of saddle stitch needles. I do that when I’m sewing a thick welt. I align holes with a couple needles. Then use a little bar clamp to keep it closed tight… add a couple more needles in like every other… or every third hole with a few little bar clamps spaced ever so often. Then I remove them as I saddle stitch down the welt.
- Yesterday
-

Replacement digs for my Artisan 246. Suggestions?
eblanche replied to Piko's topic in Leather Sewing Machines
I dl'd them despite the risk. They seem very similar size hole. New one has a slot...not really sure what the difference in use is?? I think I posted that Juki still sells the $200+ thin material feed dogs with smaller feed dog hole but I'm not sure that is what you need. I also have a 246 so I am taking notice. IMO, changing to that feed dog will not have any difference in the hole size of the material. The needle makes the hole, so maybe using larger thread to fill the hole. *Sorry i do not remember the original message board thread so something like this may have already been mentioned. -

Replacement digs for my Artisan 246. Suggestions?
dikman replied to Piko's topic in Leather Sewing Machines
You should post .jpg files as many are wary of downloading and opening unknown files. -
If you don't open them up to stitch on the loops then in the future every time you look at them you'll wish you had done it properly. You could use pins, needles, small brads or those thingy's fred showed - I bought some of those a while ago just in case I need them - to line up the holes. A lot of extra work but at least you'll know you did it the right way. I made a couple of western holsters based on Steve McQueen's from The Magnificent Seven, the end of the loop was attached using Chicago screws with the fixed part trapped between the two layers making up the holsters. Over time a slight bump developed on the inside of the holsters where the screws are and is a potential wear spot. I don't think I'll use this method again.
-

Replacement digs for my Artisan 246. Suggestions?
nylonRigging replied to Piko's topic in Leather Sewing Machines
same as your other Pic. attachment on other Posting . when I Clik-On .. Are asking me to 'File to open', Download to my PC . Rather than just opening up attachment Pic. or a Vid. here . . -
That last line of your is the key; I use mapping pins into small cork block to align sewing holes or you can use these;
-
I'm thinking that if you cut them open you can line up the holes again using the pricking iron you used to make them. You'd probably get glue on the iron but if it's water-based adhesive maybe it'll be easier to clean.
-
Very nice, given the circumstances you did well!
-
For some reason ??? Your Posted/Attach. Pic. Files, when I Clik-On .. Are asking me to 'File to open', Download to my PC . Rather than just opening up attachment Pic. or a Vid. here . .
-
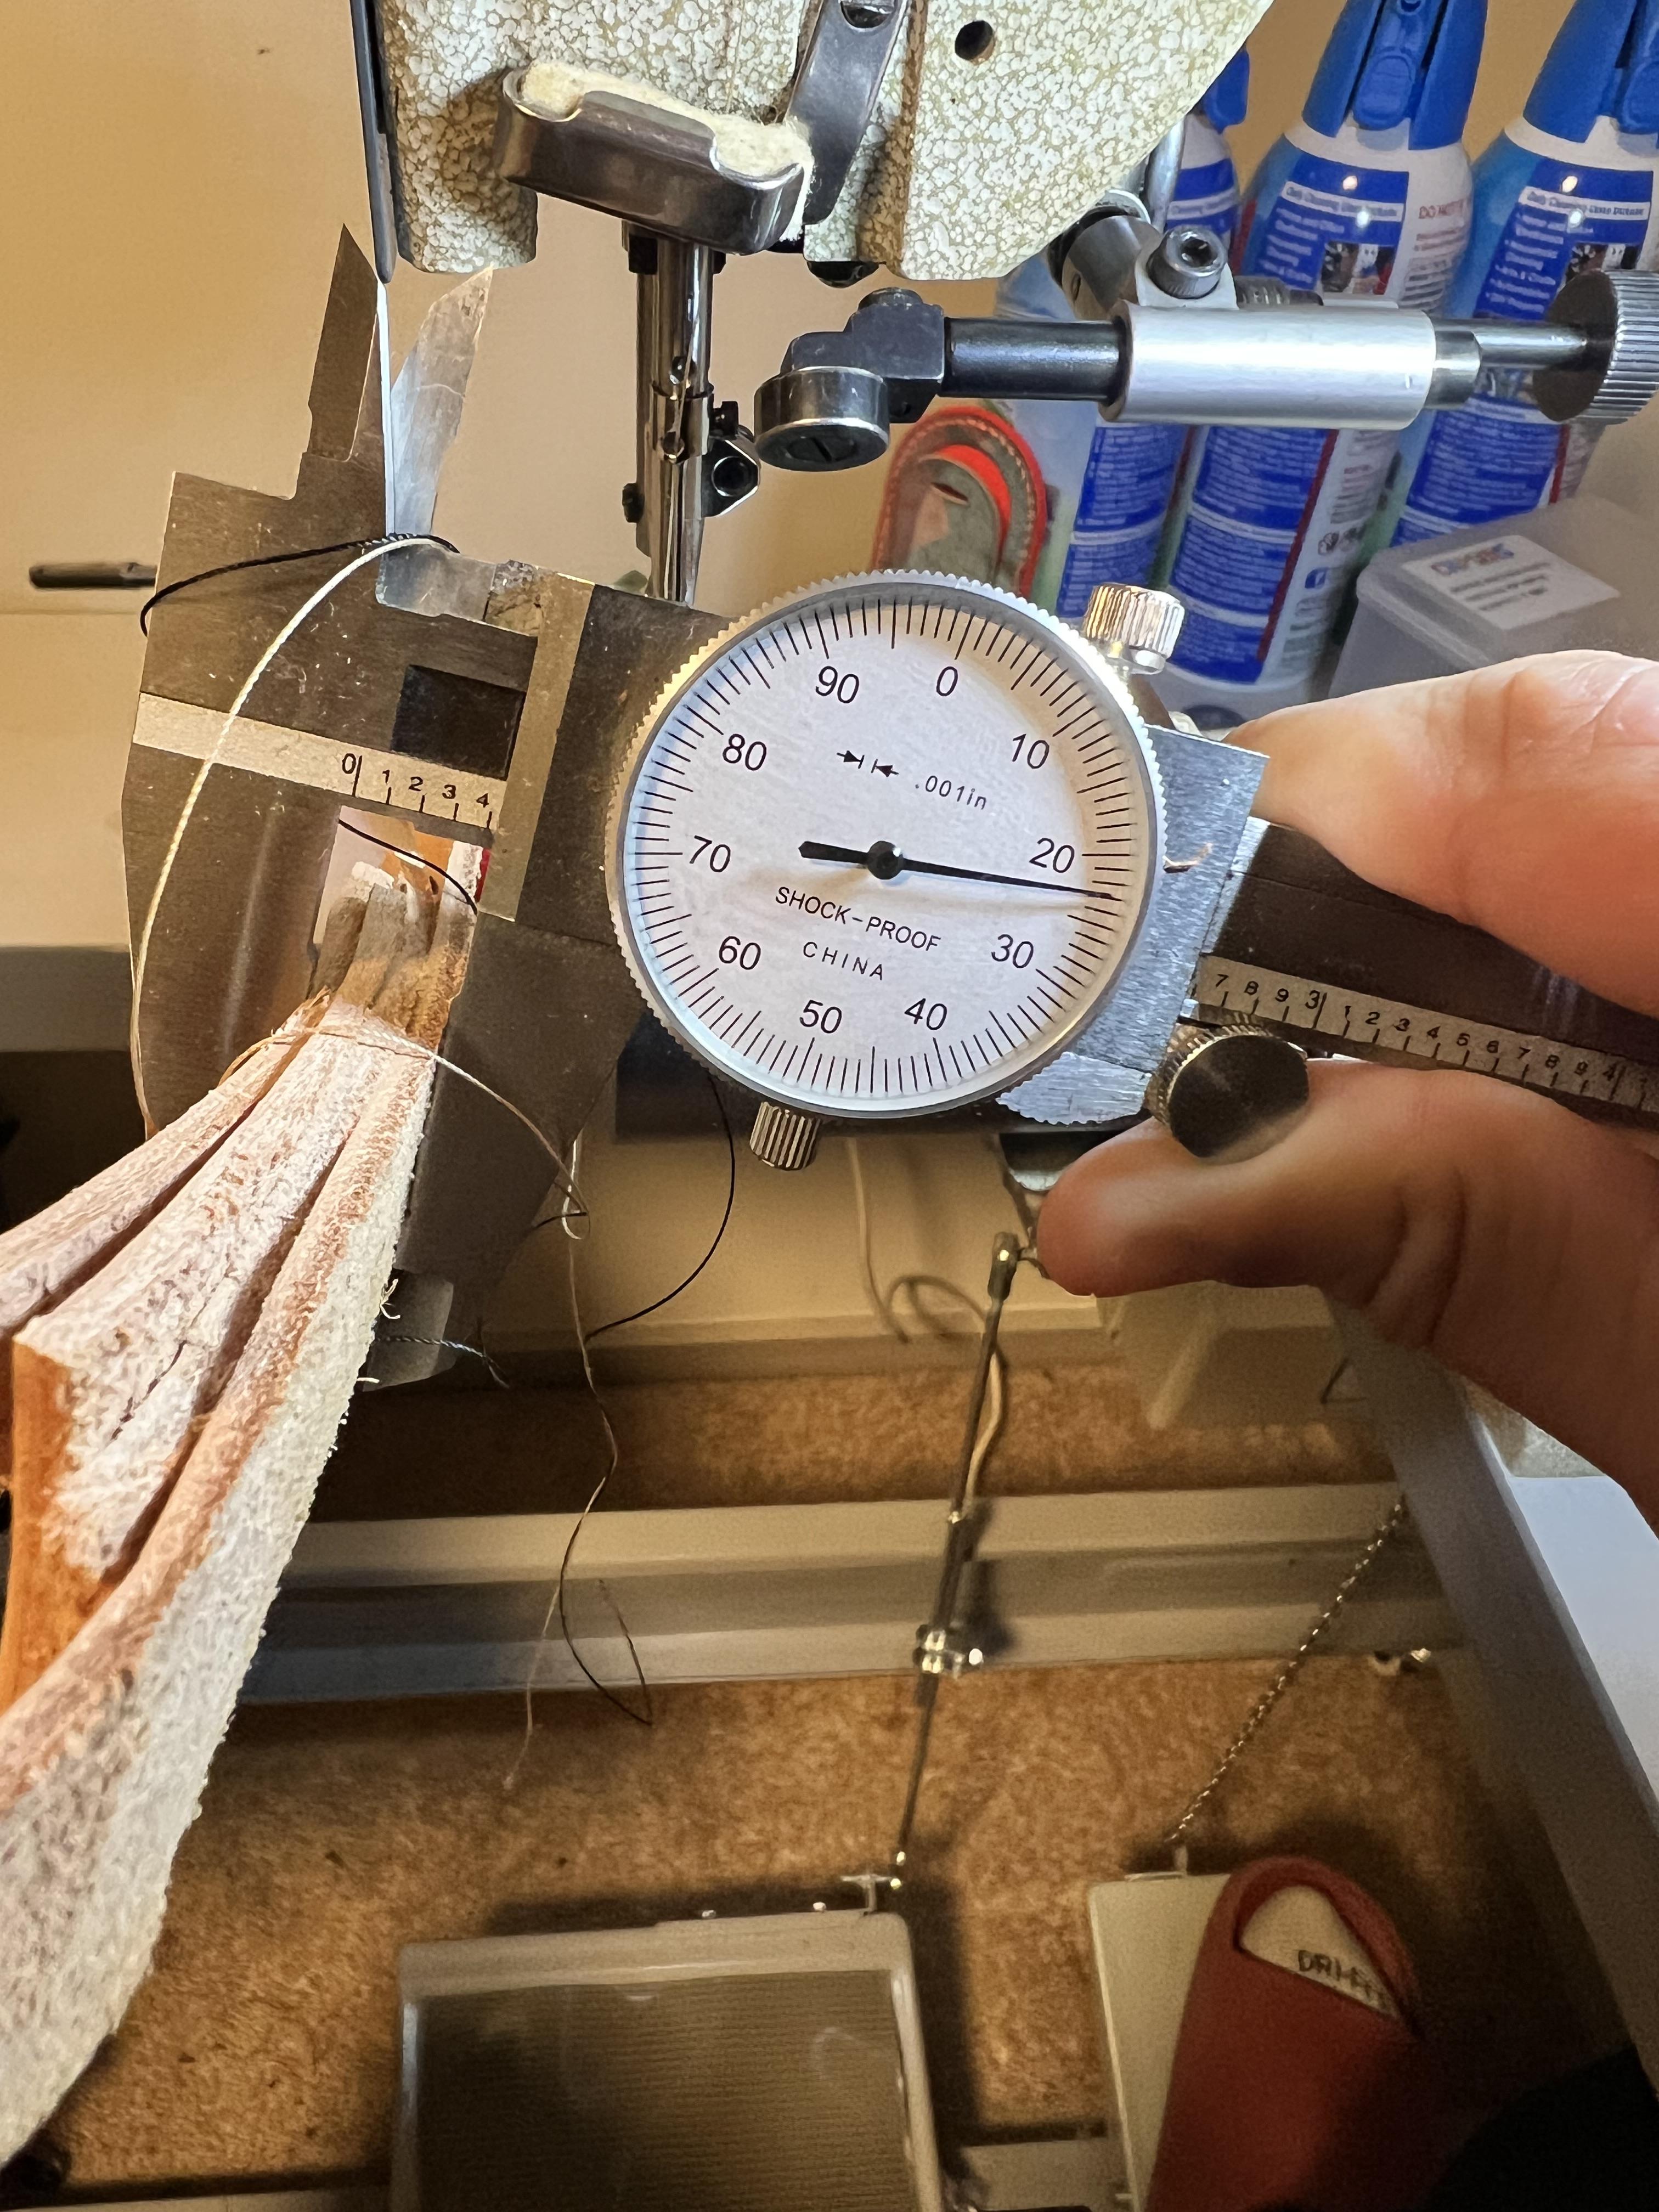
I got the replacement doggy thingy for my Artisan 246. The problem I am having is that the hole in leather is very large even with smaller needles. Someone said the hole in my dog feet thingy was too big so i bought another one. Looking at it, it does not look much different. What do you think, should I change the part on the machine? Would it be worth it? IMG_5377.dngIMG_5376.dng
-
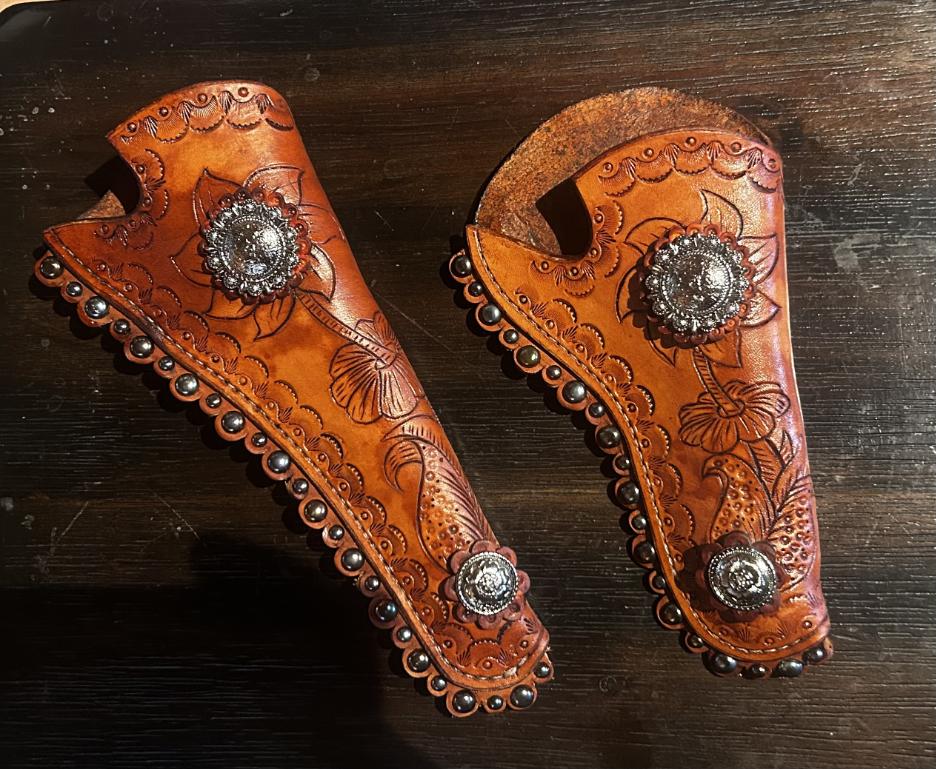
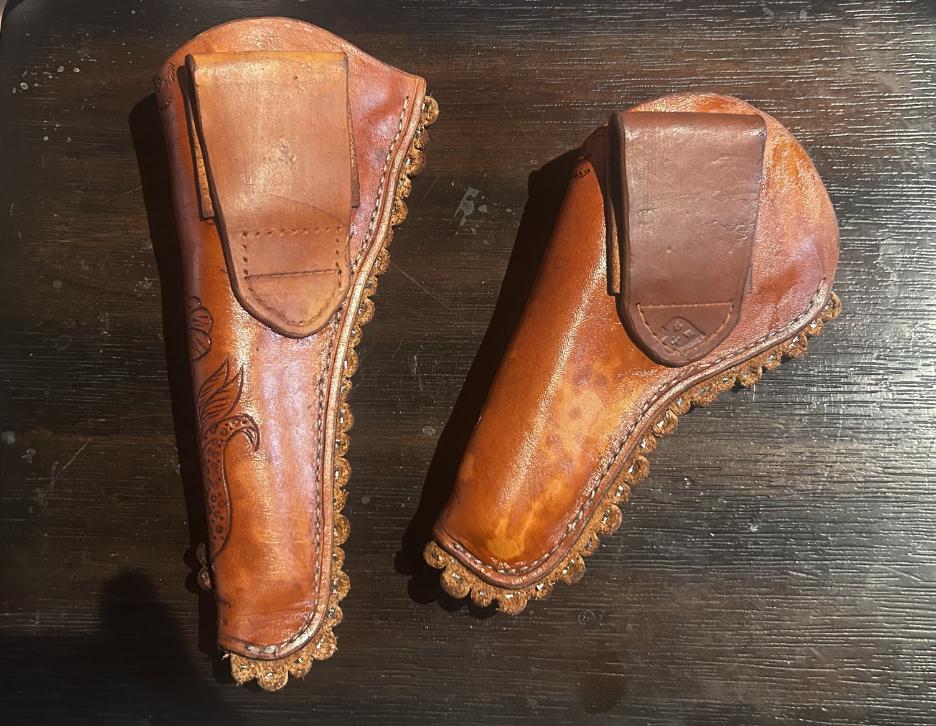
How-DEEEE-AMIT!!! So I was doing several things at once, packing, working on several holsters, a flintlock... over several days. I wound up sewing these two holsters up and applying some neatsfoot oil, then some Aussie conditioner... then I noticed that I never sewed the belt strap/loop!!! It's only glued on. The holsters are glued at the edges with SLC Ever-Tack. This is water soluble glue, so not a big problem. However, I am concerned that, once I cut them open and then go to re-stitch them, it will be a big problem aligning the holes again for the stitching. The leather piece with the spots that goes between each side of the holsters makes it more complicated to align. Considering using rivets to secure the belt/loop/strap. I think I can do this by using a narrow strip of steel on the inside as a surface to hammer on them/ I could also use Chicago Screws. Figure I'd have to glue a piece of pig skin over these on the inside to protect the pistols. Any ideas? Is it better to just cut them open and restitch afterwards? I am leaning towards that as I write this, but figure someone here with far more experience may have a more educated and effective suggestion. Just thought that when gluing them back together to prepare for stitching, I can run a bunch of needles through the holes, to make sure they align. Thanks.
-
I got the replacement doggy thingy for my Artisan 246. The problem I am having is that the hole in leather is very large even with smaller needles. Someone said the hole in my dog feet thingy was too big so i bought another one. Looking at it, it does not look much different. What do you think, should I change the part on the machine? Would it be worth it? IMG_5376.dng
-
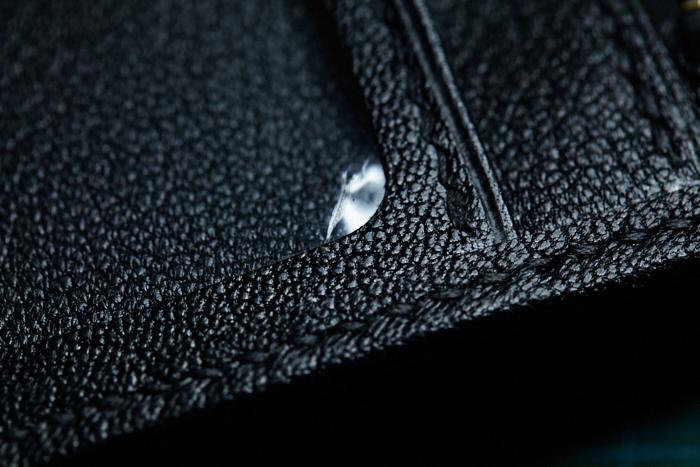
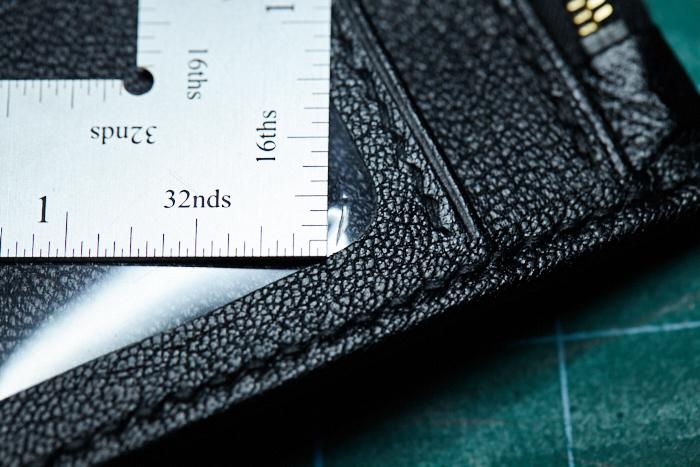
Worst kind of accident: the one that happens when you're almost done. Whilst marking the line for the stitches, the dividers jumped and landed on the acrylic window for this wallet: Not just a scratch but an actual cut: it went through the plastic. Is there a way to fix this that doesn't require remaking the entire panel? Yea, I went and made worse by proceeding with stitching the edge band and locking the blunder in, but at the time I felt fixing the boo-boo would require remaking the whole thing and I thought it best to give a discount for the blem. Now, I'm not happy with delivering this as it is. Any suggestions? TIA for any helpful input.
-
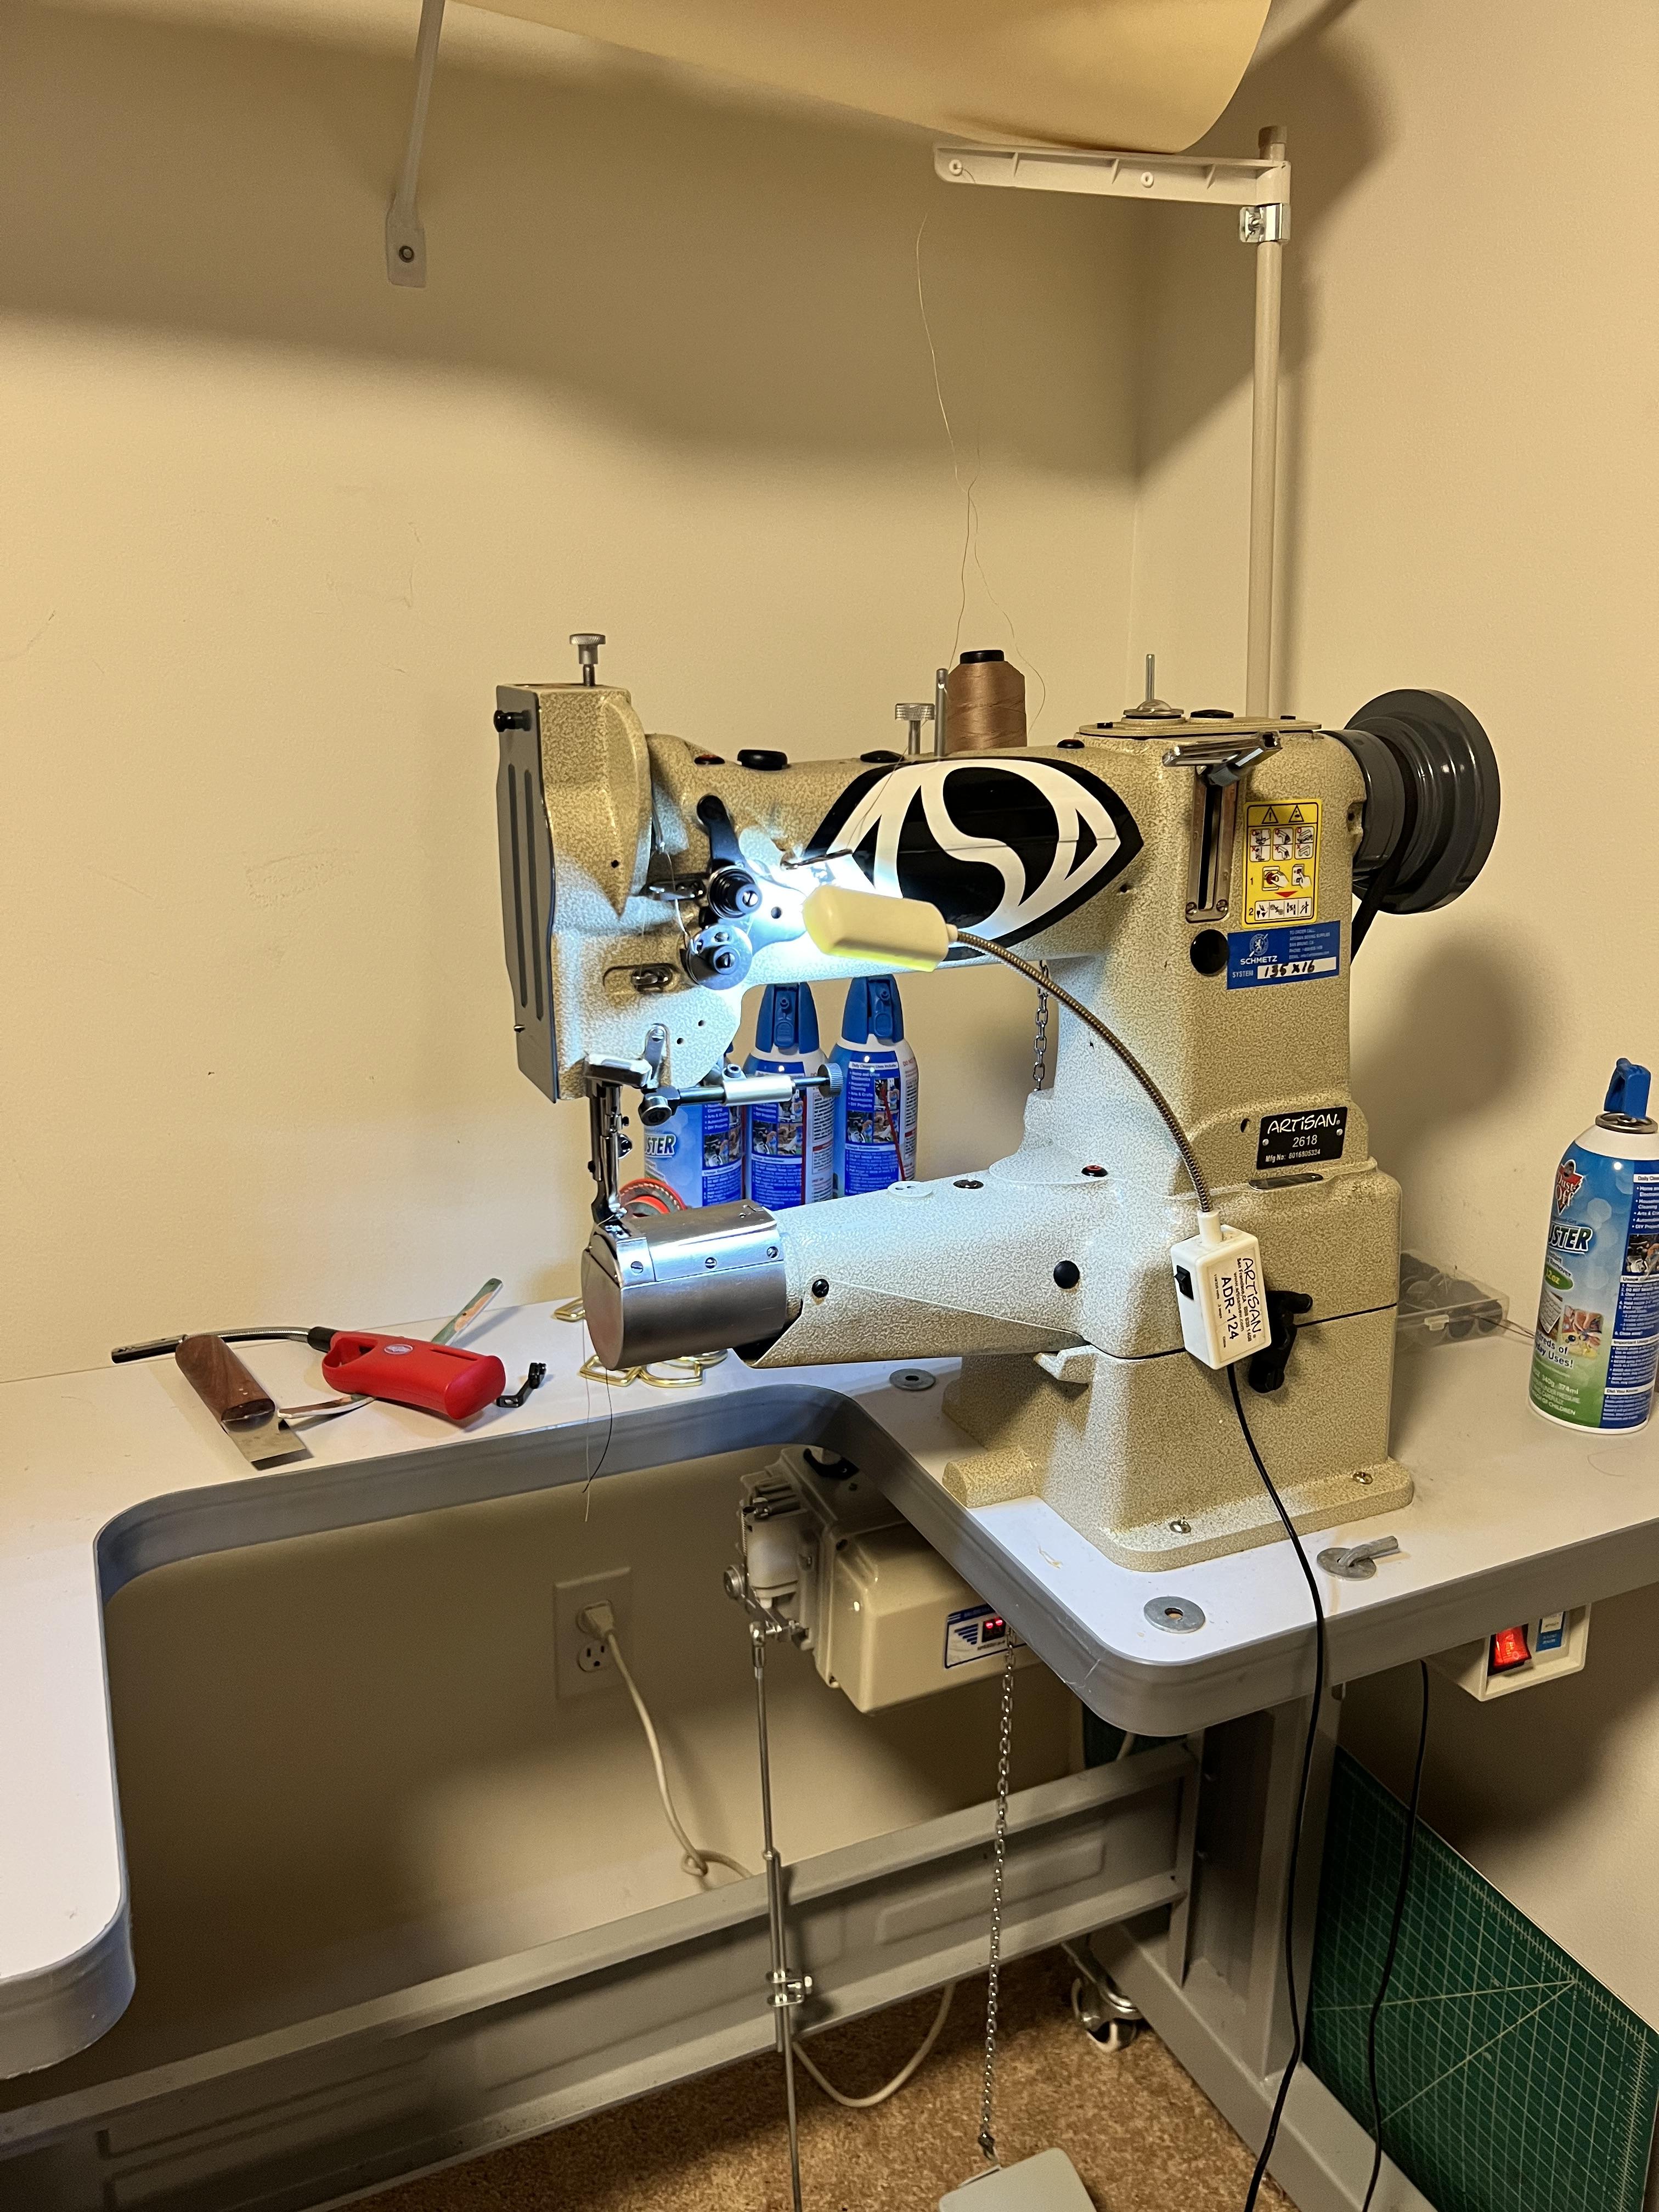
Selling my Artisan 2618 as I’m moving 1000+ miles away and trying not move it with me. This is a beast of a machine and overkill for what I do as IMG_3195.mov this is an industrial machine similar to a Juki 441, TechSew 2700 & Cobra Class 4. I’ve used this to build multiples handbags, duffle bags and wallets with this machine and love it and it will outlast whoever uses it. Current Retail Price: $2720 Location: Seattle, WA (available for local pick-up) Shipping: Can coordinate but buyer will need to add for shipping as the head is already attached to the table. Manual: https://artisansew.com/pdf/manuals/2618-1b.pdf Specs: https://artisansew.com/pdf/specs/2618_1B.pdf Message me with questions
-
Hey Folks, I had a customer request that I make them a custom-fitted basketweave sheathe... there was just one problem.. See, this Hunting Knife was sentimental to them and they were unable to risk it getting lost or damaged in the mail, and they lived much too far to exchange in person so there was only one thing I could do. I had them take photos and map out measurements, and then I constructed a similar shape to the blade for reference and began working. In the end, the knife fit perfect and the thick sheathe came out beautiful. Looking back, I think I would've shortened the snap closure, but that's pretty tricky to get right when you don't physically have the knife in your possession. Let me know what you think!
-
 LMullins changed their profile photo
 -

Suede gun-money belt help.
ZARDOZ the GREAT replied to ZARDOZ the GREAT's topic in How Do I Do That?
Thanks! -
 RemyFriday joined the community
 -
Gave hand embossing a shot today! Looks kinda like hot stamping, but hot stamping is way easier. Still, doing it by hand was super fun.
-
 Christopher Speed joined the community
 -
Personalized leather goods have become increasingly popular as thoughtful gifts and stylish accessories. One of the most elegant and eye-catching ways to customize leather is with foil monograms. Whether you're crafting handmade leather wallets or offering a luxury branding service, this guide will show you how to personalize leather goods using foil stamping to create professional and lasting impressions. What Is Foil Monogramming? Foil monogramming is a method of imprinting letters or designs onto leather using heat and metallic foil. This technique gives leather items a premium finish, with gold, silver, or colored foil catching the light and adding visual appeal. It's commonly used for: Initials on wallets, notebooks, and bags Company logos on promotional products Personal messages on leather gifts Foil stamping is both decorative and durable, making it ideal for everyday use items. Tools and Materials You'll Need To personalize leather goods with foil monograms, you’ll need the following tools: Hot Foil Stamping Machine: A precision heat press that applies foil to leather using heat and pressure. Metal Letter Dies or Custom Logo Plate: Used to stamp the desired initials or design. Foil Sheets: Metallic or pigment foil in your preferred color (gold, silver, rose gold, etc.). Vegetable-tanned Leather: Works best for stamping due to its firmness and smooth surface. Ruler and Alignment Tools: For precise placement of the monogram. Step-by-Step Guide to Foil Monogramming Leather 1. Prepare the Leather Surface Ensure the leather is clean, dry, and flat. If needed, lightly dampen the area to be stamped to help the foil adhere better. 2. Set Up the Hot Foil Machine Adjust the machine’s temperature and pressure according to the foil and leather type. Most leather foil stamping is done at 100–130°C (212–266°F). 3. Align the Monogram Place the metal dies or logo plate into the press and carefully position the leather item underneath. Use alignment tools to ensure perfect placement. 4. Apply Heat and Pressure Lower the press onto the leather with even pressure. Hold for 1–2 seconds, then lift. The foil should transfer cleanly to the leather. 5. Inspect and Touch Up Let the leather cool, then check the imprint. If needed, re-stamp any missed areas or carefully remove excess foil. Tips for a Professional Finish Test on scrap leather before stamping your final product. Choose high-quality foil for consistent results and strong adhesion. Use guides and jigs for uniform positioning on bulk orders. Offer multiple foil colors to match your branding or gift themes. Why Foil Monograms Add Value Custom foil stamping transforms a simple leather product into a luxurious, one-of-a-kind item. Personalized items are highly desirable for: Corporate gifts Wedding favors Holiday presents Brand merchandise Adding monograms not only boosts the product’s appeal but can also increase its price point and perceived value. Conclusion Learning how to personalize leather goods with foil monograms is a rewarding skill for crafters, designers, and business owners. With the right tools and techniques, you can create stunning, customized leather items that stand out in the market.
-
 wolf_au joined the community
 -
thank you. Finally got a direct answer to my question. Very helpful information.