All Activity
- Past hour
-
I have absolutely no experience with this kind of cutting board, but LDPE has a pretty low melting point, so could you smooth down those ridges using an iron? Possibly using some baking paper to protect it?
- Today
-

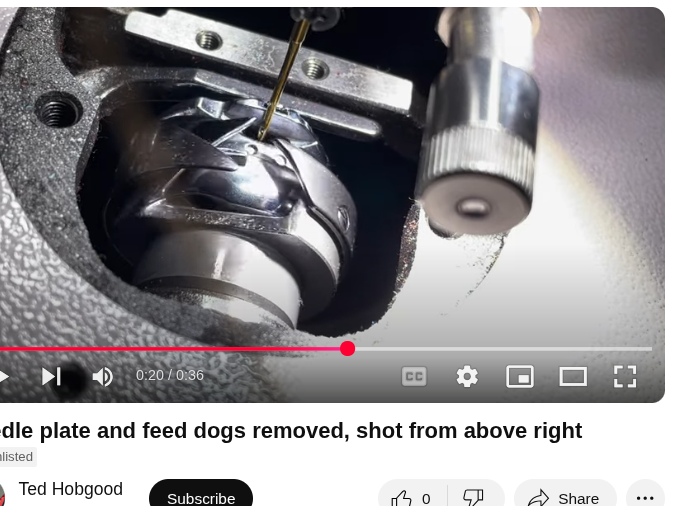
Juki 5550N experiencing problem in the bobbin area
Wizcrafts replied to thobgood's topic in Leather Sewing Machines
@thobgood In case you didn't know, Juki machines are top shelf for many applications. Yours is a top notch garment material sewing machine with a fixed foot and bottom/drop feed. Once you get the timing right, it will be a money maker. Many leather crafters on this forum sew heavy and thick leather projects on specialized machines we often refer to as harness or holster stitchers. Way back around 1986, or so, Juki came out with a heavy duty harness stitcher that they assigned the model name/number: TSC-441. I saw one that was still in a wooden carton in a sewing machine warehouse. At that time, the dealer told me that I could take it home form only just under $6.000. I didn't have that kind of money and they didn't do financing to individual buyers. Fast forward to around 2011 and a Chinese sewing machine company obtained a Juki 441 and disassembled it. Then they made molds and began casing new versions of that Juki. They gave them new model names and sold them to dealers who assigned their own brand names. I bought one in 2012 that I still use every time I need to sew a thick project. It is a Cowboy cb4500. My best friend has an equivalent brand, called a Cobra Class 4. Both have the same capabilities. Techsew offers their own model as a Techsew 5100. You can now buy one of these machines for between $3500 and $4400, with all manner of accessories! In contrast, I just found a new Juki TSC-441 for sale from a dealer for $9400 plus shipping. Enjoy your Juki! -
Leather trade shows - we set up as venders at Prescott Az, Sheridan WY, Pendleton OR, and new show in Las Vegas next January. We are going to miss Waco this year but on the radar for next year.
-

Juki 5550N experiencing problem in the bobbin area
friquant replied to thobgood's topic in Leather Sewing Machines
When I feel two pops it's when the thread has not cleared the latch by virtue of the latch opening but rather by the thread being yanked past it. Maybe you can find out what opens the latch. Removing the bobbin case may help you see additional mechanisms at work. -

Some exotic inlay for 1911
Yellowhousejake replied to Stetson912's topic in Gun Holsters, Rifle Slings and Knife Sheathes
Nicely done! I have some caiman but the holster design I was looking to use it on has proven to be difficult without very thin borders on the window (an avenger style). Did you back the caiman in the window of the outer later Or, did you use three layers. Outside, lining with Caiman, backside? DAve -
Juki 5550N experiencing problem in the bobbin area
Wizcrafts replied to thobgood's topic in Leather Sewing Machines
Some hooks have a deflector shield that will prevent the needle from touching the needle. They are thin steel and bendable. Yours may or may not have one. If not, just move the hook away from the needle slightly. This may alter the timing, so recheck it afterward and advance or retard the hook as necessary. -
Nice job!
-
Juki 5550N experiencing problem in the bobbin area
thobgood replied to thobgood's topic in Leather Sewing Machines
I forgot to say, if anybody else finds this thread in the future and wonders about hook timing, I found this video quite helpful: https://www.youtube.com/watch?v=GxMT3UfE_tk&t=6s -
Somewhat unrelated to the question at hand, but I'm curious what shows/types of show you attend?
-
Juki 5550N experiencing problem in the bobbin area
thobgood replied to thobgood's topic in Leather Sewing Machines
Update: I checked my hook timing and the hook was touching the needle and moving it slightly instead of passing close to the needle like it should've been. I found a video that helped me adjust the hook timing to be correct. That felt good! I'm still having the issue I described initially, feeling resistance when handwheeling as the takeup lever reaches its lowest position and then feeling two pops in the bobbin area as I add a slight bit more force. I'll do a thorough check for burrs tomorrow. I'm happy I fixed the timing issue though! 😃 -
Michelle, I deal in leather tools and come across this situation more often than not. You can sell them through the market place here. Ebay is another option, some people have good luck on FaceBook marketplace too. There are also FaceBook groups dedicated to just selling leather tools. If you want to get them moved as a group and sell them, these are all viable options. Problem with all this is taking pictures, dealing with the selling process and collecting payment, then shipment. Oh yeah and figuring a price first. Pricing - There is a lot of smoke and advice from people who have never done this. I tried Craftool stamps early on with my website. There was too much time in pictures and descriptions for singles to make it worth the time. Put them in small groups by type and you get five questions about "I just want that one, not the other 4". We evolved to just selling them on a bargain table at the shows. In about the last 5 years I have all but stopped intentionally buying just Craftools for resale. Still with estate sets I end up with 500-700 Craftool stamps a year, plus the hand tools and patterns. Contrary to popular belief, older Craftools do not necessarily sell better than newer ones to most people. Maybe a single stamp or small group here and there, but overall - no. For the shows, I used to price the preletter Craftool stamps at $7 and letter prefix stamps at $5. I spent a lot of time at the shows explaining the difference to people who in the end just didn't care. They either liked the stamp or they didn't and tried to deal down on the $7 price anyway. Now all stamps are $5 each and Ms Rundi will deal them at 5 for $20. The hand tools are usually on the bottom end too - lot of $5 tools and they are still piling up here. Patterns and books depend. Some are pretty much outdated styles and projects. Some are good like the Baird books, some are fire-starters like bowling ball bag patterns. Likewise with Craft-Aids - a few good ones, more though that we bundle and hope. What do we do now? We take them to the shows and reliably the Prescott AZ show is our better one for them. We found they sell decently at Prescott, barely sell at Sheridan, do just Ok at the Pendleton show. Overall we end up and sell maybe half the stamps at best. Now Maker's Leather Supply is set up across from us at the Prescott show. They are great about having kid's project kits they give away. The kids get a free kit and then Janie Sue sends them across the way to us. They get to pick out up to 5 stamps for free. Mallets are free too if we have any. The cool thing about Prescott also is there is a guy who has a leather craft program at the VA facility. He gets whatever he asks for and more. There are a few kids whose parents take classes or are venders at the shows. I have a loosely structured informal program with free roaming kids. They help empty my candy dish, I give them a deal on a few tools for part of their pocket cash. Later on they trade up to something they like better, or sell stuff back (at a profit for them). It keeps them occupied throughout the show and learning cowboy bartering skills. My experience anyway
-

Very wide twin needle guage machines?
nylonRigging replied to medion's topic in Leather Sewing Machines
I tried blowing up the Pic. some to see. But still little hard for me to see exactly what you are talking about with a double-edge guild, on the Feed of that cylinder bed. A lot of Flat-Bed double needles come with a attachment slide plate, right in front of the Feed ( pic. below ) . I do have use that for securing different folders and such. I could just attach a 1" wide feed guild to that. I might end-up having to go that route . But I trying to keep it more visually clean for my eyes to follow pencil markings of where to hand guide the webbing on top the material as I laying down stitches. The 112/212 needle-feeds style machines keep the press foot really low also when stitching. They pendulum walk with the feed dogs. never high stepping like a Compound or a Drop-walk feed . So if there was both a L and R guide on both sides of the Presser Foot. It really never loos contact guiding 1"webbing under the 7/8" needle gauge Foot. - -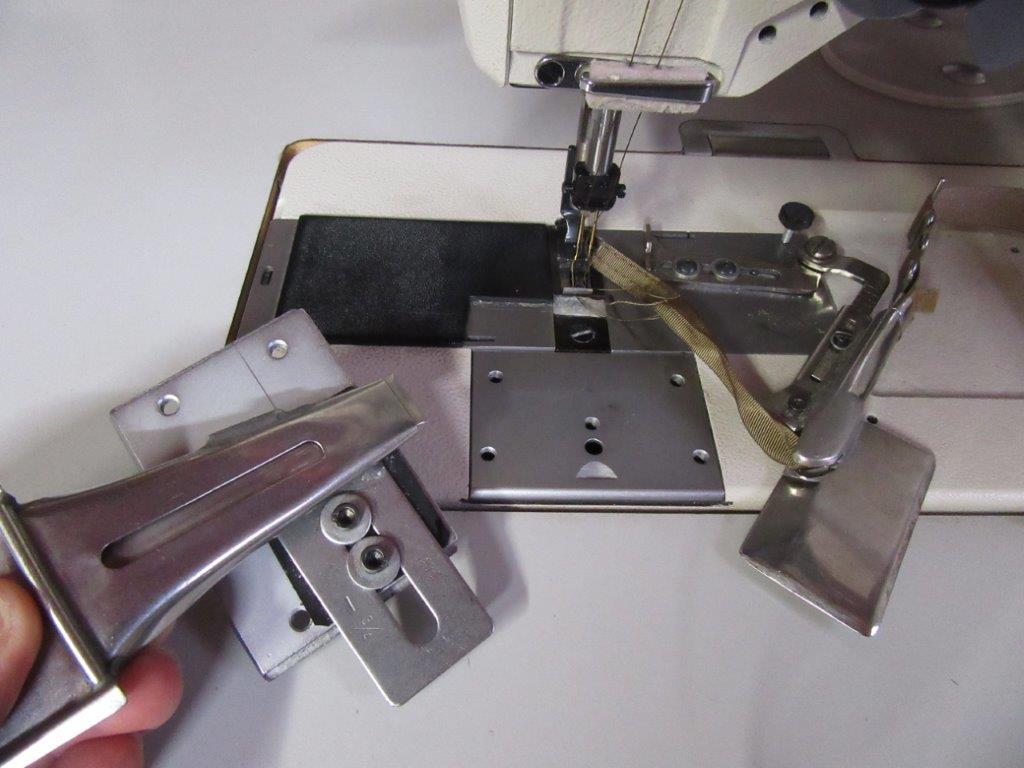
-
Juki 5550N experiencing problem in the bobbin area
thobgood replied to thobgood's topic in Leather Sewing Machines
Aha! Thank you. I've learned something! -
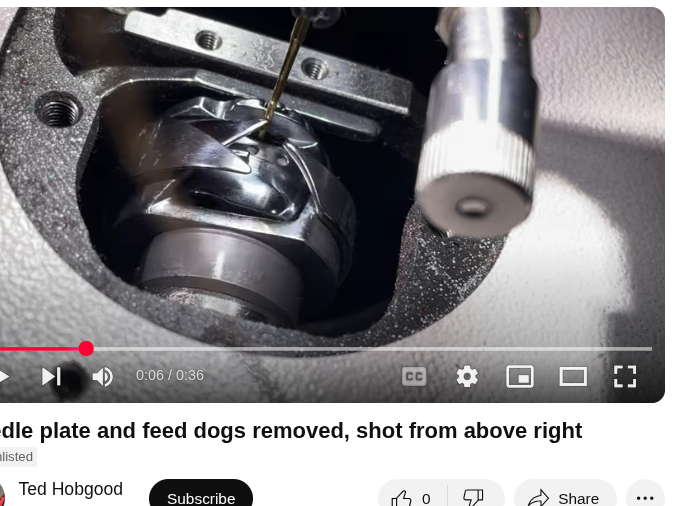
Juki 5550N experiencing problem in the bobbin area
friquant replied to thobgood's topic in Leather Sewing Machines
The latch is the area between these two red arrows. It's also what keeps the bobbin case from spinning as the hook spins. The latch has to open at least once during the stitch cycle to let the thread pass.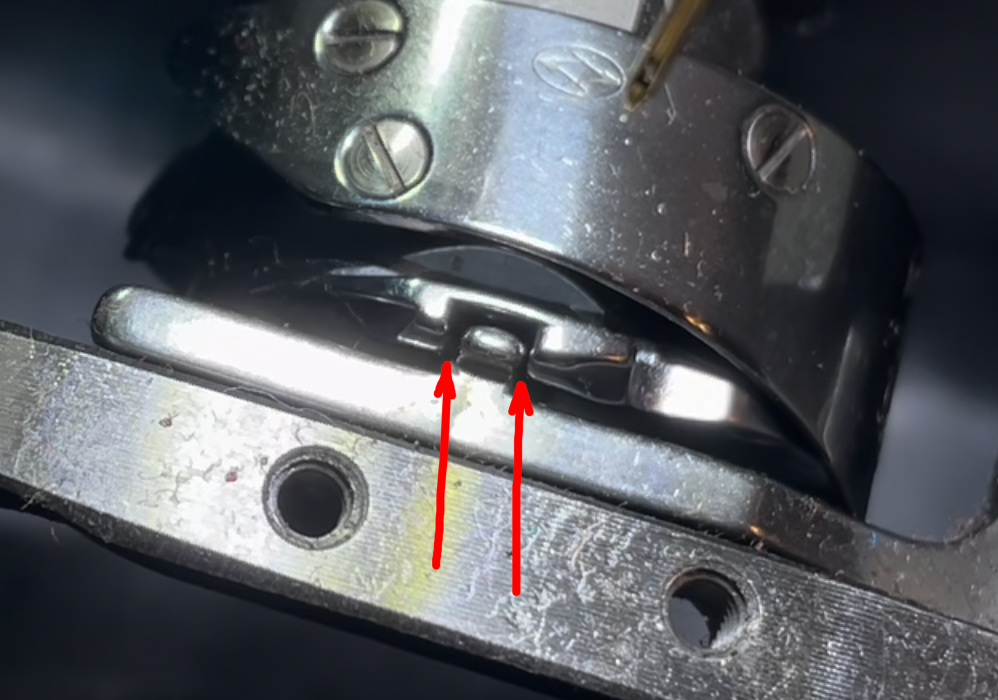
-
Juki 5550N experiencing problem in the bobbin area
Wizcrafts replied to thobgood's topic in Leather Sewing Machines
No, that isn't the opener. On some machines there is a lever with a bent arm that pulls back on the bobbin case to let the thread slip through without getting hung up. If your machine has a latch opener, it is quite abrupt in comparison to those found on our typical walking foot machines. Without the opener lever, the only thing making room for the thread to the hook is the thread itself. That works if the top thread is taut, but can fail if it has too much slack. - Yesterday
-
@Michelle M First option; list them on here in the 'For Sale' section I guess a lot of ppl on here might want to buy them btw, put your location in your profile. This is an international forum with members all over the world
-
Juki 5550N experiencing problem in the bobbin area
thobgood replied to thobgood's topic in Leather Sewing Machines
Which part is the latch? Apologies for my ignorance. Is the opener the part that releases the bobbin case so you can remove it? There's a little hinged latch on the bobbin case that lets you remove it. -
Juki 5550N experiencing problem in the bobbin area
thobgood replied to thobgood's topic in Leather Sewing Machines
Thread is coming off the cone smoothly, that was my first thought too! Someone suggested rubbing a cotton ball over the bobbin area where the thread passes to check for burrs. I'm going to try that next. Thanks! After reading Wizcrafts' note about the thread check spring, I found this video that helped me understand it more. You might enjoy it as well. https://www.youtube.com/watch?v=4758pErWmY8 -
Juki 5550N experiencing problem in the bobbin area
Wizcrafts replied to thobgood's topic in Leather Sewing Machines
The bottom travel stopper is set by the bottom screw inside the open channel in the bracket. The slack adjustment is the little screw in the curved slot that's above the main shaft and nut. -
Juki 5550N experiencing problem in the bobbin area
friquant replied to thobgood's topic in Leather Sewing Machines
What jumps out at me is that the latch opens abruptly. Not sure if that's normal for this machine. I don't see the bobbin case opener..maybe it's internal? -
 trent2005 joined the community
 -
When you say slim what do you mean? That the coverage doesn't go back much past the closure? Or, do you want them more open in the back, more narrow leg pattern. Either way you can adjust your pattern. I have made a couple pairs of shotguns based on a modified from Tandy pattern in the link from Mulesaw above. I have also made patterns from jeans. There are a lot of websites out there with how to take measurements for chaps. I only made 2 sets of chinks using 2 different printed patterns and I wasn't really happy with either pair. Have fun.
-
Thanks, guys. In the harsh light of pictures, it looks like I could decrease my presser foot pressure.
-
Sure looks a lot nicer than the original!
-
Juki 5550N experiencing problem in the bobbin area
friquant replied to thobgood's topic in Leather Sewing Machines
I'm enjoying learning hidden qualities of the thread check spring. Which of these screws do I loosen on my 341 to effect #1 and #2?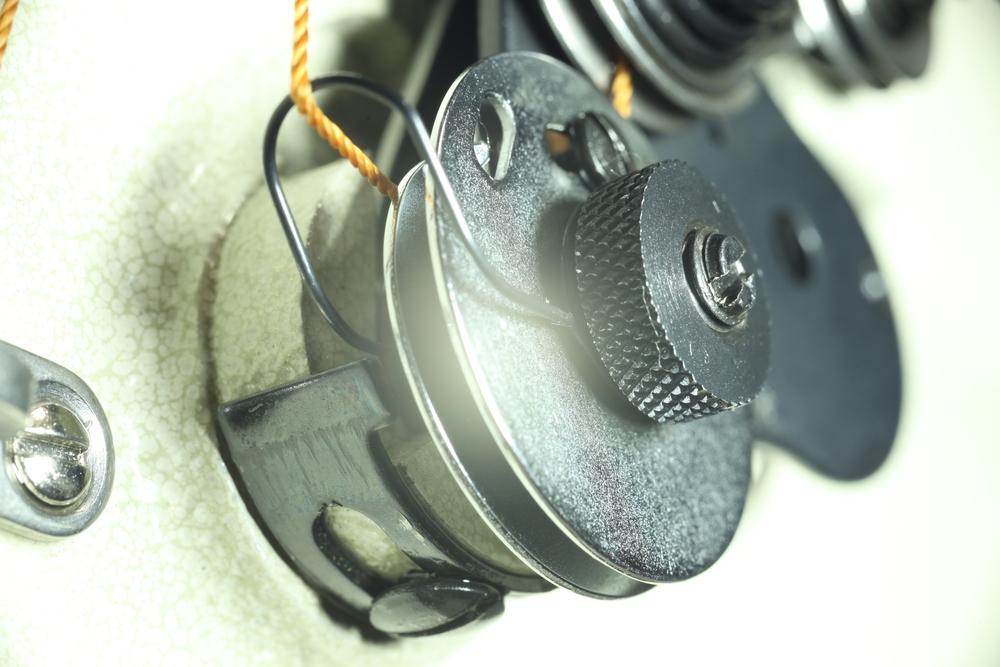
-

Juki 5550N experiencing problem in the bobbin area
AlZilla replied to thobgood's topic in Leather Sewing Machines
Have you looked at everything the thread touches and slides across to be sure there's not a burr somewhere? Come to think of it, have you looked to be sure the thread is feeding smoothly from the spool?