All Activity
- Today
-
Thank you for all the tips, Jonas. I've been buying a roll of continuous zipper and cutting to length then adding stops. With the Vislon/formed tooth zippers I've seen videos from Sailrite where they melt the teeth (using a heated nail or similar) to create stops. I've raised my prices for zipper replacements as I gain more experience and demand grows. I am becoming friends with my patcher as I use it more. Has a different rhythm than the compound walking foot machines. We have a visiting horse who wears rubber bell boots continuously (has an undiagnosed skin condition that is aggrevated by sunlight) and he rips the rear boots regularly. I've been patching them with 4 oz leather - they have a hook and loop closure - this seems to last and saves quite a bit of money.
-
 Google is failing me and It doesn't appear to have instructions. If anyone has some ideas let me know!
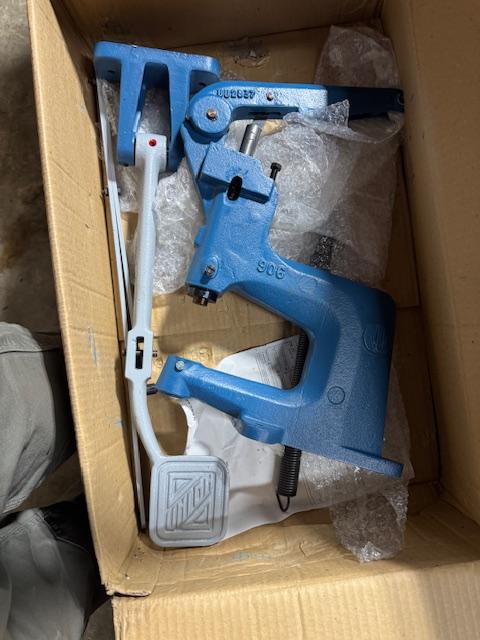
-
Sorry I missed this message!
-
Master List of leathers I have for sale.
nstarleather replied to nstarleather's topic in Leather and Lace
Hey did you get in touch? -
Sharp design. Those 2 colors go well together.
-
When the Girl Scouts happen by to get some ideas for their next project, we don't need them blundering in to posts like the one in question. Just because worse is available elsewhere, doesn't mean they need a dose of it here while looking for key chain patterns. Even if that forum didn't appear in the All Activity or New Post streams, a person would then have to go looking for it. Maybe an "opt in" the first time a user accessed it. Verifying a users age is highly impractical for most cases.
-

help choosing first leather sewing machine
kgg replied to TakashiOkada's topic in Leather Sewing Machines
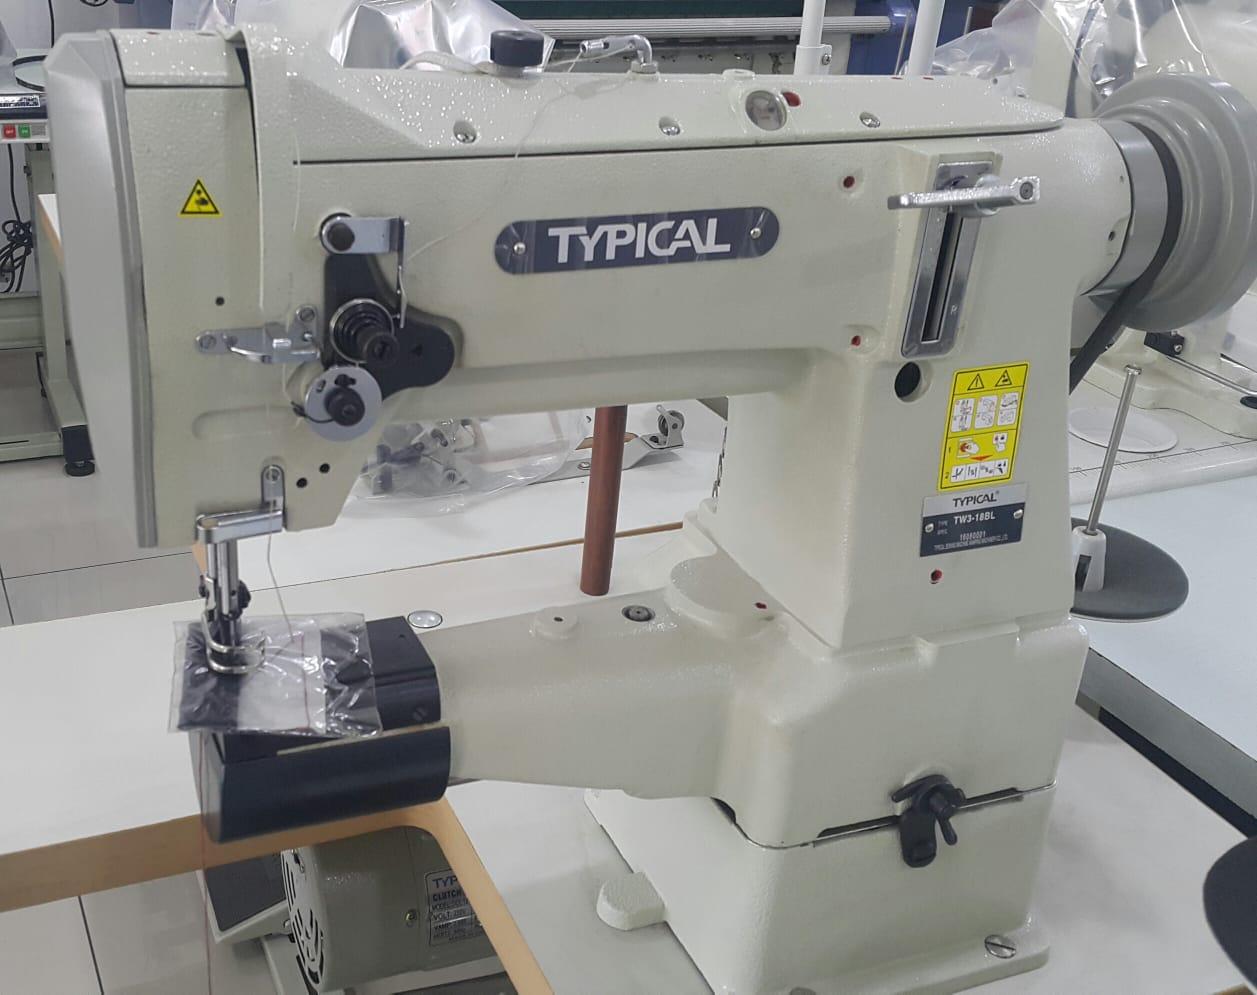
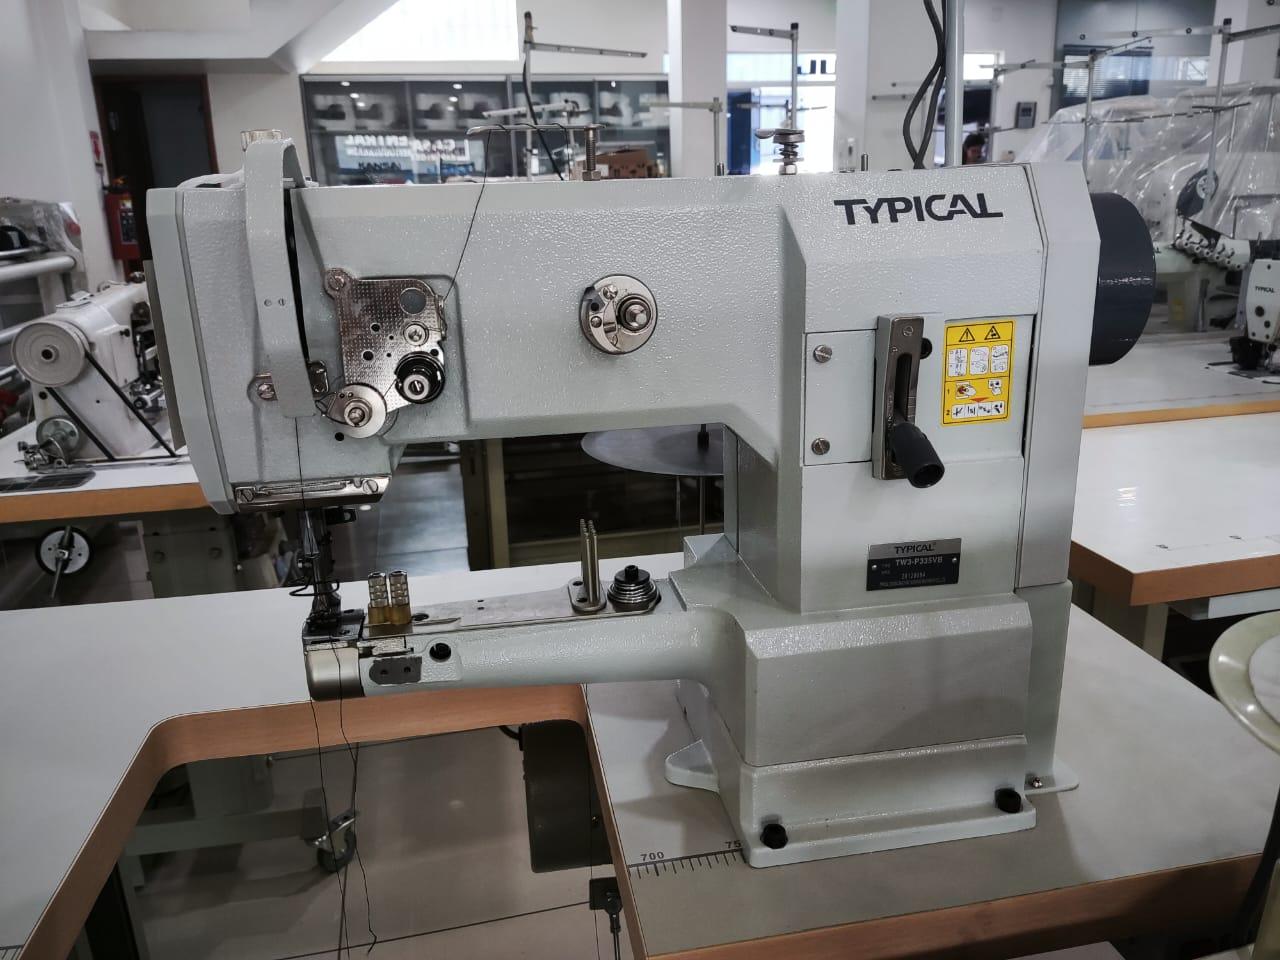
From the information I have seen: The p335vb is a binding machine that has a max thread size of V69 which is the cross over thread size from domestic sewing thread to industrial with a breaking strength of 11lbs. The 18L can take a max thread size of V138 with a breaking strength of 22lbs. I agree with @RockyAussie neither are the right machine. If you have only one source for new machines the one I would suggest looking at is their Typical TW3-341 which by the looks of it is a clone of the Juki LS-341. Also consider a used brand name like Juki in the Class 341 / 1341 or import a Juki LS-341 / 1341 clone from China. Buy Once, Cry Once kgg -

help choosing first leather sewing machine
AlZilla replied to TakashiOkada's topic in Leather Sewing Machines
I'd agree that neither of those machines seems ideal. Several members here have purchased machines from overseas (to their country). I wonder if that would be an option for you? I've never imported anything large and expensive, so I don't know. -

help choosing first leather sewing machine
Digit replied to TakashiOkada's topic in Leather Sewing Machines
That Typical TW3-P335 looks exactly like the Global WF1335. Probably from the same OEM factory but differently branded. It's a good basic machine to get started on. Be sure to have it on a removable table so that you have room to manipulate larger work underneath the arm. Depending on which leather you'd want to stitch, have some spare feet at the ready without knurls/teeth that might leave patterns on your leather (or simply put some tape over the knurls, that's what I do). I never mentioned ideal. You need some starting point and it's best you learn to work with what's available in your market and what's affordable to you. Experience will guide you to a better machine (or not if the machine you buy does cover your needs in the end). I learned a lot about cars by buying five cheap ones over the past 15 years and working on them to keep them running, while I could have borrowed money to buy a single shiny 'ideal' car and just drive it and never learn anything... -

help choosing first leather sewing machine
TakashiOkada replied to TakashiOkada's topic in Leather Sewing Machines
that's good to hear (or read in this case). thank you! ohh yeah I've seen that video before, it's a beautiful machine and I would love to get one but sadly they don't sell it over here. I only have those two typical machines available to purchase -
In the period I signed up to this forum there was talk of some hack or something and everything needing to be set up from scratch and a backup restored. That might have done something to the permissions. I noticed that I had access to the NSFW area without needing to ask for it. Although that section isn't as active anymore as it used to be in the past (have people become more prudish in recent years?), it still contains a wealth of inspiration and tips for those interested. There have been half a dozen NSFW posts in the past few years or so. Compared to the endless stream of gun holsters, knife sheaths, and people with sewing machine problems I don't think the forum is at risk of degenerating into an obscenity pit just yet. Also: obscenity is in the eye (and mind) of the beholder. To relativize the mentioned post: I believe most people wear underwear. Some is made from plants (cotton), other is made from prehistoric micro-organisms (synthetics). So what could be the problem with someone showing underwear made from current macro-organisms (animal skin)? I hope Johanna can get that permission issue resolved so that those not interested in certain aspects of leatherwork can live peacefully ever after.
-

help choosing first leather sewing machine
RockyAussie replied to TakashiOkada's topic in Leather Sewing Machines
I believe that neither of those machines would be ideal for the work you are wanting to do. Check out this video I did awhile ago as it will point out some of the features for you to consider. I do not know what machines you have there in your world but a google search for a 246 cylinder arm machine should bring up a few to pick from. Note that they are generally not very expensive normally. -
There's a huge reduction ratio on that left-right adjustment of the bell and the first dozen turns or so just absorb the slack when you switch from adjusting in one direction to the other.
-
help choosing first leather sewing machine
Digit replied to TakashiOkada's topic in Leather Sewing Machines
That's exactly what we're doing at school and for that you need a cylinder arm triple transport machine. We use Global WF1335 machines at school and I bought a second hand Adler 69. Both have a pretty basic triple transport system (bottom transport is just a back-and-forth moving plate) but they're up to the job so far. -
help choosing first leather sewing machine
TakashiOkada replied to TakashiOkada's topic in Leather Sewing Machines
thin to medium thickness chrome tan leather bags, purses, briefcases, wallets and accessories -

help choosing first leather sewing machine
DieselTech replied to TakashiOkada's topic in Leather Sewing Machines
What kinda leather projects will you be wanting to sew? -
I've been researching a lot on which sewing machine to buy and I came to the conclusion that my first machine has to be a cylinder arm machine if I want the closest thing to a sewing machine that does it all (since I can only afford one atm). I've been watching videos and lurking this forum and reddit but still unsure since some people warn against getting a 335 model for leatherwork, but then again you mostly talk about sewing thicker veg tan leather. all I'm going to sew is thin to medium thickness chrome tan leather bags, briefcases, wallets and accessories with it. I went to the sewing machine store and they only have these two: typical tw3-p335vb is about 1.500 us$ converting from my local currency. 650w servo motor is 100$ more. the non-binding needle plate and feed dog is an extra 30$ this one is for binding but I've seen some people use it for leather too user manual: https://www.supsew.com/download/typical/Typical TW3-P335 Parts and Instruction Manual.pdf typical tw3-18bl (about 2.300 us$) 650w servo is 100$ more. this one is a proper machine made for leather. idk if it's gonna be able to handle thin leather though. user manual https://www.supsew.com/download/typical/Typical TW3-18BL-28BL.pdf the difference in price is huge for me, in fact the typical tw3-18bl is a bit over my budget but if you guys tell me it's the right tool for the job I'm willing to save up a little more to get it.
-
Leather covered bit, replacement of the leather
DieselTech replied to Mulesaw's topic in Saddle and Tack Accessory Items
Thanks. I appreciate it. Always nice to be learning. -
They seem not to move at all for quite a few turn which is why they normally supply a winding handle I guess. 20 turns will hardly seem much.
-
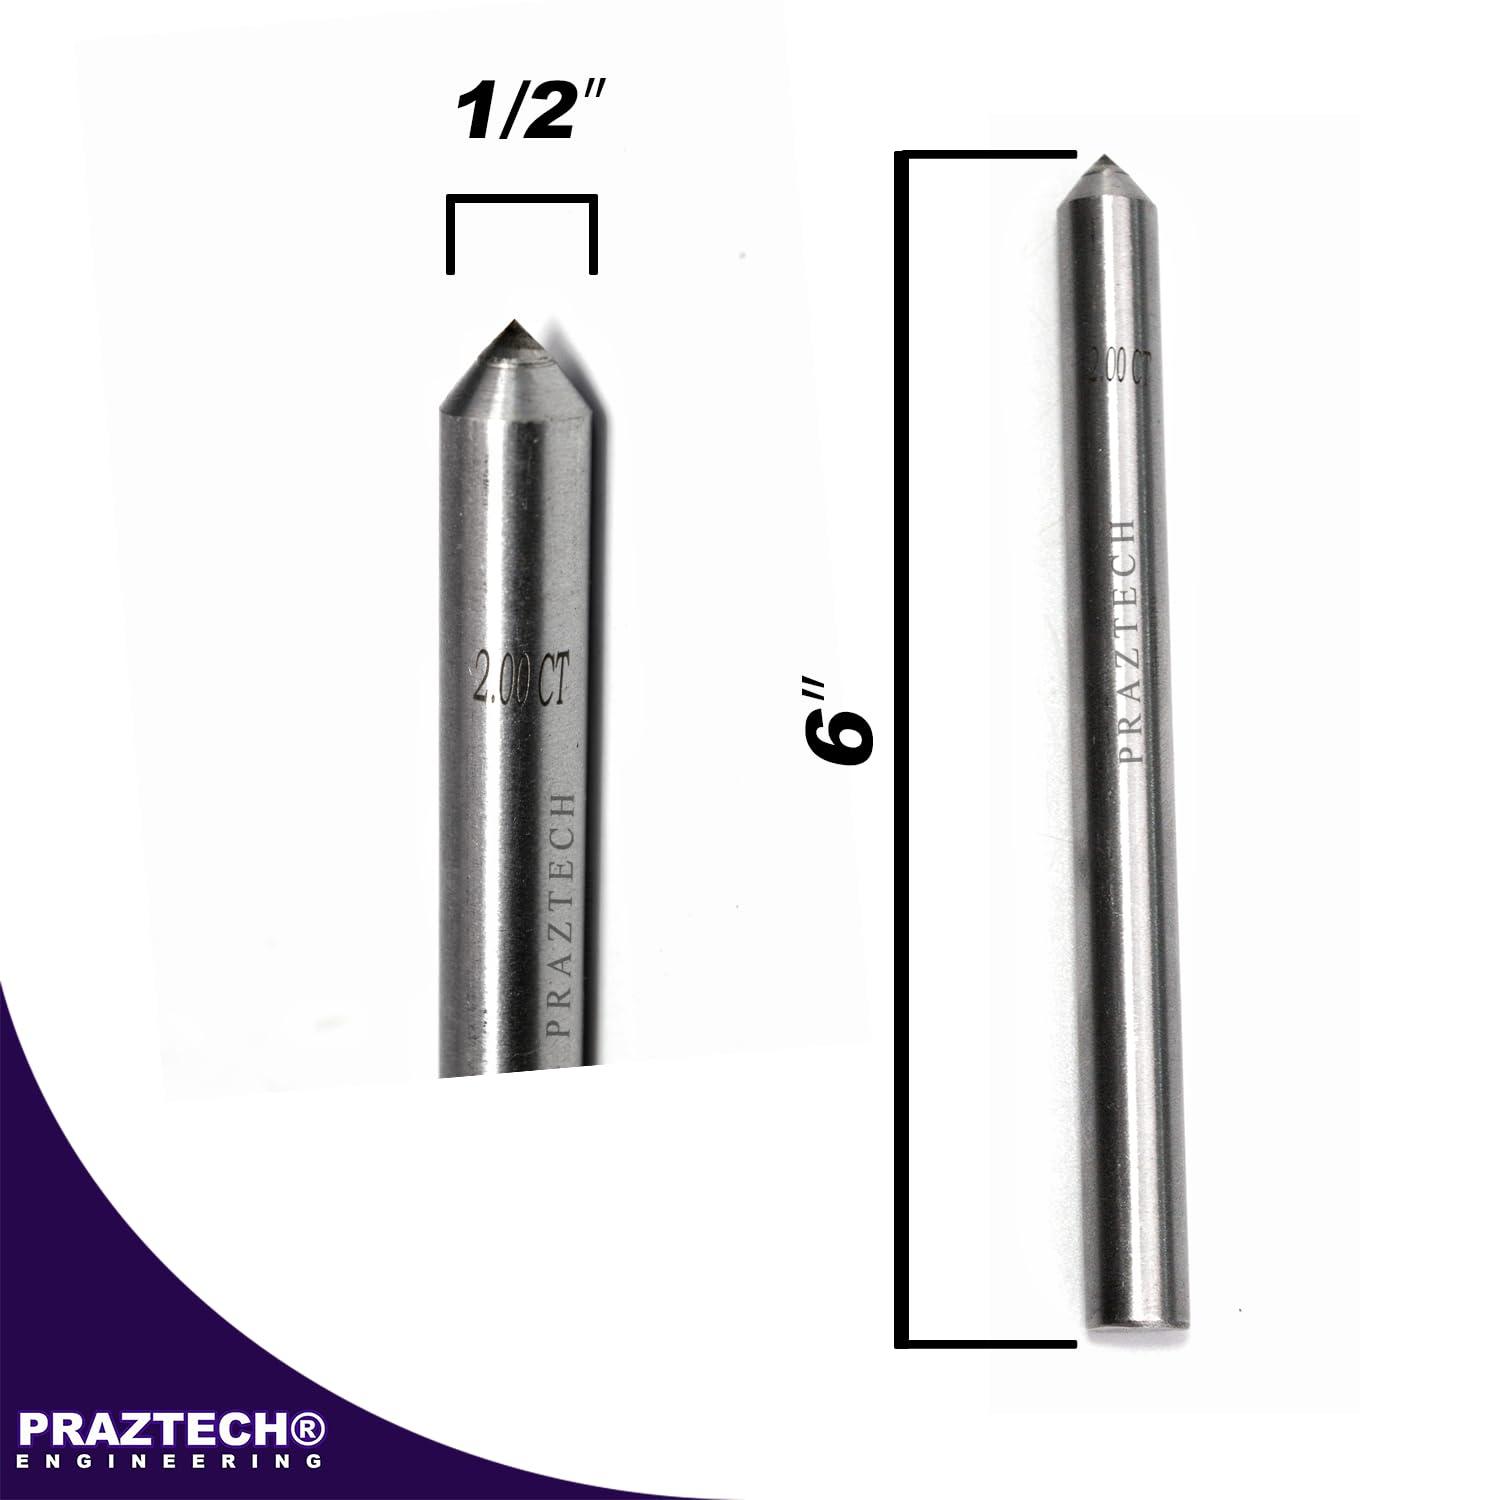
Yes there is. I gave up trying to use the revolving type years ago and now use a diamond tipped dressing tool. This picture is one I found on Amazon which looks a bit like mine. They work a lot better and way quicker so be careful not to go in to hard with it.
-

Leather covered bit, replacement of the leather
Mulesaw replied to Mulesaw's topic in Saddle and Tack Accessory Items
@DieselTech Thanks The 4th picture is the best for explaining it (I forgot to take a picture shoeing the details) There are two "straps" that are part of the wrapping. they go around the rings and are sewn together first. Next a similar sized loose strap is inserted between the wrap aorund part and the central part of the bit. Finally the wide part is wrapped around the strap part and baseball stitched together. Hope it helps a bit though it is kind of a weird explanation, :-) Brgds Jonas -
I’ll try and find some more. Like I said this was done very early on and I didn’t take too many pics of my work at that point. But I will look deeper.
-
Leather covered bit, replacement of the leather
DieselTech replied to Mulesaw's topic in Saddle and Tack Accessory Items
Looks nice! You did great work. How did you do the ends of the leather around the rings? Thanks. -
Leather covered bit, replacement of the leather
Mulesaw replied to Mulesaw's topic in Saddle and Tack Accessory Items
Thanks Tom I didn't think of looking in Stohlman's book, So I just made it with 2 needles :-) I thought that just going from a criss cross pattern to baseball stitch was adventurous enough for me. Brgds Jonas -
Tutorial, replacing zippers in riding boots.
Mulesaw replied to Mulesaw's topic in How Do I Do That?
@TomE Hi Tom I only shorten the zipper at the bottom if it needs to be shortened. If I have to do that, I install a metal bottom stop on and cut the surplus part of with a pair of scissors. I cut the zipper part itself square, and then each of the sides just a little on the diagonal, maybe 15 degrees sloping so that the center(zipper teeth) are the longest part. Then I burn the edges so it doesn't fray. It helps a little when you try to insert the bottom of the zipper, but it is still a fiddly business. On the top of the zipper I have tried different methods, from folding the zipper down to making an elaborate fold that go down and back. But at the moment I just cut it square and burn the edges. I am pretty sure that the factories sew in the zipper before mounting the bottom of the boot, and that they do it before trimming the lining, because often the zipper ends so far beneath the insole of the boot that you need to cut it and pull out the remaining part with a plier. On boots where it is possible to sew across the zipper, I try to make sure that I put the metal bottom stop below where I want my stitching to be. So far I have only needed 3 lengths for regular boots. 40 cm (16"), 45 cm (18") and 50 cm (20"). The 40 cm (16") is called for maybe once per year, so I have decided to not restock that one, but just shorten a longer zipper instead. What really helped me was when I started just sewing one side of the zipper first. I had tried double sided tape and contact gluye, but it still managed to shift around. Doing the "difficult" side of the boot first ensures that all the pulling and tuckling with the boot on the patcher doesn't dislocate the zipper, like it does when it is taped in place in both sides. Still dressage boots are a pain in the neck compared to juming boots. For some strange reason, the cheapest jumping no-name boots are much easier to work on compared to high end boots like DeNiro or Cavallo boots. The business side of it: I charge a fixed amount for replacing a zipper, and I provide the zipper, that way I know the quality and model of the zipper so I don't risk putting in a wron type of zipper. Technically I ought to charge more compared to what I charge per hour doing saddle repairs, but I choose to look at it like a way to get people to know the business. Chances are that if you have riding boots, you have some other horse related equipment that I can repair on another occasion, or I could sell some of the stable equipment that we also make. I generally try to do the repair in a day or two. Children's boots I have done it the same day, since I know how much it means to kids that they know their eqiupment is ready and they shouldn't need to worry about if they are able to attend the riding school on Friday etc. This is something that is really appreciated by the customers, I have even had a customer who gave me two bottles of wine as a tip due to fast service. :-) Off course, If I am at sea, there is a waiting time, but when I am at home, boots get prioritzed. There is another method to replace the zipper which I think is a lot faster, but I don't do it since I don't think it is good craftmanship. In that method you just cut the teeth of the old zipper of as close to the doubling as you can. Then the new zipper is taped on the inside of the lining and sewn in place. The benefits is that you don't have to spend 20 minutes carefully cutting the old zipper loose, and there is less fiddling with inserting the new zipper. The downside is that it doesn't look very preofessional in my opinion. And if I had a nice pair of boots, I would like the repairjob to be as close as possible to the original job. Brgds Jonas