

All Activity
- Past hour
-

Help! Singer 111w155 stripped / stuck screw
AlZilla replied to matthew123's topic in Leather Sewing Machines
I wouldn't heat those parts. I don't know what that would do to the hardness. But I would lay it down and build on what looks like a pretty good dimple almost dead center. I'd get a punch and make that bigger and deeper. Then I'd start with an 1/8" drill bit and work up. You'll need to determine how long that screw is so you don't drill through it. -
Help! Singer 111w155 stripped / stuck screw
AlZilla replied to matthew123's topic in Leather Sewing Machines
Mine is a more rationally sized, smaller one, but yes. They work especially well on these screws we deal with that haven't moved in a hundred years. - Yesterday
-
I think so, mouths can be tricky too sometimes
-

Help! Singer 111w155 stripped / stuck screw
dikman replied to matthew123's topic in Leather Sewing Machines
A straight-sided carbide burr to try and get a deep slot with a flat bottom and parallel sides. Try heating the screw again and then hit it with a freezing spray. Drill through the screw, sometimes this can relieve pressure on the threads and allow it to move. Doing this first and then heating should allow better heat penetration to the threads and then a screw remover tool. Just a few ideas, of course the screw will need to be replaced and if you can't get a replacement then re-tap for an allen-head grubscrew. -

Help! Singer 111w155 stripped / stuck screw
friquant replied to matthew123's topic in Leather Sewing Machines
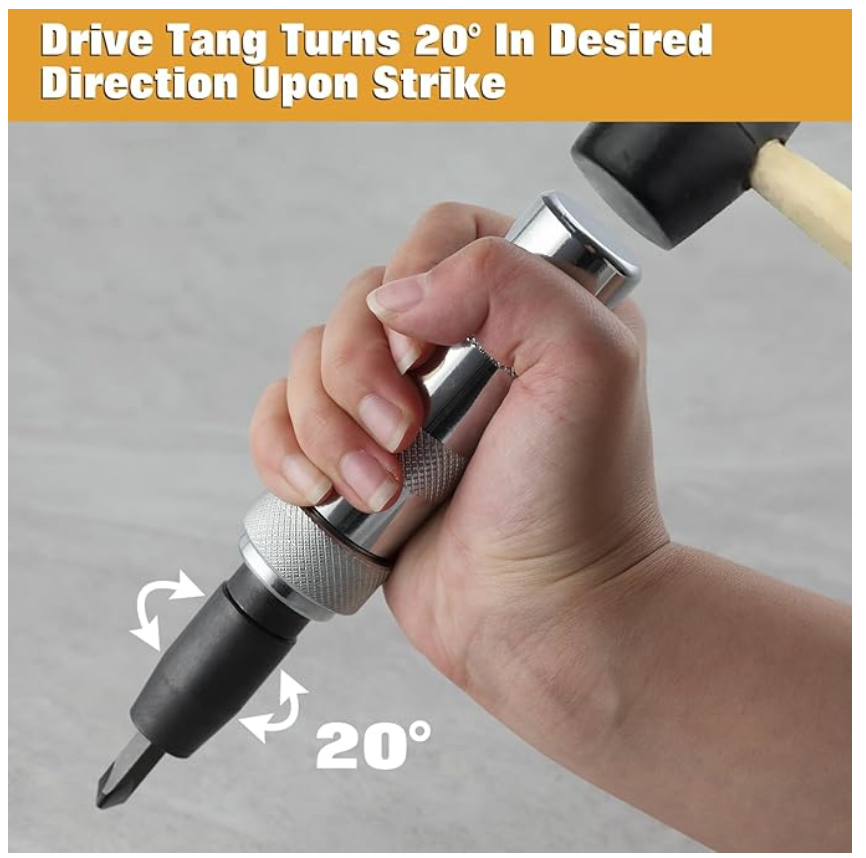
When dremeling the slot, I would go all the way to the edge of the screw head. If you overrun and go into the eccentric a little bit that's okay too. Make the sides of the slot as vertical as possible. Do you have a flat-ended burr? You may be able to scrape the sides into better shape (with a flatter bottom) using a smaller flat screwdriver or the pointy end of a file. Can you post a photo of the screwdriver bit that you are using, next to the screw you are trying to remove? Ideally the bit would be the full width of the screw head, and the full thickness of the screw slot minus just enough to get in there. I would lay the machine on its front (make sure it's supported well, not resting on any delicate parts) so you can press down from above using your body weight. I've started using a drop of diesel instead of PB blaster. When removing stuck screws, I go one way then the other. Add more heat. We're talking kitchen-sized torch, not cigar lighter. And consider the manual impact driver. -
That's true. And the eyes are the most difficult to do, especially with any expression, is it not?
-
Help! Singer 111w155 stripped / stuck screw
friquant replied to matthew123's topic in Leather Sewing Machines
As for removing the screw with the mangled head, has anybody tried a manual impact driver on their sewing machines? https://www.amazon.com/LEONTOOL-Extractor-Reversible-Screwdriver-Fasteners/dp/B0CTXD91YW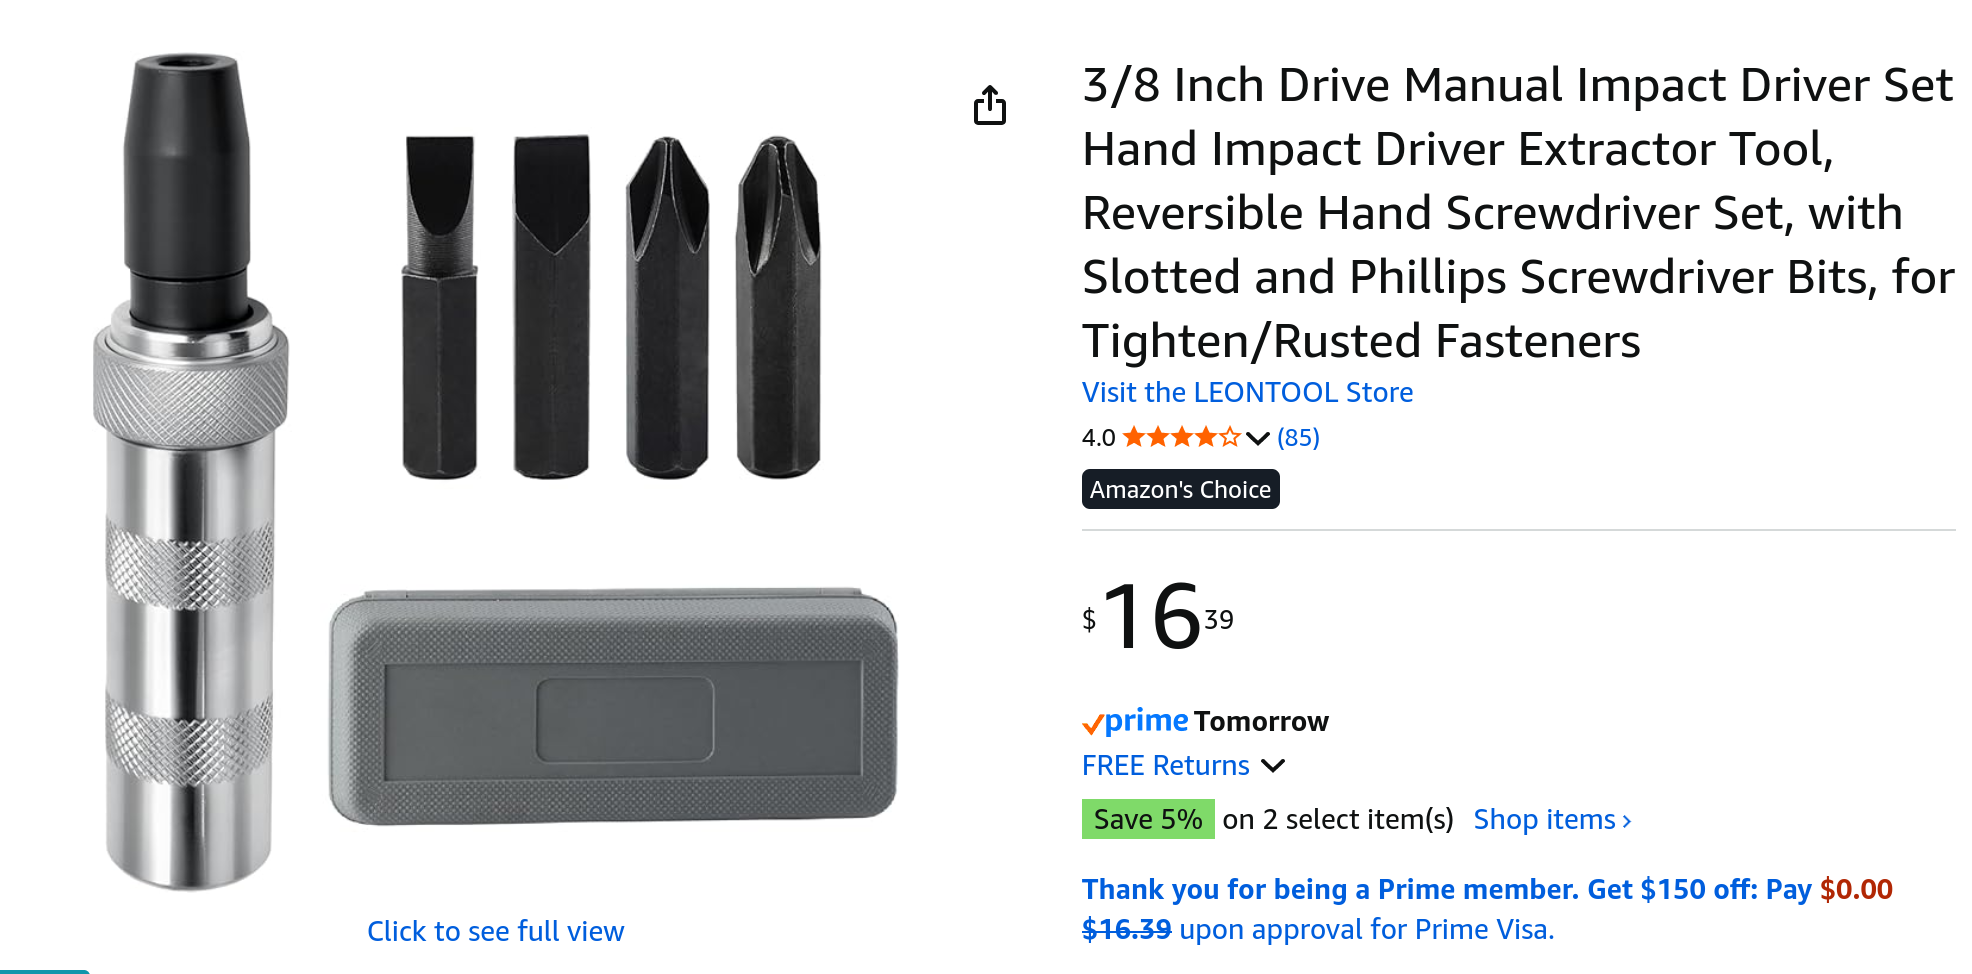
-
Help! Singer 111w155 stripped / stuck screw
friquant replied to matthew123's topic in Leather Sewing Machines
To change the relative lift, you will need to loosen the clamp screw at the top of this crank arm.
-
Thank you, the eyes are what I try to focus on most, they are the most important I think. They are the first thing you would notice if they were wrong for sure haha
-

Help! Singer 111w155 stripped / stuck screw
matthew123 replied to matthew123's topic in Leather Sewing Machines
Thanks Constabulary! I agree that the screw extractor could work. I'm trying to postpone that option because I feel like maybe deepening the screwdriver groove might still be a viable option, but I admit it's hard to get the contour good enough that a screwdriver will really bite. I appreciate the suggestion! Anyone know if replacements for this screw are available? I'm open to any and all ideas! Thanks again -
What a lovely, warm gesture. 🙂 The dog is so caringly done, especially the eyes. You have caught the expression beautifully.
-
yea i got a couple in a drawer somewhere lol. I can sew a saddle stitch much faster with an awl and two needles.
-
The 'Speedy Stitcher' does a lock stitch and I've used it a few times. In places where I wasn't able to do a saddle stitch
-
It never occurred to me to try making a lockstitch by hand. I can't remember what this gadget is called but it does a lockstitch.
-
Great info. I will give this a shot! Thank you. And thanks to everyone for the input. All of it has been tremendously helpful! Will continue to tinker a little bit.
-
you know a person can do either stitch by hand, so my question is how many of you use the lockstitch when sewing by hand? I've never even had the urge to try.
-
Google AI "A 794 S needle is a leather point needle. Specifically, the "S" stands for "spear point" or "narrow cross point," which is a cutting point designed to create straight seams in leather and other thick, non-woven materials." See attached needle / thread size chart that will be handy for you later. Looks right for your current leather. If you start using hard dense leather often needs a size larger.
-
These heavy duty harness stitchers usually ship with high thread tension and foot pressure because they are typically used to sew hard, dense leather. You will need to dumb down your machine to sew soft leather. Start by backing off the bobbin tension screw until there is just a slight amount of pull required. Next, back off the top tension to balance the knots. Next, back off the top foot pressure screw on top of the right end of the head. Use just enough force to keep the leather from lifting with the threaded needle and the bobbin thread locked around the needle. This setup won't work as well in dense leather, so try to make a mental note about the initial setup tensions and pressures. Finally, adjust the stitch length a little shorter to minimize the warping of the material.
-
Yes, many things going on at the same time. I remember my learning curve and finally getting the balance of needle, thread and settings right was very satisfactory. This all takes time to build experience and confidence, like when learning the guitar, don't rush and try to force things.
-
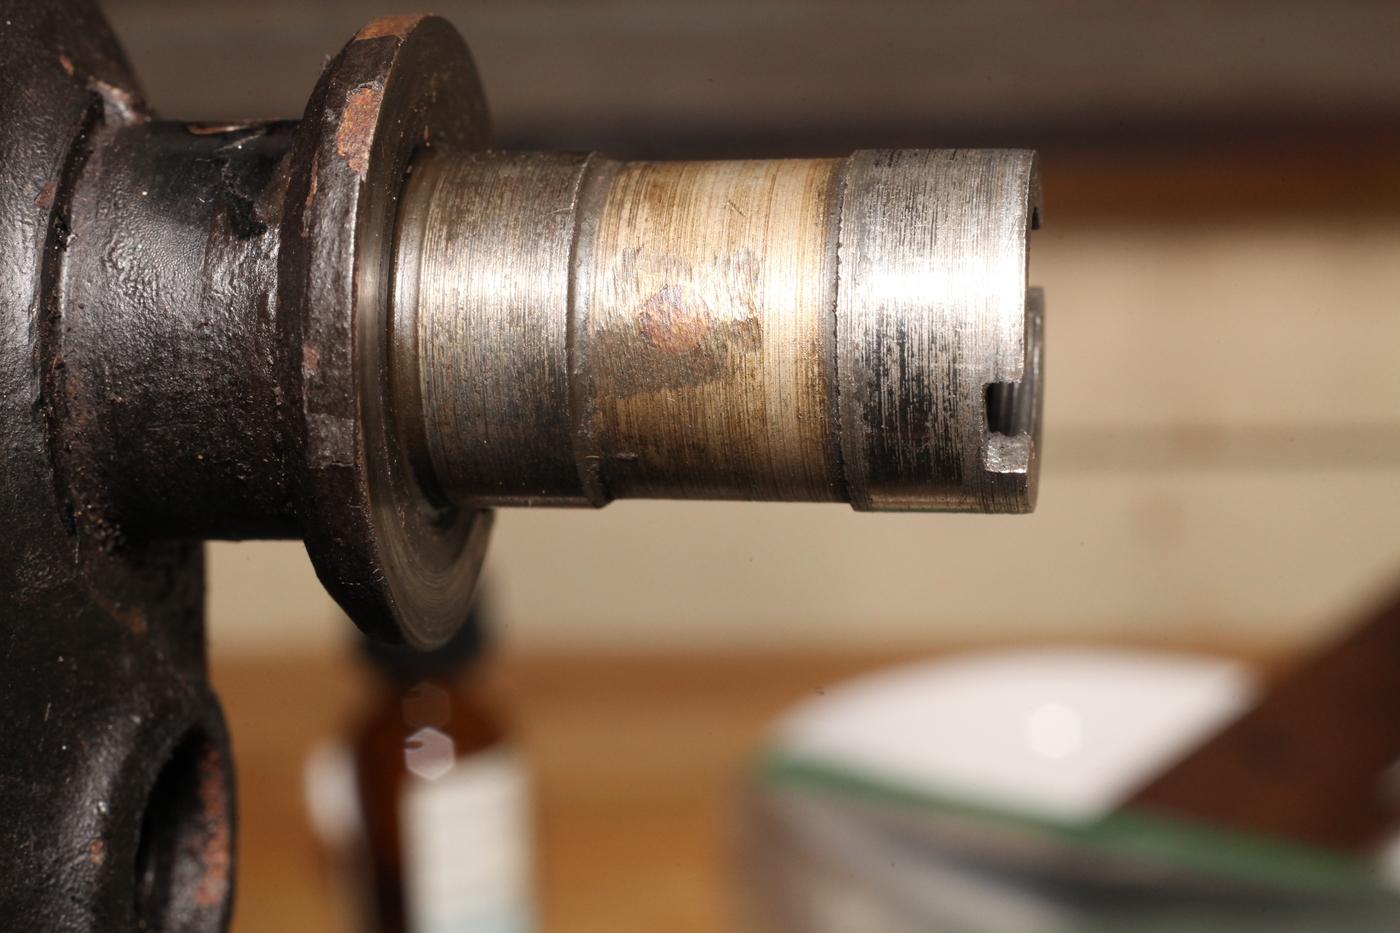
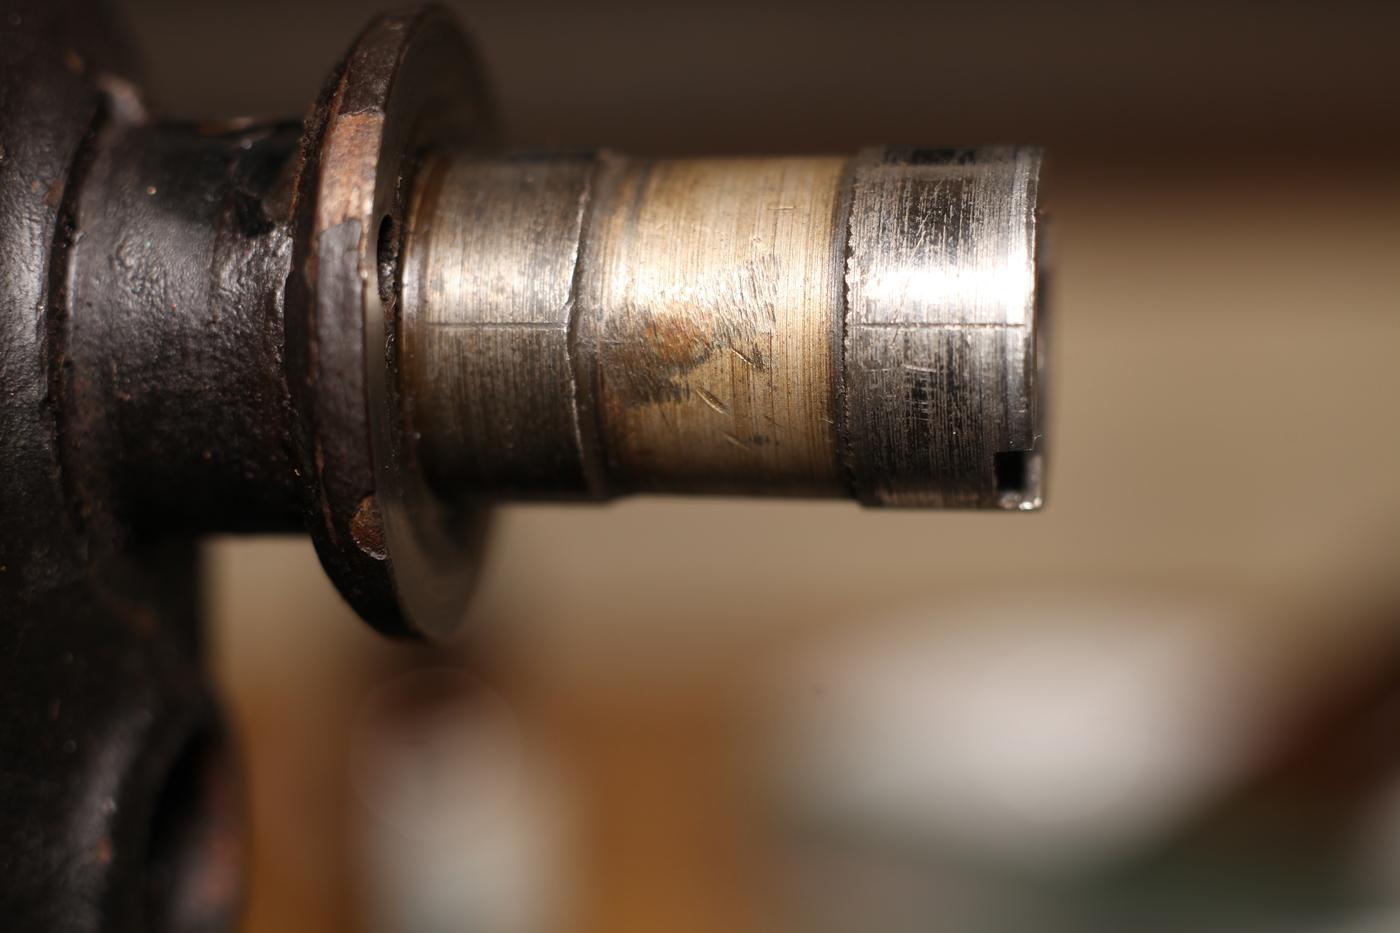
I remember years ago, someone on a gun forum said he always took high res pics of his new used guns. He said the photos showed way more than the naked eye. I bet these don't show up as well in person as they do in the pics. Also, it seems obvious that one end is a smaller diameter. Should you decide to take the plunge, it should be easy to tell which end to hit. That thing is a monument to industrial manufacturing of a bygone era. Obviously neglected, 122 years old and still quite a viable sewing machine. I'm going to go oil something ...
-
Yes, that is probably a tapered pin. Be sure to drive it out from the small end. I would measure the ends with a vernier to determine the small end. Support the shaft end well and drive it out with a drift punch. As others pointed out, proceed with caution as not done correctly could end poorly.
-
Thanks @chuck123wapati and @DocReaper I appreciate it
-
Okay I see it now. As though they pounded a pin in, then ground the ends off. That would explain the surrounding texture. Here's a view of each side
-
I haven't adjusted the presser foot at all, but I will definitely take a closer look. I'm using the needle that the machine arrived with. It's a 794 S size 25 needle. I increased the top tension and am getting slightly better results, but the stitching seems abnormally tight, like it's sinking too far into the leather. Going to do some more tinkering today.
-
From what I can see, it looks like your presser foot pressure is too high and pushing leather into the feed dog needle hole. Also, are you using a leather point needle? It looks like a lot of 'blow out' due to using a conical point meant for textiles is being used. Both of these affect appearance besides the thread tension adjustments.


.thumb.jpg.6e903dd66163ad5672f00f144058c571.jpg)

