


friquant
-
Posts
518 -
Joined
-
Last visited
Content Type
Profiles
Forums
Events
Blogs
Gallery
Store
Everything posted by friquant
-
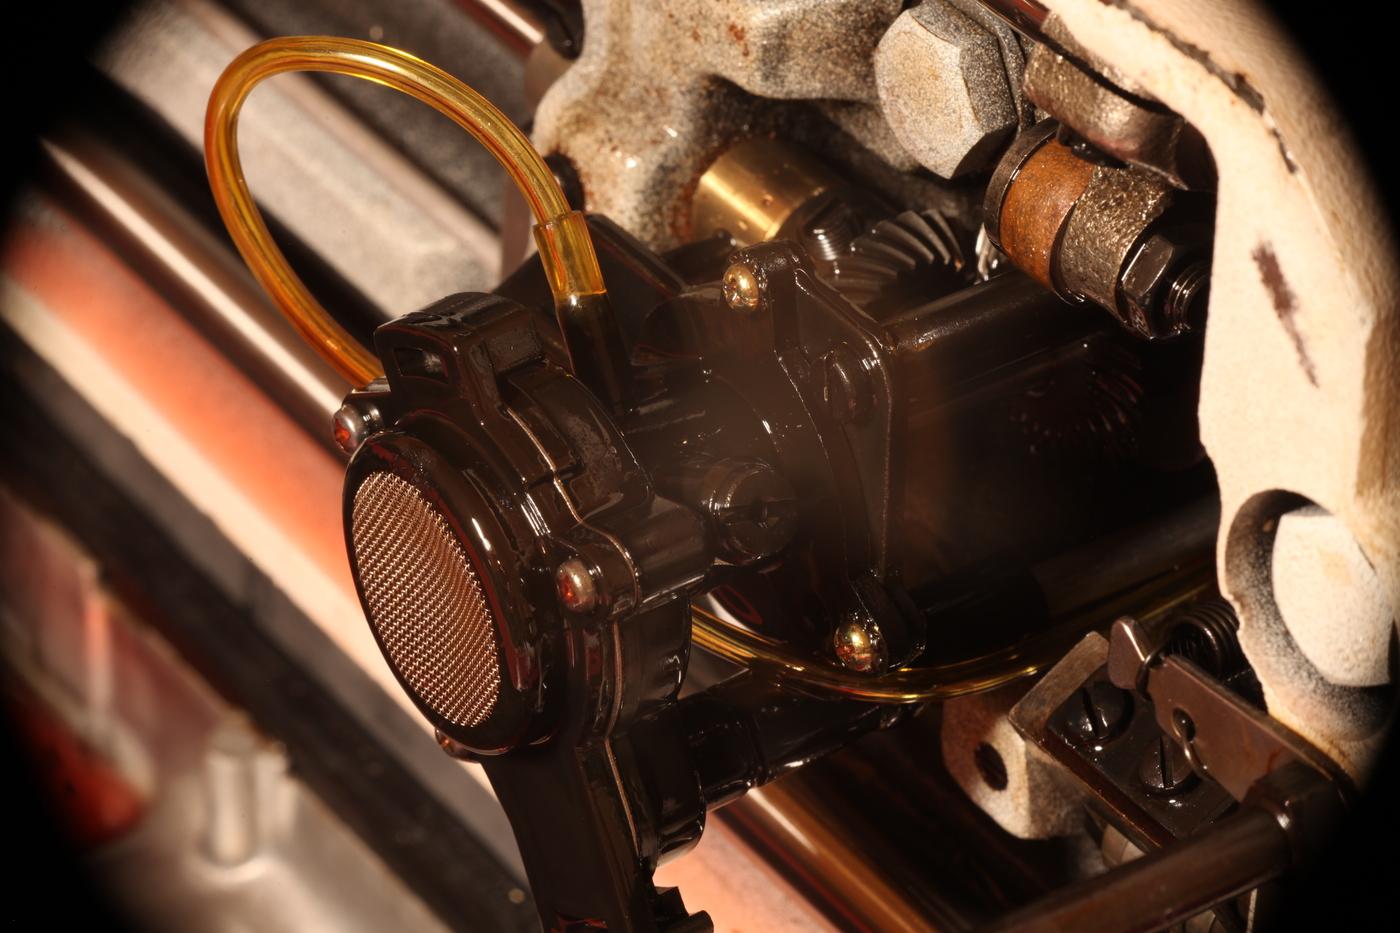
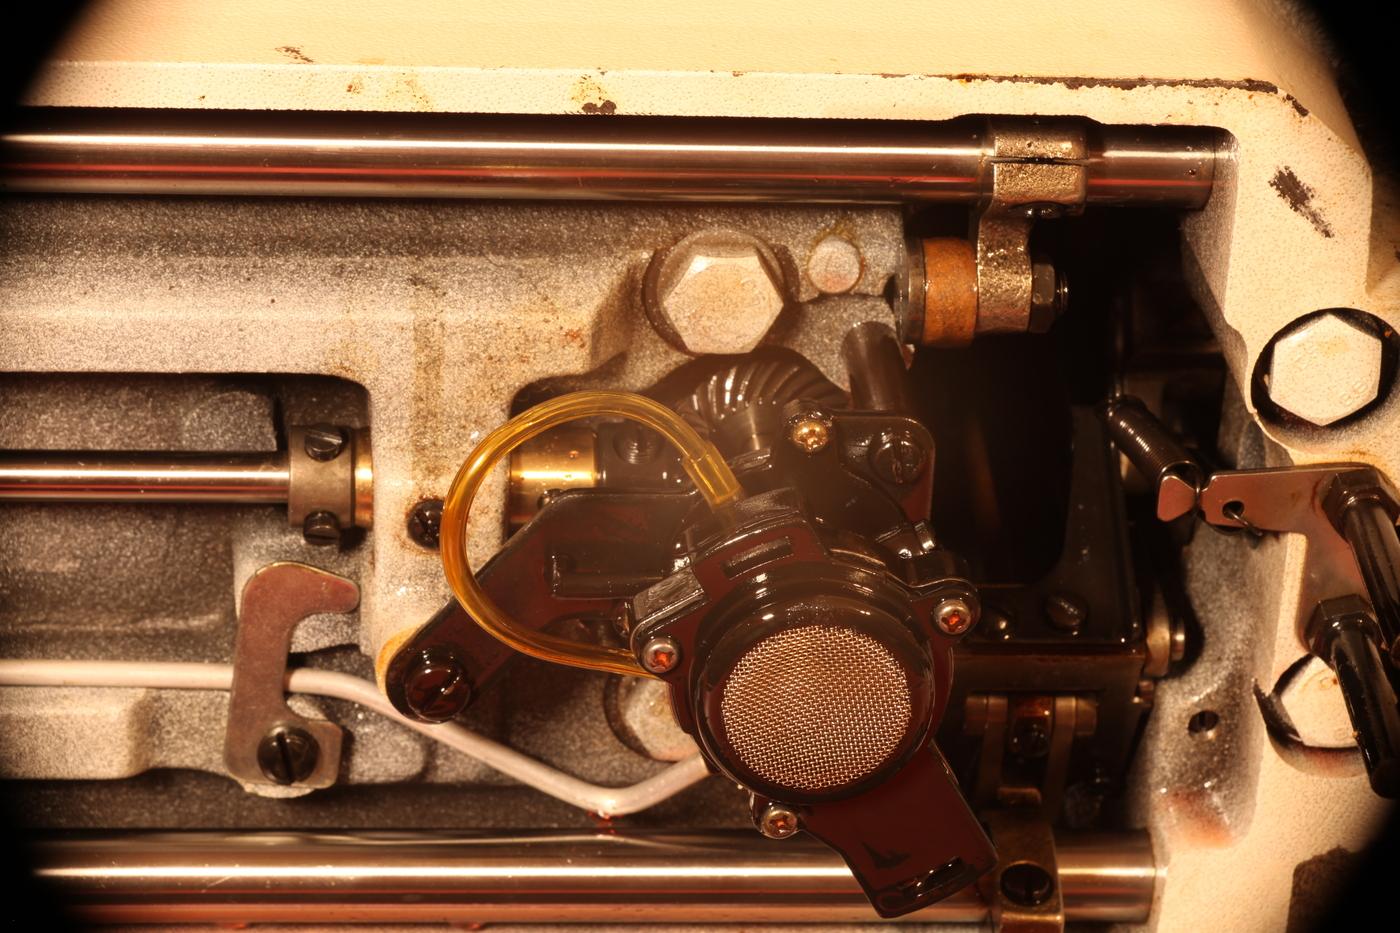
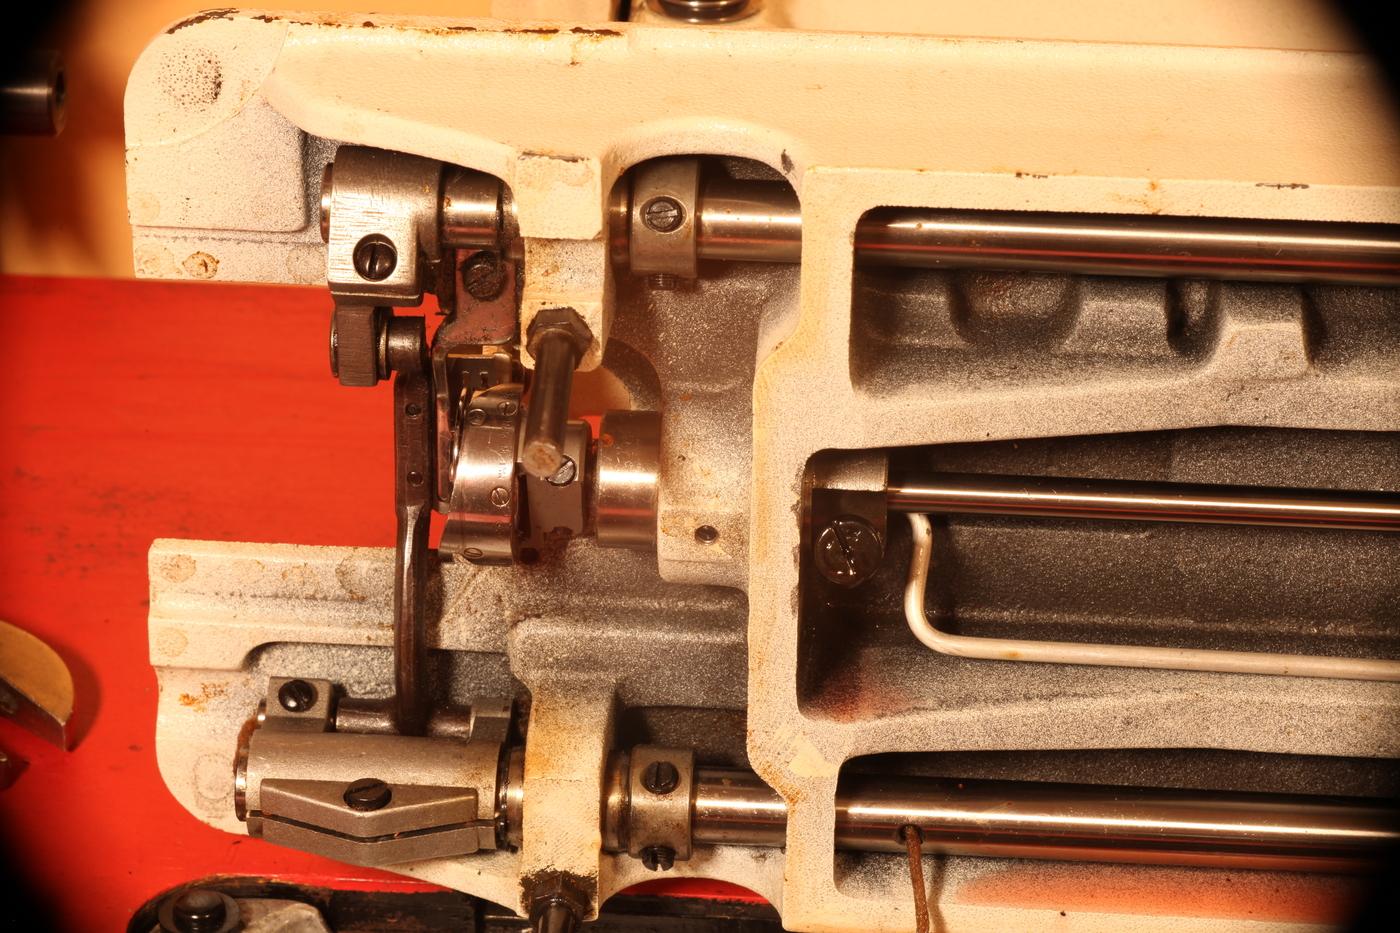
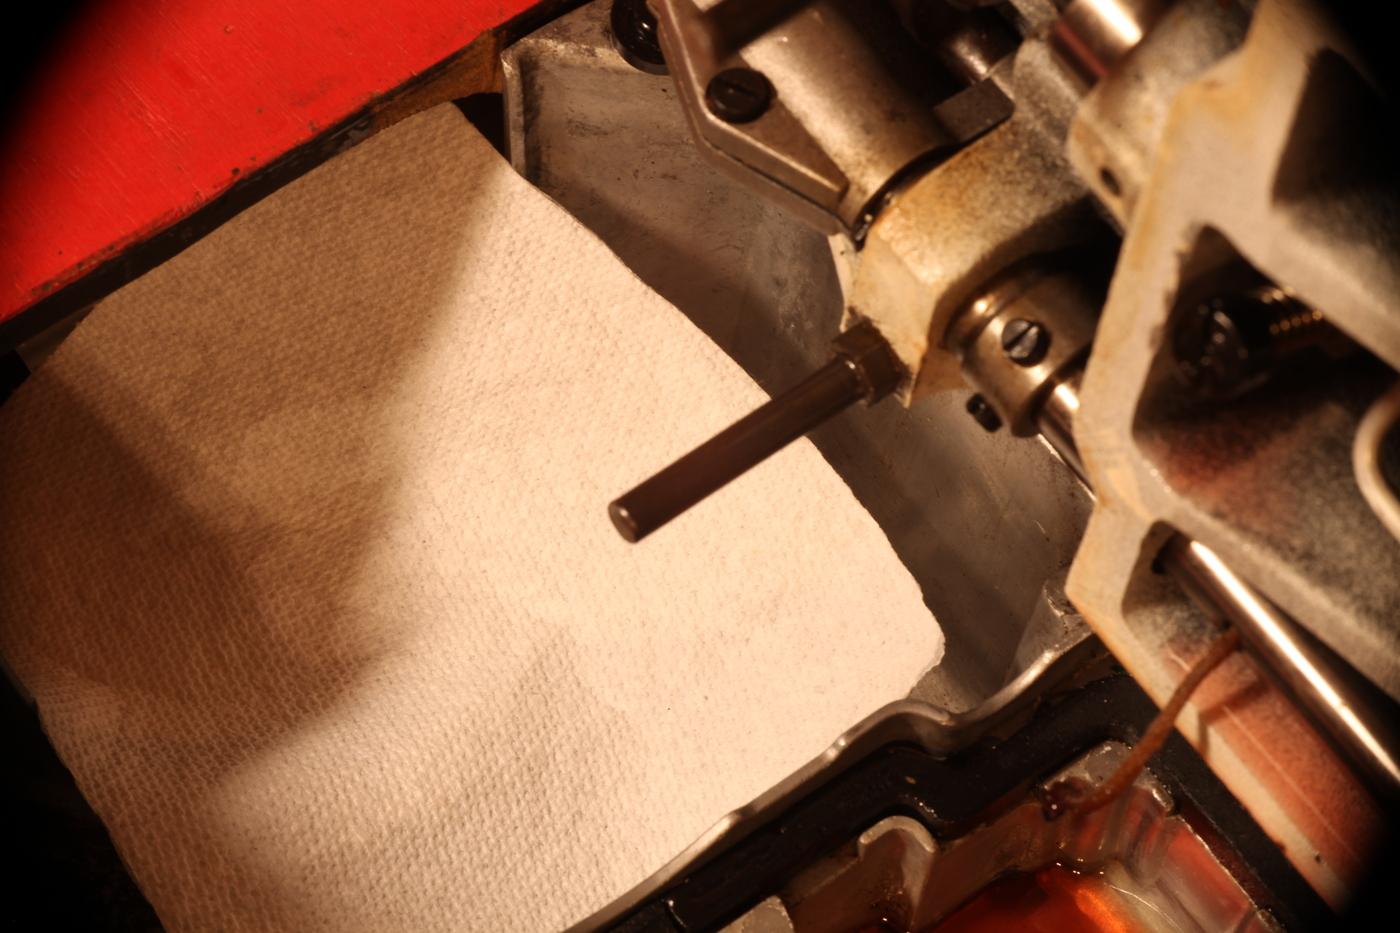
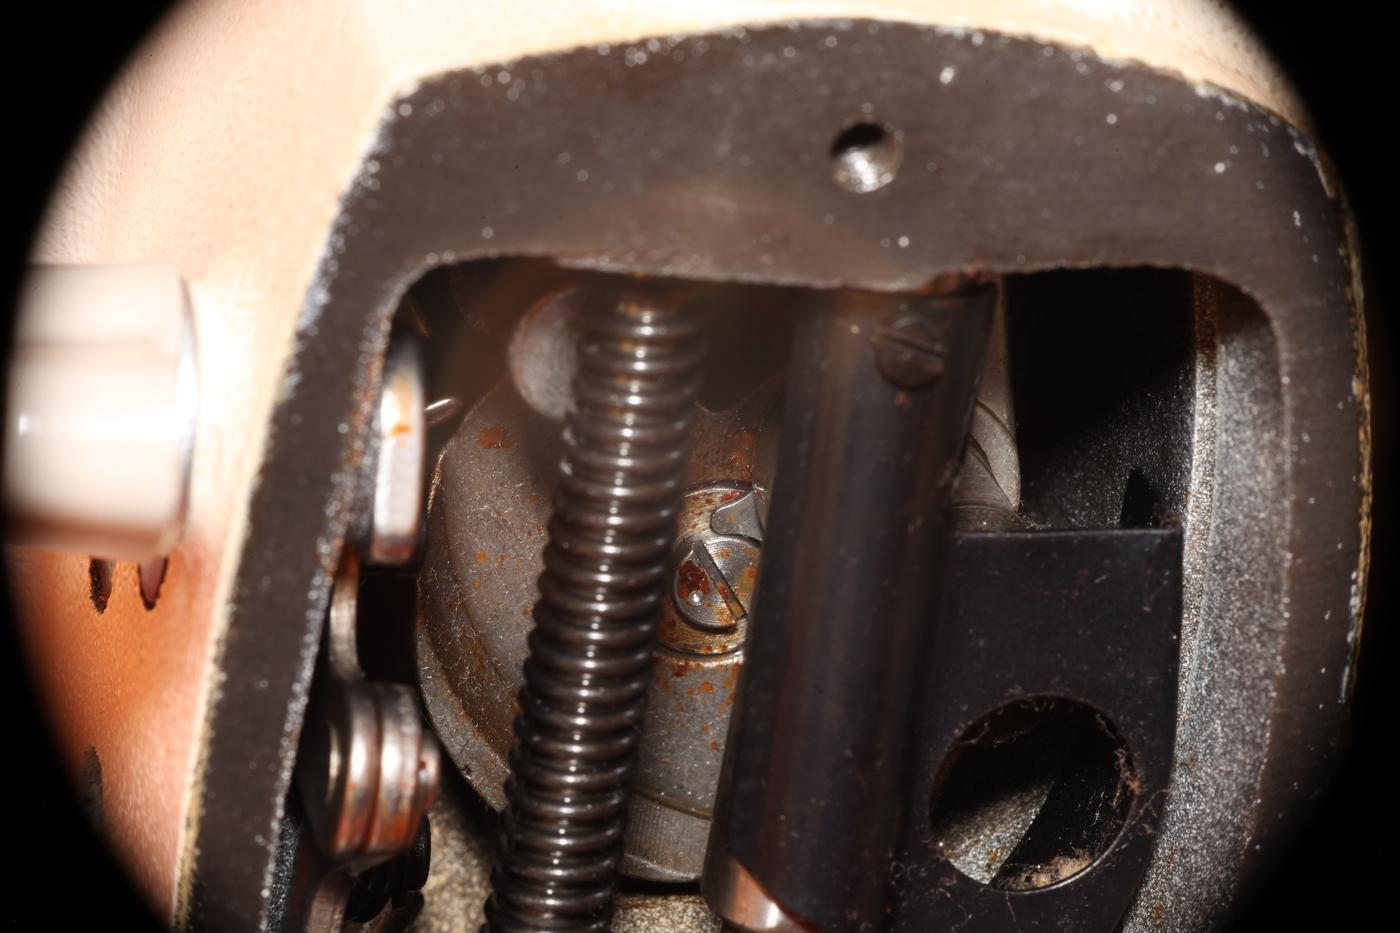
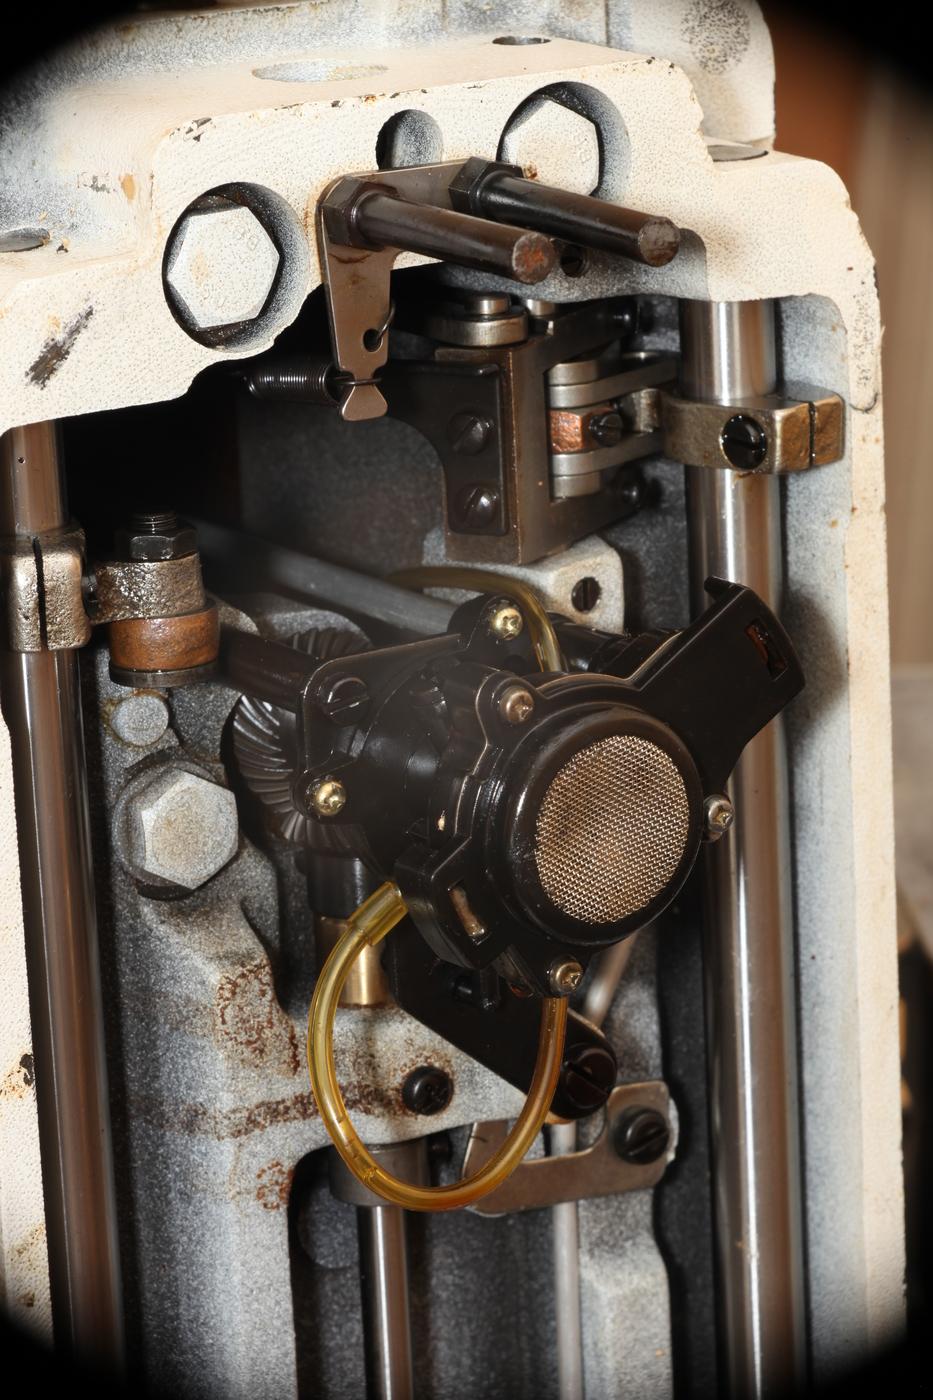
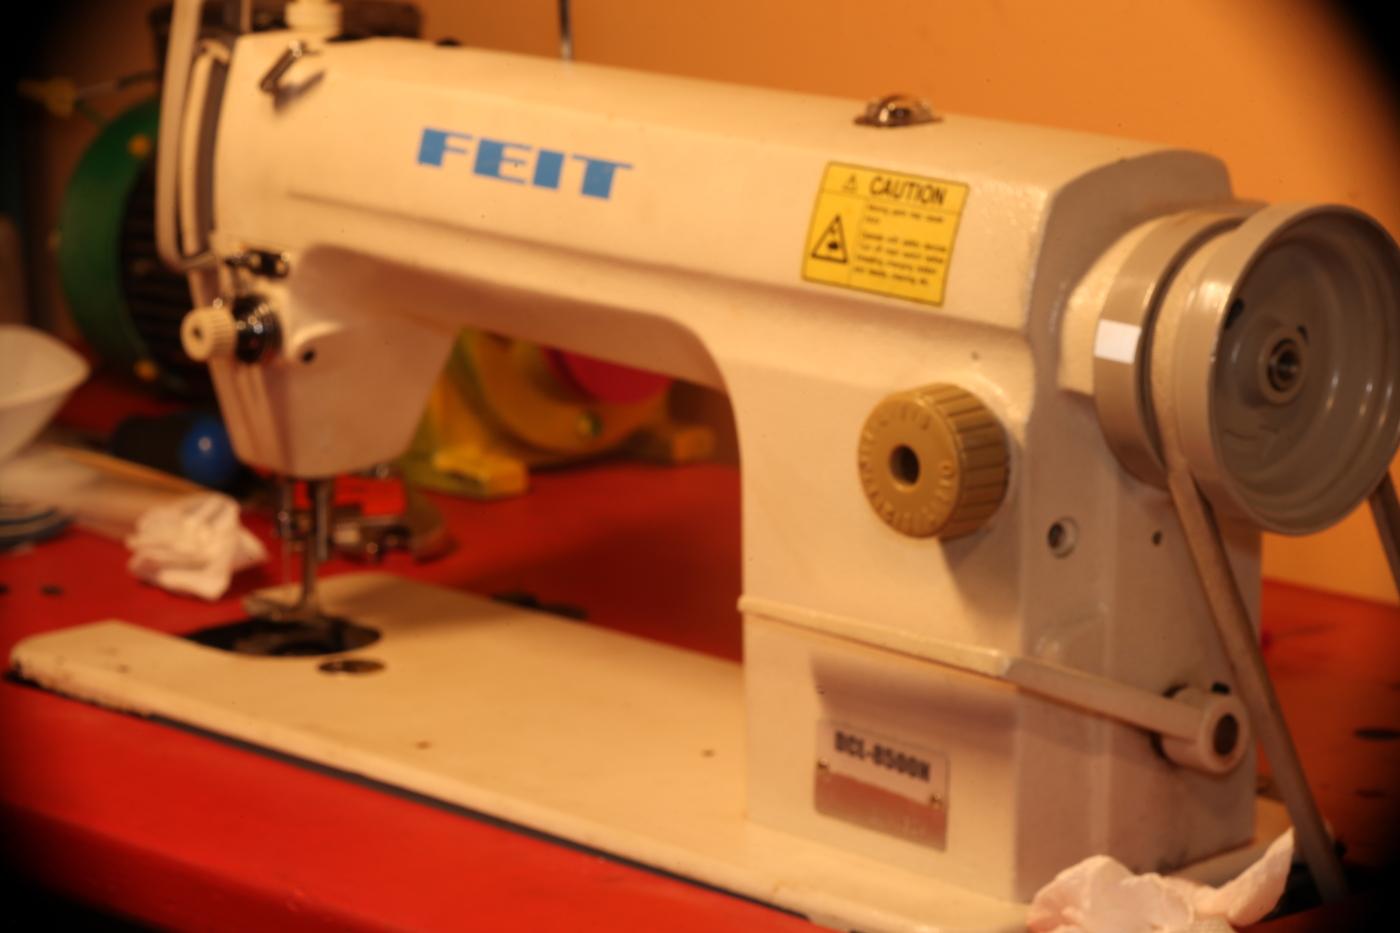
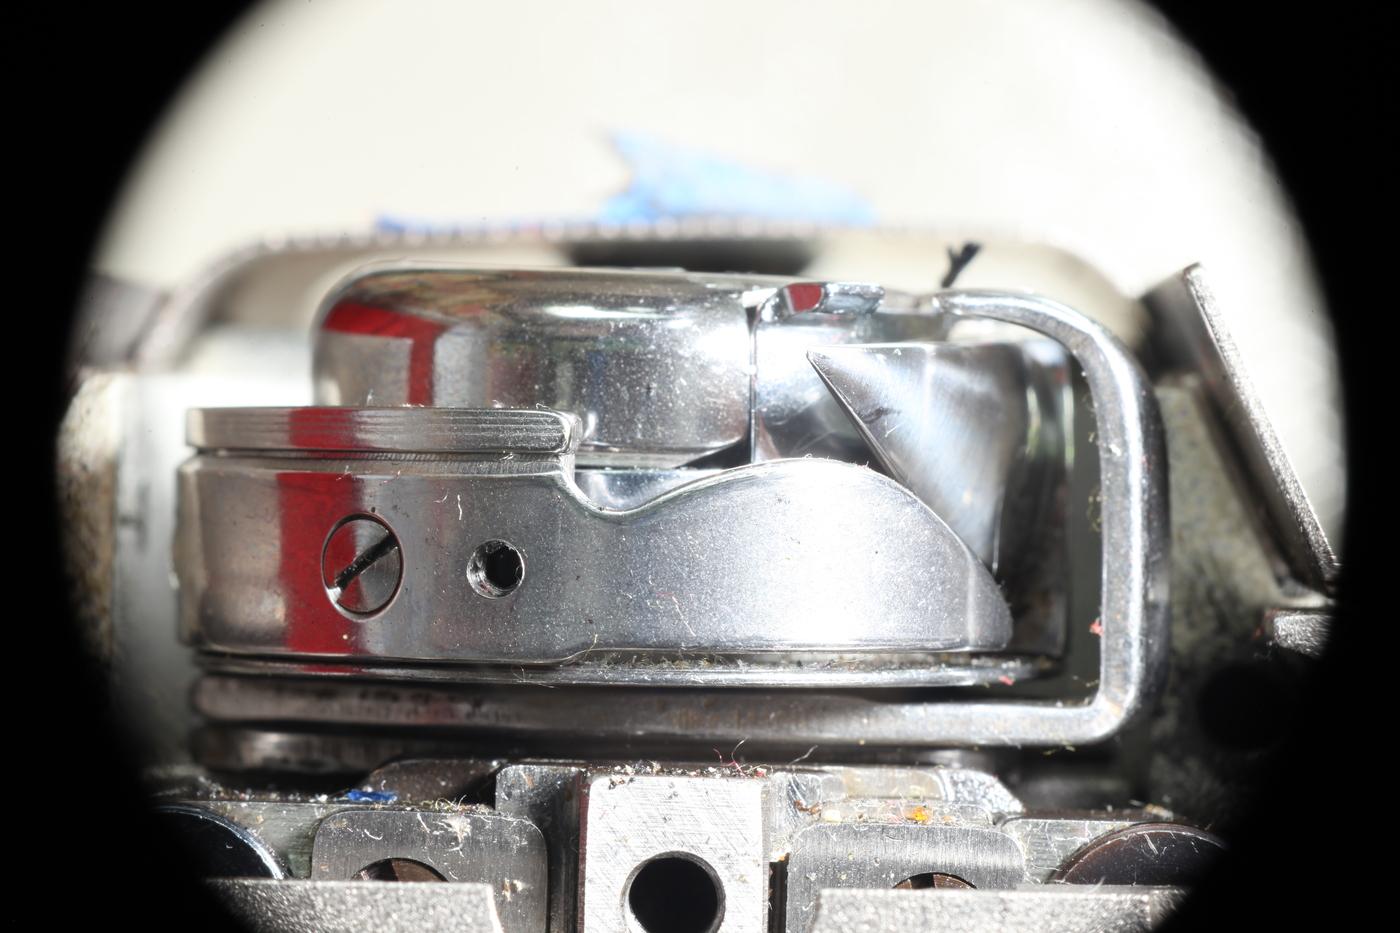
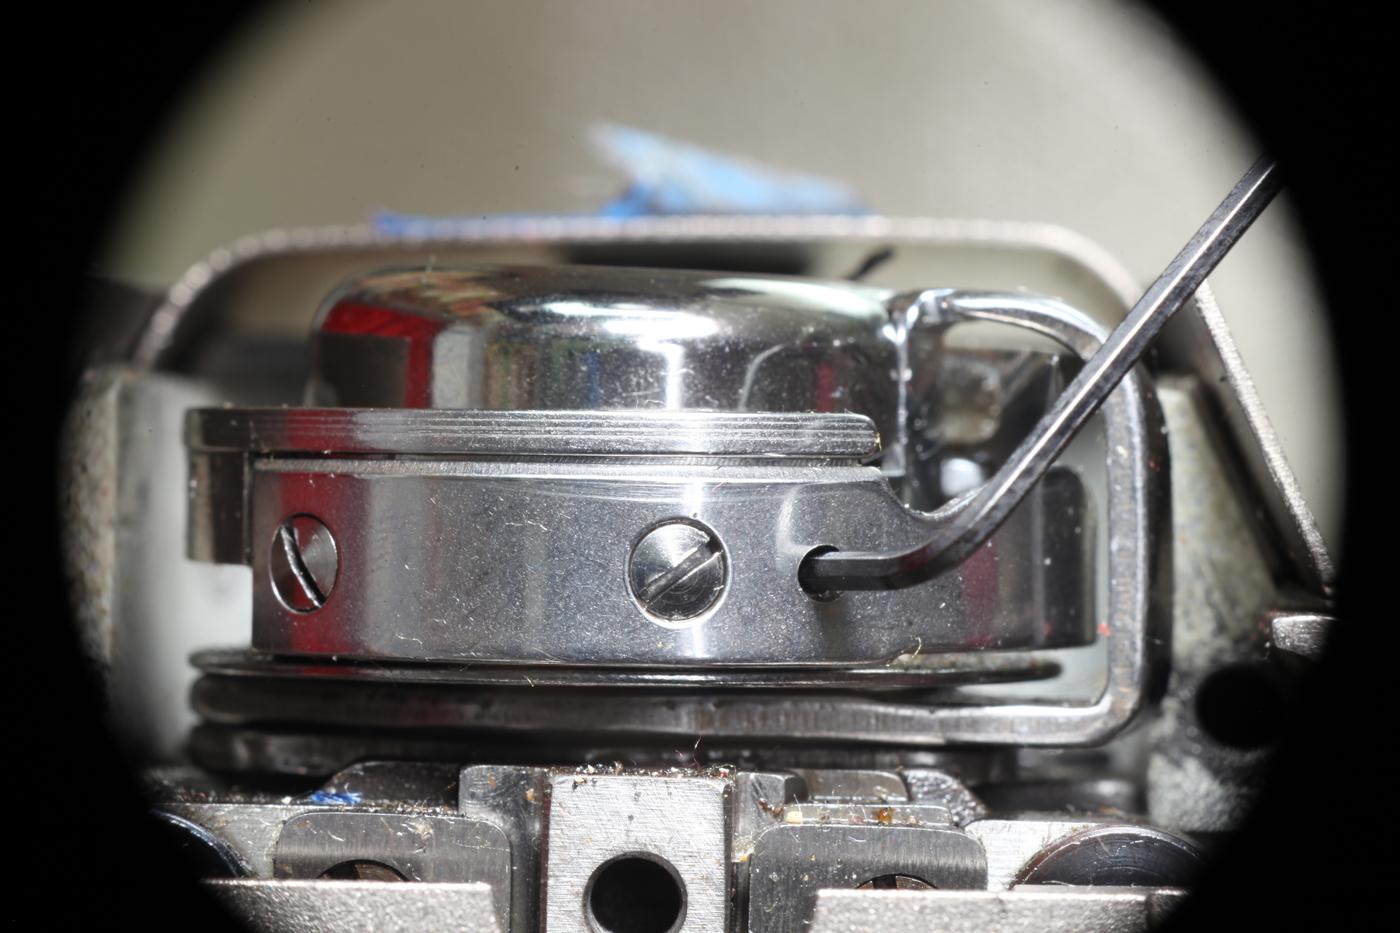
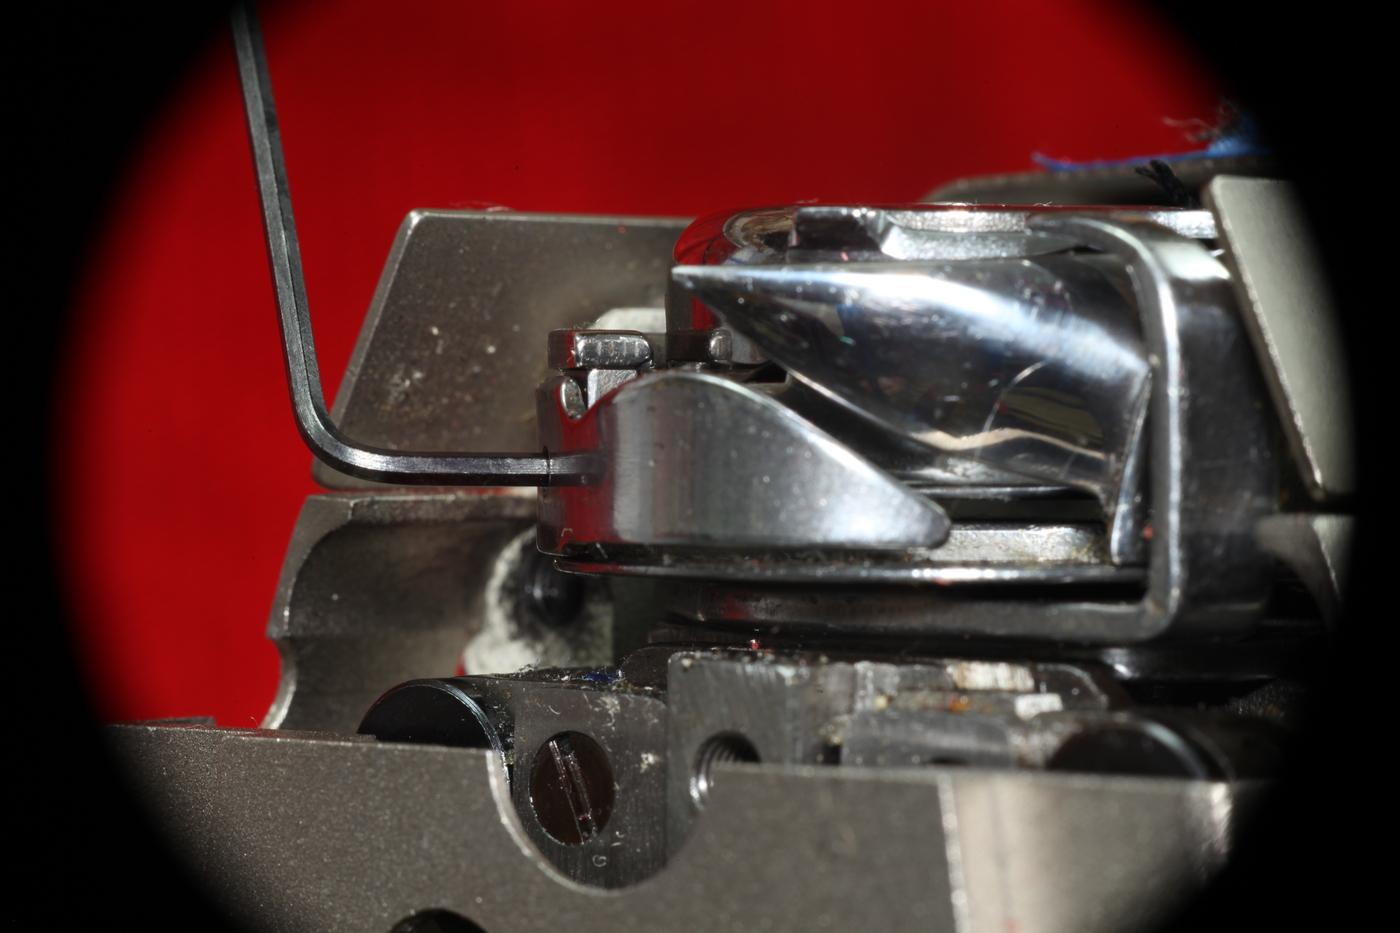
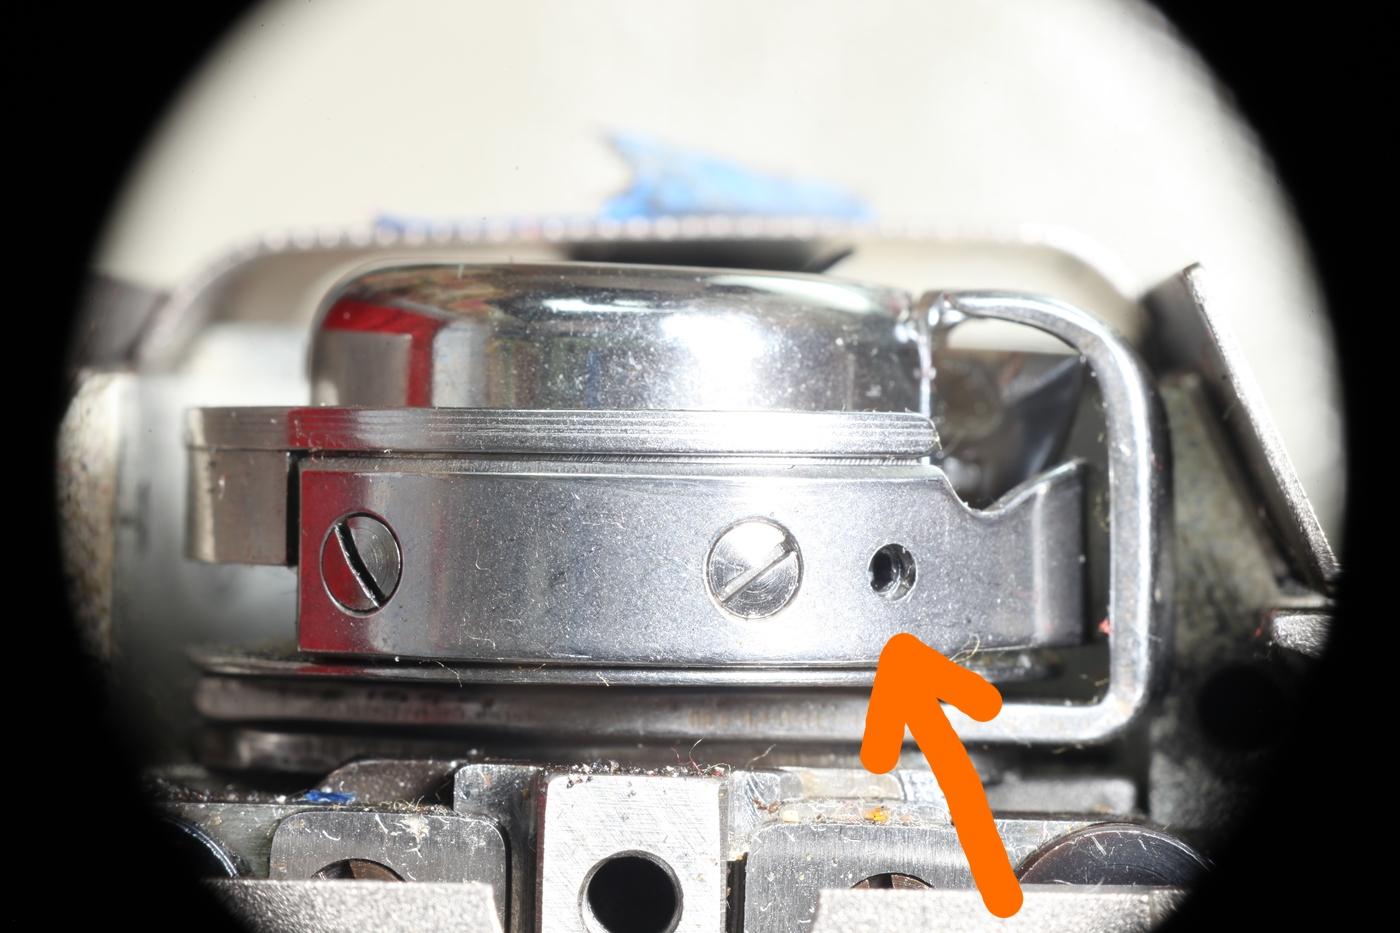
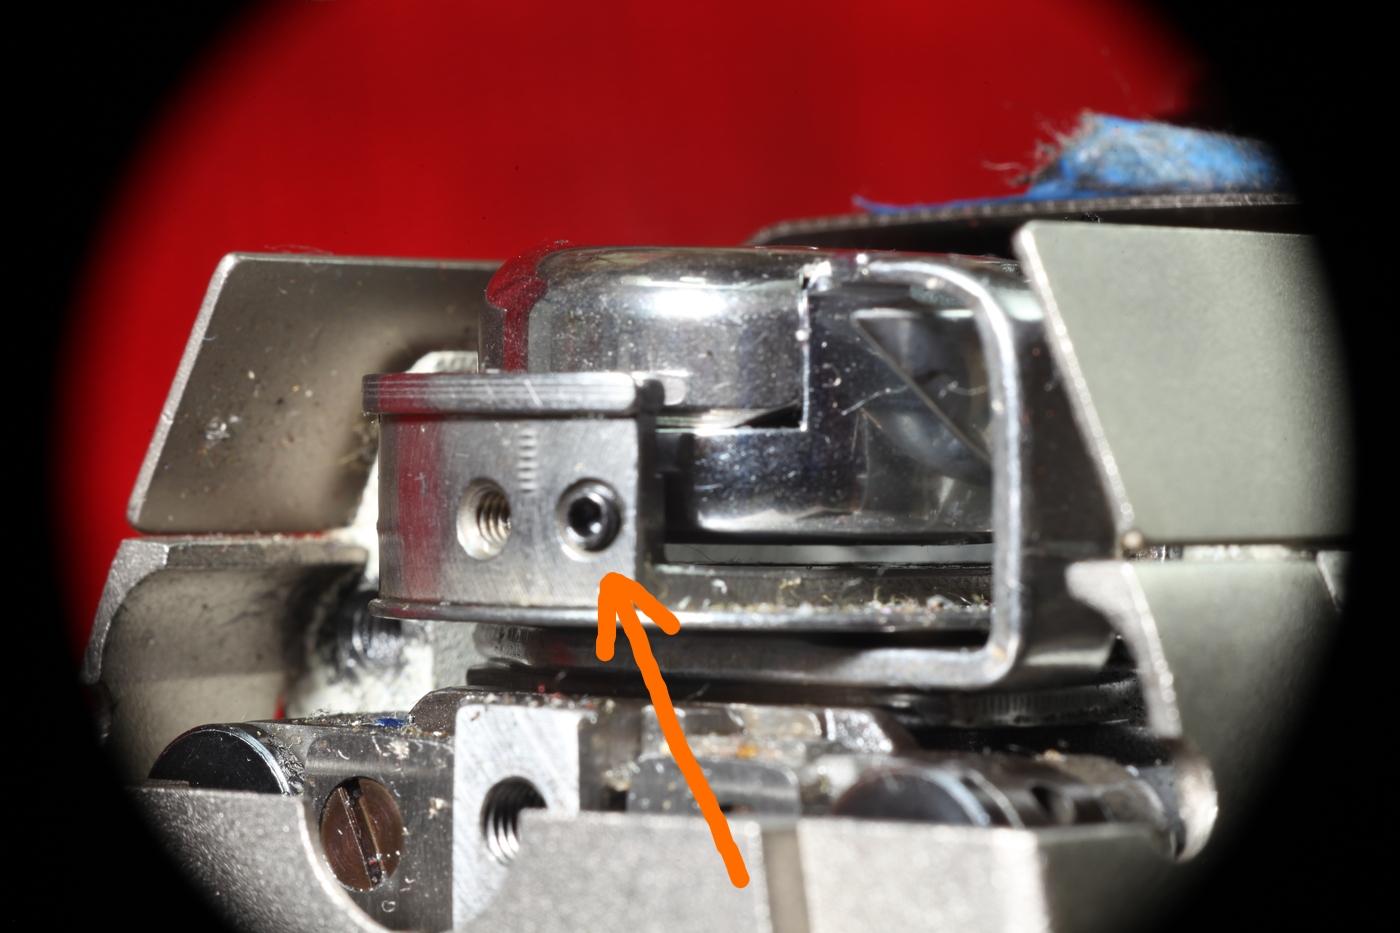
How to unclog the oil system on this cloned Juki DDL-8700? This is the first pumped sewing machine I've worked on. Machine has been sitting for about five years. Actual model number is FEIT DCL-8500N. Pump The oil pump appears intact. At low speed (200 rpm) it appeared to not pump at all, so I disconnected the vertical output pipe at the top and kept increasing the speed until around 1700rpm oil started spewing out the top of the vertical pipe. So there's at least oil now on the upper hook bevel gears. Splash Test But there's another tube that feeds the hook, and I'm not seeing any evidence of oil near the hook yet. In this video the man does a splash test with a paper towel to check how much oil is reaching the hook: https://www.youtube.com/watch?v=hQCUZs1-vUY&t=163s Here is my paper towel, still dry: Valves I have opened the valve that regulates oil to the hook: and also opened the valve that regulates the oil to the needle bar crank assembly: but still not seeing any on the hook or on the needle bar crank assembly. Tthe user manual says that when machine is new or anytime after it's been sitting idle for a long while to run the machine at 3000rpm for a period of 10 minutes. So far I've run the head unit a couple minutes at 2400rpm (checked with tach). I want to see evidence of oil flowing before I run it enough that it really needs oil, if you catch my 22. Filter? Earlier in this same video the man cleans out the filter in the pipe behind the hook: https://www.youtube.com/watch?v=hQCUZs1-vUY&t=59s so perhaps that will be my next move. As for the needle bar crank, I'm not sure sure what to disassemble to clear the way. Water Worth noting perhaps that I did find evidence of water in this machine. The oil pan drain plug is rusted in place and I did not manage to free it. Not even with mild application of a kitchen torch, a few hours soaking in diesel, and an impact driver. 🤷♀️ Also the old oil looked milky. And in part of the presser bar I found a couple drops of water concealed within some drops of oil. But I don't really expect water in the past to clog the oil pathways Manual I'm using this as a manual: https://www.juki.co.jp/industrial_j/download_j/manual_j/ddl8700/menu/ddl8700/pdf/instruction_eg.pdf
-
 I'm not sure. I've seen two different sized 4-pin connectors used for needle positioners. Have not tried mixing and matching.
 -
No, this is not typical from the 3-4 models I've used. Are you able to view the other settings? Can you upload the user manual that came with the motors? Is there a 4-pin connector on the back of the controller to accept a needle positioner?
-
It was very handy to be able to adjust it in increments. I had been breaking needles attempting to stitch through a 1/2" (12mm) stack of vinyl and foam (auto upholstery project). So I disconnected the belt and ran a few stitches by hand on a thick test piece and it wasn't very many stitches by hand before the hook point tried to bisect the needle. Ah-ha! After that discovered the needle guard adjustment screw, put some medium strength thread-locker on it, and backed the set screw out until the needle guard mostly prevented contrived collisions of the same sort. Then put it back together and stitched that troublesome seam in one pass (relief!). Not seeing any skipped stitches or unraveled thread yet (If I did I would think I had gone too far with the adjustment.)
-
I hadn't noticed this before, but I think it's an adjustment screw for the needle guard. (Jianglong 341) Looking closely, I could see a hexagonal shape behind the round hole. 1/16" (1.7mm) hex wrench seems to fit. Or from a different angle: Here I removed the needle guard and you can see the set screw that sits behind it: I've been wanting the needle guard to be stiffer anyway. (What good is a needle guard that just gets out of the way when the needle comes by?) Using this adjustment screw will mean there is a support closer to the bulge in the needle guard, so I expect it to flex less when the needle presses against it.
-
How to ease when sewing leather on a 1341?
friquant replied to joetroba's topic in Leather Sewing Machines
Oh that jogs a memory. I've got a deal in the works to buy this machine that has two foot pedals. It might be for raising the presser foot though 🤷♀️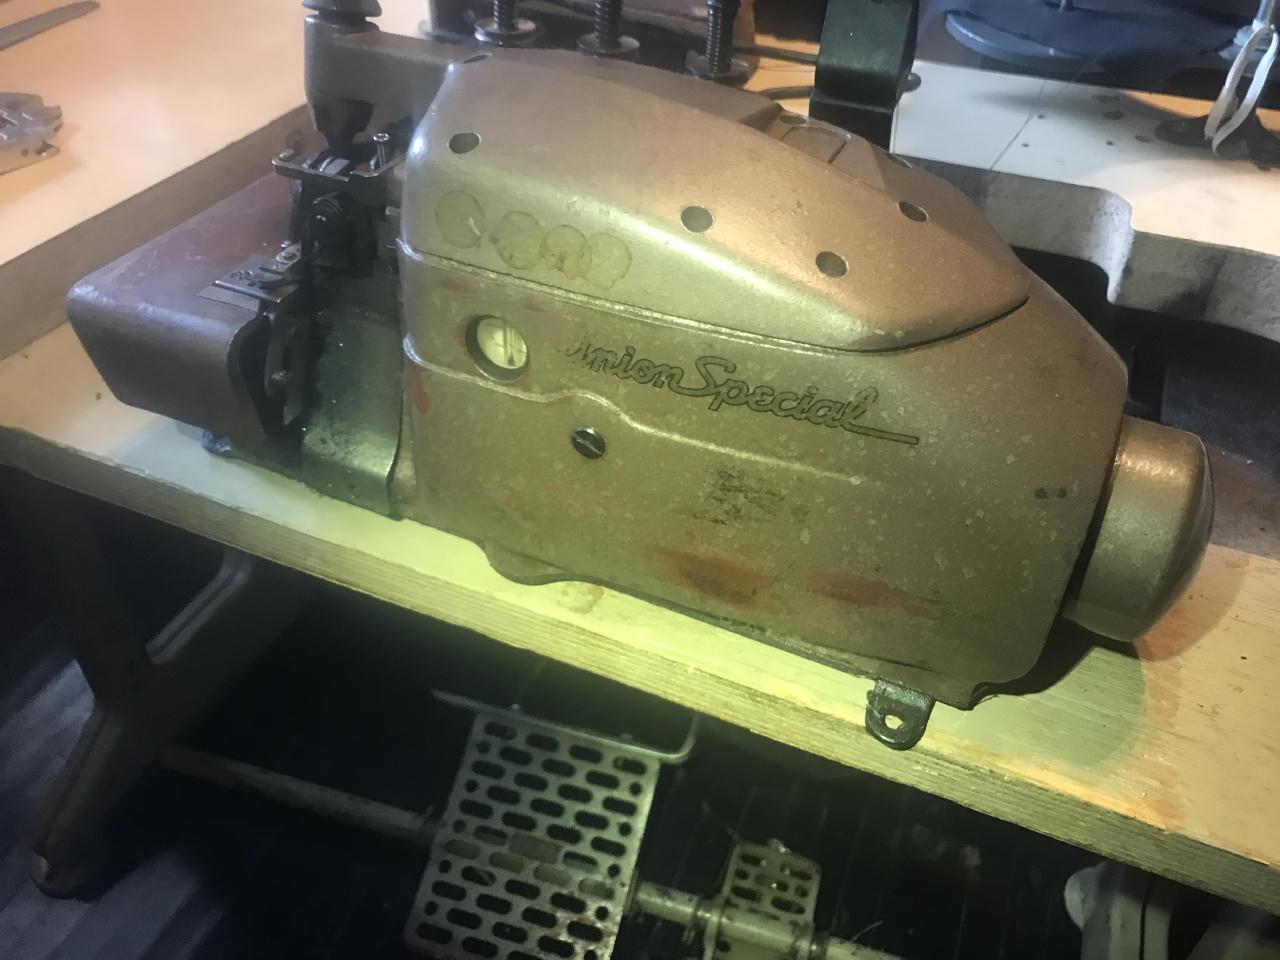
-
A bag maker in the making...with a zypper, no less 🌟 That seam next to the zypper would look cleaner if you pull the old thread off. (Looks like you made a seam, ripped that seam out, but left the old thread)
-
How to ease when sewing leather on a 1341?
friquant replied to joetroba's topic in Leather Sewing Machines
Sounds like a video in the making 😉 -
How to ease when sewing leather on a 1341?
friquant replied to joetroba's topic in Leather Sewing Machines
I'd like to see that. She appears to be using a clutch motor, based on the rapid start / rapid stop and the old style ON/OFF power selector. -
You'll have better luck if you start a new topic 😉
-
How to ease when sewing leather on a 1341?
friquant replied to joetroba's topic in Leather Sewing Machines
How does she make the machine feed in reverse? She's got a knee lift for the presser foot, but both hands in the shot when she reverses. -
How to ease when sewing leather on a 1341?
friquant replied to joetroba's topic in Leather Sewing Machines
Did you account for seam allowance? For a non-eased seam, the the pieces will have the same length along the stitch line. (Not necessarily the same length along the outside edge of the leather) -
It would be handy if there were a cross reference for beehive tension springs. You know, free length, diameter at base, diameter at top, and force when fully compressed. You can of course bend your own from music wire.
-
How to ease when sewing leather on a 1341?
friquant replied to joetroba's topic in Leather Sewing Machines
Interesting...Can you send photos of the pieces of leather that comprise a single finger stall? -
I'm assuming you only need one. And as others have said, VFD is a convenient electronic solution to get 3-phase.
-
Looks like a table-mounted bobbin winder could be a 3:1 speed reducer if you added a tiny pulley to the spot where you normally mount the bobbin.
-
No video But stills are present. Looks like you could make the pulley part of the handwheel three times its current diameter before it runs into the motor pulley. That would be a good start. And then check the foot pedal out like al was sayin.
-
Can you post some photos/videos of your Pfaff 130? Foot Pedal Does your foot pedal give linear response? That is, proportionally more torque based on how far your press the pedal? If not, buy a new pedal. Here's one I bought recently which gives good response: https://www.amazon.com/dp/B08D8WPWTY Slow Downers As for slowing it down (and increasing available torque) there are many ways to slow down a machine. Adding an oversize handwheel is just one: https://leatherworker.net/forum/topic/132445-domestic-motor-with-plywood-pulley/ Other ways include going to a smaller motor pulley, or adding a speed reducer between the motor and the machine. Or finding a motor that is slower in the first place. Here is a link to the Used Sewing Machines: https://leatherworker.net/forum/forum/84-used/
-
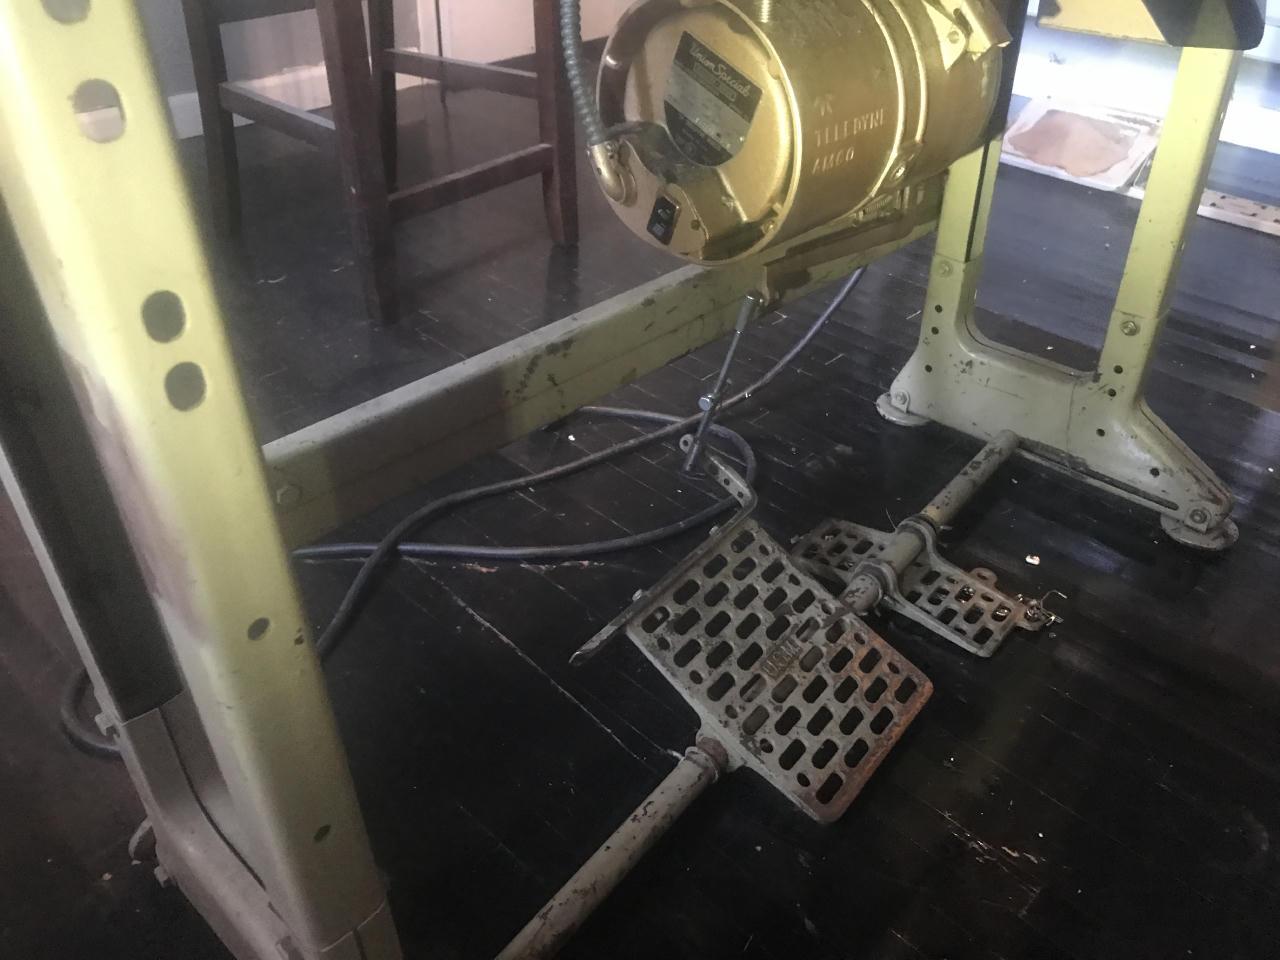
FEIT DCL-8500N : Stump for Tilting Machine Head
friquant replied to friquant's topic in Leather Sewing Machines
No lock screws on this one. I've got the head unit on my workbench, and I've been experimenting with different support points using a test support. Some positions are quite stable, other cause it to lift at the hinge line. I think I'll 3D print a new support (shorter than the original so the head unit pivots exactly 90 degrees) and use either a screw or double-sided sticky tape to hold it down in one of the stabler locations. The other idea that popped in would be to screw the support to the back of the machine head. But then I'd have to source screws that match the threads that the rear cover plate is already using.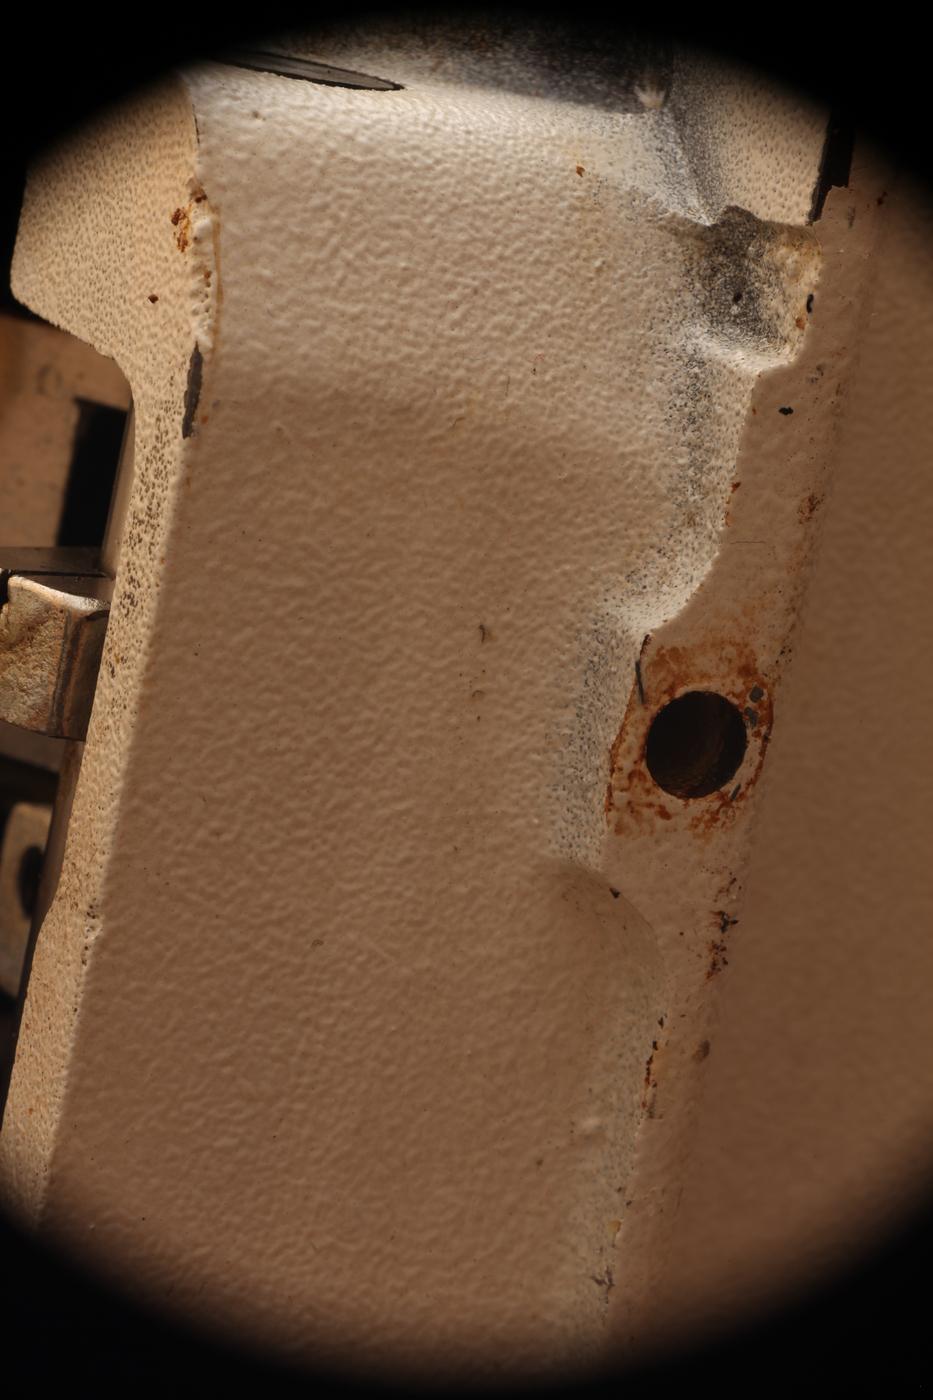
-
You can disconnect the belt while you diagnose.
-
FEIT DCL-8500N : Stump for Tilting Machine Head
friquant replied to friquant's topic in Leather Sewing Machines
Anybody care to measure the distance from the hinge line to the tilt stump on their machine? My working hypothesis is that a tilt stump too close the the hinge axis will lift the machine off its hinges. For reference, this is the hinge type on the table. I have not personally owned this style of hinge. It appears that even with the machine head tilted back, the hinge can still be pulled straight out of the table. But I suspect that is true of this other style as well: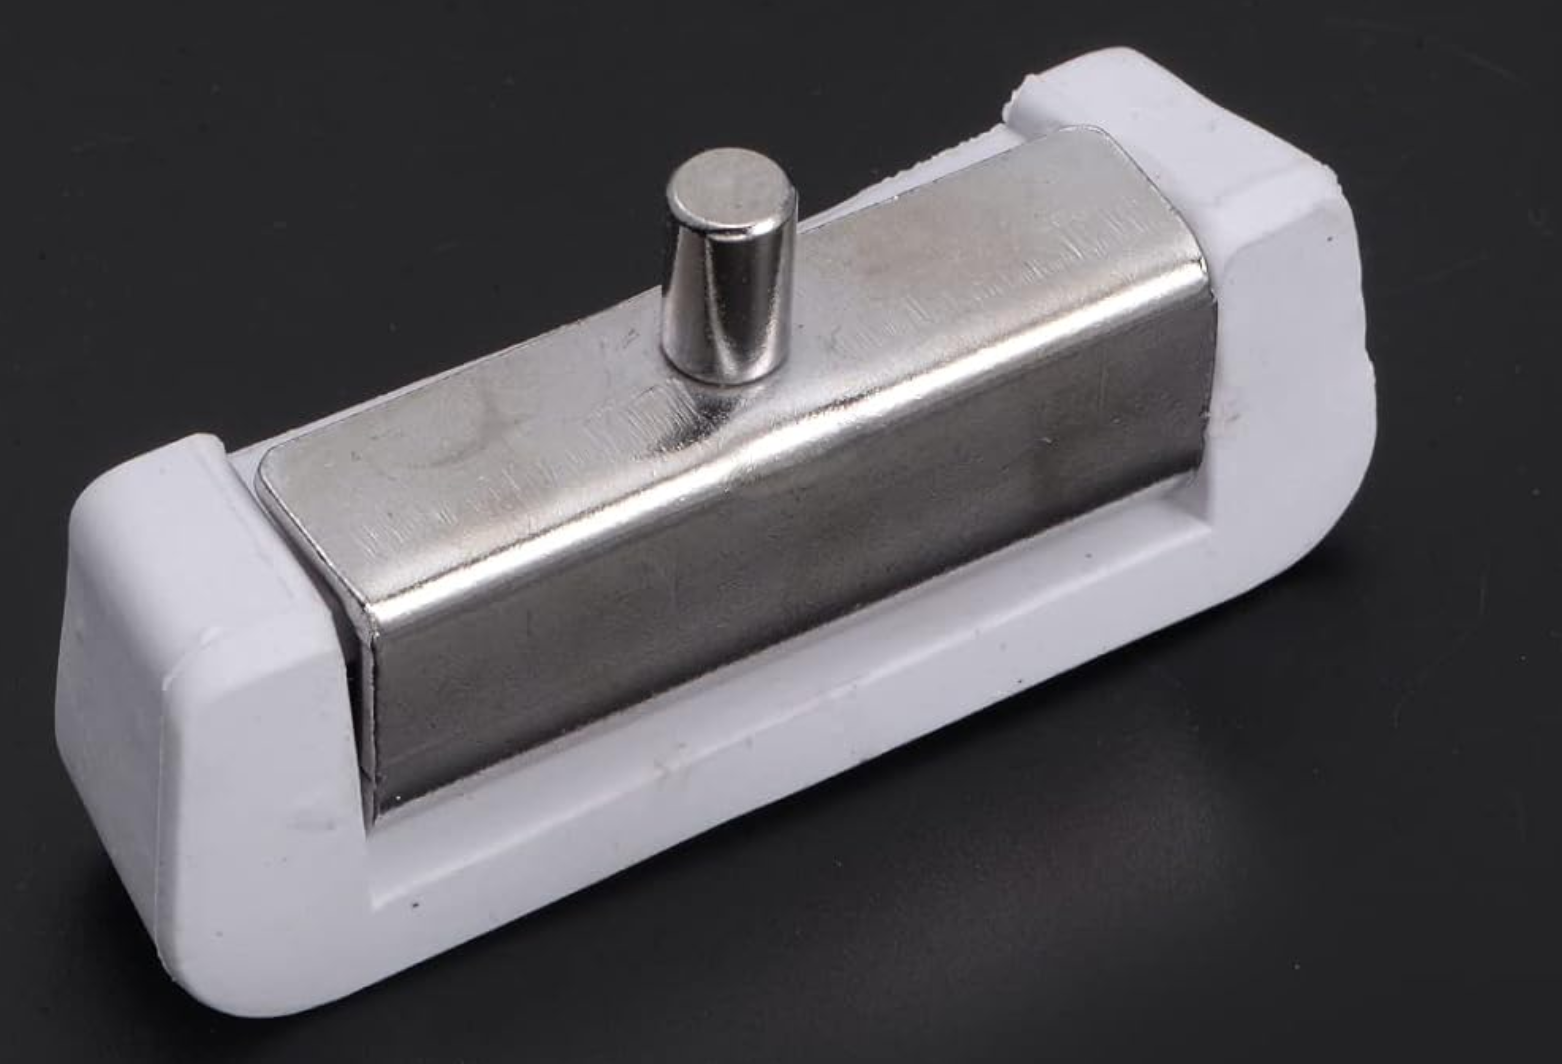
-
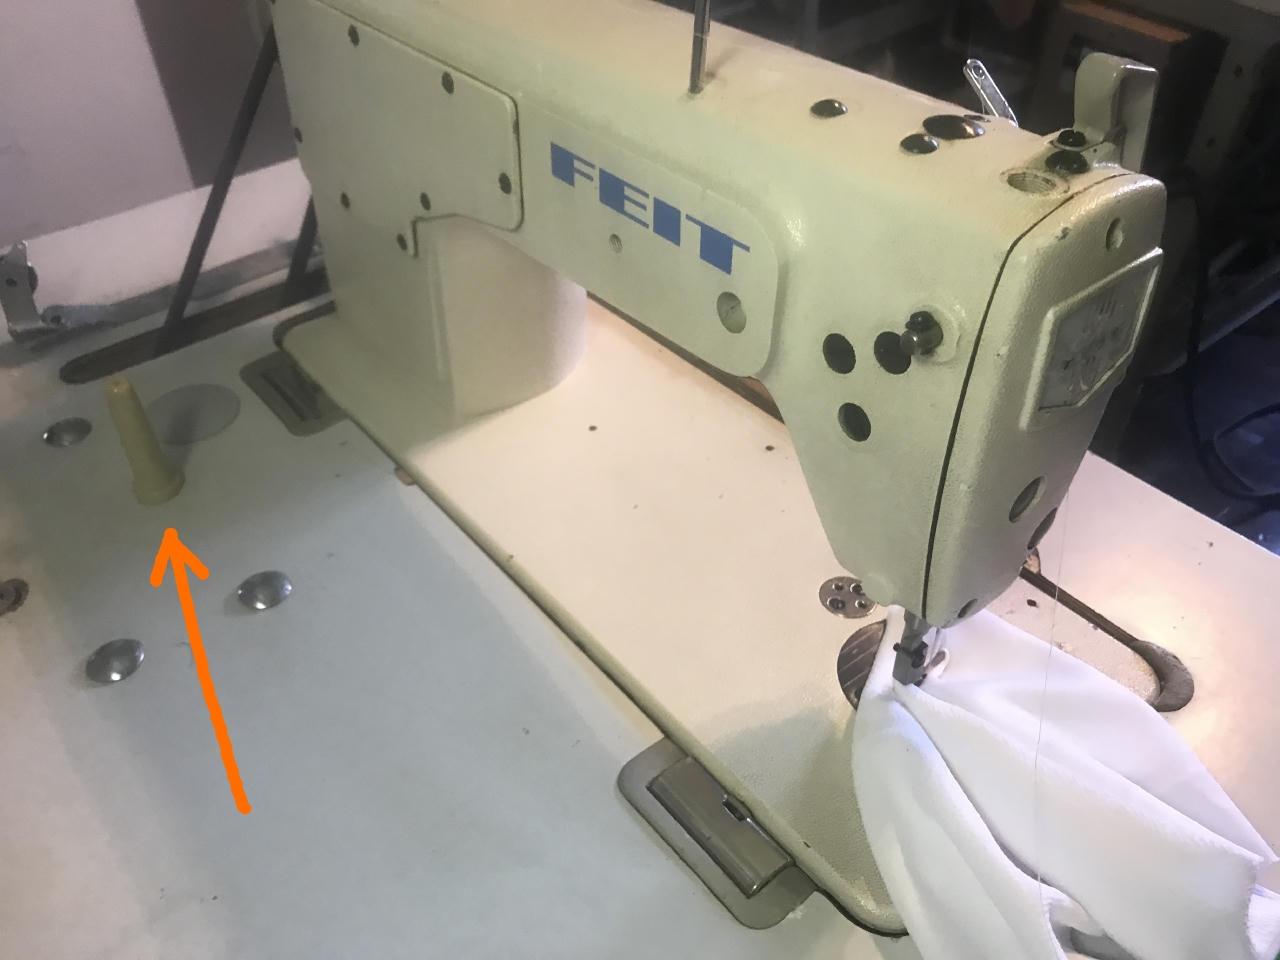
How does this "tilt stump" attach to the table? Is there a nut under the table? Or do I pry the plastic cap off to reveal a bolt head and it screws out the top? This is a customer's machine, a FEIT DCL-8500N. The closest manual I have found so far is this one for the Artisan 8500N. I brought the head unit home with me for repair. But I'm convinced that the tilt stump is in the wrong place. It prevented the head unit from tilting all the way back. But after a couple minutes, the handwheel end of the head unit slithered off the table hinge and into the drip pan. Nobody was hurt in the process, but seems liable to happen again. My intention is to move the stump further away from the operator, and a maybe a couple inches left (from the operator's perspective) so that it loses its tendency to lift the machine off of the table hinge closest to the hand wheel. But I'll need to pack the appropriate tools to do so, and while I was there I did not manage to figure out how it attaches. artisan-8500n__similar-to-feit-dcl-8500n__manual.pdf
-
I would recommend a bottom feed machine. I've been using this bottom-feed Singer 31-15 on a tabletop skirt for my thinner goods. We have a domestic sewing machine that would work as well, but I like bigger toys I guess. If the machine you're looking at is in sewing condition, you could take some of your canvas and thread (TEX 70 I'm guessing) and make sure it will sew through as many layers as you are likely to need, and make sure it has even stitch length when going over minor humps.
-
This box looks complex. It has the following ports which are common to a lot of digital servo motors: X1, X2: motor X3: gas pedal X7: needle positioner But then there's additionally X5 (head unit) and X4 (looks like a control panel) that most digital servo motor's don't have. In other words, I'll bet this is a proprietary system and that it will be difficult to buy the pieces individually.
-
Can we get a photo of the back of the box that says "pico drive"? Also can we get separate photos of each piece that plugs into the back of the motor? I'm not familiar with this model, but trying to see if all the parts are here.