


workingman
-
Posts
77 -
Joined
-
Last visited
Content Type
Profiles
Forums
Events
Blogs
Gallery
Store
Everything posted by workingman
-
Couple of wallets I've done. One is a pair of M9 Beretta's and the other is a Affliction style design for my little brother. Enjoy
-
I am about to do a seat similar to this one and was wondering how to lay out the holes on the side piece of leather ? The top is simple but when transfering the hole to the side piece wouldn't I end up with more holes since it is a larger piece of material?
-
Nogg, Great job on this one!! I am about to do a similar style seat for a customer any tips on the lacing process would be great. I myself have never done that style lacing so anything would greatly be appreciated. Matt
-
A Kings Queen Wallet
workingman replied to workingman's topic in Purses, Wallets, Belts and Miscellaneous Pocket Items
Thanks Brotha! I just used regular veg tan leather from Tandy's. To dye it, I used a combo of ox blood dye, dark brown dye, and antique mahogany gel. -
new wallet
-
Great seeing you back on the board again I always enjoy looking at your work! Great job!!
-
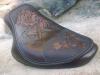
Just finished this seat and thought I'd post before heading out on The Pancho Run. enjoy!!
-
So here's the seat I did for Trent over at Biker Metric . For his Freedom Or Death build. This seat was a little different to do because, Trent is a graphic designer and lets just say "He likes layers upon layers. I had to simplify it and reduce the layers but I think I got pretty damn close to the original design. Anyways enjoy and thanks for looking!
-
Great job!
-
Thanks !!the grey is actually a charcoal black hi-lite , It's one of the eco-flo tandy's brand.
-
just finished this one. Enjoy!
-
Another way of preventing this is to line the back of the leather with blue painters tape before you tool anything on it. This really helps the leather not stretch and make sure that your leather is not soaking wet.
-
Thanks! and just to let you know it takes half a cow to make.LOL
-
A buddy of mine called me up and said he needed a bag to carry a 12 pack when he's on longer rides. this is what i came up with it slips over the back of his sissy bar and sits on a custom luggage rack . Reduced: 80% of original size [ 640 x 480 ] - Click to view full image Reduced: 80% of original size [ 640 x 480 ] - Click to view full image Reduced: 80% of original size [ 640 x 480 ] - Click to view full image
-
Just finished this for a customer of mine. enjoy!! Reduced: 80% of original size [ 640 x 480 ] - Click to view full image Reduced: 80% of original size [ 640 x 480 ] - Click to view full image
-
Did this for a customer Very fun to do but , These smaller wallets are getting Hard on my hands. I actually cramped up when I was using the knife on this one. anyways enjoy.
-
Yep Hobby Lobby, They hold better than the cups on a phantom pad.
-
New Wallet Design
workingman replied to workingman's topic in Purses, Wallets, Belts and Miscellaneous Pocket Items
Thanks Steve, To answer your question the skull is not dyed or painted. It is simply the natural leather. I have applied neatsfoot oil and tan- kote thou. -
New Wallet Design
workingman replied to workingman's topic in Purses, Wallets, Belts and Miscellaneous Pocket Items
Thanks man! Don't know what you would call it but the majority of the stuff I do is based on tattoo's. Hope that answered your question. -
New Wallet Design
workingman posted a topic in Purses, Wallets, Belts and Miscellaneous Pocket Items
Fun wallet to do came up with a new design for it since the customer wanted something a bit small than my normal biker wallet. Enjoy!!! -
Lone Star Wallet
workingman replied to workingman's topic in Purses, Wallets, Belts and Miscellaneous Pocket Items
Thanks! I used saddle tan and dark brown both feibings. And layered them in addition to dry brushing to blend . -
I had a blast doing this wallet!! I think to date this was my best tooling job. Anyways enjoy!!
-
Awesome as always!!
-
Hope you don't mind but you have inspired me to do something with my hood. Truly awesome!!
-
my favorite so far ! can't wait to see it finished up
