


Spinner
-
Posts
1,373 -
Joined
-
Last visited
Content Type
Profiles
Forums
Events
Blogs
Gallery
Store
Everything posted by Spinner
-
Thanks Roo!
-
Thanks Kate, be my guest. The main idea was just an exercise to get the great minds thinking and see if I couldn't start a pattern thread of flower alternate designs for folks to use or inspire their own drawings. I literally did this with a pencil, paper and a coffee cup while hanging out on the hotel patio, smoking a cigar and killing time before the wedding. Twas a good afternoon.
-
Thanks folks, glad to see that there is some interest in the subject. I plan to come back to this a bit more later in the week when I have some more time to just play and doodle. I also plan to examine the finer points of Sheridan flower carvings to try and better extrapolate things like John mentioned, the angles, overlaps and such. I'll update when I have more. Chris
-
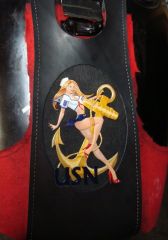
Here's the latest tank bib to come off the bench. This one was for a 2006 Honda Shadow Aero 750. The client is a Chief Petty Officer so we altered the original Billy Tucci artwork to include the USN and 1893 (on the anchor cross beam) and the arm patch detail to be all official CPO. We were also going to add the CPO cover (hat for us landlubbers) but it didn't look right so she kept the standard issue cover. W&C 6oz. leather, kangaroo triple loop lacing and felt backing to protect the paint. The bottom of the bib is wet formed to the tank and wraps underneath to secure with velcro on the bottom of the tank. Color was done with Golden Arcylic Fluid paints. 22 out of the bottle colors and 13 custom mixed colors. Close up of artwork
-
That looks great Nomad! Question: How well do the Angelus colors cover each other? Like, will the white go on over another color that may be underneath and still look clean?
-
Actually, I subscribe to Bob Park's method pretty closely. Use an edger to knock off the corners, sand the edges to a good rounded profile (220 works well) and then slick down the fibers using a light application of saddle soap & water. rub it in with your finger until the fibers lay down. You don't want a damp edge, just slightly moist and slicked down. Once you have that, run the burnisher over the edge using light pressure and mid-range speed (about 15-17k rpm on most dremels or 1100 rpm on drill presses) and work in a steady motion. Don't stay in one spot too long or it could burn the leather (you'll actually see smoke if you stay in one spot too long). If you get around the whole piece and a spot or section needs a touch up, simply reapply the saddle soap & water lightly over the edge and reburnish. The saddle soap & water mixture acts as a slicking agent and friction heat reducer. Once everything looks nicely rounded and smoothed, dye the edge (if you haven't already) and let dry. Once the dye is dry, apply your favorite top coat - I like Pecard's leather dressing, and polish the edge with a bit of demin or canvas. You can follow this up with a quick polish (no compound) with a diaper cloth.
-
Anchors Away tank bib painting complete
Spinner commented on Spinner's gallery image in Our Leatherwork Galleries
 Thanks guys! Glock, I'll drop you a PM with the info...
 -
Thanks Clay. I had to pause to get ready for a wedding we're heading out for soon but I'm definitely going to play with it some more. As you mentioned, wings, banners, kanji, pearls, koi fish, etc. Could all be incorporated to create a larger more complex design. The nice thing with dragons is they can be long or short so I can carry one from the main circle to a second circle to move the pattern across space. My thought is to make this into a panel that can be used on a tank bib eventually for my wife's bike to see if the idea works on leather.
-
While I appreciate and can view with awe some of the pieces folks put out in the traditional Sheridan Style with flowers, vines, leaves, etc. I have to admit flowers don't do it for me and I find myself bored to tears when trying to tool them. Many an artist and instructor has told me if the work doesnlt appeal to you somewhere inside your heart or mind, you'll have a hard time creating an emotional response from viewers of your work. So today while on a trip, away from my tools (most of them anyway, I did smuggle a swivel knife and some scrap to play with) I started doodling the attached sketch. I think with some work it could easily turn into a drawing large enough to fit onto similarly tooled items but provide non-flower folks a way to emulate sheridan style patterns...thoughts, comments, other examples? Chris
-
From the album: Three Mutts Customs pics
Gas tank bib for a 2006 Shadow Aero 750 in process. Tooling & color are finished, just need to add the lacing and felt backing. 22 'out of the tube' colors and 13 custom mixed colors used in this one, all done with Golden Fluid Acrylic paints. Black is Fiebing Black spirit based dye.© © leatherworker.net
-
Found out about this website today so I thought i'd share in case folks wanted to be cool like Kevin King and experiment with custom printed fabrics for wallet & bag linings, etc. http://www.spoonflower.com/ It's not cheap as far as fabric goes but when you consider there is no minimum and it's custom printed with your design, it's not too bad at all. They also offer discounts if you created/own the design and some for larger orders (20 yards+). Enjoy! Chris
-
Hey bigtree, I got the order, I'll add it to the list for tomorrow night with Sixer's and have it in the mail Thursday morning. Based on your location I would expect them to arrive by Saturday.
-
Looks pretty cool Ds, I've been thinking about making a set of motorcycle bibs using the same style...may have to get on that, the pattern looks sick.
-
LOL! yeah, the forum name thing cane be a pain. I was thinking of updating it to Three Mutts (my leather site name) but folks still wouldn't connect it to the burnishers so figured just leave it as is... Just got it a bit ago Sixer, I should have it in the mail by Thursday morning (have a bib wet forming in the shop today so I can't create a bunch of cocobolo dust tonight - dirty red bib isn't what they ordered! haha! Good deal bigtree, I'll keep an eye out for it. I usually have them in the mail within a day or two.
-
Well, here's one down for you...I have the T-mobile G1 smartphone. Measurements are: 4 5/8" long, 2 3/16" wide. The thickness is a bit weird due to the bottom of the phone having a slight dogleg curve to it. But, measuring from the tabletop, the top of the phone is 11/16 thick and the last 1/2" or so at the bottom kicks up so that the thickness from the table becomes 13/16".
-
And I hear he's a pretty cool & good looking guy too...
-
May have a custom job coming up for get this...a Navy aircraft carrier...not the tooling, but where the tooling would be hung. weird.
-
WOW, Very cool Chris - when will you find out if you got it? Do you have an idea how big the piece will be? Good luck to you – you deserve the job!
-
Thanks LNL, we're discussing project particulars and such now. They are looking at a 36" dia. piece. Should know in a week or two but bidding has been tricky as they won't share the budget for it. LOL
-
-
Here's what a swingarm bag looks like (from sideroadcycles.com): The problem you'll find in securing a pattern is that most folks make their own patterns and nearly each one is going to be bike make/model specific. Unfortunately I don't have one to share but maybe one of the other bike guys will.
-
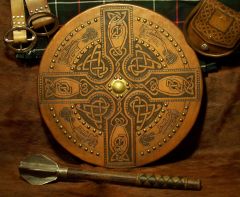 These are really cool! I don't think I have seen good pics of handmade shields before.
 -
Info & prices on the chains? I've been keeping notes on the chainmail makers that have been mentioned on the forum lately and plan to do a thread listing them all for folks to use/compare. If your son could use a little free advertising, send me the info here or via PM and I'll add him to the list.
-
Rubbing Alcohol Wet Molding Holster
Spinner replied to Clay B's topic in Gun Holsters, Rifle Slings and Knife Sheathes
I don't do holsters but I do wet form a lot of motorcycle parts. That being said, I can't see the alcohol keeping the leather moist enough for long enough to get a good form molded. The other thing to consider is that alcohol has a tendency to dry out leather a bit and using the amount you would need to wet form could cause undue damage to the fibers. Water allows you more working time, is a natural lubricant and best of all, is free. -
Yeah, that site has a ton of great info related to painting. Pics will be forth-coming, I did post a pic of the tooling done in the LW gallery so far.
-
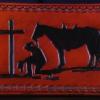
I agree if the piece is going to be simply oiled and left natural like those in the picture; but if the piece is going to be full color with shadows, shades, not to mention other bright acrylic colors, the singlular tone of natural leather will simply look out of place. My current project of reproducing this illustration in full color on a tank bib will require a few more shades & tones to make it look right.
-
Here are a couple of popular ones for you: http://www.phillipsengraving.com/Leather_Stamps.html http://greyghostgraphics.com/stamps.html I got mine from Phillips and it has been great. Many folks on the forum have used Grey Ghost and are happy with them as well.
-
Just passing along good info I found today. I'm working on a 50's style Navy themed Pin-up bib for a motorcycle and realized I didn't have or know how to mix flesh tones. So to the interwebs I went and after about an hour i found the best article out of 20 or so that puts in excellent terms. The colors used are widely available and use common names so anyone should be able to do this. Enjoy! Chris http://www.paint-sculpt.com/tutorials/skintone_pallet/skintone-pallet-page-1.html