


Wizcrafts
-
Posts
7,814 -
Joined
-
Last visited
Content Type
Profiles
Forums
Events
Blogs
Gallery
Store
Everything posted by Wizcrafts
-
Help to choose right sewing machine!
Wizcrafts replied to Gilbert's topic in Leather Sewing Machines
The old iron Singer is the most likely candidate for sewing wallet interiors. But, you will have to upgrade the motor to a brand new one drawing twice the power (e.g., 1.5 amps/150 watts) of the one supplied by this seller (0.8 amps). Expect to pay between $75 to $100 for a new motor, with the proper plug and foot controller. The 0.8 amp motor is likely to overheat if you routinely sew leather. This will cause it to smoke out and possibly catch fire. You will also need a Teflon or roller equipped presser foot to keep the leather moving. The rest of the accessories that come with the machine are useless for leather sewing. Finally, buy leather point needles in size 18 and 69 bonded nylon thread. I recommend the more expensive titanium coated needles. Stay away from the plastic body models. There is no such thing as an industrial strength sewing machine. It is a marketing term used by rip off sellers on eBay. It is either a domestic/household OR industrial/commercial sewing machine. There is no in-between unless you go to a portable Sailrite walking foot machine (dual feed only. Marks leather). -
Flat bed sewing machines are best for sewing totally flat items. If your saddle components are to be sewn flat, a flat bed gives lots of support to move and turn them without losing balance. However, if any of the parts must be sewn on an upward or downward curve, a cylinder arm is a necessity. Also, if you have to sew directly to the right of a surface the extends below the top layer, a cylinder arm is needed. There are extra heavy duty flat bed machines that use the same hook and bobbins as our 441 type machines. They allow you to sew with up to #415 thread. Just keep in mind that a flat bed will always need to sit inside a cutout in a table. A cylinder arm machine sits above the table to let items curve down as you sew, or to let lower levels pass by on the left side (hardware, formed cases, riggins, stirrups, etc.
-
Modern cameras, especially those in the newest smartphones, take photos of many megapixels in filesize. these photos can be enlarged and printed in magazines and even on outdoor banners and signs. If you are only taking a picture for use on a web page, try reducing what is referred to as the "resolution." 800x600 pixels is a good size for web use. Forum software will reduce that to about 50% for the on-page display, then render the full size when it is clicked upon. As is, your photo is already at 931 kilobyes and just over 800 x 600 resolutiion. Otherwise, this simple close-up of your patcher shuttle, can occupy several megabytes and render at banner size.
-
Try contacting Weaver Leather. They are an Adler supplier to leather sewers and are located in Amish country, in the USA
-
I gotta ask; is the #22 needle you are using a 7x3 round point? I ask because leather point #22 are hard to find in system 794, or 7x4. If you are using a round point system 7x3 in leather, it will grab, overheat and cut the thread. Instead, order a pack of system 794 #23 leather point needles. You will have much better results.
-
Trouble Installing Singer 31-15 Roller Foot
Wizcrafts replied to Daniel G's topic in Leather Sewing Machines
Unless the machine being converted has wide feed dog teeth on the left of the needle hole, I recommend buying the complete roller foot conversion kit. The feeder that come with the kit places a nice wide aggressive tooth dog exactly to the left of the needle and allows you to position the edge of the roller directly next to the needle. -
Trouble Installing Singer 31-15 Roller Foot
Wizcrafts replied to Daniel G's topic in Leather Sewing Machines
That is the presser foot pressure screw. Remove it, then loosen the screw or screws that secure the presser foot raising block to the bar, raise the bar until the unfolded foot sits flat against the feed dog, then tighten the screw and reinstall the spring.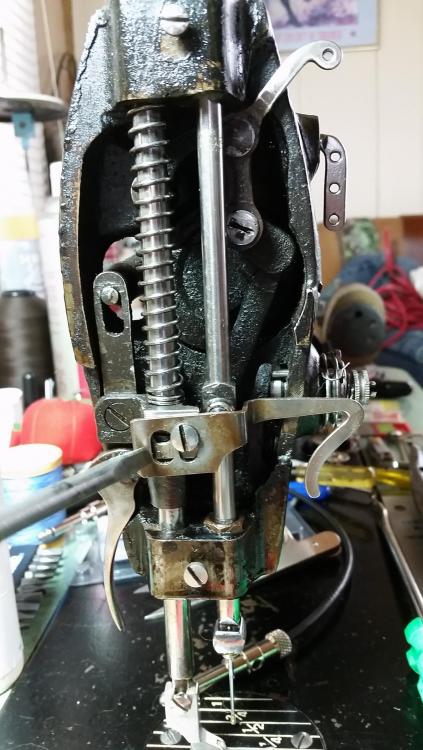
-
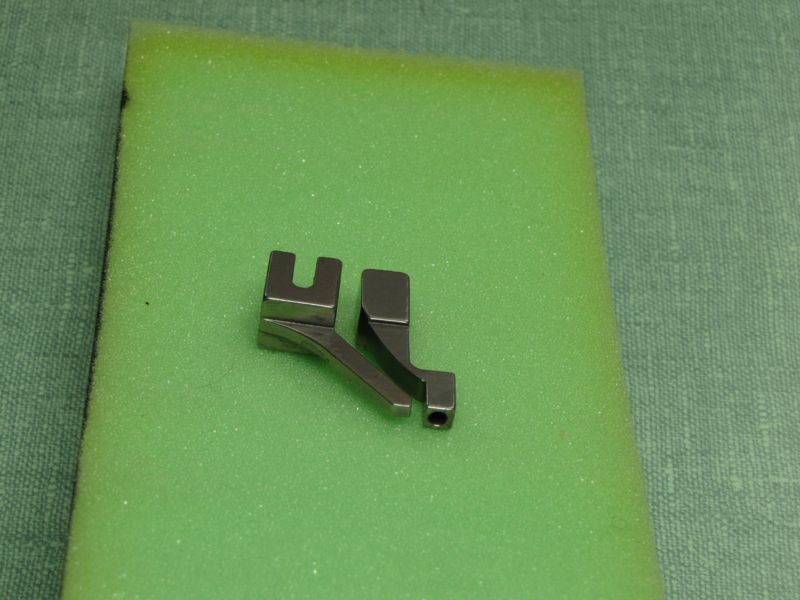
As for sewing close to hardware with a narrow edge, Cowboy made a set of feet that are inline for the 441 clones. I have that set for my CB4500 and use it for those rare times when i have to sew a sole back onto a boot or shoe, or sew a shaped pouch or case very close to the raised side (with too little room on the right). Contact Bob Kovar, at Toledo Industrial Sewing Machines, at 866-362-7397, for the price and availability.
-
If you can get a fully operational Campbell Lockstitch machine, with extra bobbins, needles and awls, in good condition, for only $3,000, grab it! These machines list for $6,000 plain Jane.
-
Here's one source for a roller foot conversion kit. Most industrial sewing machine dealers I know carry these.
-
I used to have that model. I used it to sew vests around the arm holes, pants legs cuffs and other circular items. It is an okay machine as long as you know how to deal without reverse. I has a smallish bobbin that is best limited to #92 thread, although it may be able to clear #138. You can slow down the motor by swapping it out for a servo motor with a smaller pulley and shorter belt to match the new distance. This machine is a bottom feed machine meant for light material. It will fight against sticky materials of any kind.
-
HorseLady21; This machine has what I call Poor Man's Reverse. You either spin the work 180 degrees, or lift the foot with the needle up and pull the work back a couple stitches and sew over them, or sew all the way around and stitch over the starting stitches. Since you are using a Singer 27, you may not have a tension release with the foot lifted (mine doesn't). In this case, if you lift the foot and want to pull the material towards you to over-tack, pull some thread out of the top tension disks by hand. You can pull it anywhere between the tension disks and the take-up lever. Otherwise, you may bend or break the needle.
-
Used Consew 206rb or new Highlead GC0618-1S
Wizcrafts replied to olie's topic in Leather Sewing Machines
Mikesc; Terms were developed by the manufacturers and are standardized. It may seem backwards to us users, but dealers, importers and parts suppliers use these descriptions in common to avoid confusion. You are free to personally refer to the axis of the bobbin any way you wish. But, if you contact a dealer, or replacement parts supplier and they ask whether your machine has a vertical of horizontal bobbin, use the manufacturer's designation. Otherwise, you may get the wrong parts. To clarify, using manufacturer's designations, the horizontal and vertical axis's refer to the position of the final shaft that drives the shuttle in which the bobbin resides. If that shaft runs lengthwise under the body and the shuttle and driver is connected to the left end and sits under the bed, or inside the cylinder arm of the machine, it is a Horizontal Axis bobbin system. If the drive mechanism uses gears to drive a shaft at a right angle, coming straight up to drive the shuttle and the bobbin is dropped in from the top, it is a Vertical Axis machine. The axis of the drive shaft for the shuttle is the deciding factor. -
Used Consew 206rb or new Highlead GC0618-1S
Wizcrafts replied to olie's topic in Leather Sewing Machines
Ollie, the price you saw for a P1206 is a little high, especially if it is in a box and needs to be fully assembled and adjusted. One of our member dealers offers brand new Consew P1206RB machines, fully setup with a servo motor, adjusted and sewn off, shipped on a pallet, for just under a thousand dollars.They also carry new 206RB-5 machines, also complete, for about thirteen hundred. Others may also carry these machines at similar prices.. -
You have to consider the thickness of the material when choosing the thread combination. The goal is to place the lockstitch knots deep into the material so they don't show. In my experience, if your leather is very thin, #69 may be the maximum you can use and still bury the knots. For this, use a #18 needle for medium temper leather, or, for a tighter knot in soft leather, use a #16. You may have to ramp it up to a #19 for harder leather. When the thickness is over 4 or 5 ounces, #92 thread can be used and still bury the knots. It is 50% stronger than #69 thread. But, you'll need either a #19 or 20 needle, depending on the temper of the leather.
-
The 31-15 is a garment and tailoring machine, capable of sewing leather chaps and vests. It will need a roller foot conversion to feed properly. The conversion kit includes a 1" roller, a heavy duty single row feed dog and matching throat plate. The machine should be able to sew with #69 and possibly #92 thread, depending on its age and type of shuttle. I recommend titanium coated needles if you use double sided basting tape. You'll want to get #18, 19 and 20 needles, in system DBx1 / 16x257 / 1738
-
Choosing a sewing machine
Wizcrafts replied to WolfteverGunleather's topic in Leather Sewing Machines
Correct. Most new sewers can learn to operate and adjust a walking foot machine in one day. After a week it should be old hat. And, help is found on all kinds of forums and from industrial sewing machine dealers (if you buy something from them). -
I also have a Singer 27 and it gives me 5 stitches per inch. If you can't get that spacing, either the feed dog height is too low, the stitch length lever isn't going all the way down, or the upholstery leather is fighting against the feed, reducing the stitch length. It that's the case, you can hold it up in front of you as you feed it to the machine. You don't want the stitches so close that they filigree the leather! Also, if your machine takes modern presser feet, you can buy a Teflon foot that will glide over the top of the leather.
-
It might help if you added your location to your profile.
-
Something I haven't seen before -- how to clean it up?
Wizcrafts replied to llucas's topic in Leather Sewing Machines
If you buy them, let us know how these erasers work out. -
Choosing a sewing machine
Wizcrafts replied to WolfteverGunleather's topic in Leather Sewing Machines
If you are a true novice to industrial sewing machines, especially leather sewing machines like the ones you've listed, stick to the 441 clones. They have a short learning curve and lots of fellow users to assist you over the humps. If you still think you want to get a Campbell Lockstitch machine, go to Yoakum Texas, book a motel room for a 5 day week, Go to Campbell Randall and take one on one instructions on the setup, threading, adjusting, oiling and operation of the machine. Don't leave town until you are certain you can change settings, stitch length, needles and awls, thread types and sizes and leather thicknesses and still get great results without calling anybody for help. And, learn how to lock the starting and ending stitches despite not having reverse. The Campbell Lockstitch uses a separate awl and needle. A different set is needed for each change in thread size. Feet, bobbins and accessories are costly. Few people on this forum own these machines and those who do are usually busy sewing harnesses and holsters all day. Even fewer industrial sewing machine dealers have any experience with these machines (which were designed during the late 1890s and early 1900s). In the end, the Campbell will produce a top and bottom stitch that most closely "resembles" a hand stitching awl result (e.g., Speedy Stitcher). It can sew through plywood and even pennies. But, if you are not in a position to take in-person lessons from the company, move along to a simpler machine. If you find a Campbell, or Randall, or Union Lockstitch machine for sale privately, only buy it if the seller offers to demonstrate the complete operation of the machine. A non-functional or totally unadjusted needle and awl machine can be costly and very time consuming to repair and bring into working order. FYI: The Juki 441 clones are now found in most successful leather makers' shops. They are half the price or less of needle and awl harness stitchers, easy to learn to operate and use relatively inexpensive needles. You can learn to operate one at home in a few days, just watching videos and reading our forum. -
Make sure you buy leather point needles. I use Schmetz system 794, size 200 (US #25) with #277 thread.
-
Hey guys, I found a page full of presser feet made by Cowboysew-Hightex. Some are for the Juki 441 and its clones.
-
The Juki LU-1508NH is marketed as a moccasin sewing machine, by Juki. It can have a different rate of feed on top and bottom, to gather the soft leather or suede around the vamp. Contact a Juki dealer for more info. Adler also makes versions of their machines to gather the vamps on moccasins and properly sew the bottoms together.
-
Matt, Darren IS a sewing machine dealer in NSW Australia.
