Wizcrafts
-
Posts
7,811 -
Joined
-
Last visited
Content Type
Profiles
Forums
Events
Blogs
Gallery
Store
Everything posted by Wizcrafts
-
3 Leather Machines For Sale In Flint, Michigan
Wizcrafts replied to Wizcrafts's topic in Leather Sewing Machines
Oops! The Adler patcher for sale in Flint is a model 30-1, not a 30-7. I apologize for any confusion. -
Catskin; ? There is an adjustable brake screw on the back of the servo motor (it may be inside the rear motor casing). It is secured by a lock nut and it is hard to turn, at first. I adjusted mine to give some foot movement before the motor engages. However, it does not give as much free movement as a clutch motor. Bob Kovar can assist you on the phone, or by email, with this adjustment.
-
Could be. This happened around 1987 or 88 and the machine is long gone. I never bought another Juki for myself after that, but I did arrange to buy them for other people and they seemed to work okay.
-
As a favor, I have posted the following machines for sale, in the Used Sewing Machines For Sale section of the forum, at: http://leatherworker...showtopic=28118 ... USM Puma Skiver, Rex 26-188 walking foot machine and Adler 30-7 long arm patcher These are not my machines, but belong to a local leather shop for whom I do part time work and contract sewing. Contact the owner (phone number is in the listing) if you are interested in any or all of these machines. They are all cash and carry, from Flint, Michigan.
-
A friend of mine, with a professional leather shop, has placed three of his production machines up for sale, on the Flint Michigan Craigslist. The ad was posted on December 6, 2010. They are as follows (use links to Craigslist to see photos): United Shoe Machinery Puma leather skiving machine, with an extra unused blade, a 1/2 HP, 120 volt motor and table. $500 or best offer Adler long arm patcher on a treadle base (black). Has several small bobbins and an extra bobbin case. $750 Rex walking foot machine - model 26-188. $500 o.b.o. All of these machines are sold as is, but in good working condition. This is a cash and carry sale. No shipping is provided. The buyer must remove the machines themselves. The machines are located in Flint, Michigan, at M&M Leather, 1276 Linden Road, Flint, Mi 48532. Phone Doug Monroe, at: 810-732-4907 for more information.
-
There is no Juki 565. I think your friend has a 562 or 563 model. The 562 has a standard industrial bobbin and the 563 uses a large, M style bobbin. Both are otherwise the same machine. The maximum thickness I was able to sew on a Juki 563 was under 3/8". The stitch length varied all over the place, because the reverse lever was part of a spring loaded balance system. When I sewed fast, the stitch length mechanism floated between forward and reverse! The stitches went from long to short until I slowed down. The machine was a real POS and not worth the gas money to take it to the dump.
-
Home Based Machine That'll Do Button Holes ?
Wizcrafts replied to CustomDoug's topic in Leather Sewing Machines
What about a "pippin" punch? They cut a hole and slot, similar to a guitar strap hole and slot. You can make one like I did, by welding a 1/4" hole punch tube onto the end of a 3/4" steel chisel. The hole punch needs a piece sawed out so it can be attached and welded to one end of the chisel. -
Home Based Machine That'll Do Button Holes ?
Wizcrafts replied to CustomDoug's topic in Leather Sewing Machines
I have an idea! Take some scraps of the garment leather you will be using and go visit all of the sewing machine dealers within nominal driving distance. Include your nearest Joann Fabrics, as they have a Viking and Singer sewing machine department in every store. The ladies running that section know their machines as well as anybody does and may let you try several to see if any of them can sew a keyhole buttonhole in your leather. Or, they may tell you that it won't work, and/or might damage the machines. If you can go to an industrial sewing shop and look around you might find an old buttonholer that they will sell cheap, as a fixer-upper. I have gotten machines for almost nothing that were in poor visual condition and needed a few parts replaced. Sometimes, they will sell you two partially complete machines for the price of one, so you can use parts from one to complete the other. I got that kind of deal once on two post machines, which I turned into one perfectly working sewer. Finally, if you can still get a real industrial buttonholer machine, with motor and table, for under $1,000, grab it! But, try it first with leather. I apologize for the long sentences. That it my literary style (writer's license) -
Home Based Machine That'll Do Button Holes ?
Wizcrafts replied to CustomDoug's topic in Leather Sewing Machines
We have already discussed this matter and you were looking into industrial machines that are designed to sew button holes. What happened regarding those machines? You are not going to find a home sewing machine that can properly sew button holes into garment leather. It is too sticky and flexible. You need an machine that clamps the leather from the top and the bottom, then moves the clamped work in a button keyhole pattern. This calls for a specifically designed industrial, cam driven machine. Prepare to visit your bank manager for a mortgage on such a machine. $5,000 to $10,000 should get a decent model, marked down from $14,000+. -
Without a picture of the stitching pattern, I am guessing that you have installed a leather point needle, with oval sides on a slight left to right angle. This needle causes the zig zag stitch pattern. You can escape from that by purchasing triangle or regular point needles. However, the regular point needles will hit much harder on thick or dense leather. The oval leather needles go in smoother.
-
New To Butterfly Head/universal Head Patcher Machines
Wizcrafts replied to suem's topic in Leather Sewing Machines
Suem; I strongly advise you to take the machine head to a professional sewing machine mechanic. Without the proper tools and know how, you may damage the moving parts beyond repairability. -
It is much safer to exchange email addresses and phone numbers via Personal Messages, on this and all other forums. PM's are not viewable by non-members. PMs are not usually stored in a spiderable folder. It is still better to use the phone and talk to each other.
-
You may not realize it yet, but you just left your email account on a publicly viewable and spiderable web page. Email harvester bots, sent by spammers, will come around soon and will add your email address to their active account spam lists. Never leave you email address on a web page in plain text or as a "mailto" link. Obfuscate your email address, at least by separating parts with spaces and by substituting @ with AT and .com with DOT COM, or DOT NET.
-
Bob Kovar may be able to get you a darning T-nut assembly. Send him an email, to: sewmun AT aol DOT com
-
The clutch on the motor is too far in. Back off the big screw on the front facing portion of the pulley side of the motor (front side of output shaft). It is secured by a large nut. Loosen the nut a bit, then back off the screw until you have the desired free movement, then tighten the nut again.
-
I Was Given A Free Machine.....will It Work For Leather?
Wizcrafts replied to TN leather's topic in Leather Sewing Machines
Contact me by PM and I will find a compatible foot for your machine, from one of my suppliers. -
I Was Given A Free Machine.....will It Work For Leather?
Wizcrafts replied to TN leather's topic in Leather Sewing Machines
It depends on the type of feed system the machine uses. If it is only driven by the feed dogs, you'll need to change the pressor foot to either a roller or nylon foot. -
New To Butterfly Head/universal Head Patcher Machines
Wizcrafts replied to suem's topic in Leather Sewing Machines
I got mine from Bob Kovar, at Toledo Industrial Sewing Machines. You might want to get two of the little spring mounting screws and any other screws that are worn on your patcher, while you're at it. His number is: 866-362-7397. He also sells the threading rods, for $5.00. -
New To Butterfly Head/universal Head Patcher Machines
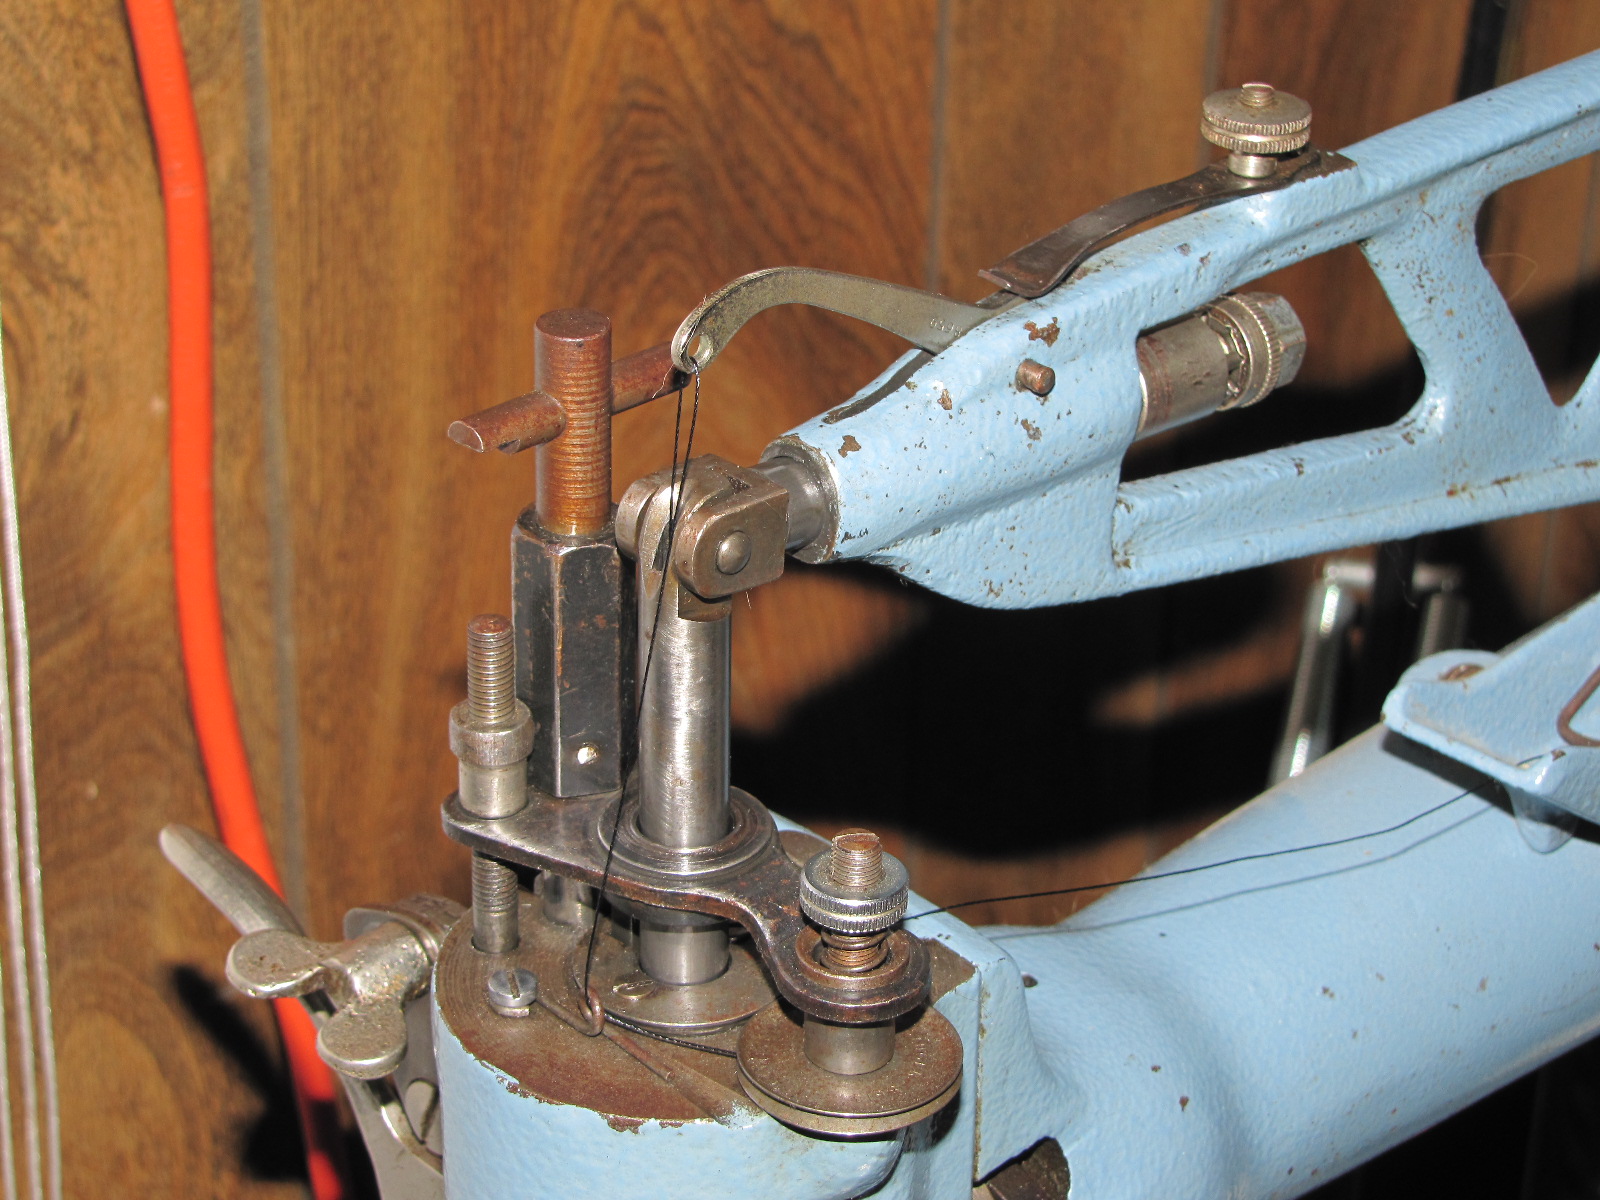
Wizcrafts replied to suem's topic in Leather Sewing Machines
Here is a closeup of the paddle on the thread regulator spring on the needlebar. Removing the parts, replacing the spring and replacing the parts took me a little over 1 hour; taking my time. It could be done in less time if someone was in a hurry and has experience with doing this. The hold up is usually getting the tapered pins out, without damaging the frames that hold them in place. It also took a few minutes to disassemble the lifting plunger assembly from the trapeze. Here is the needle lifting plunger and take-up assembly, which also needs to come off, by removing the tapered pins.

-
29K62 Small Bobbin Or Big ? Also Thread Wire ?
Wizcrafts replied to CustomDoug's topic in Leather Sewing Machines
Oh yeah. Have you called Bob Kovar and asked how much he charges for patcher threading rods? 866-362-7397 -
New To Butterfly Head/universal Head Patcher Machines
Wizcrafts replied to suem's topic in Leather Sewing Machines
Sue; First of all, you should examine the spring on the needlebar to see if it warped. Lower the needlebar all the way down. Aim a flashlight, or clamp light onto the left side of the lowered needlebar and look at the left side of the bar, just above the mounting bracket for the needle. The spring is visible at that point. The thin shaft rides inside a 1/6" wide channel and the bottom looks like a paddle and rests in a cutout. If it is warped the paddle part will not sit squarely across the cutout, but will be twisted. Ditto for its thin strut that connects to the top of the spring, where it is screwed onto the needlebar, with two little screws. A warped spring catches inside the hole as you turn the butterfly and will break off the paddle section. Here is what you will need to pull the needlebar, to replace a warped or broken thread control spring: A 9/16" open end wrench, only if your patcher has a tall hex shaped darning assembly sticking up, with a rotating T bar on top. It will need to be unscrewed before the needle lifter pin can be driven out. a set of drift pin punches, with small, medium and large faces a hammer a medium width flat blade screwdriver a small, narrow blade screwdriver, with a decent handle. Or, a medium jewelers screwdriver and possibly pliers to turn it. The needlebar assembly is in two pieces. The needle is mounted onto a little piece of metal that is screwed onto the needlebar. That screw is above the needle securing screw. Here is the sequence to remove the needlebar: Unscrew the needle holder from the needlebar If your machine has the T bar darning attachment, behind the needlebar, on top, remove it with a 9/16" wrench Use a drift punch to drive out the tapered pin that holds the needlebar to the take-up lever puck. Drive from the back towards you. Drive out the pin holding the take-up lever to its assembly (back towards front) and remove the lever Unscrew the lift height adjusters on the back of the lift assembly Remove the lift assembly from the trapeze, pulling it out of the front Lift the needlebar out of the top Locate the little T shaped thread control spring, just above where the needle holder screws onto the needlebar and carefully unscrew the two tiny screws that secure it. Use two magnets to keep them safe. Keep them in their original positions (left and right) and separated. Remove the spring clean the bar while it is out. Install the new spring and secure it tightly with the little screws. Make sure they are all the way down. Try to install the screws in the same positions, in case they have worn according to their original mounting position. Lightly oil the needlebar and replace it into the top of the hole in the head. Replace the needle lift assembly and its adjusters and the take-up lever pin (front towards back) Replace the pin that holds the needlebar to the needle lifter (front towards back) Re-attach the darning T-bar assembly, if exists. Attach the needle holder assembly and position it so that the needle is centered in the hole in the throat cover plate. You are done at this point Or, take it to a competent sewing machine mechanic and pay him to do all this. -
New To Butterfly Head/universal Head Patcher Machines
Wizcrafts replied to suem's topic in Leather Sewing Machines
There is a little leaf spring, shaped something like an inverted letter T - inside the lower section of the needlebar. It is needed to hold back the top thread a bit as the take-up lever does its thing. Sometimes, the spring gets bent and makes contact with the side walls. Eventually, the spring will get pulled out of its channel. It will bend out of shape and cause the butterfly action to have hard spots. The spring is replaceable, along with the two tiny screws that secure it. The entire needlebar must be removed to replace the thread spring. If this spring is bent, broken, or missing, the top thread will form loops on top, in random places on the material being sewn. I just went through this and replaced the spring on the bottom of the needlebar, on my Singer 29K172. It is still not exactly right and I still get the odd thread loop on top of the leather. The old spring prevented the loops, but it bent under a heavy sewing load and broke off a few weeks ago. -
What Type Of Oil For My Class 3 Cobra
Wizcrafts replied to RMB Custom Leather's topic in Leather Sewing Machines
The solvents will attack the bronze bearings. Mind you, this will be a slow and imperceptible process. Also, it is heavier than actual sewing machine oil and contains parafin, which can gum up bearings over time. The saving grace is that you have a slow speed sewing machine. If you have a sewing supplies store nearby, like Joann Fabrics, or Hobby Lobby, or a Singer store, Walmart, etc, go there and buy a few 4 ounce bottles of sewing machine oil. When you get a chance, order a quart or a gallon of Lily White Sewing Machine Oil, from an industrial sewing supplier. Lily White Sewing Machine Oil: Highly refined, low viscosity and virtually colorless. Perfect lubricant for Sewing and Embroidery machines. Also used in cutting machines and other machinery which comes into contact with fabric. Stains become much less noticeable and easily removed than stains from standard machine oils. -
What Type Of Oil For My Class 3 Cobra
Wizcrafts replied to RMB Custom Leather's topic in Leather Sewing Machines
NO! Don't ever use WD-40, or 409 on a sewing machine, except to clean the body of the machine, or the table. Also, do NOT use 3 in 1 oil to lubricate any sewing machine. It contains solvents! Only use 3 in 1 oil to loosen junk that builds up in oil holes, or stuck screws, then chase it out with industrial sewing machine or Lily oil. Bob Kovar, Toledo Industrial Sewing Machines - 866-362-7397 - and every other industrial sewing machine dealer stocks the proper sewing machine oil, in quarts and gallons. -
So, I was right when I mentioned that the top end was out of time with the bottom end. This is what I meant.