Wizcrafts
-
Posts
7,801 -
Joined
-
Last visited
Content Type
Profiles
Forums
Events
Blogs
Gallery
Store
Everything posted by Wizcrafts
-
Yep. The lift block on the back , over the long pressure spring, that engages the pressor foot lift lever, must be set too far towards the front of the machine. Move it toward the back and you'll get lift. If your machine does not have the leaf spring, but a coil spring for top tension, the lift assembly is on the back of the head and has a butterfly thumb nut to tighten the movable piece with the marks: L-M-H, which set the amount of lift of the foot. If that lift block is missing the thumb nut, or other pieces, there will be little or no lift. If the metal cam block behind that assembly is loose, or misaligned, lift will suffer. Move the L-M-H block towards the front of the machine to increase lift, or away to reduce it. Reposition the cam block behind it to get back missing lift range. Just be sure to allow the foot to go all the way down between strokes.
-
Looking To Get The Correct Machine " The First Time "
Wizcrafts replied to JS22's topic in Leather Sewing Machines
A realy good one-time purchase would be a Juki 441 clone machine. All of our member-dealers sell such machines. They have brand names including: Cowboy, Cobra, Artisan and Techsew. Most of these brands are available with cylinder arm lengths from 9" to 16.5", with some as long as 25". I am guessing that a 9" space between the needle and right inside of the body might be enough spin room to sew your holsters. If so, a Cowboy CD3500, a Cobra Class 3, or an Artisan 3000 would cost you right around the $1500- mark. Shipping would be extra though. All of these machines will sew at least 3/4"; some will sew 7/8". All can handle #415 bonded polyester or nylon or 6 cord linen thread. All have triple feed mechanisms, where the needle, inside pressor foot and feed dogs move together at the same speed. All have a stitch length lever that can be left up to sew in reverse. The bobbins are huge and all the parts are very heavy duty. These machines come mounted on short body tables, on steel frames with roller wheels. They all have servo motors and speed reducers. The prices go up by a thousand dollars for the 16.5" arm models. Parts tend to be interchangeable between all of these Chinese 441 clones. So, if you buy a 9" arm machine from one company and they go out of business, the parts for another surviving company's 9" machine will probably fit it. Most of the dealers have have a banner ad, except for Bob Kovar; the owner of Cowboy stitchers. You can call him at 866-362-7397. Cowboy is shipped from Toledo Ohio, after the machines are set up and tested. Cobra machines ship from California. All are sent by truck, due to their weight. Figure out what turn around length you can work with and buy the most machine for your available money. Stick with our dealers if you can. They take care of their buyers with help on the phone and servicing or parts replacements, should things get fudged up. All sell needles, bobbins, thread and oil (get lots of oil!). -
The Type Of Sewing Machine You Need To Sew Leather
Wizcrafts replied to Wizcrafts's topic in Leather Sewing Machines
The swing away guide was added on. They don't come with any machine as standard equipment. Bob Kovar, of Toledo Industrial Sewing Machines, sells the swing-away edge guides, along with bobbins, needles, thread, and parts for most industrial sewing machines. Call him at 866-362-7397 to get the current price for the guide. -
Highlead Gc 618-1 Sc Knee Lift Installation,pls Help
Wizcrafts replied to Aykut's topic in Leather Sewing Machines
It looks to me like the bend in the actuator rod is too high, behind the roller wheel. Try lowering it so that the bend is right behind the wheel and the angled rod will push the wheel away as you move the knee lever. There needs to be a little free play before the knee lever hits the roller. Normally, the knee lifter is adjusted so that it completely raises the pressor foot until the machine stops it. If the bend in the lift rod is too high, you lose motion on the short side. If the bend is too low, the angled rod may run off under the wheel, causing the pressor foot to snap down hard. Then you have to manually raise the foot to get the angled rod back behind the lifter wheel. A properly positioned bent rod stays in contact throughout the allowable motion of the knee lifter assembly. Once the lift rod has been set, you can adjust the actual knee pad position both vertically and laterally. Set it so you have no trouble hitting it when you intend to and without distressing your knee. -
Grab it while you can. Worry about the price later. This is a rare bird.
-
Steve; There are a few needle vs thread size charts, including one on the Singer website. But, there aren't charts for needle size vs leather thickness! I can provide you with some pointers to help you Grok the correct needle size for thick or thin leather. Thinner needles penetrate leather more easily than wider ones. Leather point (left-twist chisel; LL) needles go in easier than round point needles. Thick needles generate more heat from friction than thinner needles, as they penetrate dense leather. The thinner the thread on the top and bottom, the smaller the required needle. The thinner the needle, the more likely it is to be deflected by hard spots, or previously sewn thread in the leather. Here is a general chart of thread vs needle sizes, for sewing from garment to belt and bridle leather. Thread Size Needle sizes Temper of leather #69/T70 #14 (garments/chaps only), #16 (medium temper), or #18 (harder temper) #92/T90 #18, #19, #20 (ditto) #138/T135 #21 (soft), #22 (medium, typical), #23 (hard or thick) #207/T210 #23, or #24 (soft thread : hard thread) #277/T270 #25, or #26 (ditto) #346/T350 #26, or #27 (ditto) Where I give more than one needle size, it can pertain to the hardness of the thread, or the combined hardness of the leather being sewn. Most bonded nylon thread is stiffer than the same size in bonded polyester (outdoor marine thread). Linen or cotton thread is much softer than either. A stiffer thread will require a larder needle size than a more flexible thread of the same number size. Most modern needle only machines do not sew properly with waxed linen thread, but may be able to handle glace finish linen thread. This thread is available in 1 pound spools, in left (most machines), or right (shoe solers) twist, in 3, through 10 cord sizes. 3 cord is pretty close to #138 bonded nylon. 4 cord is close to #277 and 5 cord is like #346. All are soft and flexible and can use a smaller needle size that the equivalent nylon thread. This generates less friction and heat scarring. Generally speaking, use #69 thread on leather garments, or thin (6 - 8 oz) dress belts, or on shoes and boots. Use #138 on harder leather projects, of items of 1/4" to 5/16" thickness. Move up to #207 for 3/8" and #277 (or 4 cord linen) for 7/16" to 1/2". Above 1/2" I use #346 bonded nylon or polyester, or 5 or 6 glazed cord linen. FYI: #69 bonded nylon thread has a breaking point of 11 pounds. Each time you double the thread size, you double the breaking strength of the thread. If you make a holster for a competition shootist, or Police Officer, always use the heaviest thread your machine can handle. While #138 thread (22 pounds) may seem to be strong enough to keep a holster together, consider the forces applied to the sewn layers of leather as an officer fights for control of his gun while a felon is trying to yank it out in any direction that will give. That is why you almost always see either #277 or #346 bonded nylon, or 5 or 6 cord waxed linen thread on professionally built holsters. I hope this helps Edit: I forgot that you were asking for recommendations for a shoe patcher. Limit my answers to those for nylon thread in sizes 69, 92 and 138 only. Your machine can also sew with 3 cord linen thread. Limit needle size options to #22 or #23 maximum.As Cobra Steve mentioned, the thickness is limited by the lift of the foot and is slightly over 1/4". You might sew 5/16" if the mechanism is tight, but, the unassisted stitch length will be tiny (about 8 spi). You can help the machine feed longer stitches in thicker leather by pulling the leather behind the foot as it sews.
-
How much? All of the dealers on this forum are in competition with their heavy stitchers, especially the 9" arm models. If I were you I would contact them all and compare not only the price of the machine, but also the cost of shipping and what accessories can be thrown in at what, if any additional cost. The banners on top of the pages have phone numbers. The exception is Bob Kovar, of Toledo Industrial Sewing Machines. He has no banner, and no website yet. His phone number is 866-362-7397. Bob is the dealer in the US for Cowboy leather stitchers and they have a model CB3500 (I think) with a 9" arm. Then, there is the Cobra Class 3 - 9" arm machine.
-
A Singer patcher, or clone machine like this, will not sew holsters or knife sheaths effectively. They are limited to a bit more than 1/4" of leather under the foot. The stitch length gets shorter as the thickness of the material approaches 1/4". The maximum thread that can be used safely is #138 on top and in the bobbin. If the machine has a small dime size bobbin, it won't hold enough #138 thread in one load to sew 2 average belts along both edges. What Shoe Patchers are built for Singer began producing the 29 series cylinder arm, universal feed sewing machines in the late 1800s. They were first known as UFM, meaning Universal Feed Machine. The direction of feed is controlled exclusively by the butterfly knobs under the head. Rotating the knobs turns the pressor foot. The foot has sharp teeth under it. These teeth grip the top of the leather and pull it backwards in 360 degrees of rotation. The nose of the cylinder arm is very slim and houses a very small type of bobbin. Early models, like the 29-4 and early 29K models all had a tiny bobbin, about the width of a dime, and 3/16" deep. They are meant to be threaded with #69 bonded nylon or 3 cord unwaxed linen thread. Most shoe shops have a patcher and use #69 thread on top and in the bobbin, using a #16 or #18 leather point 29x4 needle. This is suitable for patching tears in shoe and boot uppers, or securing loose Velcro straps. It is also great for sewing patches onto leather vests or nylon jackets or baseball caps. I sometimes use a patcher to install zippers into leather coats. They are also great for sewing up purses after opening the inside seams to work on interior rips or additions. A well cared for patcher is capable of sewing no longer than 5 stitches per inch, at about 6 ounces thickness. At 1/4" your stitch length drops to no more than 6 or 7 per inch. The most thickness that can be fed by the foot is under 5/16"; or 20 ounces. A worn out patcher will not even reach 5 spi on 4 ounce leather. The stitch length is usually the first thing to go on a patcher. Patchers use series 29x3 and 29x4 needles, which are available in sizes from #80 up to #160. It is very difficult to push a #160 needle through 16 ounces of belt leather, with #138 thread on top and bottom. That is what you would probably want to use to sew 20 ounce leather holsters. The teeth leave deep marks in veg tan leather and tend to slip on polished top finishes. If the feed slips, your stitch length will vary all over the place. One tends to tighten the top spring pressure to compensate for slippage, making the tooth marks even worse.
-
I neglected to mention that the Cowboy and Cobra 441 clones are available with shorter 9" arms, for about $500 to $600 less than the long arm models. They still sew over 3/4" and have triple feed. Artisan may still have some model 3000 short arm machines left.
-
You are right about the GA5-1. It only has bottom feed and a flat pressor foot and fixed position needle. It is perfect for belts, bridles, weight belts, buffing wheels; things that are level on the top and can be tooth driven on the bottom. It, and the other machines like it, are capable of sewing 1/2" maximum, although they are factory set to sew 7/16" under the foot. The foot can be raised a bit, until it almost hits the needlebar at the bottom of its stroke. This allows a full half inch to be sewn. Since you are sewing padded and foam filled items, a compound feed machine will work better for you. These machines are triple feed: the feed dog, needle and inner pressor foot move in concert. The only job the outer foot has is to hold down the work as the needle lifts and moves forward, between stitches. If your work dictates a cylinder arm machine, some of your best options, in no particular order, are as follows. Adler 205-370 (needle feed, jump foot + feed dog, 3/4") Juki 441 (triple feed, 3/4") Cowboy CB4500 (triple feed, 7/8") Cobra Class 4 (triple feed, 7/8") Artisan Toro 3200 (triple feed, 7/8") Luberto Classic (square drive, needle feed, jump foot, 1") Union Lockstitch (quasi-post, needle & awl, jump foot machine, 3/4") Campbell-Randall (quasi-post, needle & awl, jump foot machine, 3/4" or 1") Ferdinand Bull (jump foot, ~3/4") Tippmann Aerostitch (needle feed, jump foot; requires an air compressor, ~3/4") Puritan (post, chain stitch, needle & awl, jump foot machine, ~3/4") Cowboy CB2500 (feed dog fed, flat or roller foot, 1/2" with raised foot) Some of these are very expensive new, some are sold as rebuilds, others are deprecated, but sometimes available used. Prices are all over the map. A Juki 441 or Adler 205 cost several thousand dollars, as do the Union Lockstitch and Randall stitchers. 441 clones sell for $2500 and less. A CB2500 is just over 1k.
-
Jeremy; The thickness you want to sew is the limiting factor in your machine options. Further, your preference for a flatbed machine complicates the availability of suitable machines. Nonetheless, here are some viable options for you to consider. Adler 204 series flatbed machines can sew 3/4" with a #200 needle and #277 thread. There is or was one for sale privately, by AW Harness, in the East Coast. The ad is/was in the Used Sewing Machines For Sale section of the forum. Cowboy and Cobra stitchers have a flatbed model that sews 1/2 inch plus. Old Singer Class 7 machines sew to 7/8". The Singer 132K6 sews 1/2". There are other brands of sewing machine that sew 1/2 inch. They are usually targeted at the buffing wheel and car wash cloth industries. A standard industrial sewing machine cannot sew over 3/8" unless you dink with the pressor feet and needle bar and even the needle system. The machines setup for 1/2" and over use a much longer needle system, have beefed up moving parts, huge bobbins and extra heavy tension springs, thread guides, shafts, gears and bearings. The very people you have excluded from answering you are in the best position to assist you in finding a suitable machine for your purposes.
-
My bad! I confused you with someone in Montreal to whom I had just replied a few minutes earlier. There is a really great servo motor available from Toledo Industrial sewing machines (866-362-7397). It is a SewPro 500GR. It has built in 3:1 gear reduction and a 2" output pulley. They cost around $176 shipped and bot in place of the original clutch motor. Order a 2" shorter v-belt with it. I bought one and can't find any fault with it.
-
That is a Singer 111w155 walking foot machine. It is probably 50 to 60 years old. If it is in good working condition (not too much slack, well oiled, no junk in bobbin case, no stripped parts), it should be able to sew up to 5/16" of medium temper leather, or a pair of jeans, or sailcloth. The maximum thread size is typically #138, sewn using a #22 needle. The needle system is 135x17, or 135x16 (leather). Get a servo motor from Raphael Sewing/Techsew, in Montreal, and you'll be good to go. Better yet, take it to them and have them go over it and adjust and oil it for you, replacing any really worn parts. If you take the table with they can install the servo motor for you. If you want to do all this yourself, you are on your own.
-
The Allbook & Ashfield Success IS a FUR sewing machine. Fur machines have a pair of round cups that squeeze two pieces of fur together and feed it past a needle that moves horizontally between the top of the layers. That machine is only made to sew pieces of fur together; nothing else. Here is a video of one of these machines in use. The long arm machine on the iron stand is a Singer long arm shoe patcher. It is used to repair boots, shoes, zippers ,etc, and to sew patches or emblems onto garments. It is probably limited to sewing no more than 1/4" of material and is entirely fed by teeth on the bottom of the pressor foot. Patchers have two sizes of bobbin available: tiny and small. That machine will use one OR the other, but not both. Thread is limited to #138 maximum, but most shoe shops use #69 bonded nylon thread in their patchers. They use needle system 29x3 (round) and 29x4 (chisel/leather point). The fur machine is of no value unless you intend to repair fur coats, or fur linings. The patcher is worth between $500 to $750, depending on its condition. I doubt very much that the patcher is selling for $150. That price is most likely for the fur machine.
-
Singer patchers typically use #69 bonded nylon thread. It is also known as T70. Shoe repair store usually buy it in multiple colours (note the British spelling) on small 1 ounce spools from shoe trade suppliers. eBay sellers don't usually have anything smaller than 4 ounce spools. Number 69 bonded thread requires one of these needle sizes: 90/14, 100/16, or 110/18. Use leather point for leather and round/regular point for all other materials. The needle system is 29x3/Dix3 (regular) or 29x4/Dix4 (leather). Be sure you get the correct needle system or strange stuff will happen.
-
You can buy a 2" replacement motor pulley and an equally shorter vbelt. This will give you better control over the speed, by slowing it down. Assuming it has a clutch motor and there is very little free play before it engages, you can loosen the large nut on the bolt that goes into the right end of the casing, in front of the output shaft, then back out the bolt a few turns and tighten up the nut. This will give more free play before the clutch engages. Be careful not to back it off too far or you will lose full speed. One to two turns is usually all it takes to get more control over a clutch motor (assuming it was in fairly close to start with). Bob Kovar, of Toledo Industrial Sewing Machines, sells these parts, plus brand new gear reduction SewPro servo motors, already equipped with a 2" pulley. This motor is awesome for slow speed control and reasonable high speed when needed. It punches through 3/8" of belt leather without bogging down. His number is 866-362-7397.
-
Ray; You have it backwards: Joe Namath looks like me!
-
Bias Binder Attachment For Artisan 3000
Wizcrafts replied to Bar C Leather's topic in Leather Sewing Machines
I believe that Toledo Industrial Sewing Machines has the thick material single folder attachment you are looking for. Their number is 866-362-7397 -
Rayban; Try Angelus Acrylic Finisher. It is available from shoe repair suppliers, like this one.
-
What's on your mind?I want to wish all my fellow crafters a Happy New Year and much success in 2011!
-
I'd say the right toe foot is your best option. But, it is not the same as having a real piping foot. A piping foot has a semi-round cutout in both pressor feet, on a walking foot machine, or on the left half of a single foot machine. This cutout allows the foot to ride on top of the welt as the needle sews right next to the right edge of the covered cord. A right toe foot is the next best option, but may need to be modified on a grinder to allow the left back side to clear the welt.
-
Art, you have me all figured out! I am the Stitchin' Musician! I am also still alive, so, I'll try to help beckiesgran out. beckiesgran; The 29k machines, nicknamed "Patchers," are all threaded the same way. All patchers have the main top tension disks on top of the head, facing the operator, with the needlebar behind it. Some patchers have a second set of tension disks - mounted on the front of the head. This second set is only used for freehand darning, not foot driven sewing. I will describe the correct thread path, for the top and bobbin threads. Place the cone of thread on a thread stand, if you have one. feed a big spool off the top of the spool, up and through the twisted loops at the top of the thread stand. If the spool is small, like a home style spool of thread, place it on the thread spindle, at the upper rear area of the trapeze (that's what I call the big moving arm on top). Feed the thread under the spring in the little lube pot on the upper body of the machine, then out one of the holes on the left side of the pot. Feed the thread to the back of the little peg behind the top tension disks Go around the back of the little peg and forward to the tension disks Pull the thread between the top tension disks Pull the thread backwards from the disks and feed it through the eye in the spring steel on the front top of the head. Feed the thread out the eye of the spring, up to the front of the eye of the take-up lever Feed it through the eye of the take-up lever, front to back. Pull out about two feet of top thread through the eye. Double up the thread about a foot down and place it into the recess in a threading rod. Use the threading rod, or a piece of thick piano wire to ram the top thread down the snout of the needlebar Keep pushing until the top thread appears under the exit hole on the bottom of the needlebar Pull it out of the needlebar until it is totally straight. Withdraw the threading or ram rod. Make sure that the proper 29x3 or 29x4 needle is inserted all the way up, with the eye facing to the right and the slotted shaft to the left. Feed the top thread through the eye of the needle, from left to right. Load a bobbin with thread. Hold the loaded bobbin in one hand and the bobbin case in the other hand (move the small spring out of the way so the bobbin can be pressed into the case. Insert the bobbin into the bobbin case, with the thread feeding clockwise, looking down from the top. Leave about 6 inches loose. Swing the little top securing spring over the bobbin. Draw the bobbin thread into the diagonal slot on the side of the case and under the little bobbin tension spring Pull the thread all the way to the back of this slot, then feed it through the tiny hole in the top of the bobbin case, near the back of the spring. If the machine uses a "large" bobbin, there will be a hole in the center peg on which the bobbin rotates. Feed the thread from the tiny hole through the hole in the center peg. Insert the case into the shuttle and close the throat plate, feeding the remaining loose bobbin thread up and through the hole in the end which you intend to use (big hole on one end; small on the other). You can now sew. If the thread is too tight on top, loosen the top tension nut on top of the disks. If the thread is too tight on the bottom, loosen the bobbin case screw slightly. Check top and bottom threads to make sure they aren't jammed. There should be a modicum of bobbin pressure and a lot more upper tension. Adjust the pressure on the pressor foot to the point that keeps the leather from lifting with the needle and which is able to feed the leather a full stitch length. Adjust the stitch length with the little thumbscrew behind the brackets that move the foot. Up is shorter, down is longer. A patcher with little wear can produce 5 stitches per inch maximum, on its own. If you help by pulling or pushing the leather into the machine, you can fudge it for longer stitches. The thicker the work, the shorter the stitches. I hope this helps get you sewing.
-
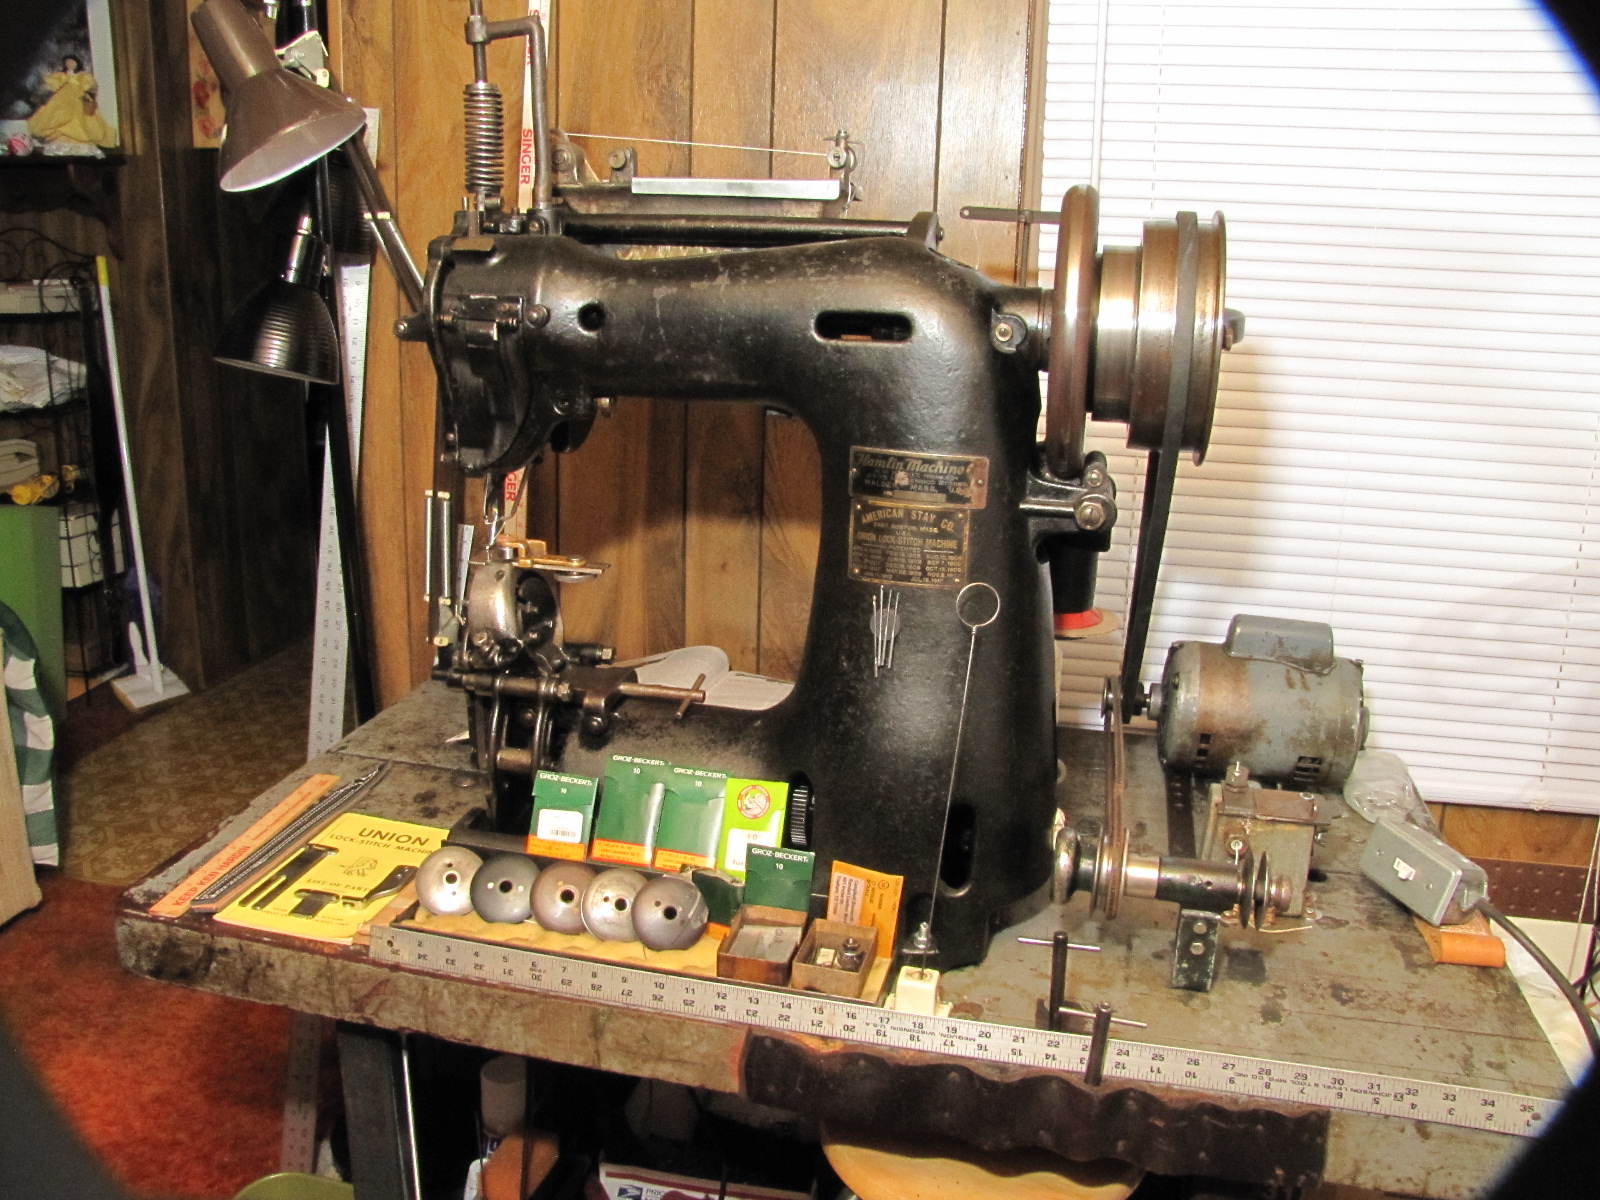
I have a Union Lockstitch Machine that I have rebuilt. It operates on the needle and awl principle, where the awl comes down and stabs a hole, then the needle comes up through the hole, then, as the pressor foot lifts, moves the work back, as the thread gets looped around a barb in the needle. When the needle goes down the thread is picked off the barb and drawn around the bobbin. The machine sews from 1/8" up to 3/4" of anything that the awl can pierce. It can sew leather onto plywood lined cases. The motor is on top of the table and has a belt going to a huge flywheel on the back of the machine. When you push down on the drive pedal the mechanism slowly forces the flywheel into a clutch on the rear shaft. It is possible to feather the clutch for very slow stitching, or press all the way down for Gatling Gun like speed (800 spm). The stitch length can be varied from 12 /inch, to a about 3 /inch (requires retiming the pickup point). Parts and accessories are still made and are available from Campbell Bosworth, in Texas. The bobbins are 2.5" in diameter x 1/2"+ deep and hold about 300 feet of heavy thread. The machine can sew with bonded nylon or polyester, or multi-cord linen thread. I have needles from size 1 (160) to size 3 (200), and awls from 1.5 to 3.5. This allows the machine to sew with thread sizes 138 through 346, or 3 to 6 cord linen. I have two pressor feet and three throat plates (2 customized). It will sell with a threading rod, manual, 7 bobbins, dozens of needles and awls, three square drive wrenches and a swing-away roller edge guide with two different height rollers. I will throw in all of my linen thread and any remaining Lax Wax. The machine is mounted onto a 3" thick wooden table, that is bolted onto a heavy steel stand and weighs around 500 pounds assembled. It has a 1/2 horsepower continuous run motor on the right rear of the table top, and a bobbin winding attachment, driven by one of the two motor belts. There is a wax pot for the bobbin winder and another on top of the machine. Due to the weight and my inability to lift much weight anymore, the buyer will have to come to my place, in Flint Michigan (48506), and remove it themselves (with their own helper). I can unbolt the head from the table and remove the flywheel assembly, to make it easier to take out. I will sell the machine and accessories for $2500 cash, or trade for a working, good condition, major brand cylinder arm walking foot stitcher of equal value, with a 12 inch or longer arm. It must sew up to about 3/4 inch. Contact me via the Forum messaging system, or phone 810-422-5301 (leave a message if I am out).

-
Union Special Sewing Machines Sn# Look Up ?
Wizcrafts replied to CustomDoug's topic in Leather Sewing Machines
I once had a Union Special blind stitch machine, as do a lot of tailor shops. It used a curved needle to make a hidden stitch inside hems and cuffs, on cloth garments. Union Special are mostly garment factory and tailoring machines. I doubt you will find any that are suitable for sewing leather or vinyl, but I could be wrong. I once thought I was wrong, but I was mistaken! -
What Is The Max Thread Size For A Consew 225?
Wizcrafts replied to lowes48's topic in Leather Sewing Machines
If it is like the rest of the walking foot machines from, or based on the Consew system, it will sew with #138 comfortably, and, #207 with caution and very, very slow speeds. If the machine has a standard (small) industrial bobbin, it will limit you to #138 in the bobbin, unless you only sew short runs (1 or 2 belts). Number 138 thread in the bobbin will last for up to 3 belts, in a standard industrial bobbin and almost double that in a large M bobbin. In order to move #207 thread you will need a #24 leatherpoint needle. I recommend Weaver lubricated thread. In lieu of Weaver thread, use Linhanyl, but run it through a lube pot, filled with liquid sewing silicon, that you can buy and attach to the top of the machine. They are under $100. I have a walking foot machine, based on the Consew 206RB series and it is not happy sewing #207 thread, with the required #24 or 25 needle. The huge needles take a lot of pressure to puncture belt leather and hit hard. The pressor foot needs to be tightened all the way down, to keep the leather from lifting with the needle, which tends to get stuck from friction. That's why I recommended running the top thread through a lube/cooling solution, or using Weaver's prelubricated thread. If you find that this machine doesn't do the job you want it to do, there are beefier machines available. Some sew up to about 1/2", with #277 or 346 thread, others up to 7/8", with #346 to 415 thread. These machines are sold under the brand names Cowboy, Cobra, Techsew, Artisan, Adler. The big machines use a different spool shaped bobbin that holds a *huge* amount of thread. They use a longer needle system that has sizes up to #27. Most of these machines are geared way down and have high power servo motors, for slow speed control. They can sew with #277 in a #25 or 26 needle and penetrate 3/4 inch without allowing the leather to lift with the needle. Whole nuther story. So, if you buy the Consew 225 for cheap and fix it up, let it do what it was made to do: sew with #138 thread, up to 3/8" thickness, with a #22 leather point needle.