ClayB
-
Posts
2,063 -
Joined
-
Last visited
Content Type
Profiles
Forums
Events
Blogs
Gallery
Store
Everything posted by ClayB
-
 Kathy, You said only use acrylics over acrylics. I am not sure about using acrylic over oil dye, but I am going to give it a try. I dont see why it wouldn't work. I have used acrylics over spirit based dyes without any problems at all. If it is the oil in the dye causing problems, wouldn't a sealer over the dye before using acrylic fix that? I also don't understand why the acrylic would wash off after it is dry. I have been able to get it off with deglazer but that is yucky stuff. I still wonder if it's a problem with the paint. I use Delta Ceramacoat and Liquitex. Guess I will have to do some experimenting this weekend with paints instead of starting that fish belt. I can just tell the guy it's all Kathy's fault.
 -
Basically you hold the tool similar to a pencil and draw the hair on to the animal. You can also get the hair blades that go into a swivel knife. Which one is better would just depend on which felt better and you were most comfortable with. When putting the hair on, it's important to make it look natural, usually short overlapping strokes work best. Dont just make a straight line from the top of the back to the belly, or from the tip of the nose to the tail. Jan Schoonover explained it really well in a class one time and I probably wont do as well. But he said, generally, hair will lay in a direction that if an animal is standing in the rain, the hair will allow water to shed off it's body. He also suggests studying your pets hair when trying to put hair on a carving.
-
It sounds like you are doing everything right. Once you have let the paint dry, the second application shouldn't be taking the one before off. I have never used Fiebings acrylic. Maybe you should try a different brand of acrylic paint? One thing that might help is to spray a light coat of acrylic sealer onto the leather after each coat of paint. That should keep the previous coat from coming off, but it sure shouldn't be necessary. There is also some kind of medium you can use to dilute your acrylic paints instead of water. I am not sure what it is called. Maybe that would make a difference with the brand of paint you are using. Getting paint to look good on leather is tough enough without the problems you are experiencing. I hope you figure out what the problem is.
-
Patrice, The pro petal from Hidecrafter is probably a good one to start with. They are a lot less money than the ones Jeff sells at Grey Ghost Graphics. There are a couple differences. The ones Jeff sells come in more sizes, especially smaller sizes and they are very sharp when you get them. My suggestion would be to get one from Hidecrafter, see if it's something you will use much and if it is, then consider getting a set of them from Jeff. Thanks for the comments on the oak leaf. I will be looking forward to seeing how yours turns out. Clay
-
If the tutorials help anyone out, I will try and keep doing them when I have time. I have heard that a couple other people might be thinking of doing some tutorials too. I think that would be great. There are so many different styles of carving and ways to do things and it would be neat to see differents ideas. A contest is in the works right now and I hope that we can work out the details and make it happen this time. As for the "live chat" idea, I am open to that too. Not sure how to go about scheduling something like that. Can we find out if there is any interest in the idea? Anyone interested? If there is, I'll try and schedule it. Clay
-
Hey Harvey, Those flags dont look that simple to do. You did a really nice job on them! Glad you found your way back here. I always find your posts entertaining. Hope you stick around are share some more. Clay
-
how do I make an eyeglass case ?
ClayB replied to Sjm1027's topic in Purses, Wallets, Belts and Miscellaneous Pocket Items
Not a lot of difference between 5 and 6 oz. so I think you're ok there. Can I ask where the rest of the directions come from? I wouldn't rubber cement your tracing film to the carving side of the leather. I think that's gonna cause you lot of problems, especially when it comes time to add a finish. Maybe they are cementing it to the back of the leather to keep it from stretching when you are carving and stamping? Some people add a drop of dish soap to thier casing water. I have heard of people rubbing a bar of ivory soap on the leather too once it is damp. It's supposed to help the knife slide through the leather when you are carving. I have a bar of soap near my bench, but have never gotten around to trying it. I am looking forward to seeing your project when it's finished. Clay -
Don, The tool I used there is a tool you push with your hand. You can get somewhat similar results with an undercut beveler or one of the petal lifter tools made for Sheridan style carving, just not as deep. Pete, I don't think it would matter if you used the pro petal before or after the backgrounding. Not sure why I use it afterwords except that maybe I dont think of it until I am done. A lot of times I go back and put the background tool into the depression left by the pro petal to clean it up a bit. I do think that after the background is done, it might be easier to slide the tool into the leather in the position that it will slide in without going to shallow or too deep. Clay
-
There is a website here http://classicbells.com/index.htm They have a lot of info on sleigh bells there and I bet if you emailed DeeAnna she would tell you how to attach the bells. (and while you are at it, invite her to join the forum) Clay
-
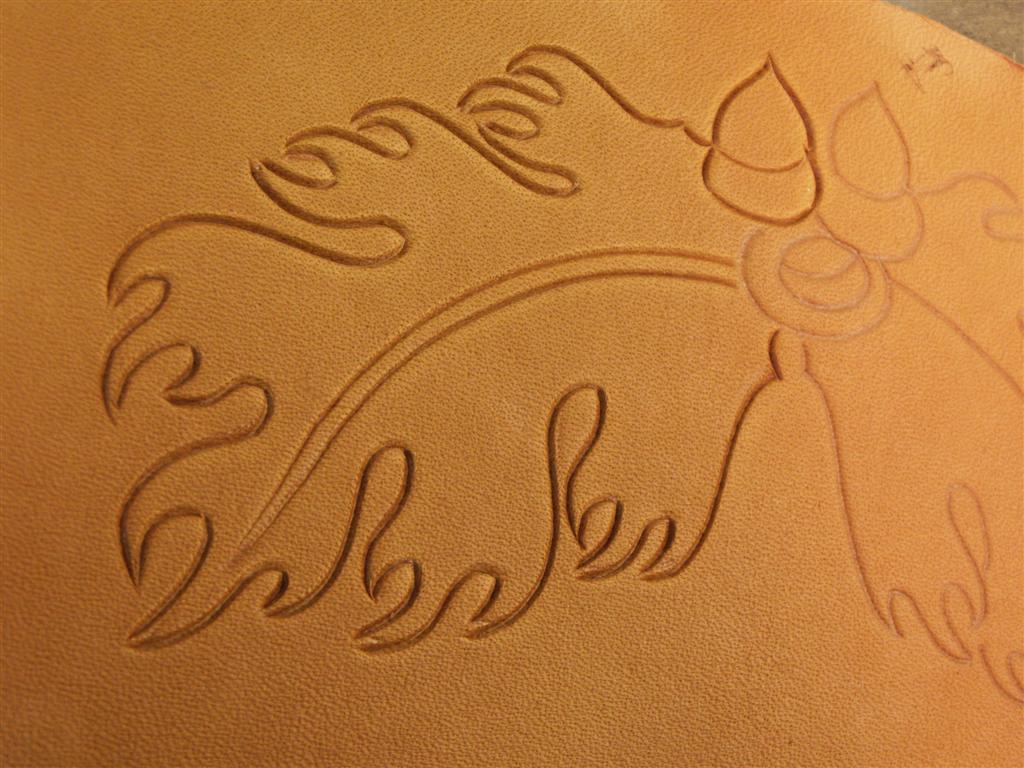
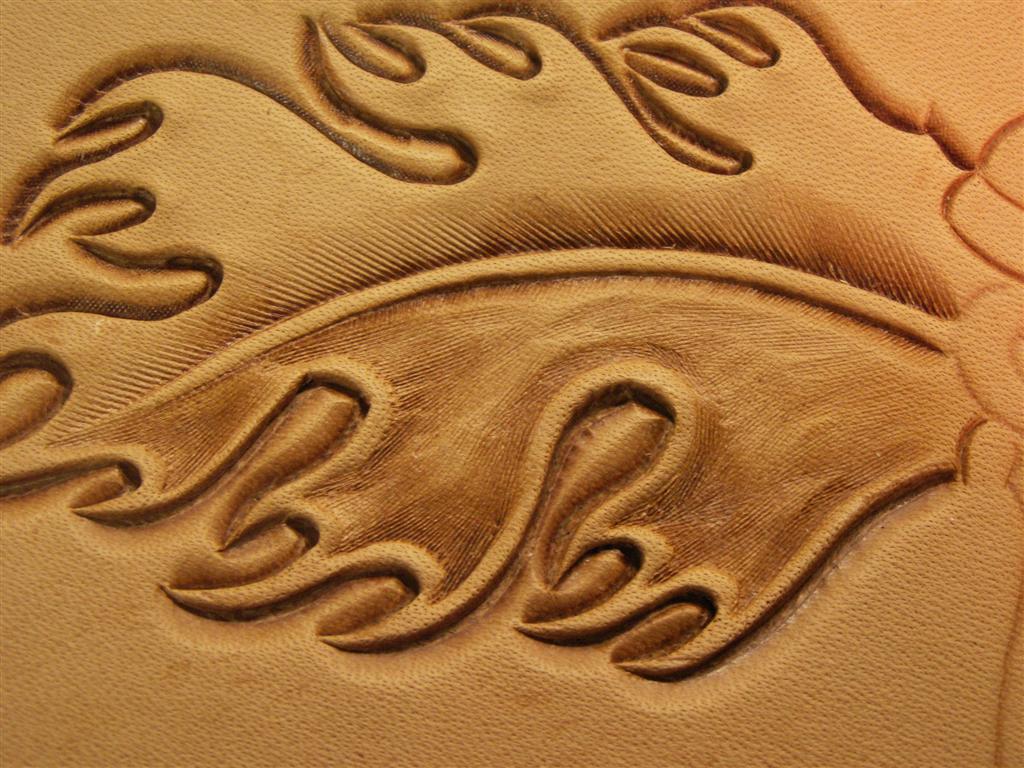
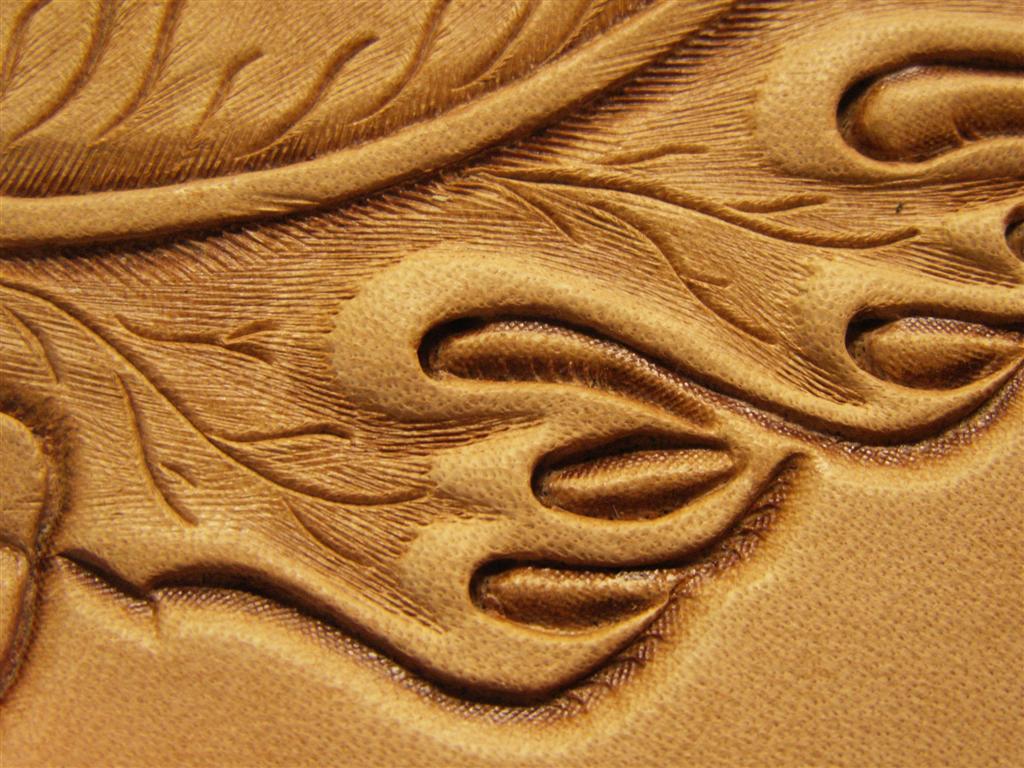
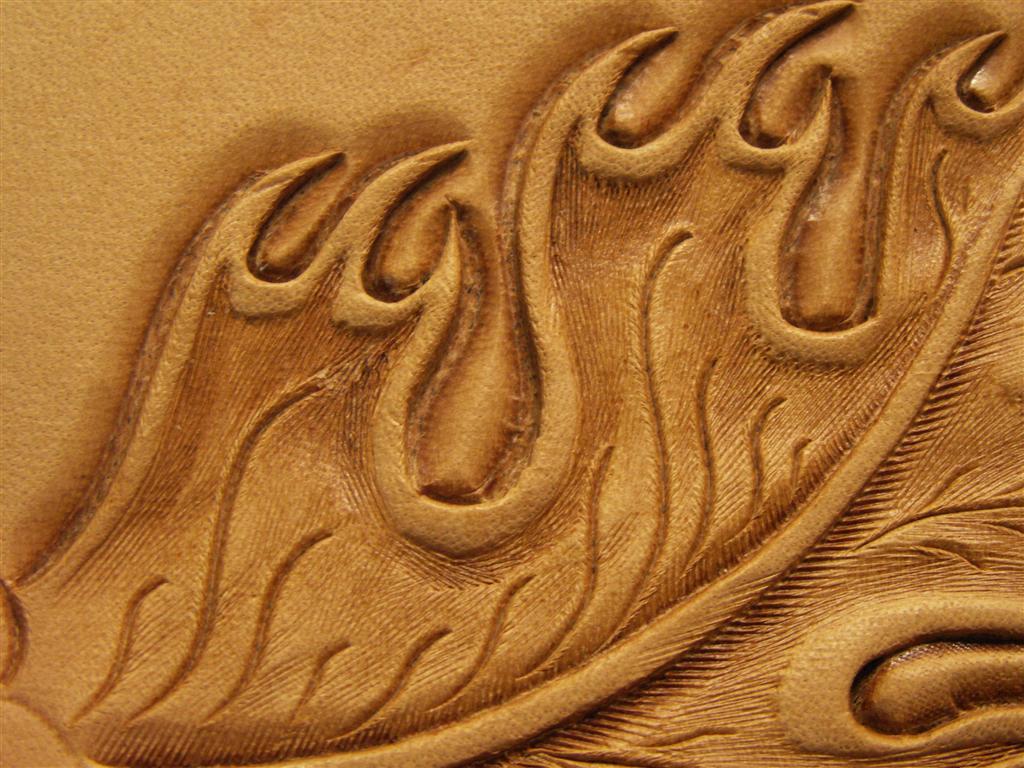
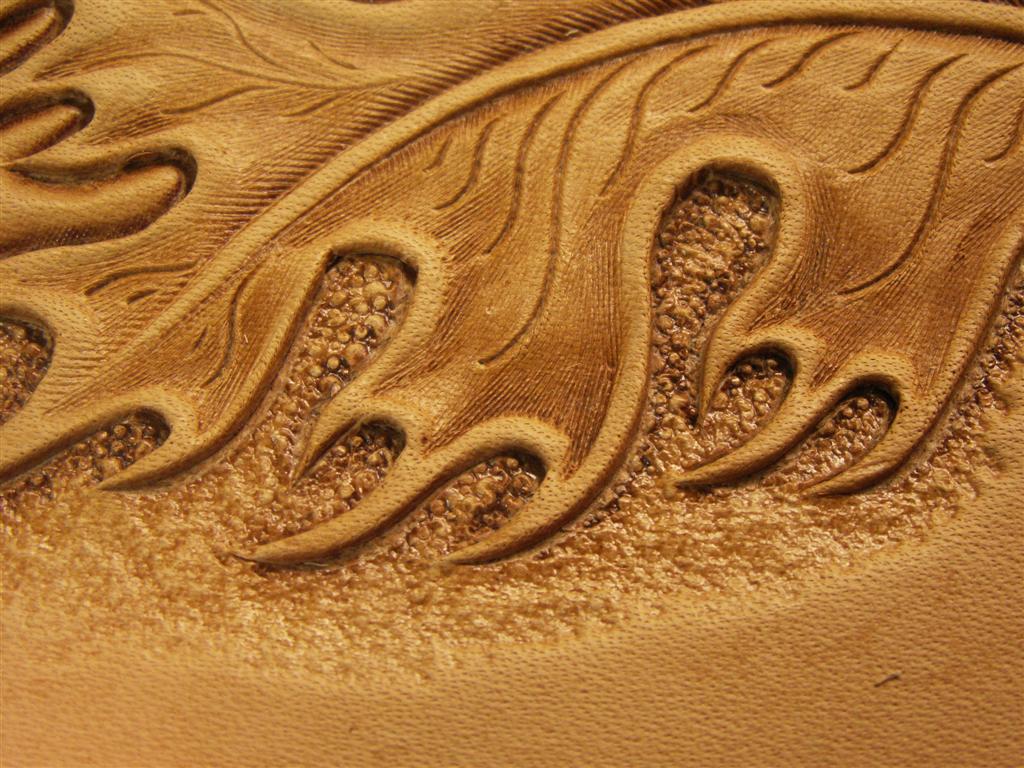
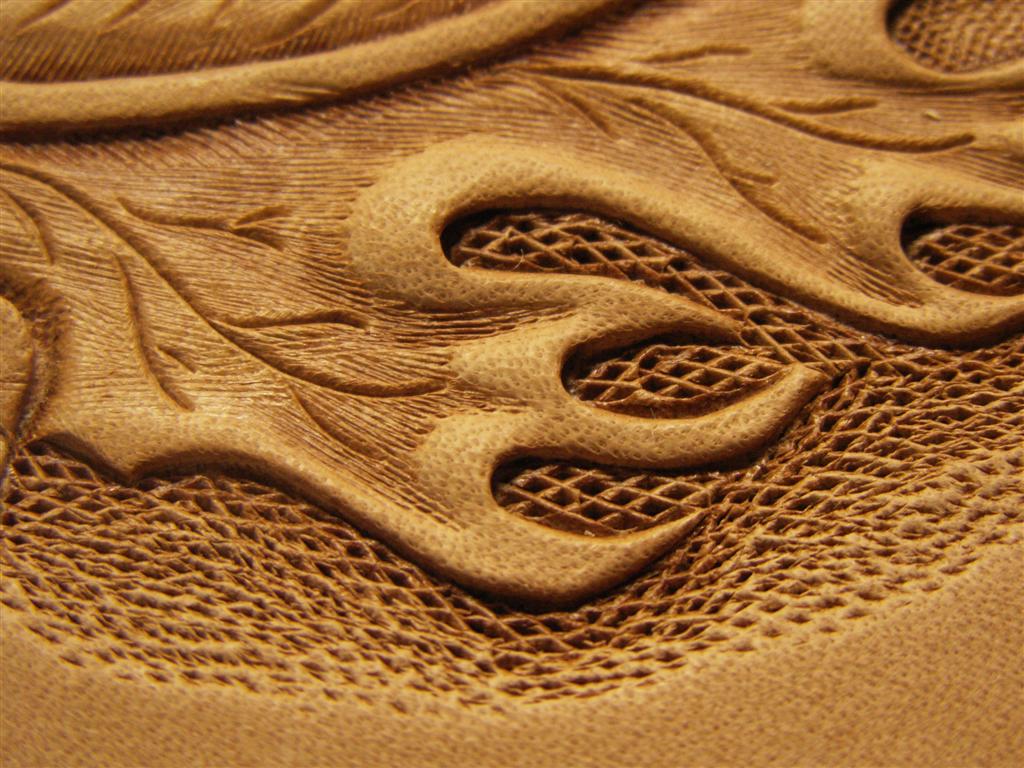
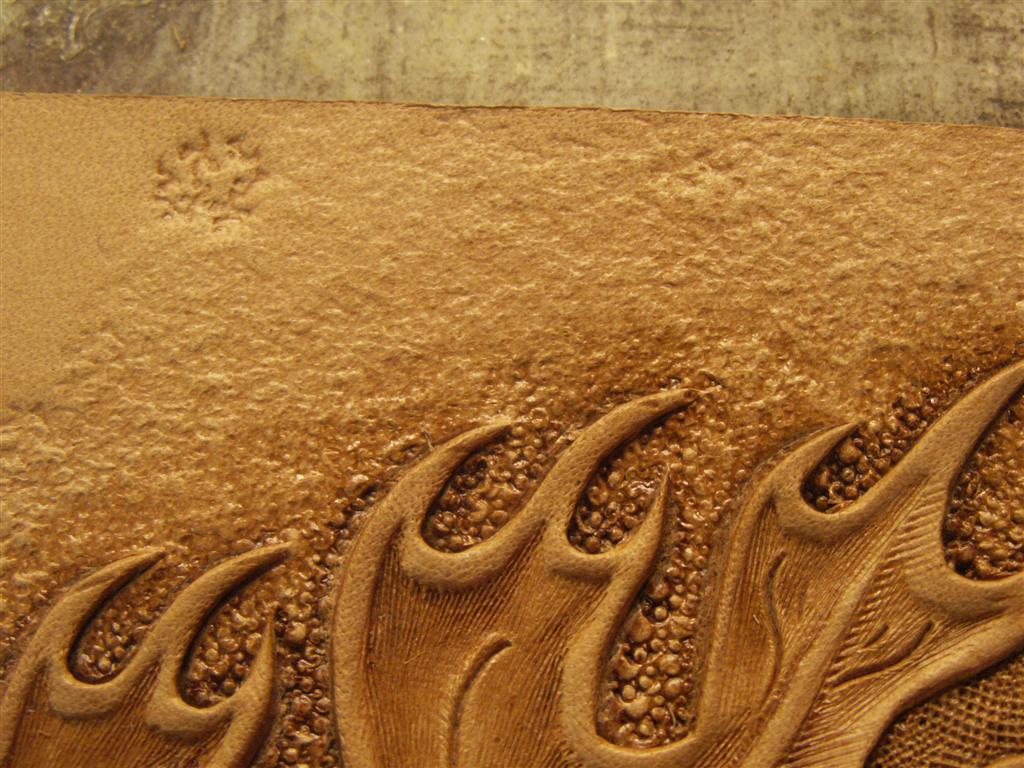
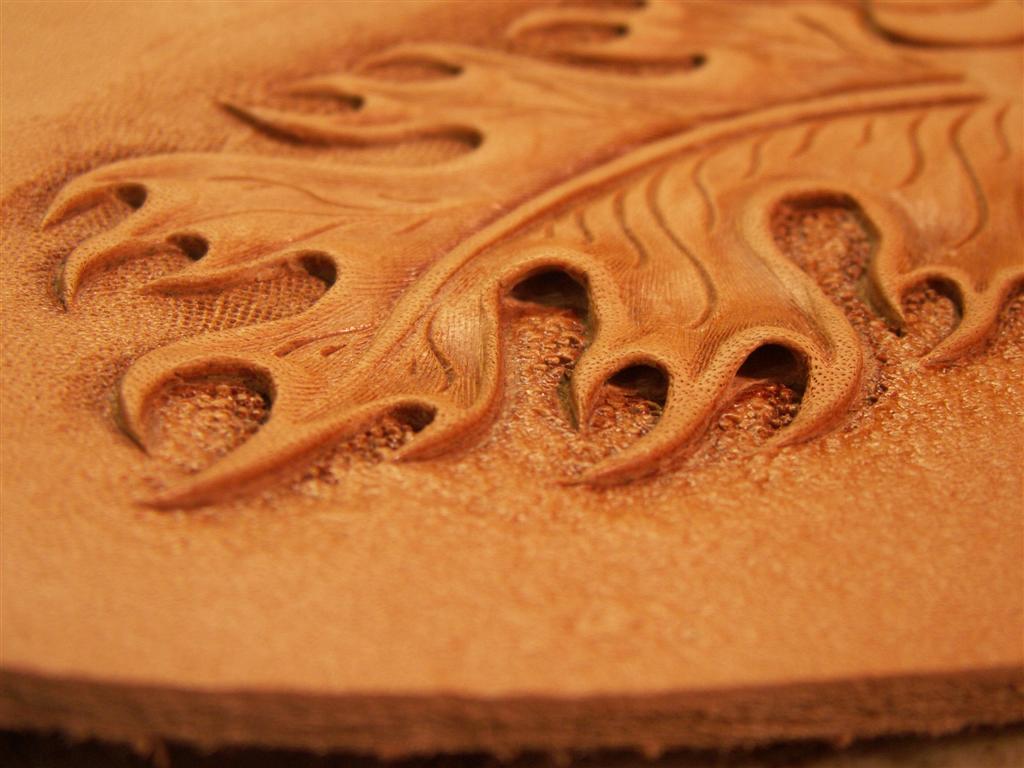
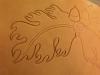
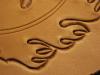
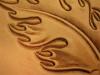
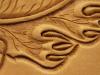
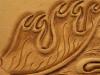
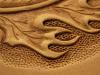
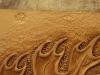
There are probably 100 different ways to carve an oak leaf. George Hurst has a book called The Mighty Oak with a bunch of different styles in it. The one I will show here is based on a pattern in that book. I used different tools on each side of the leaf to show different effects you can get. Here the leaf is traced and cut. I try not to join the cuts at the tips. If you do, the tips can start to peel up, which now that I think about it, might look neat in certain carvings. Here I started to bevel the leaf. On this side I used a smooth beveler. I usually start on the inside curves with a smalll beveler. Tandy used to make round bevelers that should be good for that, but I found them hard to use. For really tight curves, the small figure bevelers work pretty good. This side was beveled with a checkered beveler. I usually use checkered bevelers because they leave less "tracks". Next I beveled the center vein. The top side was done with a Craftool 202 (left or right) angled beveler. I always have to hit it on scrap first to know which one to use on which side of the vein. On the bottom I used Hidecrafter Pro Crafter PB016. It allows you to do both sides with the same tool. You can see that the craftool makes finer lines. Here I am starting to pear shade. I use a long, narrow pear shader like a P368 and start in the points of the leaves. Once the leaves are shaded at the tips, I fill in most of the rest of the center of the leaf with the pear shader, but leave a ridge along the outside. Continuing to fill in. While looking at the pictures really large like this, I am thinking it might look better to leave ridges that aren't shaded from the tips to the center vein to get more contrast. I might have to try that on the next one. The pear shading is done on one side. Small viens are cut in with the swivel knife. On this side, decorative cuts where put in instead of the small viens for a different look. Decorative cuts have never been my strong suit so you'll have to just pretend they look good. This side was backgrounded with a pebble backgrounder from Hidecrafter. It's one of my favorite backgrounders. This side is backgrounded with a regular checkered backgrounder just to show the difference in looks. Here I used a coarse textured backgrounder. Just another different look. If I dont have a border on my carving, I like to switch from the pebble background to an E294 matting tool when I get a little ways away from the figure. I like to use a pro petal tool to lift the inside curves of the leaves. I think it gives added depth to the carving. The tool slides into the leather, but not through the back. It creates a small cavity in the leather and if you lift on the tool, it raises the top side of the leather, giving your leaf a 3-D effect. So there's an oak leaf the way I carve them.


-
[quote name='Beaverslayer' As far as "sealing" before dying, what you're actualy doing is opening the pores to accept the dye better and deeper. The sealing comes afterwards, once the dye has dried. Ken Ken, Kathy mentioned using a sealer before applying acrylic paints. That's another difference between spirit dye and acrylic. Quite a few people apply a sealer before using acrylics. I am not sure the reason for that and maybe Kathy can explain it. One thing I have found that it does is makes it easier to remove paint if you mess up. Since the sealer keeps the paint from penetrating into the leather, you can "wash" it off to some extent. When I am done coloring with acrylics, I will then spray on a final coat of sealer to make the paint permanent. Clay
-
Hi Randy, I am really glad to hear that Bill is going to make the show in Ft Worth. Must mean he is feeling better? I would really like to take a figure carving class from him someday. I think most people think of him as a saddle maker, but I have seen a couple pictures he gave to Robb Barr and they are really nice. Do you remember back in Denver when he was talking about doing a video series on making a saddle? He mentioned having videos of making the tree, engraving the silver, carving the saddle, doing some rawhide braiding etc. Do you know if he ever got anything going on that project? I think he started having health problems right after that and I haven't run into him again since then. Hope you guys have a great time in Ft Worth. Wish I was going. Say hi to Riley for me. Clay
-
I don't know what to say to that. Thanks Shawn. I have step by step pictures of carving an oak leaf the way I do them someplace. I'll have to try and get them posted on here sometime. Clay
-
Hi alessandro and welcome to this forum. If you read through some of the posts in the Dyes and Finishes section, you will find that the topic of acrylics vs. spirit dyes has been discussed before. One place is in this thread http://www.leatherworker.net/forum/index.php?showtopic=527 Most stores that carry art supplies will have acrylic because it is used by lots of different artists. I think spirit dyes probably have a more limited use outside of leather. As for some basic differences between the two, acrylic is water based and can be diluted with water. Spirit dyes are alcohol based and need to be diluted with alcohol. Spirit dyes penetrate deeply into the leather and are permanant. Acrylic paint stays mostly on top of the leather. It is permanant too once dry, but you can work with it while it is wet. You can remove it with deglazer if you need too, but I would only do that as a last resort. Spirit dyes tend to fade more over time while acrylics are supposed to stay the same color forever. There are artists that can get wonderful results from either form of coloring. As with most things, it takes a lot of practice to get it right.
-
Thank you Mike. It's the Hidecrafter version of the Beard pebble backgrounders. They are my favorite backgrounder to use these days.
-
Thank you Pete. That was just a demo piece I was playing with. I dont normally mat before I background. One thing I found for getting depth to my backgrounding is to use a small background tool for most of my backgrounding. I can get a lot more depth with a small tool than a larger one. It takes more time, and sometimes I have to go over it several times to get it smooth. Sometimes after backgrounding, I will even re bevel and then background again for greater depth and to even it out. You have to have your leather glued to something though if you do this to keep it from stretching way out of shape. I am starting to think there is a point where the leather will not compress any further. At that point, your background can get pretty smooth, and you will usually get good color too. As for knife blades, I am still trying to figure out what I like. I use an old Craftool angle blade, Peter Main's low angle blade (made by Henley) and recently got a couple angle blades from Bob Beard. I switch around a lot. Clay
-
One thing that Jeff Mosby does on the ones he makes is to round the heel part of the tool. This makes it a lot easier to use without the back end marring the leather. It shouldn't be that hard to file the back end of any of the Pro Petal tools to make this improvement. Clay
-
Hey David, You know you can mail your entry, right? But if you do it can be a little pricey. Last year I took my entries to a UPS packing place cuz I didn't have a box and thought they would do a better job of packing them anyway. BUT.... when they saw that they were art work, the said they needed to be wrapped in bubble wrap, put in a box, then that box wrapped in bubble wrap had to go into another box. Then they hit you for oversized box and again for insurance. The reason they used was "if grandma is mailing a jar of pickles of to her grandkids and that box is on top of yours, and the jar breaks, we dont want them to ruin your art." They also took digital pictures of the contents just in case the pickles did leak on my pictures. It ended up costing me about $90 for shipping each way. Last spring I packaged my own pictures to send to a different show and mailed them through the USPS for about a third of the cost, same insurance. But if there is someone close by that can take them for you, that would be a lot better all the way around. Clay
-
Like you said, the hide is firmer up along the spine, also at the butt end. The belly and neck areas are stretchier. For things like straps and belts etc where you want strength, you want to cut them from the firmer parts of the hide, and cut lengthwise. You wouldn't want to cut a strap starting at the spine going towards the belly or one end would be firm, the other stretchy. The belly and neck areas can be used for projects that dont require strength. I also use these areas for carving projects where I want to be able to mold or emboss the leather.
-
Some history on the leather magazine. What is today known as the Leather Crafters and Saddlers Journal originally started out in Nov 1956 as The Leather Craftsman. In July 1962 the name was changed to The Craftsman. I think at that time they thought about adding some other crafts. In Oct 1972 the name changed again to Make it With Leather. Then in Nov 1985 the name changed again, back to the original, The Leather Craftsman. Some time in the early 90's they went broke, and were taken over by Bill and Dot Reis and became the Leather Crafters Journal. The name was changed one last time a few years later to The Leather Crafters and Saddlers Journal. The magazine has been around for a long time. It has gone through a lot of changes, just as styles of leather craft have changed. The early issues are mostly western. In the 70's there was a lot of the "hippie" style stuff. I think in the 80's, things changed from mainly Stohlman style stuff with the arrival of new artists like Robb Barr, Robert Beard, Kat Kuszak, Paul Burnett, etc. Through Ebay or leather shows swap meets, you can still purchase a lot of the older magazines. I have most of the issues from the first one in 1956 up until the beginning of the Leather Crafters Journal. When MIWL was going broke, they were begging people to pay up additional years subscriptions and I was paid up for a bunch of years when they went under. I didn't know when they started back up again so I am missing several years of the Journal. Maybe someday I will fill in the missing issues. I read most of every issue. Even if the articles aren't something you are interested in right now, someday you might want to try something, and think "didn't I read about that once?". Clay
-
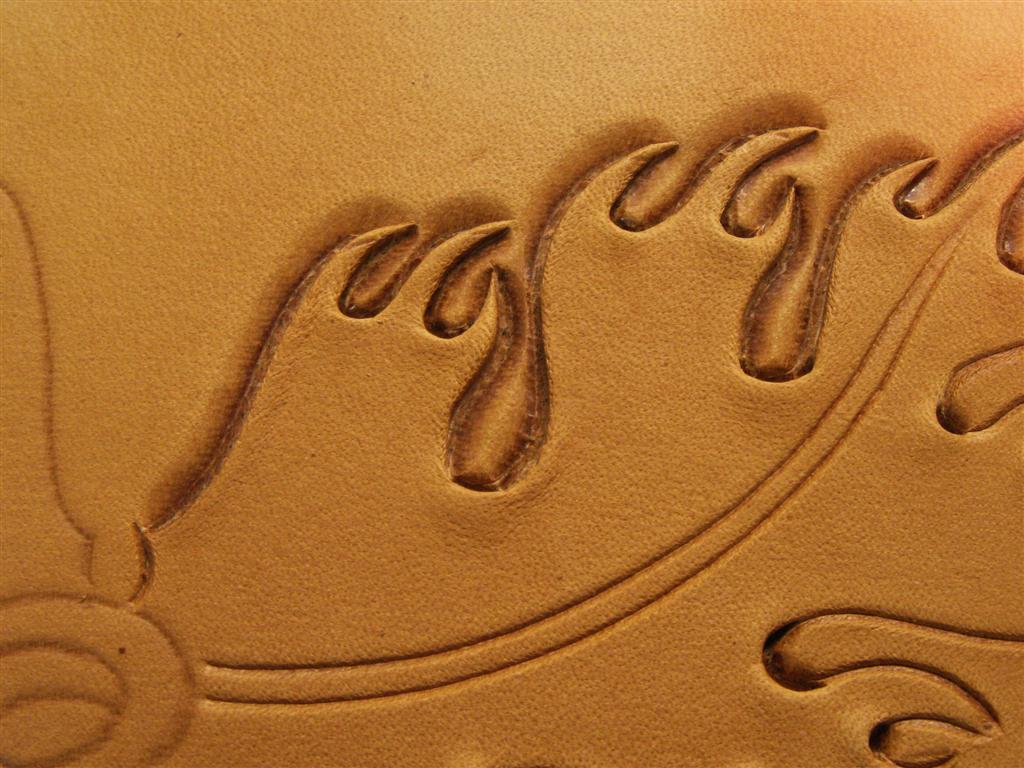
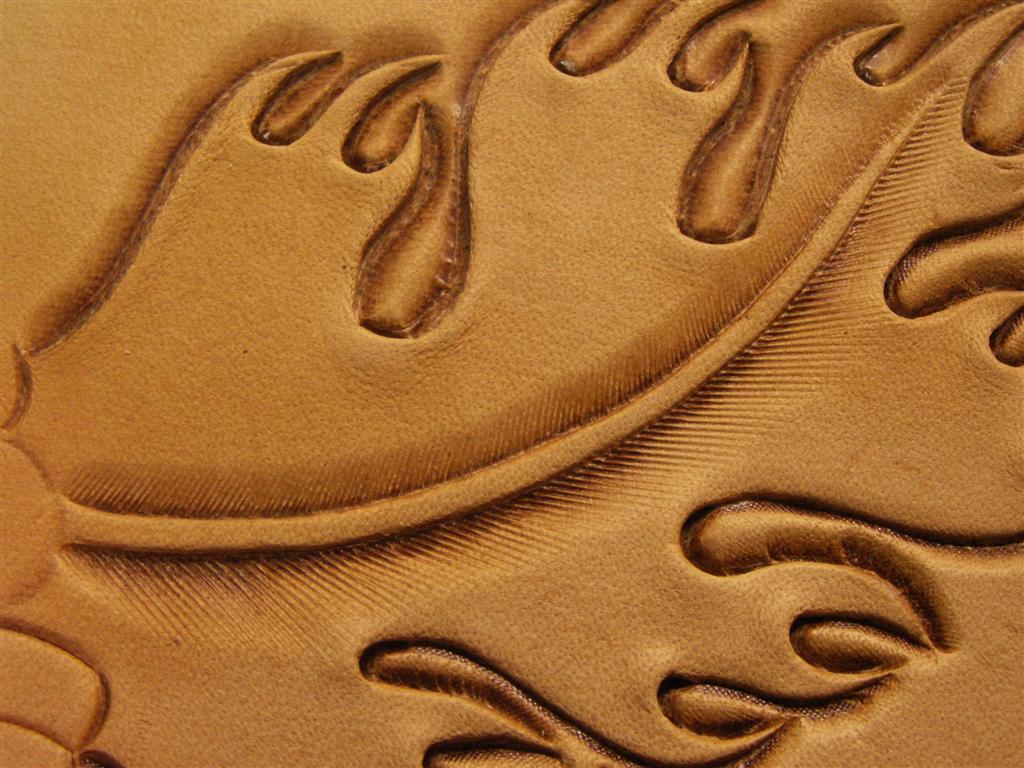
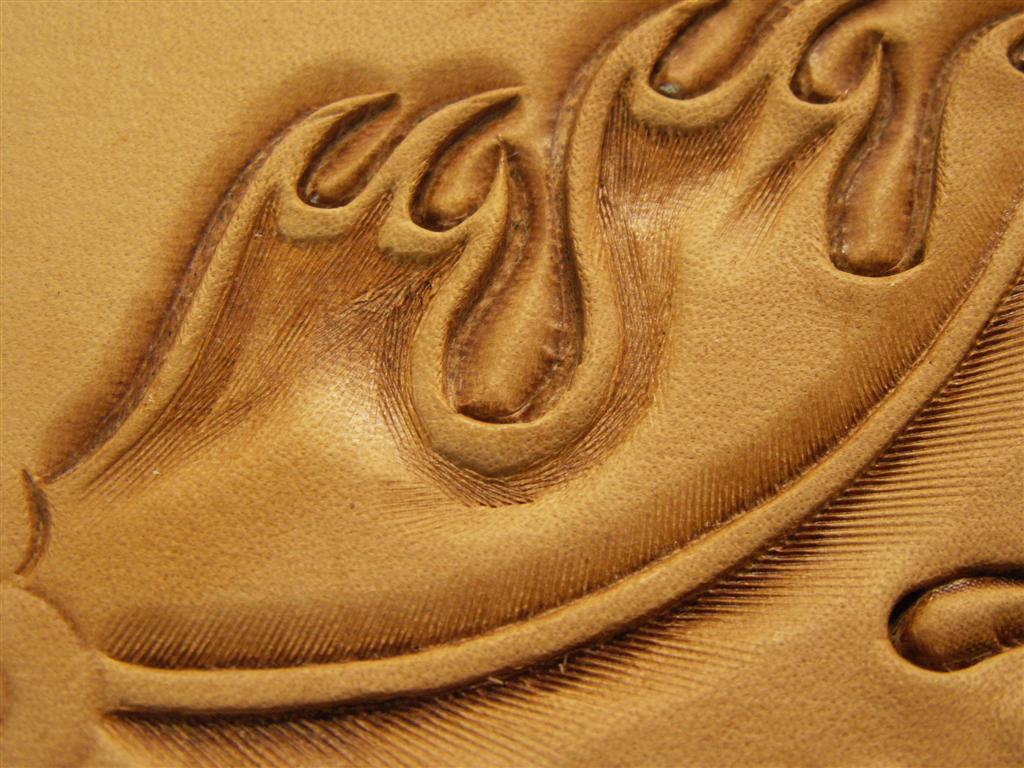
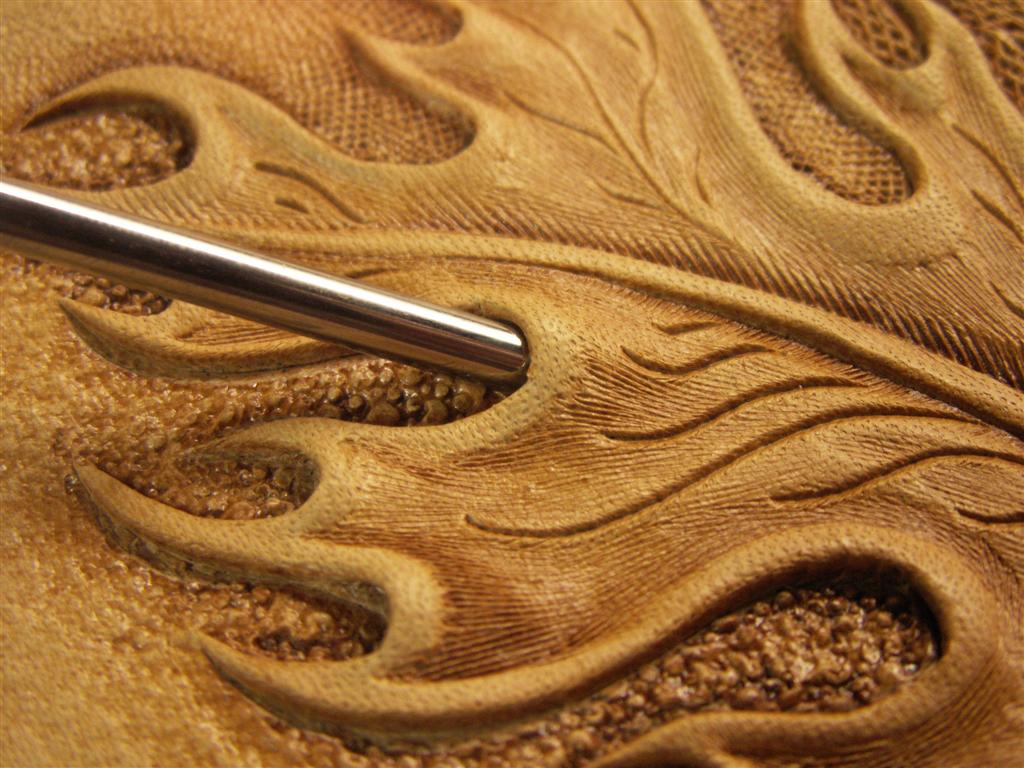
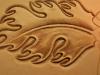
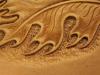
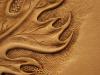
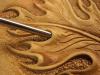
One thing you have to do is make sure your pro petal tool is sharp. If they aren't sharp, they dont work well at all. Then it's just a matter of sliding it into the leather, usually on inside curves of leaves. Try to hold the tool at an angle so it will go about half way into the thickness of the leather. If you go in to shallow, the leather can rip out on top. Here are a couple of pictures, one with the tool inserted in the leather, the other of what it looks like when it is taken back out.


-
Up here in North Dakota, we usually get above 100 degrees 2-3 days each summer. This year we had about 6 weeks over 100. We had an abundance of rain this spring and have more grass than usual too, but with the heat it's really dry now. We are constantly checking the sky for smoke, worried about prairie fires. The only good thing about the heat is I don't feel bad at all about spending time in my basement workshop on days off. Its usually the coolest place in the house, and it's given me some time to work on a project that I have been thinking about for a long time. Hopefully it will get finished in time for me to send it off to the show in Fort Worth. My boss said he had 104 on Monday, I didn't bother looking. Saturday night we are supposed to be down in the 30's for lows so it sounds like summer might be over up north pretty soon. Wont be long and we will be complaining about the cold for about 6 months. Clay
-
Hey Dave, If anyone starts picking on that poor little guy with Sweet Tater on his bike seat, tell him to call up Kate. She can take care of all the bullies with that 6 lb maul of hers! Clay
-
metallic finish
ClayB replied to candyleather's topic in Dyes, Antiques, Stains, Glues, Waxes, Finishes and Conditioners.
Funny, I just happened to come across a site that gave detailed instructions on using gold leaf on leather yesterday. You can check it out here. http://www.alleycatscratch.com/lotr/Leather/Gilded.htm -
softening veg tanned
ClayB replied to JustWakinUp's topic in Dyes, Antiques, Stains, Glues, Waxes, Finishes and Conditioners.
A friend of mine that owns the local saddle shop swears by Skidmores Leather Cream. http://www.skidmores.com He uses it on all the old, neglected, dried out saddles that come into his shop before he takes them apart to work on them. He also uses it on saddle strings and things that are going to really get flexed a lot. I have found it softens up stiff leather pretty good and gives it a really nice feel. They market it for saddles as well as biker gear. You can get a 1 oz trial size jar for a couple dollars. You might consider giving that a try. Clay