-
Posts
934 -
Joined
-
Last visited
Content Type
Profiles
Forums
Events
Blogs
Gallery
Store
Everything posted by KnotHead
-
I get all mine from Tandy Leather. You can buy them in 10 packs and by the 100 count box. Brian...
-
The bevel should be like A in your diagram. This is what I do to cut the small lace. I cut a wide cut first. Usually about 1/4 inch width. I split that 1/4 inch down just a few thousandths. I cut my my next straight 90 to just within where I need the actual finished lace before I bevel. Now I check the thickness of my lace by feel in my fingers. If it is too thick then, I split it one more time, a little at a time to get it where I think I will like it to be. Now I bevel one side of the lace with a fresh blade, not the blade I used for my 90 degree cuts. It's important to have a fresh new blade every time you bevel. I know it seems to be a waste, but you'll see the difference in the cuts. Then I bevel the other side. It's important to have a good straight cut on both sides when you're cutting your bevels. If you have curves and stuff like that and it is not even on the hair side from the splitting, you'll end up with bad cuts and not what you want in lace. Hope this helps some. Brian...
-
I like the Plaits Round & Flat by Ron Edwards myself. That would be a matter of preference though. I have a link to their website. The Ram Skull Press located here, The Ram Skull Press There you'll find all of Ron Edwards books. You can order on their international ordering page, which is where that link will take you by default. Brian...
-
I like the ideas of Fig 1 which would be most likely the quickest and cleanest way. I also like the idea of Fig. 3 for the simple reason that you could also take the looped end and bring that together into a 6 strand round braid, or an 8 strand round braid thereby making the loop appear to be more natural, or making it look like it belongs there. Do one of those two braids for a length and then separate the 6, or 8 strand round braid into the equivalent smaller round braids and treat the rest of the lanyard as you have designed in your figures for adjusting and such. I also like the idea of Fig. 4. It would be essentially be nearly the same as Fig 3 in the way the loop is made. Making the loop by starting with the looped end and then bringing that together with another braid. Example; a 4 strand round braid brought together making an 8 strand round braid with a 550 cord as the core for a length, then dividing the 8 strand back to 2 separate 4 strand round braids and then spliced together as in a back spliced technique used aboard ship to bind 2 ropes together that are to short for a specific job. That's my little tid bit for you. But in the end you're the artist and should go with what you think best for your skills and product. Brian...
-
I am thinking that a photo, or drawing would be a good idea so we can see where you are with your project. This in turn can help us help you in how to proceed in the best way possible. Brian...
-
Hi Bergjes. To me it looks like an 7, or 8 strand quarter round braid with a sequence of; U1-O1-U1 / O1-U1-O1, around the back and either O2-U2, or U2-O2. The objective with that sequence is so that the band will bend around the wrist without separating the parts on the top of the band. For the core that bracelet must have a bendable plastic core of some type. The findings are most likely bought from a supplier somewhere. I don't know where though. I'd like to know myself. That is a very nice finding. Brian...
-
Very nice show of skill Mike. Brian...
-
Thank you very much for your kind comment entiendo. Well, it's been 3 or 4 days since I finished it. Now on to another project. More, or less an experiment. I'll post that later. Brian...
-
I don't know. I'm not a golfer. Like the PDF document says. I just got tired of lookin at it all naked and stuff. I tried my best to ignore it too. LOL...
-
That stems from the very start of your braid. You have to start the diamond braid like you have above different from the barber pole braid. But when the above braid is done you have to be aware of the diamond pattern being straight as you braid.
-
Thanks ya'll. Brian...
-
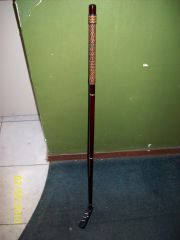
Okay ya'll, I've made a PDF document of the creation process for this particular project. I did not want to bore ya'll with too much details. So this is more, or less a story of the creation. You can download it by right clicking on the link and saving as to your hard drive. Thanks to everyone for their kind comments. Download Link; http://khww.net/mystuff/GolfHandle.pdf
-
-
From the album: Misc Leather Works
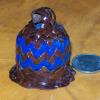
Some fid work that took over a week to do. This one is just a sample piece for customers to view the different patterns. Thanks for looking. Brian...© © 2010 Brian Kidd
-
Thank you all for your kind comments. I know the pineapple knot kind of throws a bump in the work, but I figured if I'm gonna cover my mistake I might as well cover it with something kewl. Brian...
-
Well thank you all for you kind comments. I'm not sure the big T of the course would want anything to do with it. LOL... Brian...
-
About a week and half later I finally got this putter handle done. While not looking for any balance within the patterns, I think that it turned out quite nice for a sample to be shown to potential customers. Yep, before you say it, the pineapple knot is to cover my mistake.
-
Thank you. I just did the shooting. All vids are now uploaded and ready for viewing.
-
The knot is a 5part 4bight Turks Head, or known to the leather braiding world as a 5part 4bight casa knot. Here are the instructions for two different turks heads. 5part 4bight Casa Knot - The one you are talking about. 7part 4bight Casa Knot Attached are the instructions by Tom Hall - Introduction To Turks Heads.
-
No picture or link to a photo.
-
:crazy:Gaucho knots, Fan knot from Bruce Grants book. Brian
-
Hi all. I am not sure which ones you were looking at. But I know the ones I make I back splice(back braid) both ends. I use the fancy knots for ascetics purpose and to make it have a little more dimension to the leash. If the leash is for your own personal use, then I don't see why you shouldn't just back splice and leave it as that without fancy knots. If that is what you want to do that is. When I make my leashes, the customers always have a basis of what they want, like how many strands and what type of braid and what type of handle they like. But after they have said that, they tell me to be creative in whatever fashion I want by adding to it. Most of them like something that show out and gets the attention, like ( POW ) ! there it is. Mostly the fancy knotting is used just to cover up the areas that are back spliced(back braided). I used to think that making a dog leash would be a pain in the patooka. But the more I got into it, the more fun they became. So the addiction started. I look forward to seeing your work when done. Please do post a few photos. We all would love to see your work. Brian...
-
The reason the other lace was so easy to bevel many strings at one time is because of the way the lace was prepared. On most of that goat lace and calf lace the density of the lace is not as strong as with Kangaroo lace. Even if you have bought that Kangaroo lace on a spool. Now if you bought that kangaroo as a whole hide and then cut your lace from that hide, you will also run into the chatter problem with that. The kangaroo is a much more dense hide than the other two hides are. Running you bevels on kangaroo should be done different than you do with the other two hides. The other two hides you can bevel in that way very easily. But with kangaroo the bevel should be done just like when you cut the 90 degree cuts, except at a 45 degree, or 30 degree angle. Even with my cutter / beveler, I still have to change blades about every 150 feet or so. I have tried many different ways to bevel kangaroo and the way you're doing it is the way I had done raw hide, calf and goat. Most of those you normally wet the hides, except for the calf. I hope that this helps out a bit. Brian...
-
Yep... LOL... I think the only reason it came out was because of the 2 beers I had while cutting, splitting and beveling it. LOL... Brian...


