Bob Blea
-
Posts
1,771 -
Joined
-
Last visited
Content Type
Profiles
Forums
Events
Blogs
Gallery
Store
Everything posted by Bob Blea
-
Do you mean the stamp? If so, yes it is square and the impression is symmetrical. Bob
-
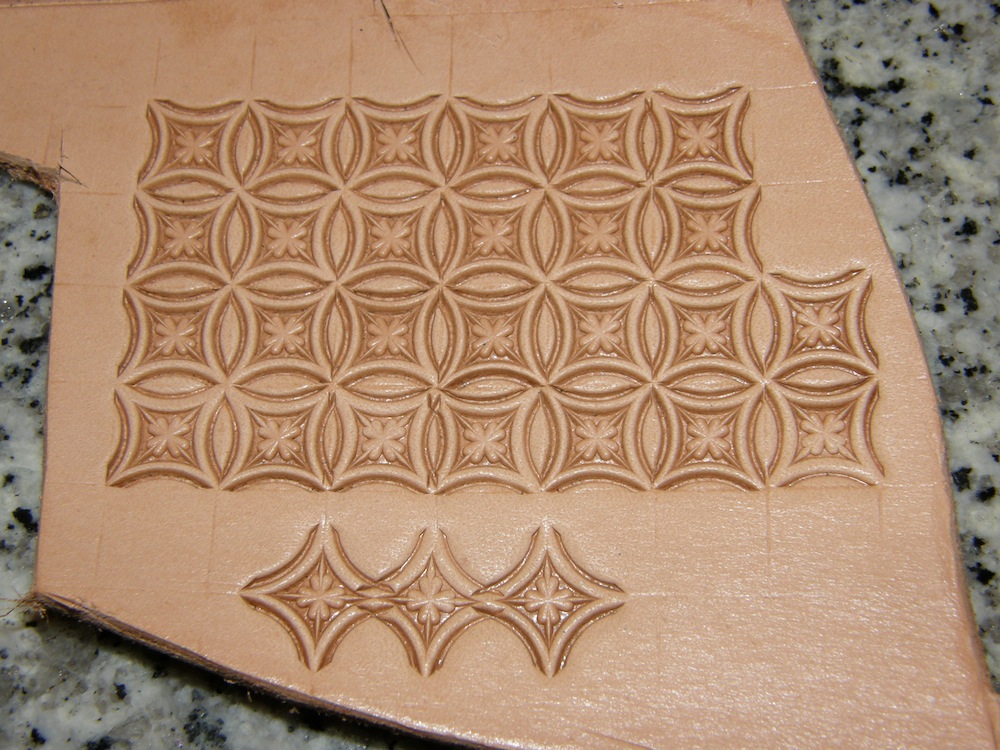
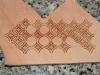
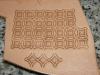
So, I've been busy with other projects and am only getting back to trying some of these suggestions. Today I tried the Tandy Geometric Stamping tool craft aid. The 1/2" grid was closest to the size of my larger stamp which is 3/8" square. Unfortunately it isn't quite big enough to work with this stamp: It was off just a little bit, so I can't make the stamp line up when filling up the whole pattern. If you are only stamping the intersections, like the middle of the picture shows, it will probably work. But the effect I'm working towards is what is shown on the left. I then tried using the 3/8" grid and stamping inside the grid. It worked pretty well and was a good reference gird, but if you make impression with the craft aid too deep the lines of the grid will show up between the stamps. However, I could stamp this quicker than just doing it by eye: As the bottom of the picture shows, the 3/8" grid is too close for stamping right on the intersections. I'll try some of the other suggestions and post anything that looks promising, Bob
-

Evolution Of A Belt
Bob Blea replied to mlapaglia's topic in Purses, Wallets, Belts and Miscellaneous Pocket Items
Really like the design on the belt. It looks great. Bob -
You're Bible cover turned out great! Your customer is going to be proud. Bob
-
I like the border pattern too. It looks really classy. The color turned out really nice too. Bob
-
I like the idea of a fence or guide for each row. I have a clear plastic ruler I could put along side under my shot bag to help keep the spacing orderly. I also bought the craftaid grid this weekend, but haven't had a chance to try it yet. I'll give these methods a try and report back. Thanks all for the help! Bob
-
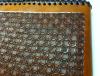
Hi Tree Reaper, I'm with you on the border stamp. And it isn't that the leather is moving. I tape across the back and don't usually have problems with stretch. I'm pretty sure the problem is lining them up. I can be just a hair off on one row, then the next row is just a hair off again in some place, and pretty soon after a few rows you end up with the end of the row out of alignment by a small (but visible) amount. That's what happened in the second photo. For this kind of stamp you have to depend on alignment by eye, and sometimes I'm a little off. Just looking for a more fool proof method. Bob
-
Hi all, Thanks for the good ideas. Dirtclod, I like your idea. Breaking it up into four smaller sections could make it much easier to keep things lined up. Sheathmaker - What you describe it how I do it now, but because these square stamps don't have any overlapping legs, you have to rely on eyeballing it to make them line up. Being human and with aging eyes, I eventually make mistakes. LOL! Michael - I actually looked at that template last week at Tandy. I need to go by there today and I might need to pick that one up. I have some stamps, like the Crazy Legs or Windmill (which ever you call it) that wouldn't hide that grid, but for these box stamps it would probably work. Tree Reaper - If I understand you, it's the same thing I do when running a border stamp. I had thought about this idea and I need to try it too. My concern is that with this kind of stamp, when the spacing varies a little bit it SHOWS. It's probably hard to see in the photos, but the stamp makes a little football shape between each one because of a curved border it has. When done correctly it four stamps make a circle in the pattern, but if your off much the circle is distorted. I really like these stamps (I have several) but they are kind of unforgiving... These are all great ideas, and I need to try some of them on scrap and see how it works out. One question that comes to mind: What do you think of using a border stamp with this kind of pattern? It would give you some leeway to drift a bit because the border would cover the uneven edge, but I'm not sure border stamp would look that good with a grid like pattern like this. Just a thought, Thanks again for all your help! Bob
-
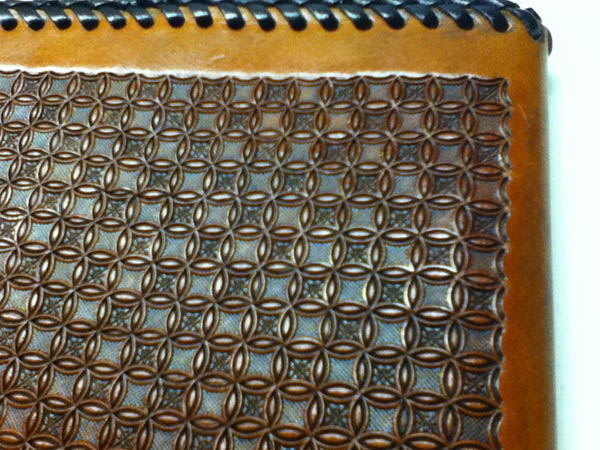
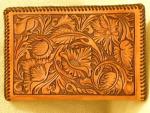
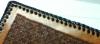
Hello, I have been searching the forum for answers to this question with no luck. I enjoy basket and geometric stamping, and while I don't have any problems with basket stamping, I am still working to get really good results from geometrics, particularly box or block stamps. I really like these, though they are time consuming to use. This pattern was created using two square stamps that are ¼ inch to a side. I can run these over small areas but on larger areas, invariably I have trouble with alignment and I end up with the stamps spreading apart a bit. The notebook in the picture measures roughly 9x6 inches and has that pattern across the whole back. I did pretty well until I reached the far corner, where the slight spread by the stamps causes the whole pattern to shift outside of it's border. You can sort of see it in the picture below, but it's more noticeable in person. The whole pattern "stretched" a little bit and that corner didn't come out square. I've been trying to come up with ways to combat this, but I wonder if anyone out there has tips on using these sorts of stamps. I have seen some really nice saddles with patterns similar to this though the stamps are much bigger than the ones I use. I know it would be easier with a bigger stamp. These don't have a leg that rests in the previous stamp like a basket weave or a tri-weave would. Is there something I am overlooking that would help make the alignment of these stamps hold square across the whole panel? I think I must be overlooking something obvious, but any help that the experts here could provide would be appreciated. I really enjoy running these stamps but I dont' feel confident enough with them to put them on a customer's project quite yet. Thanks in advance, Bob
-
Hi B Milla, That is an excellent question. I have struggled with keeping belts moist and they are hard to keep in the bag while tooling. For me I decided to try to complete a section at a time so I wouldn't need to re-wet as much, but I have very little experience at belts, and would love to know the best practice here too. Bob
-
Thank you Keith, that is good to know about wetting from the back. I've only been able to try it twice and it seemed to work OK, but what you say makes sense. Just more reason to stick to using the spray mist technique. Bob
-
I rarely carve anything in one setting. Too much other stuff going on, so sometimes it can take weeks to get the time together to finish something. My projects stay in a bag when not on the bench, and I have a small narrow space in the refrigerator they stay in to prevent mold. When carving, I try to keep parts I'm not working on still in the bag, so they don't dry out. When adding water, I usually do it with a spray bottle so the water gets down into the cuts and tooling evenly. If you can add water from the flesh side that is great. It works really well and I think it may be the ideal way to keep moisture in the leather. But in my case, it's always thin leather that has tape on the back to keep it from stretching during tooling, so I have to add water from the front. Bob
-
I think you did a fantastic job. I'm not a figure carver, though I am trying to become better at it. I think what you have done looks very good. I paint in oils too and while I can paint landscapes or objects, I have never had much sucess painting a person. I think that because we are so hard wired to recognizing human features and expressions, it take a lot of talent to represent the human form well and not have things look out of proportion. Thus I think representing a person, either in painting or in sculptures on leather, is very hard and takes a lot or artistic skill. From my point of view, you did a great job.
-
I Just Sold My First Pendant On Etsy
Bob Blea replied to DoubleC's topic in All About Us and Off Topic
Congratulations Cheryl! -
I use a Leather Wranglers SK-3 and find the blade holds it's edge wonderfully and takes very little maintenance. I also have a Barry King knife that has found it's place doing my decorative cuts and as a beader blade, but for general carving, I don't think Leather Wranglers can be beat. I haven't tried a ceramic blade though. When I do feel the need to sharpen I have a similar set up to Marlon's. I have a board that has 1000 grit wet/dry on one side and 2000 on the other. Start on the 1000 grit side and then move to the 2000, and then strop. Bob.
-
Floral/basket Stamped Photo Album
Bob Blea replied to Double U Leather's topic in Books, Journals and Photo Albums
I'm impressed, and I hope to get to your level someday. Very nice work. Bob -
Hi Ron, If you are really interested in carving animals and forest scenes, figure bevelers are the way to go. Tandy does sell them but be careful. Many of the modern day bevels from Tandy have very sharp edges and they can be difficult to use. I have a few modern small figure bevelers that have very sharp edges and are almost no good (in my hands anyway) as an actual beveler. They leave too many tool marks. I was recently in a Tandy store and looked at some of the figure bevelers, and the larger ones actually looked pretty good, so I recommend visiting a store and trying them out first. You may find they work OK for you. If not, try finding classic bevelers on Ebay. I'm fortunate to have "inherited" old craftool figure bevelers from my wife, and they work very well. You can usually find someone selling them out there. Also, there is a new 'used tool' website (the name escapes me right now) that did have some on it. Of course, if you need the ferrari of figure carving tools, contact Robert Beard and Pro-Tools. Nobody makes better figure carving tools. Hope this helps, Bob
-
That looks great! Bob
-
Cute Little Stirrup Purse
Bob Blea replied to ReneeCanady's topic in Purses, Wallets, Belts and Miscellaneous Pocket Items
It looks good. If it were me I think I would leave it the way it is. The dyed background shows up nicely. Bob -
resists
Bob Blea replied to Hilly's topic in Dyes, Antiques, Stains, Glues, Waxes, Finishes and Conditioners.
Thank you on the flower Cheryl. The basket stamp is Barry King and I really like it too. I've got a couple of his that I end up using all the time. On Satin and Super Shene, you will want to use multiple coats to get a good resist. I found it took a couple of coats to really block the antique. With just one or a few coats, I found some antique could still get through and color the leather. It didn't look bad that way, just gave a different effect. Experiment on scrap and you will get a feel for how it works. Hope it works well, Bob -
resists
Bob Blea replied to Hilly's topic in Dyes, Antiques, Stains, Glues, Waxes, Finishes and Conditioners.
Hi Cheryl, Thanks, this is good info. I've started using Wyo Sheen (basically same as Neat Lac) recently as a resist and I found that scrubbing when applying the Wyo Sheen does seem to leave a finish that is not very shiny. After antiquing it looks a little shiny, but I definitely would not call it 'plastic' looking. It blocks the antique well too. This picture doesn't show it really well, but it's all I have on a project that I finished this way. I might have to try the talc too. You shouldn't be breathing in lacquer fumes anyway. Bob
-
That's your first try? That is very good. Bob
-
I'm curious to know answers to this too.
-
Notepad
Bob Blea replied to Tim Schroeder's topic in Purses, Wallets, Belts and Miscellaneous Pocket Items
Really like your work. It looks great. Bob -
Smoke...Big fire very nearby Fort Collins, lots of smoke blowing into the city