Goldshot Ron
-
Posts
405 -
Joined
-
Last visited
Content Type
Profiles
Forums
Events
Blogs
Gallery
Store
Everything posted by Goldshot Ron
-
OK...I've been busy lately, but, your first question was in regards to rivets on breast collars versus sewing. I've only owned horses and ridden for 60 years, so I do not claim to be an expert. You first mentioned copper rivets. They are a good choice for a rivet because they don't rust. They work well on thick leather, but for headstalls and belts you would use a #14 size. This size is hard to set the burr on, and adds too much weight or bulk that is not necessarily needed. I only use copper, chrome on brass, and stainless steel splash rivets so they don't rust (cost more than chrome on steel). Chicago screws should be used on items that may need frequent change over with buckles or straps as Jaclynn mentioned. I try to avoid chicago screws on bit ends of headstalls because they do come unscrewed when least appreciated. However, your first question was in regards to breast collars. I would not use chicago screws on a breast collar. If you are concerned about changing buckles, you might consider using a conway buckle. They are good for straps of 1 inch width and under, but can be a hastle to install and adjust. Heck, you can even buckstitch items and use no other type of fasteners (metal nor thread). Just a few more thoughts to ponder. It's your project, be creative.
-
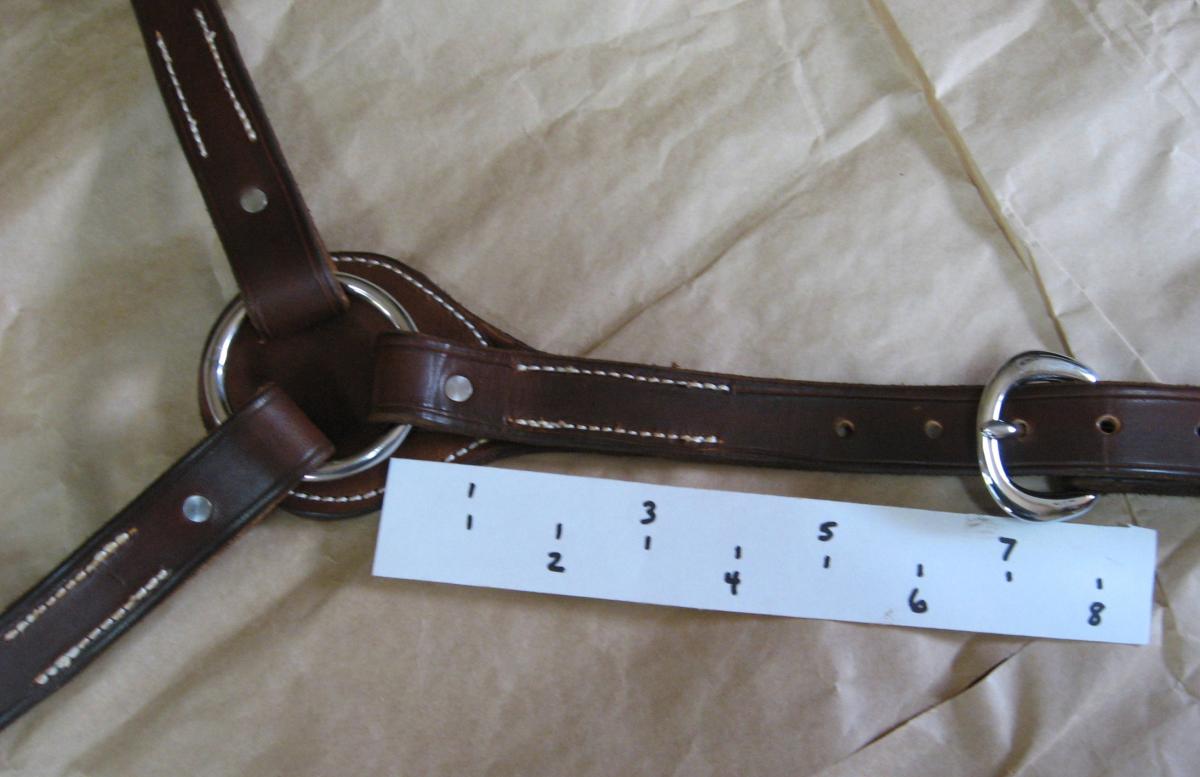
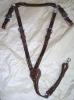
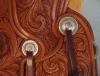
Chris, For setting copper rivets you'll need a ball peen hammer, a rivet setter, and a steel plate or avil to back the leather for support when setting the rivets. I also suggest sewing your tack pieces and using rivets at stress points. I've included a couple of pictures showing a 1 inch wide leather breast collar which was sewn and rivetted at the stress points. Stitching adds strength, and improves the appearance of your work. Ron
-
Your strap cutter may not be the problem. Herman Oak has a problem with rawhide in the butt area. Recently, I had the same problem as you. While cutting my stirrup leathers along the back my draw gauge blade could not even make a dent in the leather. It was like pulling it through a 2x4 board. After a little cussing and questioning my tools, I realized it was the side of leather that I started on. Since then I've talked with an experienced saddle maker who has had the same experience with Herman Oak. Ron
-

Gordon Andrus Tooling Class
Goldshot Ron replied to Goldshot Ron's topic in Floral and Sheridan Carving
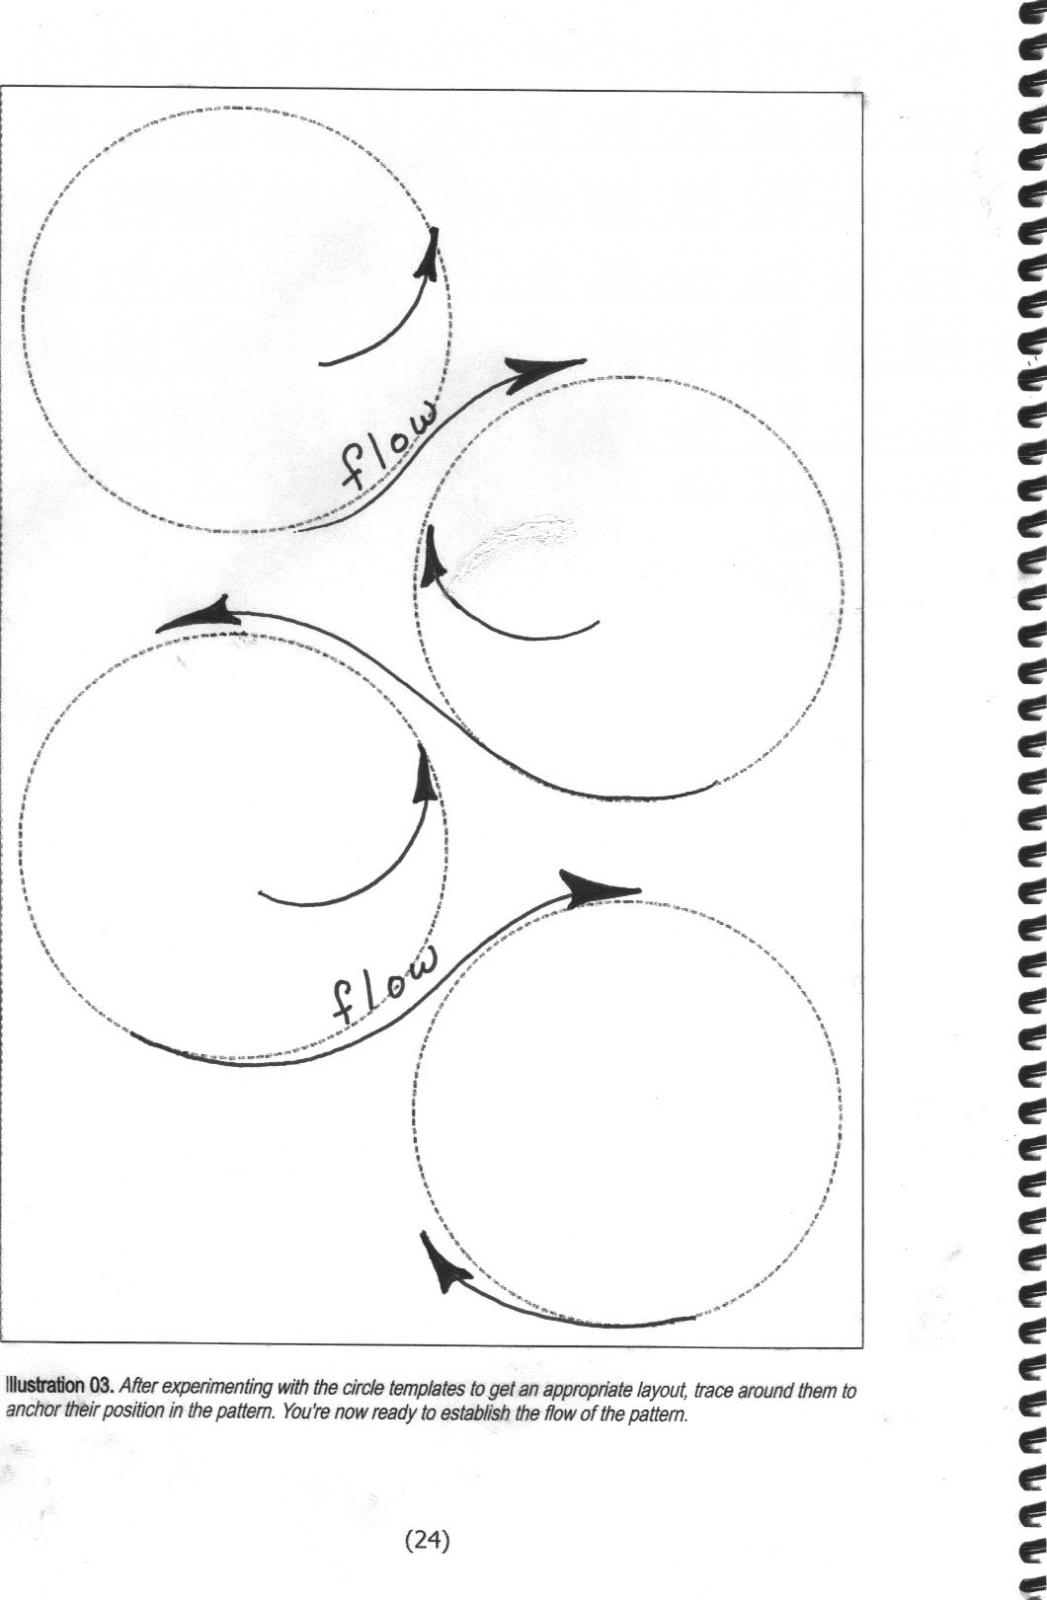
The page that I attached shows the flow of his style. What you will normally see in an example such as this page is a reverse of the arrows. When carving a sheridan pattern you usually have an eternal circle; where there is no obvious start. This still holds true with Andrus' method. By following the arrows (up to down) with a design, it assists in drawing the conjoining lines that form the leaves, stems, and scrolls. He uses the Gardner book on Sheridan Style in his class; but, his class for me was an "duh...I get it" moment.
-
Gordon Andrus Tooling Class
Goldshot Ron replied to Goldshot Ron's topic in Floral and Sheridan Carving
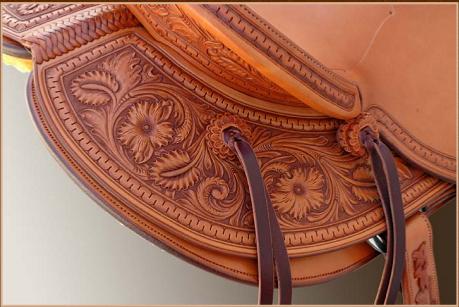
Gordon uses the Sheridan style of tooling, but his acanthus leaves are larger and fill in more area. His approach to flow of the pattern starts at the top of the vinework and flows down to the start of the vine; instead of starting at the ground and moving upward. I found that this technique helped me with my leaves being more flowing than starting at the ground level or bottom of the design and working upward. The two photos show some of his work.
-
Josh, Your saddle came out well. I like how your border drops down from the fork even with your rigging border. That shows some planning on your part, and it works well. I agree with CW about your jockeys being a little too high. But, that is not often realized until it's too late. I can't count how many times that I have remade rear jockeys because the original ones just didn't "cut the muster". The shape of your seat looks good; hey, this is a great looking saddle. Ron
-
Tim, You didn't mention how your skirts were attached to the tree: tugs, pockets, or inskirt rigging. Sometimes a maker will sew pockets on the skirts to insert the ends of the bars into these pockets. Some makers will sew these pockets on by sewing through the pocket leather the skirts, and the fleece. When resewing pockets, always use the same stitch holes; and in the case of going through the fleece style, you'll have to sew this type of pocket on after tacking the skirt to the tree. If you stitch this style of pocket (pocket, skirt, fleece) together prior to attaching to the tree, the saddle won't fit back onto the bars correctly. One last OPINION, don't but back all of the nails that you might have removed from the fleece side of the skirts. I have removed up to 12-16 ring shank nails from the bottom of factory made saddles. This is over kill, and makes it more likely that a nail may work it's way out to sore up a horse's back. Ron
-
I just got home from Wickenburg, and I want to recommend a tooling class taught by Gordon Andrus of Sage Creek Saddlery in Utah. This was offered during the Leather and Saddlers Journel trade show. Gordon has an interesting tooling technique that is quit impressive. His three day class was well worth the tuition. I recommend this class for anyone wanting to advance their tooling skills. It is not for beginners, but people looking for new techniques and a fresh new approach to design and tooling would well benefit from his knowledge. Three thumbs up from Ron
-
Tim, With the skirts off you'll need to use a sharp knife and insert it between the sherling and the skirt leather and start cutting the thread. Once started a flat knife works well to keep cutting the thread. Keep your knife flat against the leather so that you don't cut into the leather. The sherling will probably fall away if it was glued with rubber cement. Like you mentioned, removing the old thread is the time comsuming part of the job. Sometimes you can remove longer runs of stitching but finding the bobbin thread and pulling it out of the loops created by the needle thread, but, this isn't aways possible, or can be performed quickly. Once the sherling is removed make sure that you mark the location of the 2 or 3 pieces of leather between the skirts and the fleece. You'll have to recement these to the skirts prior to gluing on the new fleece. I pin these pieces in place using blue tacks or small nails to line up the stitching holes prior to and during the drying of the glue. Good luck, Ron
-
I start at $300 for new fleece, and that includes cleaning and oiling. I adjust up or down from there according to type of rigging and how the skirts are attached. A flank cinche alone starts at $75 and billets are extra (whole item easily $125). The new flatplate would be at least $100 since this item isn't removed normally for new fleece. You did a lot of work, so as mentioned, don't sell your work short. And, also as mentioned, friends get discounts. One last thought, using existing hardware doesn't really save much in cost becaue of the time needed to tear off the old items, and clean them up for reinstallation. Ron
-
Josh, When I mentioned the nail and string method, I assumed that everyone understood what I meant. Before you start putting any leather on your tree, first mark the centerline of the tree. Set your tree up against a straight level wall (behind your workbench, table against a wall, etc.). with a long side of the bar against the wall and the tree setting flat on the table. Take a tri-square or a leather square and hold it on the wall with the other leg extending onto the cantle and make a mark on the cantle (say at 7 inches). Do the same on the horn. Flip the tree around to the opposite side and make your marks at the same measurement (say 7 inches). Now, determine the midpoint of these marks, and you will have the center of the cantle and the center of the horn. Of course, you should always check your work, and the horn is the easiest by just finding it's center by using a compass. After finding the center of the cantle, tack a nail into the centerline mark, and you can use this mark to determine locating your rigging by using a string looped around the nail and pulling it down to a reference point on your rigging (say the corner of the rigging plate). A good example of how to do this is on Bill Gomer's saddle tapes. This way you can put your work anywhere and still have a reference point on the saddle that doesn't change. Ron
-
Josh, Hopefully this photo shows you what I'm talking about in my first post. This photo is of Al Gould showing how to install a flatplate rigging during the Wickenburg Leather show. Ron
-
Josh, Your work looks good. I like your stitching and the fork cover looks good. One suggestion on your rigging would be to bring the leather up to completely cover the front of the bars. This allows you to attach the rigging with the rosette and front jockey nails, and you won't have the low spot that you have at the upper tip of the bars at the gullet. I, probably like you, have used the Stohlman's book extensively. I made the rigging jig, and use it when first setting my rigging plates. However, I end up using the old string and nail method for checking repairs to the rigging rings and usually during construction just to make sure that I'm keeping things even. The nail and string is just so much easier than the rigging jig, and doesn't get in the way when working. Keep up the good work, Ron
-
My recommendations would be to buy Stohlman's Vol. 1. encyclopedia for history, measurements, and basic information about starting a saddle. Harry Adams book is good for more modern advice, and has plenty of pictures. A good tape (unknown if in DVD format) is Bill Gomer's, under $100. It is cheaper than Watt's, and is geared more toward beginners. The only books that I have found that can take you all of the way through building a saddle from step 1 to the final product is Stohlman's first two books. However, they cover only a leather ground seat, and their style is old fashion. It's expensive, but you'll find over time a compulsion to acquire as much information as possible to build a better saddle. Good Luck, Ron
-
Your saddle looks good. What type of ground seat did you install? You mentioned the front of your skirts coming out too far, but I think that the front seat jockey may be a little too high at the junction of the bars and the fork. If the jockey and rosette was brought down some on your next saddle, if would even out the appearance of the skirts. One other comment is the location of the rear flank cinche; it may be just a smidge too far back. The rule of thumb is that it should be centered on the cantle where the bar extends downward and starts arching up to the rear tip. I only mention this because I have a real problem with my placement of the rear cinche dees. It seems that only after everything is on the saddle and my pictures are taken that I notice how placement is off. Overall, your saddle looks very well done. Ron
-
Well, since no one responded to your questions I'll try to give you some advice. First, the average length of the bars for saddles is about 23 inches. As you push the cantle back to make the seat larger, you don't increase the length of the bars. So this places the center of balance for the rider out of alignment to the horse's center of balance. The overall length of the skirts is usually around 27 to 28 inches in length. If the skirts are longer, you'll need a larger pad (duh), but often overlooked. With a longer and larger pad, you start interferring with the hips of the horse, another possible sore spot for the horse. I recently ran into this problem with a saddle that I built, and I am now remaking the skirts to fit the horse, not the rider or saddle style. Hope I didn't bore you, but, you may want to consider a draft cross for your primary steed Tex. Ron
-
Tools For Bridles, Etc.
Goldshot Ron replied to EquestrianLeather's topic in Saddle and Tack Accessory Items
If the buckle end of the strap is tearing, then eventually the strap will fail at the buckle tongue. How are you cutting the strap end? What type of leather and thickness are you using? I would recommend using 9 oz. harness leather for single ply headstalls. It can be dyed to the color you choose, or left natural, and it will darken over time. When purchasing Tandy Leather Factory leather, be very careful in your selection, and by all means ask the clerk for their help. Of course, this is true when purchasing anything. -
Tools For Bridles, Etc.
Goldshot Ron replied to EquestrianLeather's topic in Saddle and Tack Accessory Items
What style of bridles are you making? Since there are many styles it is hard to give you any advice. As far as the ends splitting on your first bridle, can you explain this better. Also, the edging tools that Tandy sells are not very good for people who want good edges. CS Osborne tools is where you would start, then work up from there. One final suggestion, is to look up Bob Park's blog on this site for burnishing edges. It'll give you good insight on how to finish your edges. Good luck -
Saddle looks real good. I like your burnished edges. Your seat jockey lines up well with the cantle and fork. It's time for a grain out saddle and some tooling. A couple of questions: is the ring on the latigo catcher for a rope or your breast collar? And, your hand hole appears a little small; maybe it's just the photo. Keep up the excellent work. Ron
-
Saddle Leather Has Turned Yellow
Goldshot Ron replied to THE MEXICAN's topic in Saddle Identification, Restoration & Repair
First, take the saddle apart at the jockeys by removing the rosettes or conchos. Next, clean the saddle well with saddle soap. After it dries, lightly oil the saddle with neatsfoot oil (100%, no fancy stuff). Let the saddle sit for a day or so and look at your color. It this hasn't brought back some consistant color, then I'd redye the saddle. Start out with a light brown or tan before going for any darker colors. After dying, a second coat of oil may be all you need to bring the saddle back to a good appearance. Good luck, Ron -
Contact Cement Vs. Rubber Cement For Sheepskin
Goldshot Ron replied to Freedom's topic in Saddle Construction
I use Elmer's rubber cement. I used to use Barge in the blue can, but I can't seem to get that in California anymore (clean air laws). I tried Tandy's rubber cement, made by Barge, but it never set up like it should have (junk!!!!). Ron -
Sounds good. Cutting new fillers makes the job easier as far as lining up stitch holes. Go for it....
-
Matt, The important part of skirt alignment would be to put the bottom edges toward the middle of the skin. This gives more padding under the lower part of the bars. Many of the old timers feel that the head to butt theory is better; but, what I've learned is "...what works best for you" counts. On the saddle that sored up your mare, check the bottom of the skirts for nails and tie string bumps. It is not uncommon to find bent nails in mass produced saddles. Feel for these nails in the rear section of the bars under the cantle area. Also, when installing the wool to the skirts, use rubber cement, not contact cement. Make sure that your skirt fillers are glued back in proper position to line up you stitch holes. And, don't forget to resew any bar pockets before you get too carried away with gluing on you wool ( I speak from experience). Good luck, Ron
-
Matt, Just a couple quick questions: how many sheep skins did you buy? and, have you read the many comments on how to lay out your sheep skins in relationship to your skirts? Depending on the size of the skirts you'll need 10 square feet minimum and maybe larger hides for each set of skirts. Good luck, Ron
-
Laporte poly-tuff cable rigged trees
Goldshot Ron replied to fjjensen's topic in Saddle Supplies, Tools & Trees
Try: www.dhrss.com There phone no. is 970-482-6229 in Ft. Collins, CO. Owner is Mark Howes. His son makes the trees.