Goldshot Ron
-
Posts
405 -
Joined
-
Last visited
Content Type
Profiles
Forums
Events
Blogs
Gallery
Store
Everything posted by Goldshot Ron
-
Looks good Randy. You must have been working overtime on it. It seems like you were just stamping the rigging plates. Your basket weave looks good. And, since you are entering it in a contest, I won't critique anything. However, one suggestion, buy a Jeremiah Watt cantle binding edger to trim under the roll. Its worth the money and eliminates some frustration when finishing the Cheyenne rolls. Good luck in the contest. Ron
-
It looks like a stamp by Wayne Jueshke out of Nevada.
-
Joel, Missed reading your comments, and seeing your work. Haven't met anyone in the local area who does saddle work any more; but, I'll put the word out on your draw down stand. If you have any good stamps (King, Bob Beard or Hackbarth) I'd be interested. Sorry to hear you downsizing the shop. Ron PS...Randy, I agree with the other guys, dye your edges; even the chestnut skirting. You don't have to wait too long after dying to the edges. When the edge is still damp (from the dye), rubbing the edge with your cloth will quickly give you a shiny edge. Just make sure that you are not rubbing it into the undyed area.
-
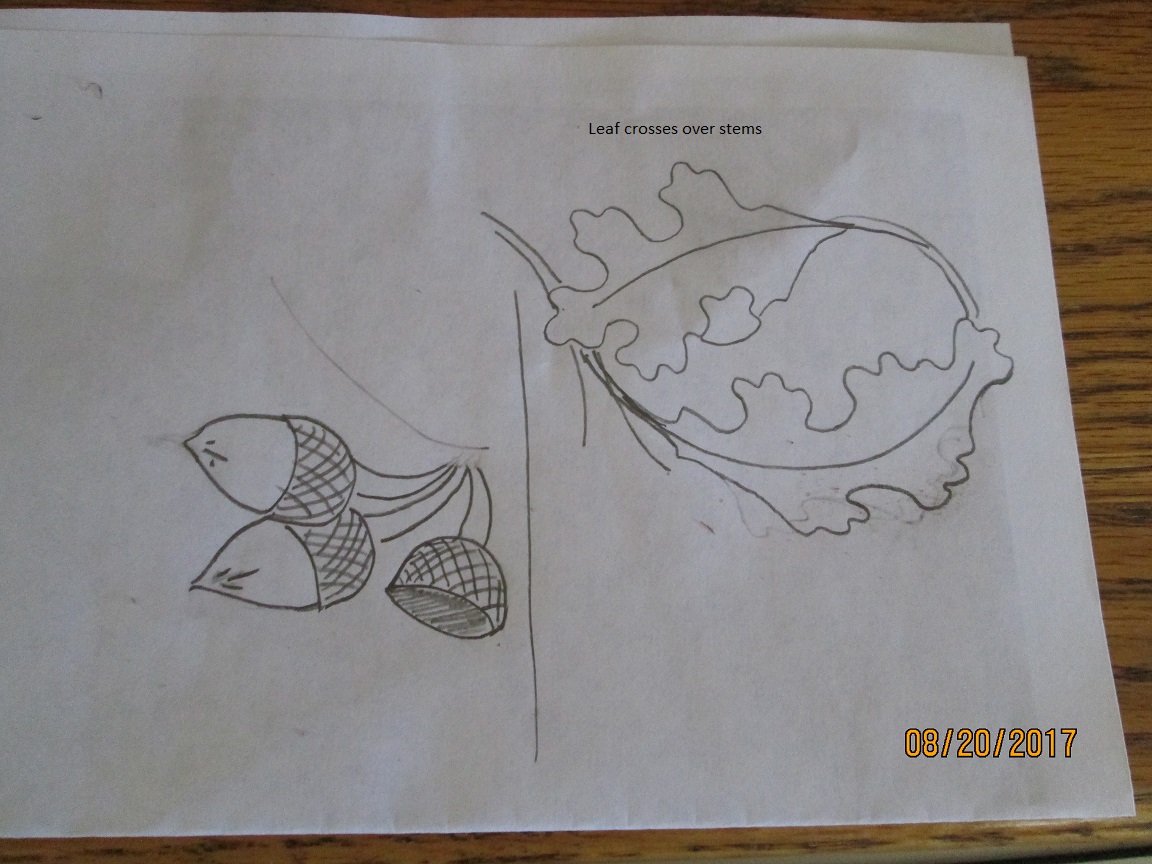
Randy, I applaud your attempt here. It sounds funny, but filling a blank space like you are considering, allows you to practice your tooling. At the same time adding an artistic touch to your work. Now to the acorns, the empty shell adds flavor to the work. However, the sample you showed does look like an old innertube. Just draw 3 acorns, and erase the nut, then make a cut where the shell would be on the back side of the nut. One other consideration would be to make your leaves slightly larger so that they cover the convergence of the stems. This allows the viewer to use their imagination as to how the design flows. I've added a doodle that kinda shows what I'm suggesting. Ron

-

Removing the horn from a saddle... is it possible?
Goldshot Ron replied to CourtneyLynn's topic in Saddle Construction
Big Horn Saddlery makes a good endurance saddle with a western look; and, there is a maker called Stonewall Saddles (located in So. California) that make a nice endurance saddle at a reasonable price. Stonewall Saddles is more likely to design a saddle specially for you. You mentioned cable rigging; I believe Freckers saddlery (in Idaho?) can make you a cable rigged saddle without a horn. However, cable rigged trees are only made by two brothers: one is called LaPorte saddle trees (out of Cheyenne, Wy.) and the other is LiteRide or Chicago Stockyard Saddle Trees. Both makers use composite trees and can install the cable when the tree is made. I personally have used a Big Horn endurance saddle for over 30 years. It has worked well with Arabs, Appys, and Walkers. It's cheap enough for you to take it to a saddle maker and have him/her to do any custom modifications you'd like, and a shop in Canada is more than likely to carry this brand. I would recommend staying away from flex-style trees. Ron -
First ever bag!
Goldshot Ron replied to motocouture's topic in Purses, Wallets, Belts and Miscellaneous Pocket Items
Looks really good. I don't see a flaw. Your stitching looks great. Did you use a pricking iron or diamond awl? I make quite a few rounds for horse gear, and your rounded handles look excellent. I've only installed one zipper in the past, and it was a pain. Your's looks professional. Did you design the pattern for the bag? That's a talent in itself. Kudos. Ron -
Looks good Randy. I thought Howard Council was a saddle maker, what is unique with this type of tree? I see a lot of improvements in your work, and it looks like you have a good feeling for what you are doing. I do have a few comments or questions: the rope strap looks awkward, the placement of the front rosettes are a little low on the jockey, your horn edge could be rubbed out more, and (I say this because I took a hit in a contest on this) your wool needs to be trimmed better to give a nicer appearance. Your stitching looks really good, and the stamping of the skirts and jockeys look uniform, and blend in quite well with the Carlos Meander border. If you haven't ordered Cary Schwarz' Cantle Binding DVD, I highly recommend doing so. It'll help improve your Cheyenne Rolls, not saying yours is bad, but I bet you are still sweating the task. Look forward to see saddle number 6. Ron
-
I just checked YouTube...there are plenty of "how to" videos there to watch and learn how to hand stitch leather. Also, what type of thread are you using? Are you waxing your thread prior to sewing?
-
You need to buy a book on sewing leather. Tandy has one that was written by Al Stohlman. Cary Schwarz has a CD for sewing, and there are a few others. You should be using the two needle method called saddle stitching or a "handy stitcher". The only knots or half hitches used to secure your stitching would be at the end of your stitching or at splicing. Also, in the instructional materials, it shows how to affix your thread to your needle. You DON'T tie a knot to affix the needle to the tread.
-
Charlie, First buy a saddle making book for direction: Stohlman's Encyclopedia of Saddle making or Harry Adam's book to name a couple. These books will give you all the information needed to make repairs. Second, determine if this saddle is worth repairing. What is the skirting condition, is the rigging safe and does it fit your horse, how will this saddle be used (pleasure riding, kids, roping, mountain trails, etc.), and who was the maker of the saddle? These are some considerations you need to determine. Looking at your photos, tell me that this is not an expensive saddle and the materials in the saddle look dry and worn. The rigging looks like it may need some attention. Also, the stirrup leathers appear to be about 2" in width, and double tongued buckles are used for adjustments. Anyway, I am always, first, concerned about saddle safety for the horse and rider, and then what needs to be repaired. The repairs you mentioned would cost, if performed by a technician, any where from $150 to $200. If you tried to repair it, expect to spend $300 plus for materials, tools, and instructional materials. I'm not trying to dissuade you from trying and learning, but giving you more information to determine the direction in which you may want to go. Ron
-
Josh, Your work looks very good. The design of the bags looks well planned and functional. Your dee attached to the buckle strap is something that I haven't seen before. The binding along the top of the opening looks good and adds a touch of class. My only question would be: are the bags deep enough to hold a couple of beers? Ron
-
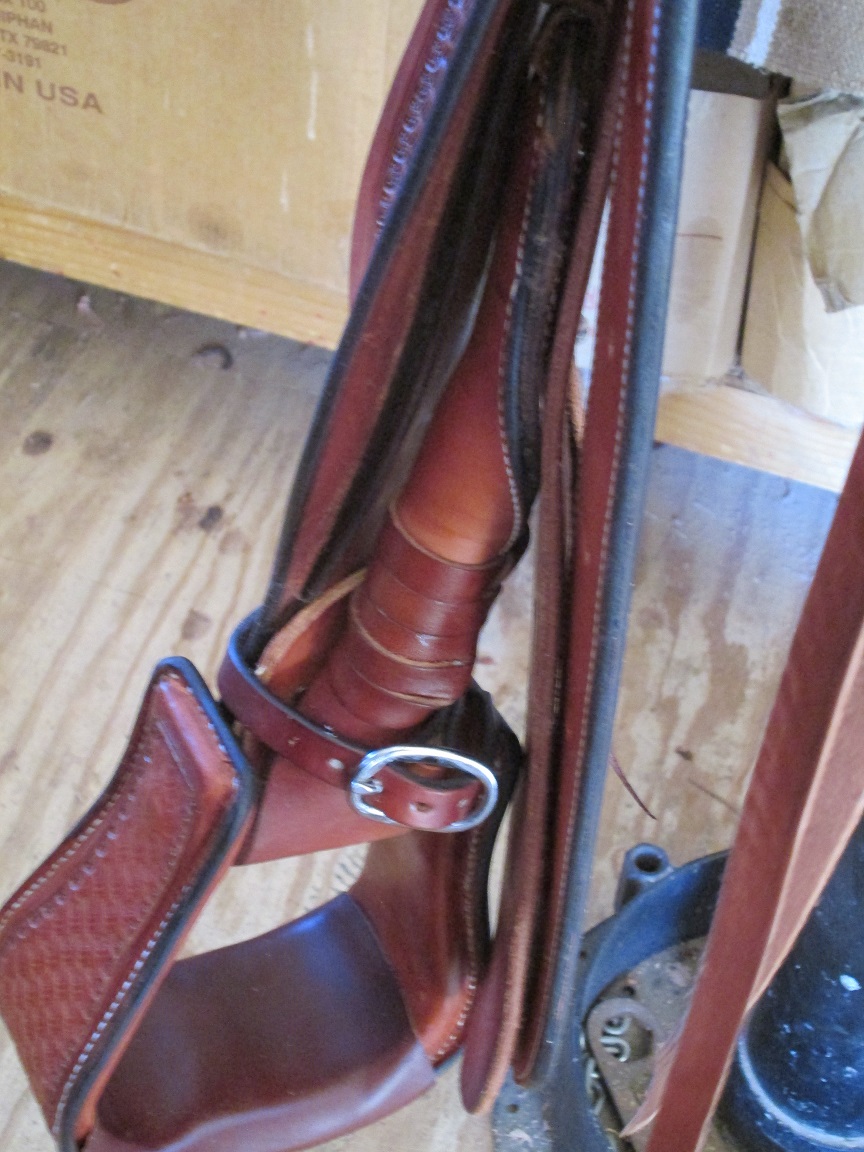
Thanks Ron for the rigging photo. I used a similar rigging on a saddle last Fall. I like to use lugs for the skirts, and this design works great. I'm still riding the first saddle I made, and my flank cinch dees were set back by my lack of knowledge. I've used this saddle extensively on a large Quarter Horse mare, and she would buck occasionally. Recently I have been using a Colorado Saddlery with the flank cinch sitting more forward, and she seems to give me less trouble. I now use my first saddle on a smaller QH gelding, and I can definitely see that the FC is too far back on him. He hasn't bucked, but he is a mellow "old man's" horse. Thanks, Ron
-
Randy, I have found Jeremiah's method to work the best for me. I've tired Stohlman's methods, paper patterns, rubber type plate patterns, and a few other's who I don't want to name. One thing to mention in regards to the cantle ear cut when putting in a Cheyanne Roll, the ear tab needs to be lower on a Cheyanne Roll than on a straight up cantle. I've yet to see where anyone has addressed this issue. Please feel free to quote any sources on this procedure. Ron
-
Ron, The saddle looks good. Your cantle stitching looks good. Have you tired rubbing out the awl mark? You could blame it on a Levi pocket rivet and a rowdy colt. One comment is that your flank cinch dee is wandering back some. Also, I'm waiting to see photos of your rigging under the fenders. Toot's pattern tip sounds worth trying.
-
You've found out that the time consuming part of this job is taking off the old wool. I have not found a quick and easy way; but, the best way for me has been to slowly remove the stitching on the top side by pulling up a loop and pulling the top thread through the bobbin thread, Once you get in rhythm it's not fast, but faster than cutting the stitch and removing each little hanging piece of thread from the stitch holes prior to sewing. After removing the stitching now pull off the wool. This sounds like where you are at at this time. You have to remove the old wool so that you can properly align and re-glue the skirt filler pieces under the wool. These pieces may have come loose and will affect your stitching on the new fleece. And, prior to attaching the new fleece you need to clean and condition the skirts. I recently refleeced a custom saddle that the original maker had contact cemented the wool to the skirts. This was a real pain when removing the wool. So I recommend gluing the fleece on with rubber cement. Good luck, Ron
-
You have to call Bob Douglas to order items. I don't have their number handy, but it should be easy to find.
-
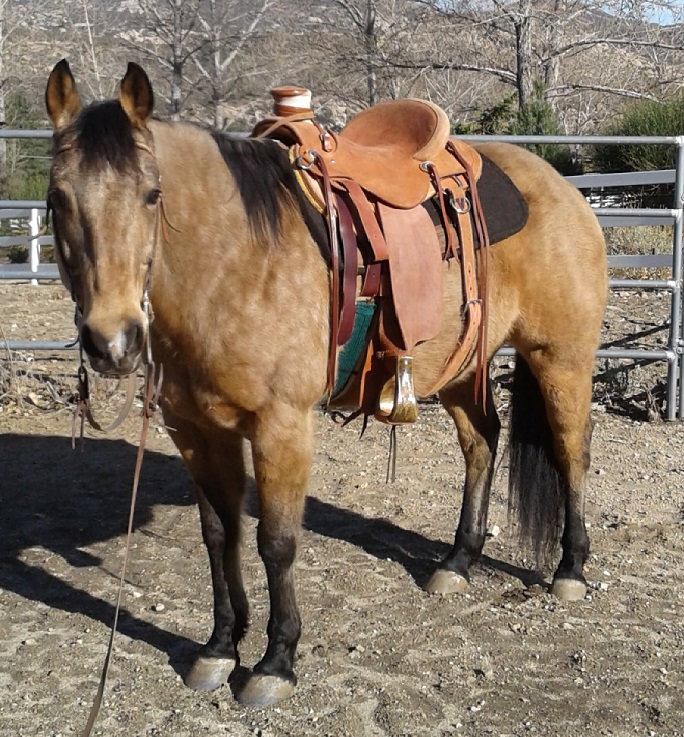
Ron, Your saddle looks really good. The lines are clean and the design looks balanced. It's hard to believe that this is only your third saddle. I'd like to see a photo of how you put in your rigging, and sewing in the top of the skirt assembly. A little over a year ago I broke off an awl while sewing a binding. The broken part of the needle still in the haft went through my thumb nail. It was a Bob Douglas awl, and it takes a lot to break one of his. Anyway, the reason it broke was that I was in a hurry and was not pushing straight on the needle. Luckily, fresh blood wipes off leather fairly easily. Keep up the good work. Ron
-
Hey, it should make you feel good that people like your work, so congratulations on a commission sales. When I do straight up seats, I always do a hidden stitch just so my cantle stitching is somewhat hidden. Yours looks like it rawhide covered. If so, one way would be to stitch the front and fold a scalloped back over and nail it. I normally wouldn't do this, but lately I've worked on saddles made by experienced saddle makers that have used this method, and they look pretty good. Hang in there Josh so one day I can say "...I new him when..." Also, I've been trying to make lighter weight saddles lately, and I'm having a hard time finding sides that have a consistence weight without run-off at the shoulders. So, I'm just curious about tanners other than H.O.. I mostly use W&C. Ron
-
Josh, The saddle looks good. It looks like a good working saddle; just the right amount of tooling. I believed that you used Herman Oak in the past, did you see must difference in the Chahin? Will this saddle be a keeper, or is it sold already? Ron
-
I had to think about this. Traditionally, up was the custom. But why? Conclusion, most people are right handed. You cut your slit using your right hand through the upper string. Then push the string through the slit and the weight of your right hand help keeps the strings tight as you cut the second slit through the next string. I can see if you are left handed, the strings would be cut in the opposite order (thus the down). My guess.
-
Stetson, If this is one of your first attempts, it looks good. Your seeding looks good, along with the center flower. However, let's start at the basics. FLOW; imagine how a plant grows. It starts out as a single seed. From there it grows each leaf and stem; and, each leaf and stem flows back to the single seed. Your knife cuts do not flow back to a single seed, but tend to be just cut lines radiating out to some unknown point. This holds true to your decorative cuts also. Envision each decorative cut growing out of a single seed or point. As you make your decorative cuts, they should fade into an imaginary point or seed. Your decorative cuts are basically knife cuts. Practice making a blade nick on a piece of leather. Take you blade to a starting point and bring the blade (fading out as you go) to the nick. Now repeat this, using an odd number of cuts. Most of your cuts were in even groups; 4 or 6 cuts. Odd numbers work to balance your decorative cuts. Al Gould, a Stohlman Award Winner, recommends making practice cuts as "c"s and "s"s. He says that basically most cuts are either a "c" or an "s". So practice making these figures and working for FLOW. I'd like to end here, but one last thing, do your pear shading before doing your decorative cuts. Decorative cuts are the last this I do on a piece. Keep practicing, Ron
-
Ted Aldal's associate on their tapes was Bill Conway. Last fall I worked on a saddle Aldal made, and I was impressed by his tooling and craftsmanship. Ted lived in San Jacinto, CA. Just around the corner from where Al and Anne Stohlman lived prior to moving north.
-
Split the bottom of twisted stirrup leathers?
Goldshot Ron replied to Squilchuck's topic in Saddle Construction
John, If you've already cut your fenders then it is too late to make a longer buckle end. Try splitting your leathers from the top of the skirt downward to reduce bulk. As mentioned, there are a lot of saddles that don't use full length leathers, and they work just fine. So reducing leather under the fender won't hurt. However, I've found when twisting the leathers, if you don't have a long enough buckle end, the twist will interfere with the stirrup swing at it's loop position. It also requires slightly longer stirrup hobbles to account for the bulk of the twist. You can see by the attached photo what I'm talking about. The leathers in this photo are 2 1/2" wide. The buckle end was longer than 12 inches because the buckles are Farrows, not Blevins. The leathers were full length and were 12/13 oz. Ron
-
Split the bottom of twisted stirrup leathers?
Goldshot Ron replied to Squilchuck's topic in Saddle Construction
John, To split or not to split is determined by the intended use of the saddle. A lot of fenders have the stirrup leathers only attached at the top, and a short piece of leather is attached at the stirrup buckle end and works as a wear piece under the stirrup bolt. This helps in reducing the weight of the saddle and is used on recreational trail saddles. How wide are your stirrup leathers? And, how long are you cutting your stirrup piece from the fender down? I have found that you have to cut your stirrup piece of the finders longer than suggested by Stohlman's book and the Blevins buckle instructions when twisting the stirrup piece. In short, you ask 10 people, you'll get 10 answers. Ron -
Welcome to the world of leatherworking. Now that you've finished your first saddle, like Sioux said, look at other saddles and see how they were made. Not just the factory made ones, but custom saddles. Maybe find friends with horses and offer to clean their saddles for free or at cost. Take photos and draw pictures of these saddles. What you see may not teach you much now, but later you'll be able to compare results. Check out You tube, and look for Bruce Cheney saddle making tips. I say this because he made "how to" tapes in the 80s demonstrating saddle construction, and his main tool was a sharp pocket knife. Don't think that you need a lot of tools to build a saddle. I recommend buying a few good tools; quality over quantity. And, go ahead and ask questions on this site at each confusing step. Someone here has been there and can help you along. And oh yeah, just because you think that you completed this saddle, don't be afraid to tear it apart and make improvements. I've recovered a horn five times before it finally satisfied me; and don't get me started on rear jockeys. Good luck, Ron