-
Posts
1,183 -
Joined
-
Last visited
Content Type
Profiles
Forums
Events
Blogs
Gallery
Store
Everything posted by Josh Ashman
-
From the album: Wild Bunch Rig
-

A 'special' Ammo Belt
Josh Ashman replied to Eaglestroker's topic in Gun Holsters, Rifle Slings and Knife Sheathes
Looks awesome Robert, great job! Josh -

Shoulder Holster Rig
Josh Ashman replied to Imapeopleperson's topic in Gun Holsters, Rifle Slings and Knife Sheathes
Looks nice, good job! Josh -

Double Loop Knife Sheath
Josh Ashman replied to Josh Ashman's topic in Gun Holsters, Rifle Slings and Knife Sheathes
Hey Dan, There's nothing silly about that question at all. Friction keeps the sheath above in place, the loops are very tight and I dampen the "skirt" piece before putting it together and sort of mold it in place. By the time it dries there is no movement at all. It's a little hit and miss and I do worry that they'll work out OK when I make holsters or sheaths this way, especially if I haven't done one for a while. My rough rule of thumb is that the slots are 1/8" longer than the main body when I make the pattern. The 1/8 is measured with everything laying flat. Another thing I sometimes do, especially on "half breed" holsters is to tie a lace through the main body and skirt with a bleed knot (like a saddle string). I noticed Bobby (Treed) did that and it has worked well for me. Good luck, Josh -
Those all look really nice Frank, great job! I'm excited to see the case for the 94, please post pictures! Have a great day, Josh
-

Double Loop Knife Sheath
Josh Ashman replied to Josh Ashman's topic in Gun Holsters, Rifle Slings and Knife Sheathes
Thanks Don, that's really nice of you to say. I am probably not the best guy to ask for pricing, especially on knife sheaths. I struggle to find what seems like a happy balance on them myself. My price for a plain simple fixed blade sheath is $35, tooling, spots, conchos etc. add to that. I sold the sheath above for $60 which was probably too cheap, $80 might have been a little closer. As far as time I probably have between 3 and 4 hours in it. Doing the math $80 might be too cheap . Best regards, Josh -

Old Leather Rifle Scabbard Question
Josh Ashman replied to REDTAILHAWK's topic in Leatherwork Conversation
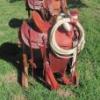
I've had pretty decent luck bringing some life back into old saddles by soaking the pieces in water until they're thoroughly wet. Then cleaning them with a little Murphy's Oil Soap mixed in water, roughly a 1/2 cut per gallon. Then I hang the piece to dry, once it's about half way dry I thoroughly rub it with more Murphy's, I use a lot of it. I'll let that soak in for a day or so then a little NF oil and saddle soap. I don't know what would have made the leather stiffen up and I've never tried the hid rejuvenator. Here's a before and after pic of an old Hamley saddle I cleaned in the manner described above. Good Luck, Josh -
Thanks everybody, I appreciate the kind words and I'm glad you like it. LederRudi, I pretty much always go in the following order; cut, bevel, background, shade, cam/veiner, mulesfoot then decorative cuts. Aside from a few books on the subject and this site I'm self taught so I don't know if anybody else uses that order or not. It works OK for me. Best regards, Josh
-
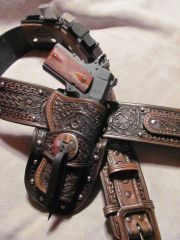
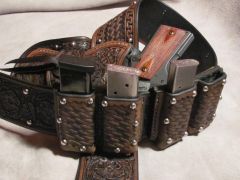
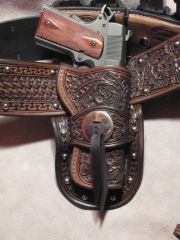
Hey everybody, I just finished the belt portion of a fully carved/tooled wild bunch type rig. This will carry a full frame 1911, 2 mag pouches and maybe a few other goodies. I kept the camera at my bench and took a few progress pictures along the way. Does anybody else have a hard time getting good pictures of belts? For those that like to know, 10-11 oz HO, 1 coat of NF oil, then Fiebings liquid antique black, hit it with liquid glycerin soap on a scrap of sheepskin then 50/50 mop & glo. Thanks for looking and have a good Easter weekend! Josh
-

Making First Headstall...what Order Do I Do What?
Josh Ashman replied to cmantz's topic in Saddle and Tack Accessory Items
That looks nice and your craftsmanship looks great. It's a whole different thing from the kind of tack I make and use but I'm sure you'll have a lot of demand from folks that are more stylish than me Good job, Josh -
I use a 14 oz. poly mallet for stamping, a 19 oz. mallet for punching holes and slots and a 22 oz. maul for larger stamps and slots. I just checked in Weaver's catalog, buying all three would run around $70. I've been using the 14 oz. mallet for 3 or 4 years and it's about due to be replaced, for an investment of less than $20 I don't have any complaints. I do like the Barry King mallets but the Garland ones are much cheaper, they're also American made and they work good for me. That's my 2 cents. Have a good day, Josh
-
Those look nice Chis, good job. I've had problems with large stamps "bouncing" a heavier mallet and better base (granite slab, steel plate, etc.) helped me. With the cam tool you used I kind of doubt that's what's happened to you though. For most of my tooling that size I use a small poly mallet on a 2" granite slab. Good luck, Josh
-

Double Loop Knife Sheath
Josh Ashman replied to Josh Ashman's topic in Gun Holsters, Rifle Slings and Knife Sheathes
You nailed it Kevin, the back and skirt is all one piece and there is a welt. Thanks Haystacker! Have a good day, Josh -

Latest Off The Bench
Josh Ashman replied to BondoBobCustomSaddles's topic in Saddle & Tack Maker Gallery
Hey Bob, the saddle looks great and seeing it on the mule is even better. What a cool story about Ann Stohlman, thanks for sharing! Best regards, Josh -

Double Loop Knife Sheath
Josh Ashman replied to Josh Ashman's topic in Gun Holsters, Rifle Slings and Knife Sheathes
Thanks Robert & Zooker! -
Nice job!
-

Double Loop Knife Sheath
Josh Ashman posted a topic in Gun Holsters, Rifle Slings and Knife Sheathes
Blingy double loop knife sheath finished today. 10-11 HO Fiebings antique black liquid over two light coats of NF oil with 50/50 M&G-water. Thanks for looking, Josh


