


Andrew Chee
-
Posts
719 -
Joined
-
Last visited
Content Type
Profiles
Forums
Events
Blogs
Gallery
Store
Everything posted by Andrew Chee
-
 What kind of briefcase are you making? Will it be a turned construction or external gussets? 5-6oz is a good thickness. Saddle leather or bridle leather is fine if you're not gonna make a turned bag. But for turned bags, they won't work very well because when you try to invert the bag, the stiff leather will get all creased and wrinkled. If you're going to make a purse for your wife and daughter, go for the 3-4oz range. Purses shouldn't be so heavy. Andrew
 -
How thick is the material that you are trying to sew? What type of leather is it? What I've found is that these large machines don't really sew nicely close to the edge if the leather is too soft. They're made for heavy leathers. I had some similar issues sewing straps. The problem is that these machines have big presser feet and feed dogs and the leather can get mashed into the food dog slot. For wallets you really should use a smaller machine. If that's not possible, you can try using the slotted plate. That removes the feed dog and has a much smaller opening so your leather won't smash down as much. Just remember to increase your stitch length to compensate for the lack of feed dog. Andrew
-
Questions On Making Leather Sandals
Andrew Chee replied to flyknitrilleau's topic in Getting Started
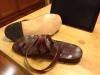
That's a very personal decision. I have a whole bunch for different applications. The ones with curved replaceable blades are nice. The Blanchard ones are good (I think they're called "l'indispensable" or something like that). Head knives are good if you to push instead of pull your cuts. It's up to you. Just get one with good steel and keep it well sharpened. To be honest, go get yourself a belt sander that you can invert and mount on your bench along with a decent shop vac. I use that a lot more when making sandals than I do any clicking knife. Here are some that I've made. Andrew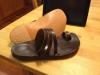
-
Questions On Making Leather Sandals
Andrew Chee replied to flyknitrilleau's topic in Getting Started
The nail should be slightly longer than the thickness it's going through. The point of the nail is very thin and it is designed to curl back on itself and lock into the leather. Hence the term clinch nail. If you're going to use brass clinch nails (as opposed to iron) I would suggest predrilling tiny holes almost all the way through the leather. What I found is that brass is relatively soft and when you try to hammer it into the hard sole leather it tends to bend and clinch before getting all the way through the layers. The tiny holes (1/32" or so) give a pathway for the nails to follow and remain straight. I've found that something like a band or jig saw and a belt sander to be very helpful tools. Sole leather is like working with wood. Pretty hard. Andrew -
Questions On Making Leather Sandals
Andrew Chee replied to flyknitrilleau's topic in Getting Started
Pre-cut leather soles will work fine as long as they are large enough for what you're doing. They are a good way to go if you plan on doing a few sandals. But if you plan on doing a lot, then buying sole bends and then cutting them yourself may be more economical. As for knives, I don't think it really matters honestly. Soling leather is super tough and you're going to have a tough time cutting them with any knife. I use a combination of a manual sole cutting machine, jig saw, and belt sander. I use the sole cutting machine to get a rough shape. I use the jig saw to get a closer shape. Then I use the belt sander to get the final shape. Sole leather is a pain in the butt to cut. As for cutting the top leather, any decent clicking knife will work. An anvil may work fine as long as you can slip the straps over it and be able to hammer the bottom of the sole. Andrew -
Questions On Making Leather Sandals
Andrew Chee replied to flyknitrilleau's topic in Getting Started
Check Zack White: http://www.zackwhite.com/Nails-Tacks_c_136.html They have both iron and brass clinch and soling nails. The difference is the soling nails have a larger head. I use the clinch nails when nailing the sole together from the bottom up. I use the soling nails to hold down straps that may need to be removed and adjusted in the future. Andrew -
Questions On Making Leather Sandals
Andrew Chee replied to flyknitrilleau's topic in Getting Started
I've made a few of these. For the soles, get sole bend leather. Basically the stuff they use for shoe soles. Thick, stiff, veg tan leather. After you draw out the pattern, thoroughly wet the leather and mold to the shape you want and let dry. It will hold the shape. The top leather is pretty much anything you want to use. Veg tan leather is good because it will be firm enough. I've found that about 6-7oz is a good weight for the top layer and straps but that's up to you. The nails are brass or iron show tacks. I bought mine from Zack White leather a long time ago. Don't know if they still sell them. As for tools, you don't need three different knives, a good clicking knife will be fine. You want something that can cut that thick sole leather. There's really no skiving to do so a skiving knife is not necessary. I would suggest getting a cobbler stand because it will help you in positioning the sandal when nailing it. Good luck, Andrew -
Genuine Shell Cordovan Oval In Whiskey; Large Size, By Joseph Clayton
Andrew Chee replied to FStyles's topic in Old/Sold
How would you say this leather compares to Horween shell? Andrew -
FYI, there's a lucris in ebay right now. Andrew
-
Nice looking tool. If it has enough pressure I would say that it's a good price. $340 for something like that isn't bad. Setting up a shop press will cost almost as much and won't be as easy to use. The small size isn't that much of a problem because you can use several passes to cut a larger die. As long as it will fit between the two posts you should be able to cut it. Theo Ly question is how much for pce that thing applies. Andrew
-
To some extent you will still see some glue line. With hidepounder's example you don't see much of a line cause he uses a very dark dye on the edge. I don't think seeing a small line is a problem. You can also try using white glue. Leathercraft cement. I've recently come up with a slightly different burnishing method that I think gets good results: -Glue and assemble pieces -Use a belt sander with 80grit paper to even the edges and remove excess glue -Edge corners with appropriate size edger -Use Sheridan leather's quick slick on the edges -Burnish with a rub stick or mechanically with a wooden wheel. This will get the edges decently smooth -Hand sand edges with 400grit paper. This will give you the perfectly smooth edges -Dye edges. I use angelus dye eons filled with whatever colored dye I want to use -For the last step I either impregnate the edges with paraffin wax or apply Tandy edge finish with a q tip. For paraffin wax I use a motorized felt wheel with a groove cut in it. I turn on the motor and apply the wax onto the felt so it rubs in. Then I run the leather on the felt. The friction melts the wax into the edge. So far I've found that the wax method gives the smoothest edge but I'm experimenting with the edge finish cause I'm looking for something with acrylic in it to hopefully get a longer lasting edge. Hope this helps. Andrew
-
The setter works with all of these presses. It's the inserts that go into the presses and they can be really expensive. Andrew
-
Laser Cutting Or Cnc Cutting Leather? Also, Printing On Leather.
Andrew Chee replied to CCPhotog's topic in How Do I Do That?
I've seen some use a drag knife on a cnc router to cut shapes in leather and it seemed to work nicely with no scorching. You can try that. Andrew -
With great difficulty. I tried using the Prym snaps and they just don't set easily. I tried the setting tools they sell for them and they don't really work. I ended up buying SW snaps from universal fasteners (now owned by YKK) and they work much better. You have to have a resellers license to purchase from them. The snaps themselves are not expensive but the setters are. I am about to place an order from them if you want to purchase anything. PM me. Andrew
-
Some Exotic Skined Knife Sheaths
Andrew Chee replied to rgepting's topic in Gun Holsters, Rifle Slings and Knife Sheathes
Nice. Is the process for finishing edges on alligator different than cowhide? Andrew -
Leather Roll Hand-Stitched But How To Do It On A Machine?
Andrew Chee replied to Flattracker's topic in How Do I Do That?
A pfaff 335 would be the best of the bunch for this. A flat bed can sew this but you would have to sew it with the needle going in from the inside gusset out and since the bottom will never look as good as the top, it won't look as good as if you sewed it from the outside in. Hence the cylinder bed. I don't know exactly what leather you are using but if it's very soft then what I mentioned may be less of an issue. The leather in the picture doesn't look terribly firm so feet marks may not be a problem if you use smooth presser feet. Andrew -
The answer is "not well". You may be able to use a mallet on a small die but even then, you'll have all sorts of problems with the die bouncing. The harbor freight presses don't really have enough pressure and only acts on a small area. Your cheapest solution is to go with the shop press thing that some people on this site uses. Andrew
-
Have any of you been able to sign up on the tannery row website? I try to sign up for a login but I never get a confirmation email. Andrew
-
Want To Buy Puritan 2 Or 3 Needle Stitcher
Andrew Chee replied to Logans Leather's topic in Old/Sold
Look up Mulholland Brothers leather in Berkeley, CA. Ask for a person named Guy. He's one of the owners. A few months ago he had a bunch of those for sale but I doubt he sold them. They looked to be in good condition and were priced to sell. Andrew -
What kind of leather are you looking for? If you're looking for something like their ChromeExcel then there's no on else in the US that does pull-up leather in that many varieties. They are a bit unique in their offerings as far as American tanners are concerned. But it all depends on what you're looking for... Andrew
-
Milled Veg Tan Bucket Bag
Andrew Chee replied to Britkk's topic in Purses, Wallets, Belts and Miscellaneous Pocket Items
Milled veg tan is hard to burnish. It doesn't edge well because it's soft. It doesn't burnish well either because it's soft. For softer leathers, you can paint the edges. If you don't like that look then you can skive and turn them. But then you would probably need a liner cause the backside doesn't look so good. You could bind it with another piece of leather but that's a different look altogether. If you're making an unlined, soft, milled leather bag then the look is kinda rustic already so it may be just fine to leave the edges raw. Andrew -
Hey corter, do you treat the credit card slot opening edges in any way? Andrew
-
Not unless the thread changed twist direction in the middle of the spool. Could it be possible that the hook twists the thread the wrong way while making the loop? Andrew
-
So I tried the instructions above and set the timing on my machine. It now sews fine. The stitches look good. I still have an issue where the top thread looks like it's unraveling when I look at it after running a line of stitches. I also notice more thread fluff on the presser feet after a long line of stitches suggesting the top thread is rubbing somewhere? Any ideas? Thanks Andrew
-
I don't live on a farm. I was at the petting zoo with my son and there was a goat just standing there with its head against the wall. Just thought it was funny and said something about life. Andrew

