Andrew Chee
-
Posts
719 -
Joined
-
Last visited
Content Type
Profiles
Forums
Events
Blogs
Gallery
Store
Everything posted by Andrew Chee
-
Awesome. I had adjusted the needle bar to 15mm above the bed at bdc but didn't understand the 1.8mm rise after bdc at stitch length 3. I think I got it now. Thanks. Andrew
-
Does 1.8mm sound about right to you? Andrew
-
Interesting. I actually start with 80 to level, then 120 then 240. Only about one pass of each. This is on the belt sander. I slick the edge and then touch up with 400 before dyeing and waxing. It's the initial passes with the belt sander where I get the mushrooming. Maybe I just need to apply a lot less pressure... Andrew
-
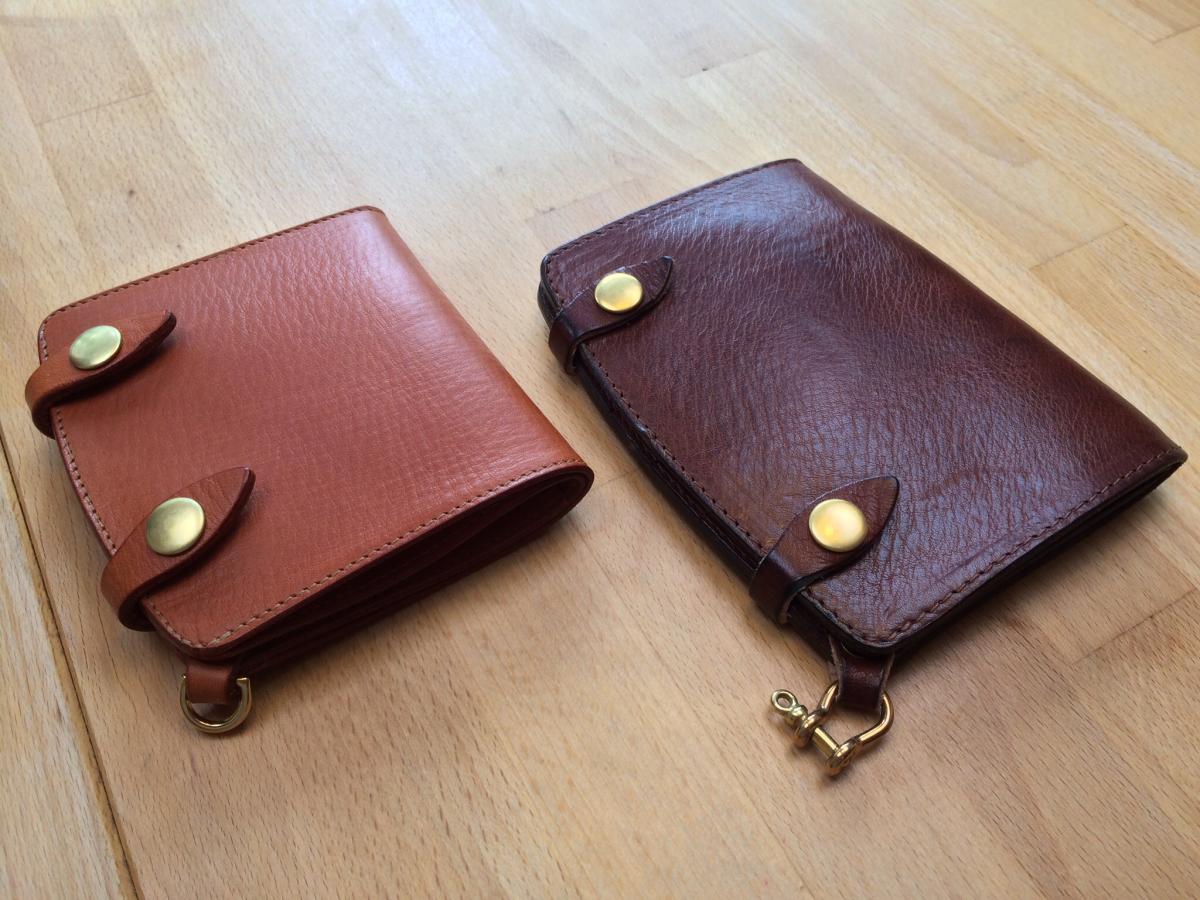
Hello all. I am making the wallets below. I take veg tan leathers and hand board them to bring out the grain and soften them up. Usually when making wallets or bags I would assemble the pieces, glue, sew, etc... To even the edges out I would cut the edge after sewing. But because these wallets are curved, I can't really do that. I end up sanding them to even and smooth out the edges before burnishing. One thing I notice though is that because the leather has been softened, it tends to mushroom when I sand it with my belt sander, especially at the corners. I end up having to do some cutting afterwards. Do you guys have any suggestions for evening out edges after sewing curved edges on softer leather? Thanks. Andrew

-
If you want even stronger, you can try brass rivets. Those really won't break. Pain to cut the stems though. Andrew
-
I've had many brass jiffy rivets fail on me but never a copper rivet. They don't have to be cut off though. You can punch them out with a center punch. Andrew
-
 Interesting. Do their football leather come in different colors? I have a hide and it's more reddish. Similar to the color of a football. Yours is a lot darker brown. Andrew
 -
 No. I might have use for it in the future. Andrew
 -
I have the manual. Page 12 says to put a 1.8mm thick feeler gauge with its cutout close under the lower needle bar bearing. What does that mean? Andrew
-
Hello all. I recently had to replace the needle bar on my Pfaff 335. In order to do that I had to remove the hook assembly and needle bar and put them back on. That necessitated a retiming of the machine. I have a pfaff service manual but it's useless to me because it mentions things like the lower needle bar bearing and I have no idea what those parts are. Futzing my way through things I think I have it almost there. The stitching look ok but the knot is but super consistent. The upper thread tension seems very sensitive now. The weirdest thing is at the end of the stitch, the extra top thread looks like it has been unravelling or something. There's something weird going on here. Earlier on I was having problems with the hook splitting the top thread but I set the hook to engage a little later and that seems to have solved the problem. Can anyone give me the proper way to time this machine? I'm just doing this by trial and error at this point so any pointers would be appreciated. Andrew
-
Sewing Light Weight Leather Help
Andrew Chee replied to kramhunter's topic in Leather Sewing Machines
Possibly. Depends on how firm the leather is. Also depends on the home machine. My wife's bernina could probably do it but the old cheapo Janine would not have been able to. Andrew -
Really nice work. Do you do it all yourself or do you have a team of people? The website has quite a lot of stuff on it. Andrew
-
Early Game Bag
Andrew Chee replied to Fowlingpiece's topic in Gun Holsters, Rifle Slings and Knife Sheathes
What I mean is was it a particular leather you used or did you take unfinished veg tan leather and dye and finish it yourself? If the latter, what kind of finish did you use? Looks nice and relatively pliable. Andrew -
Early Game Bag
Andrew Chee replied to Fowlingpiece's topic in Gun Holsters, Rifle Slings and Knife Sheathes
Nice bag. What leather did you use? Andrew -
To be honest. I bought it but really haven't used it much. I actually don't do much with chrome tan leather so I use more traditional burnishing methods with my veg tan stuff. Andrew
-
Can you supply some more details on switching out the shuttle and race? What parts do I need, what is the procedure? Sounds interesting to me. Andrew
-
Looks like a 31-15. It can sew six ounces fine. People here says that a 92 thread is the max. I have one. I have it set up with a 69 thread right now but want to try a 138 on it. Don't know if it will work... Andrew
-
Couple of things. Stay away from things that say "napa". That usually denotes a very soft leather, for garments. Veg tanning is simply a tanning process which usually results in a firmer type of leather (although that's just a general guide). Usually when you see something that just says "veg tan" it means be tanned leather that isn't dyed or finished. It is most often times used by crafts people who want to stamp/carve and have more control over the final product. Bridle leather, harness leather. Those are terms used for veg tanned leather that have been dyed and finished. They are named so because they are designed for a particular purpose (for making bridles and harnesses). They usually don't come very thin because bridle and harness makers don't want thin leather. The truth is, there isn't a lot of very thin, finished veg tan leather because there isn't a big market for it. Cow hide, when split down to the 1mm range loses most of its strength. Wallet and small goods makers that use it for card slots (I do) split it themselves down to that size. I understand that you want to make a wallet and want to use the right materials, but the truth is, it takes a lot of equipment to make the right product. For example, the exterior panel of your wallet. You don't want that to be 1mm because you wallet will fall apart rather quickly. You want it to be in the 1.5-2mm range. So now you will either have to buy two hides of two different thicknesses or have one hide and either make the card slots thicker than you like of the exterior thinner than you like. Or, you get a splitter. So as for leather, this is why it's harder to find finished veg tan leather that's thin. That's why I suggested places like W&C that will split it for you. You can try calling dealers in the UK and ask them if they do splitting. Bear in mind, leather is dyed but the dye does not usually penetrate all the way through. So if split, the flesh side will be a light tan color. Tanneries have the ability it refinish the flesh side but distributors will not. This is why I like dealing with a place like W&C. They once allowed me to order a single hide where half of it was one thickness and the other half was another. Dunno if they still do that. You can try calfskin which, because it comes from a younger animal has more strength when thinner than cow. The problem is I've yet to see finished veg tan calf. Maybe some people in Italy might do it. It would be beautiful (less blemishes) but will cost you an arm and a leg. Anyways, hope this helps. Andrew
-
Uh... You just wrote the same thing I did... Andrew
-
1oz = .4mm Andrew
-
Nice work. Andrew
-
I purchased the first book. It was ok. Quite expensive for what it was. Had some interesting info on calculate hide yields and such but I don't think I would purchase it again. Andrew
-
The way the belt is angled, it should tilt back. There will be some tension but it should tilt back. If you want to take the belt off, do it at the motor. In the picture of the motor you included, you see there's a bracket with a bolt running through it with a bolt secured on either side? Loosen the rear bolt and the motor will move back thereby loosening the tenstion on the belt and then you can slip the belt off the pulley. Andrew
-
Looks like a typical setup. Have you tried just tilting the machine back? Andrew
-
What kind of leather and how thick is it? It looks like you're pulling you stitches too tight. For softer lighter leathers, don't pull with as much pressure. Andrew