Cyberthrasher
-
Posts
2,397 -
Joined
-
Last visited
Content Type
Profiles
Forums
Events
Blogs
Gallery
Store
Everything posted by Cyberthrasher
-
Simple answer - cased. But, even a little bit of dampness from moistening with a sponge will give you a good enough impression to last throughout your tooling. This is the way we've all been taught to transfer our images and it works. The ONLY reason I back my design with packing tape is because I'm too cheap to buy Tandy's expensive and unnecessary transfer film. I spend $2 on a big pad of tracing paper and just put a piece of packing tape on the back. The packing tape keeps me from poking through, makes it last a lot longer (if I need to use it more than once), and keeps the moisture from distorting it. By doing it this way, the image is transferred by making a LIGHT impression in the leather, which translates to nothing to rub off. Oh yeah, and the "Saral paper" is basically what it sounds like you're using - colored transfer paper that works just like carbon paper.
-
Isn't that an unnecessary step when considering all the other transfer methods available (and risky if you happen to not get it all off)? On a similar note, I see a lot of people who try to just get the artwork directly on the leather without tracing it out first. Some people even do it in such a way that they NEVER acquaint themselves with the design before cutting it. I want people to think of the tracing (to get it onto the transfer sheet) as ONE MORE step in getting familiar with the design and HOW it should be cut/tooled. Each and every time you go over a piece of artwork, you should be thinking ahead of time about how you will cut and tool it. So, by drawing, tracing, then transferring - you've now acquainted yourself with all the lines 3 times. If you didn't draw it from scratch, you can see where this is even more vital to the successful outcome of the work because you'll only have 2 times to get familiar with it. Now, if you use a carbon copy method (such as Saral paper), then you're only going over the design ONE time before tooling it. Think of all the times you've gotten mad about a piece and redid it to realize that you were better acquainted with the design now and could pull it off better. This is the same exact concept, except you're not wasting any material by ensuring that you're familiar with your work before you ever take knife to leather.
-
Yeah, I did that once, twice on the same job The worst part is, the second time I was watching myself and trying really hard NOT to do it!!! Plus, it wasn't a small piece of leather either. But, the good news is that it was large enough I could just throw it down to cut up for wallets later. There's never any scrap - it's all usable for SOMETHING - even if it's just practicing your cuts or stitching. Practice materials are never wasted materials.
-
 Just need to tear it down and CLEAN. I love spraying Resolene, but I have a cheap airbrush that's set aside just for that purpose due to how bad it can gunk up. Get your parts diagram, tear it down completely, and just start scrubbing. Here's a pretty good walk through on it. Those little tooth cleaners are pretty cool for airbrush cleaning http://www.ipmsstockholm.org/magazine/2005/03/stuff_eng_tech_airbrush_cleaning_2.htm
 -
Basically, you're going to have to wet it down (hopefully - depending on the leather) and wet form it to fit YOUR shoulder. Once it's wet, it should bend and stretch without all the wrinkles and then once it's dry, it will hold that shape. But, test the moisture on a small section of the handle that's not visible to see how it reacts. And, we're not talking a spritz here - WET.
-
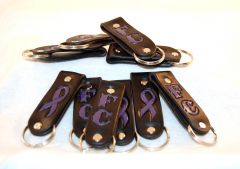
F@%K Cancer Keychains - Hodgekins Lymphoma
Cyberthrasher posted a gallery image in Gallery- Our Leatherwork
From the album: Miscellaneous Items
Some of my F@%K Cancer Keychains going out to support a young mother with Hodgekins Lymphoma. You can offer your support by going here and helping with her treatment costs. The organizer is an old High School friend of mine. https://www.giveforward.com/fundraiser/cnc2/helpjenroker?utm_source=facebook&utm_medium=fb_share_stream.share&utm_campaign=vanity_page_T1&fb_ref=1009617© Hellhound Kustoms Leatherwork
-
Sounds like you means when doing filigrees/underlay. Best method I've found is to use my bone folder to get in there.
-
With a brush - good and heavy.
-
Cutting Two Pieces Identical
Cyberthrasher replied to Eternal Custom Designs's topic in How Do I Do That?
Thanks Kate!! If there's enough interest I'll probably do a real one with a teal live camera and pictures you can see -
Sounds like a good enough reason to me for black. Just make sure they're well defined and it should be cool.
-
Cutting Two Pieces Identical
Cyberthrasher replied to Eternal Custom Designs's topic in How Do I Do That?
If it's just a little bit on the top side you should be fine. I would only be concerned if it was coming off on the bottom, but I believe I remember that you were leaving the bottom natural. -
Cutting Two Pieces Identical
Cyberthrasher replied to Eternal Custom Designs's topic in How Do I Do That?
Is this the one that's already finished with Resolene? If so, you probably need another coat. But, just buff and buff once the Aussie is done and see if you get any more color off. -
Cutting Two Pieces Identical
Cyberthrasher replied to Eternal Custom Designs's topic in How Do I Do That?
I'd say I can probably get about a 10 inch or so section with it just wiping back and forth to cover. If you see some light spots where your dye's running out, reload and go back over it. It's a really even application and pretty hard to mess it up when you're only doing one color. It's basically block dying, without the block. So, if you have any tooling/impressions, it will go right over that without getting dye in there, but you can touch that up if needed. -
You also have that A104 , but I'm not a big fan of those either. Get yourself some Barry King bevelers since you're buying some new ones anyway. You'll want them for the detail in those flames.
-
Cutting Two Pieces Identical
Cyberthrasher replied to Eternal Custom Designs's topic in How Do I Do That?
Just remember that dye can take time, so let it do it's thing before you panic too much. You'll be amazed at how it evens out over time. I think that was Tom who said he uses the old T-shirt for resolene. I'm a sock or blue shop paper towel kind of guy I stopped using the towels for Resolene, but still use them for dye all the time. Just fold it up into 1/4's, hold it over the dye bottle, and splash some up there. Wipe that on and it will be perfectly even. You'll have to reload a lot, but you won't get streaks or uneven spots as easily. -
do some test flames on scrap and see what you like best. Do a portion of it with no background, then a portion with each of the backgrounders you have. Other than that it's just beveling.
-
Cutting Two Pieces Identical
Cyberthrasher replied to Eternal Custom Designs's topic in How Do I Do That?
How big are your scraps? When testing coloring, I like to use stuff about the size of a post card or so. But, for overall single color, I use the rag method that we were discussing and just wipe it on. It's easy to get even coverage that way without building up too much. -
Cutting Two Pieces Identical
Cyberthrasher replied to Eternal Custom Designs's topic in How Do I Do That?
Not really. Since the dye soaks into the leather, you can't remove it. Is it only too dark in certain areas? If so, apply a light coat of neatsfoot oil over the whole thing and then just let it sit. The dye may even itself out. -
Pictorial edge finishing guide for those who are struggling. I just whipped it up real quick for the purpose of this topic, but I may do something more thorough in the future. It's basically my take on Bob Park's instructions. Hopefully pictures will help those who have been having issues. http://leatherworker.net/forum/index.php?showtopic=48696&st=90&gopid=309196entry309196
-
Pictorial edge finishing guide for those who are struggling. I just whipped it up real quick for the purpose of this topic, but I may do something more thorough in the future. It's basically my take on Bob Park's instructions. Hopefully pictures will help those who have been having issues.
-
Cutting Two Pieces Identical
Cyberthrasher replied to Eternal Custom Designs's topic in How Do I Do That?
I'm still learning, but here's a REALLY GOOD video from one of our members http://leatherworker.net/forum/index.php?showtopic=12259 Here's another one he did about how to sharpen your awl, since it's something that a lot of people have troubles with. http://leatherworker.net/forum/index.php?showtopic=47996 Hopefully these pictures about edging will show others that Gum Trag is NOT necessary to get a good edge easily. I continuously tell people it's just a crutch and only glues things down. It should be clear that this edge is smooth and will hold on its own without the aid of something holding the fibers down. -
Cutting Two Pieces Identical
Cyberthrasher replied to Eternal Custom Designs's topic in How Do I Do That?
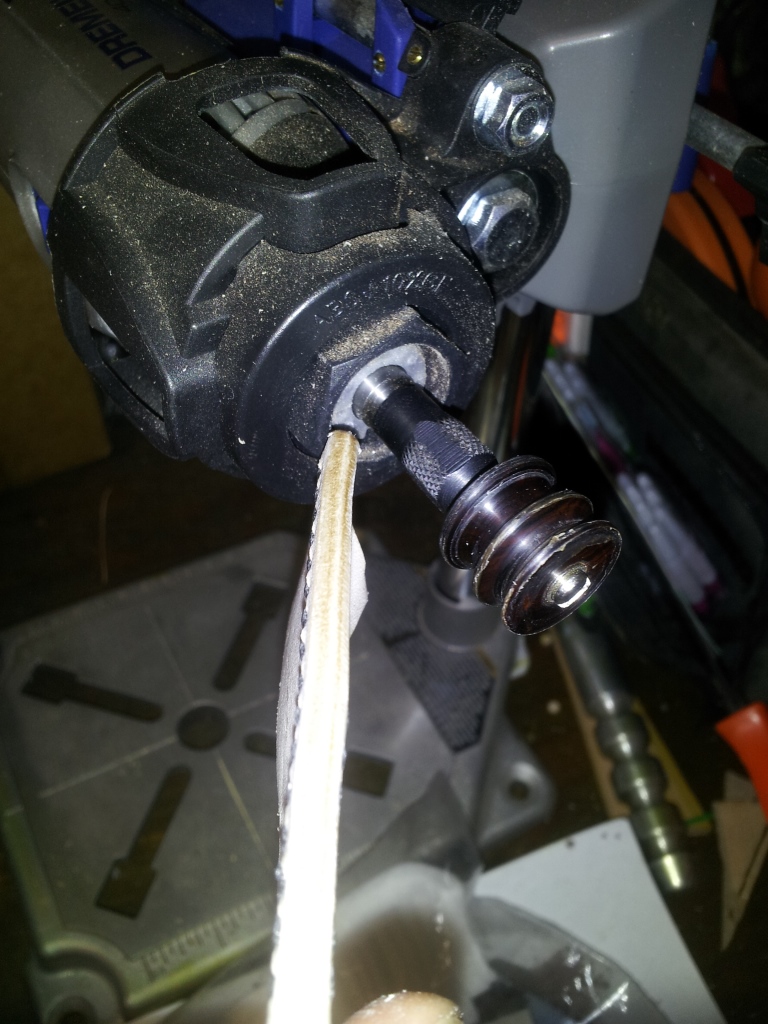
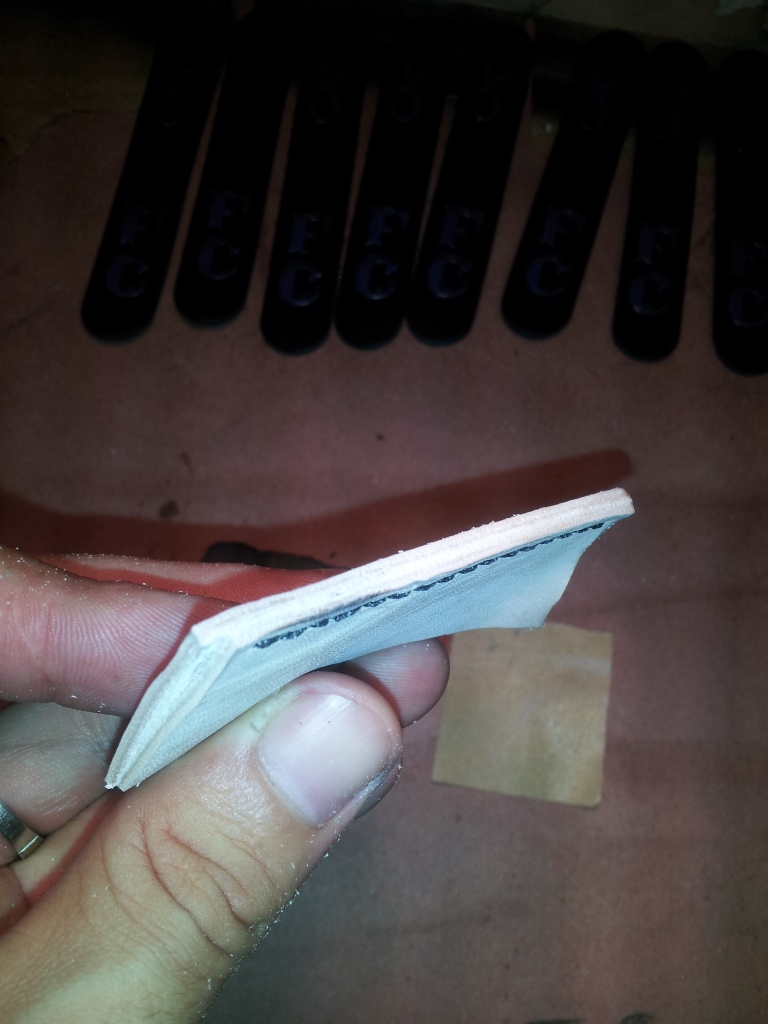
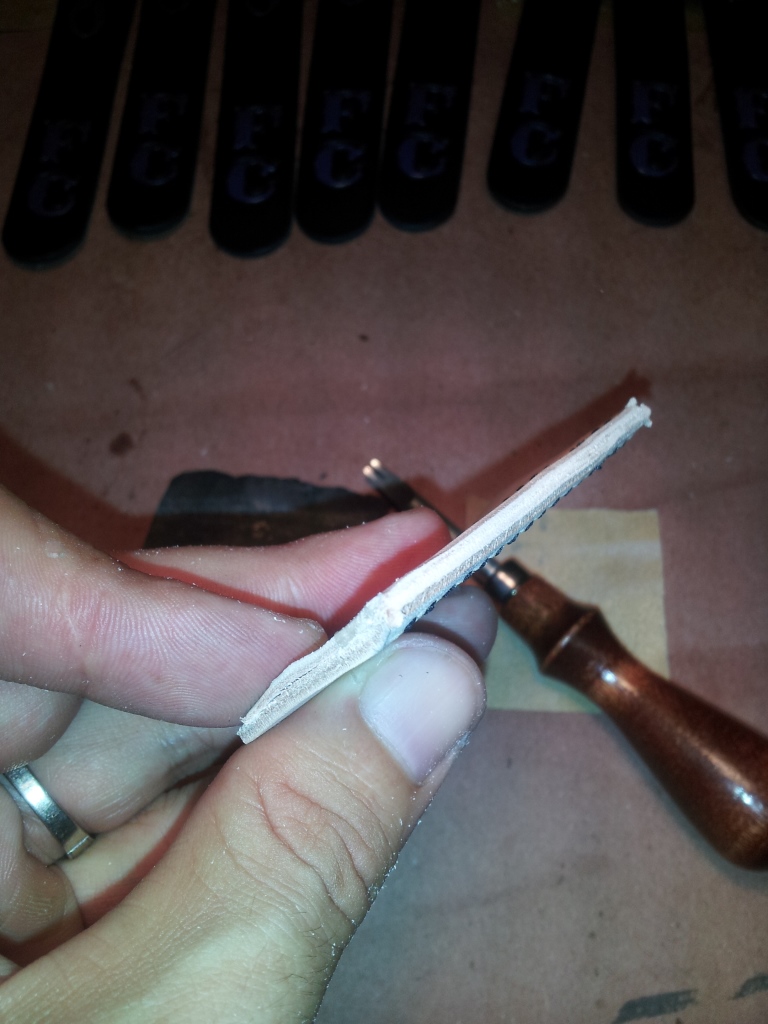
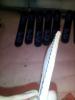
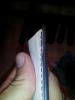
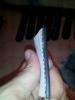
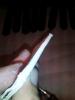
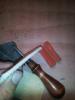
Next up we I take the leather with lubricated edges (from the saddle soap) over to my dremel burnisher. This makes it super quick and easy, but doing it by hand works too. I use the back channel on this one because it fits the profile of the leather better. Yes, I know, I need to clean my burnisher These next two shots are attempting to show the burnished look of it with a bad cell phone picture. Since I wasn't getting a good shot, I decided to offer some contrast and put some dye on the edge. I just splashed some dye onto my blue shop paper towel (as tom explained earlier) and rubbed it on. See how the dye pretty much stopped solid on the line? That's because the burnished edge doesn't allow it to bleed past it. I also briskly buffed it up with the dirty side of my denim scrap. Dirty as in, it's already got black streaks on it. I should also add that I really didn't take any time to make sure I had good dye coverage on it since I was just going for contrast to show in the pictures. Had this been a real project, I would have use a sponge or foam brush to get good coverage, or at least worked a touch longer on applying it with the rag. This was just a QUICK rub down. Here's our "finished" result. I have wax loaded into that denim pretty good, so I rub it in and then get a non-waxed portion of the denim to quickly rub at the edge and cause friction. This makes for a super smooth and shiny edge that you can hardly tell was once two pieces. Now, if I were putting Resolene or other finish on, I would do it before waxing. Other than that, my process is the same. As I said, this entire thing took about 5 minutes, with a lot of that stopping to take pictures over and over until I got a clear one I usually just leave that natural and give it a quick rub with my bone folder to slick it up a little. If the customer requests that I color it, I'll brush some in there. You'll also find that Sharpie can work wonders here I don't do any texting or anything, but this method is working fine.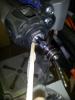
-
Cutting Two Pieces Identical
Cyberthrasher replied to Eternal Custom Designs's topic in How Do I Do That?
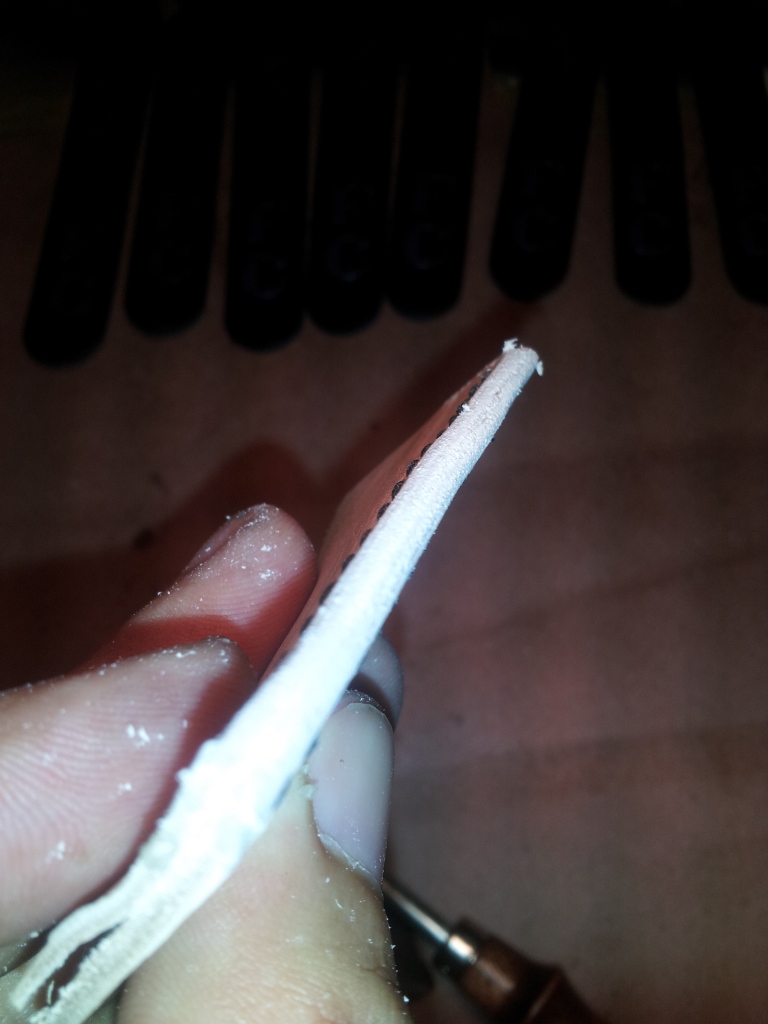
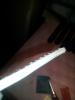
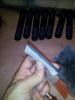
Ok, so let's see if these crappy photos help out at all. I was doing some stitching practice last night and decided to edge it up for you real quick to take photos of the process. The seam is held together with seam tape, not glue, so that part could be better. Also, there is no resolene or other finish on the edge - it was a quick job. I think it took me about 5 minutes here. First off, we have 2 pieces of 5/6 oz leather stitched together as close as possible to an even edge. I've sanded up the edge to get it as even as possible with little to know sign of it being 2 layers. This was done with a small piece of 220 grit, followed up with a little 400 because I thought it needed a touch more smoothing. I pulled out my #2 edger to knock off the corners - front and back. I think I should have used a #3 here, but we'll make it work. because I had a little bit of a ridge from beveling the edge (the "mohawk" effect), I went back to the sanding real quick to even that out and make it a rounded profile like it should be. Once I'm happy with the profile and the smoothness, I get ready to burnish. Here you see my bar of glycerin saddle soap that I've rubbed into many edges - hence the groove. I don't get it wet at all, some do. I find I get better results this way. I usually do the front first and then the edges, but it doesn't really matter. Q-tip should work fine. What you're about to see in the next round of pictures is a quick way to do it that doesn't offer the best coverage. Just make sure the edges are well burnished first as you'll see here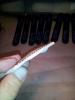


-
Thanks Coop! I talked him into doing the crosses like that since I knew they would really POP without being too over the top. Makes the center of them separate from the background, but not a huge amount of in your face gold to distract the eyes from the other details.
-
Cutting Two Pieces Identical
Cyberthrasher replied to Eternal Custom Designs's topic in How Do I Do That?
I would still try to get it uniform. May not need to get it as smooth as if you were leaving it with no border tooling. I would probably stay away from any of the hatched or checkered tools myself. They may not look right. If you have a seeder and maybe a Camouflage tool, that could work well. I've done some cool stuff with a seeder to make it look like rivets around the edge before.