


markush
-
Posts
112 -
Joined
-
Last visited
Content Type
Profiles
Forums
Events
Blogs
Gallery
Store
Everything posted by markush
-
Others will be along to give you more insightfull info I'm sure, but I might suggest going to more SPI (stitches per inch). I'm taking a guess in saying it looks like your doing something like 4 1/2-5 SPI. A higher SPI should smooth out the appearance, especially on tighter radiuses. I've always liked the look of 6 SPI myself. I'm curious why your leather is crinkling if you pull the stitches tight....are you sewing wet leather?
-
The half width plus leather is a "rule of thumb" It's a baseline starting point. It's one of those things that you have to figure out yourself and tweak as you go...trial and error. I have yet to get a perfect stitch line spacing on my first attempt with a new gun. for me It's always, make one up and adjust the stitch line as needed on the next one. I will say that I have found that if I add the leather thickness part it's too lose for me. I always start out with just the half thickness of the slide on an auto. Don't add in the slide stop etc you'll probably be too lose. Start with the thickest part of the slide and see what you get. If leather work could be done with mathematical calculations alone anyone could do it...trial and error.
-
Ruger Lcp Set
markush replied to Shooter McGavin's topic in Gun Holsters, Rifle Slings and Knife Sheathes
I just commented in another thread where pink thread was used on a black holster... I think pink thread would have really looked good with that LCP! -
I like it also...love the pink thread! I'd also second Eaglestrokers suggestion to double stitch the entire design if you had to do it again. If you don't find further use for the pink thread I would consider buying a few yards from you
-
Mag Pouch Question
markush replied to Abram's topic in Gun Holsters, Rifle Slings and Knife Sheathes
Yep, what steelhawk said. You'll often read about people using lesser quality belly leather to make up a couple/few pieces before finalizing a design. -
Vinegroon- Observations And Questions
markush replied to chiefjason's topic in Gun Holsters, Rifle Slings and Knife Sheathes
The first holsters I did were with vinegaroon so I thought the burnishing and molding were supposed to be that difficult. I only realized how false that was when I made a natural non-dyed holster. The burnishing took half the time and the molding/boning was way too easy! My process was as simple as I could make it...I dipped in the vinegaroon for 10-15 secs. I let that set and take on it's full blackness for 2-3 minutes, did a baking soda dip, then dipped in fresh water...about 10-15 seconds for each of those dips. If was pretty well soaked after all that so I took that opportunity to chuck up the cocobolo burnisher in the drill press and do all the edges using...nothing else! I could get super smooth edges like that. Vinegarooned leather is pretty tough stuff as you found out so it took a while. If the leather happen to still be too wet to mold I'd just let it sit for a while. But before it was totally dry I would mold and bone. So I accomplished 3 steps in one...color, edges, and molding. This was my very first vinegarooned holster and all the edges on the holster body, reinforcement piece, and belt loops were done as described above. Here's a more edge on shot of a mag carrier I did about the same time as the holster above. Cocobolo burnisher in a drill press and leather wet from the vinegaroon process...I saw no need to put anything else on the edges. -
I've only ever seen mention of the "secret formula" for black cherry once...and I saved the link I haven't made it yet so if you get to it before me let me know how it works out. This is an exact quote from another forum "1/3 Burgandy and 2/3's Black....Angelus or Pro Oil dye works just as well" But you didn't hear that from me!
-
How about some of that ostrich I mentioned in another thread
-
Calling All Katasses, It's Started
markush replied to DoubleC's topic in Exotics, Reptiles, Furs and others
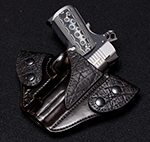
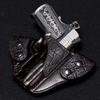
The very first picture is most definitely elephant. I don't know if anyone else mentioned it but the one with the tag attached is snake. The zebra looks like stingray to me also. Elephant is my favorite and very easy to work with. lizard is like armor but easy to work with...never have done anything with snake or stingray yet. I have some ostrich scraps from them that I haven't figured out how to work yet. Everything else I can attach to a layer of cowhide and get a nice burnished edge...not so with the ostrich. -
Metal Lined Holsters For Sass/cas
markush replied to MadMorbius's topic in Gun Holsters, Rifle Slings and Knife Sheathes
I have one that I never paid attention to how the reinforcement was done until seeing your post. So I just snapped a quick and dirty pic to draw on. It only extends about 3/4" below the cylinder, wraps around, and extends up the shank but doesn't bend over and through the belt. The images should clear up the confusion of what I just said. -
What's Your Favorite Finish?
markush replied to IngleGunLeather's topic in Gun Holsters, Rifle Slings and Knife Sheathes
My favorite is Bag-Kote diluted with 20% water Here's an example of Angelus MATTE diluted 50/50 with water. It's a couple ticks shinier then the Bag-Kote The cordovan for the compact is horshide, which starts out smoother so also appears shinier in the end. -
The way I currently do things I cannot see how to incorporated the oil with anything else. There may be but I can't see it. It's not a huge deal. I've always tried to approach everything I do from the "work smarter, not harder" standpoint. And this is just one of those things that since I have seen no hard evidence that it is necessary, I have to question it. And like I said, I did try a couple without the oil and saw absolutely no difference...in the short term.
-
I have recently made two without oil that I have worn several times and can notice no difference...what would I watch out for...surface cracking? When would this happen...imediately or months, years down the road? The problems that show up immediately are my own and I can deal with that. The problems that show up down the road would be a whole different story! I understand you guys saying oil doesn't hurt....But If a step is totally unnecessary and adding 24 hours to my process, of course I would prefer to avoid it.
-
Well...the biggest reason is that the dye process has added 2 days wait/dry time to a holster. If I could cut out the oil I'd get back one of those. With the vinegaroon the oil added that last bit of necessary blackness to my pieces that isn't needed with my dyed stuff. So I'm wondering if it is as necessary to condition the leather with the oil when using spirit dye and 130 degree heat as it is with vinegaroon and baking soda dips.
-
My first few holster were colored with the vinegaroon process so I always oiled them with neatsfoot. Now I'm playing around with the Angelus spirit based dyes and heat drying and am wondering if I should continue to use the neatsfoot on them?
-
Since I started out with making a couple IWB's and then went right to snap removable OWB's I've never made a simple pancake with belt slots before. I figured I should probably figure out how to do them so here's my first completed holster with belt slots. I've been able to find information on the various methods used to cut belt slots but I haven't been able to find a whole lot of info on stuff like spacing and angling them. These are spaced with the closest part of the slot 5/8" away from the stitch line and 3/8" away from the edge. And I decided to angle them out from vertical for no other reason then I think it looks better then straight up and down. What are the rules for belt slot spacing and angles...how many did I break?
-
All of my holsters have passed the hold it upside down and lightly shake thing. I could probably tighten up the stitch line some here and there but I'm using Hermann Oak so the quality leather part is covered. I did use a fan to dry one of my holster and it shrunk up in the wrong direction....vertically...so the muzzle end moved up and the mouth moved down...both about an 1/8" . My patterns are drawn so they are only about an 1/8" long at the muzzle, so when that one shrunk up that 1/8" I decided to go back to regular ol still air drying. Would heat make it shrink even more then that? If so all my patterns would have to be redone some.
-
I read it all the time..."My new holster was so tight I needed to use wax paper or a baggie etc. to loosen it up." I just saw pics of a guy using baggies on his 1911 and mags to loosen up his new Milt Sparks VMII holster and mag carrier?? I've made a dozen holsters now and none of them have been even close to needing to be stretched out. I can understand certain guns with say accessory rails and the like being molded too tight around the rails but a slab sided 1911 or mag carriers being too tight?? How do they get them so tight? Are they using undersized molds? Does my molding/boning process have something to do with it? I've used the actual guns to mold/bone my holsters so I've wrapped them in a single thin layer of saran wrap, stuffed them in the wet holster molded/boned, let then sit for between an hour or two then pulled the gun. If anything moved when I removed the gun I make sure the leather was back in place, inside the trigger guard etc.. Then I let it air dry between 24-48 hours. With this method I get a good fit but it's nowhere close to being too tight!
-
Since starting the thread referenced by winterbear I have made a couple of holsters using the Gum Tragacanth on the interiors. I will say it is working out pretty good so far. I'm using Hermann Oak but we use the same vinegaroon process and I know the extra "hair" you speak of after that process. Here is a pic of the hairiest piece of belly leather I could find. A portion is slicked up with only the Gum Trag and a bone folder to show you that this stuff would smooth out anything!
-
I believe the Angelus site says they sell 55 gallon drums, would that work? If that's too much they also list gallons and I think quarts...Turtle feather sells pints and 3 oz.
-
Horse Hide Thickness
markush replied to J Hayes's topic in Gun Holsters, Rifle Slings and Knife Sheathes
If I'm reading the charts right, your .110 horsehide is the equivalent thickness of 7oz cowhide. Having never used horse hide but knowing that many if not most holsters are in the 6-8oz thickness range I'd guess your horsehide is good to go. -
I've handled exactly 3 shoulders and two belly cuts my whole life so take my info for FWIW, which is not a whole lot. I've tried both their B and Craftsman grade Hermann Oak. I'll say that I won't buy another craftsman shoulder and in fact have just purchased another B shoulder from them. In regards to blemish's they both looked really close on the grain side. The noticable differences with mine was in the flesh sides. The B was much denser and firmer while the craftsman was less dense and was dryer. The looser fleshed Craftsman shows up as more "nap" after I vinegaroon and form the holster. If you didn't already know, Springfield will cut you off a shoulder of the B if you ask. What I really want to try is some top quality A grade Hermann oak or some Wickett & Craig. I don't know of anyplace to get a shoulder or even a single side of Hermann oak A though. So my next leather will most likely be some W&C.
-
I'll give you guys the quick and dirty answer...Eco-flow is water based. I used it exactly once had the same problem then i found this forum and started reading. Eco-Flow is not a recommended product on this forum.
-
Thanks guys, I was hoping that doubling up the cheap stuff wouldn't be so bad. I've been working with a couple of HO shoulders that I got Springfield to cut me. One their "Craftsman" grade and one of their "B" grade, both in 8-9oz.The quality difference between the two was such that I probably wouldn't use the Craftsman grade for holsters again. And with the B grade costing me $8.00 a SqFt I can't bring myself to get it in 4-5oz and then double it up. I'd have close to $20.00 in leather in each holster. If I could sell my stuff for premium prices OK, but that's not happening.
-
I've been using a grover to cut my stitch lines but when it come to a tight radius turn it sometimes gets ugly/choppy. I've tried a modeling tool to free hand crease a stitch line and it seems easier to to keep the tight turns looking good. I see the Tandy Pro stitching grover set has both the grover blade plus a modeling spoon that i think can be used on it's edge to crease the stitch lines. If there a disadvantage to creasing in the stitch lines as opposed to cutting them with a groover? Here's the Tandy tool http://www.tandyleat...e/88081-00.aspx