Billsotx
-
Posts
533 -
Joined
-
Last visited
Content Type
Profiles
Forums
Events
Blogs
Gallery
Store
Everything posted by Billsotx
-
Thanks to all for your help on this one. ~Bill
-
I have CutePDF installed. I used it to convert a couple of jpgs to pdfs. I saved the pds (made from the jpg) in the PDF file with all my other pdfs (actually in a sub-folder. Double clicking the converted pdf to open it, it opens in Adobe Reader and it appears in landscape view. I can rotate it but it will not Save so that it stays upright (portrait) view. I tried to print it from Adobe Reader but it doesn't print. I get a small window: Adobe Reader has stopped working ... A problem caused the program to stop working correctly. Windows will close the program and notify you if a solution is available. (No solution shows up.) I can print from Word, Notepad, Excel, so the printer works, but Adobe Reader does find it. Two days ago I printed the 30 page contract from Adobe Reader, so I messed it up with CutePDF probably. Any ideas how to hook back up to the printer.
-
Not defending TLF's quality, but my stamps have a small, almost indiscernible, index mark on the bottom edge. Nevertheless, I put my own with a punch and heavily beveled the edges to reduce the halo the edge of the stamp usually leaves.
-
I'm working with a pdf that was emailed to me. I have made a hard copy, i.e. printed the pdf, it's a legal contract approximately 30 pages. I have to hand-write in some changes and initial same and return email it. My printer will scan. Is it possible to scan it back into an emailable attachment? My scans comeout jpgs and I hate to email a slew of jpgs if there is another option. Will a zip file bundle a bunch of jpgs? I appreciate any pointers. ~Bill
-
San Antonio
-
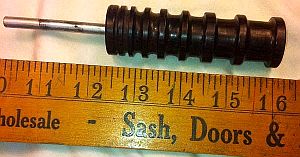
For sale: Cocobolo edge burnisher. The rule will give you a sense of actual size, it’s approximately 6 inches long. I’ve used it with success in both a drill press and hand drill - run it 1300 to 1700 rpms. $30.00 firm, Continental 48 only. I'll pay shipping by U.S.P.S. PM or email me off my contact page via my web.

-
I'll ride with TexasJack! He covered it well.
-
I like a very fine point red ink felt tip pen. You can even draw lines with red ink if you're going to dye your project, as the red ink will hide when the dye goes on. Test it on scrap if you're not sure.
-
Tell him to return it with a piece of string tied through the hole that he is using and make that you center hole measurement.
-
I do the same as Luke, then sand and true up the edges however you're accustomed to doing that, then set your compasses to scribe a line working of the edges you've trued up. If you're stitching and tooling you may want to layout 2 lines, 1 on the outside that will be your stitch line, then 2 just inside that will become you crease, border, whatever you're planning to do.
-
Interesting Thread Combination
Billsotx replied to mlapaglia's topic in Gun Holsters, Rifle Slings and Knife Sheathes
Did you try different needles? ...did it always break on the same needle? -
Iwb Spacer Help.
Billsotx replied to cjcinin317's topic in Gun Holsters, Rifle Slings and Knife Sheathes
Punch out a plug with a 1/2 to 5/8 punch, then punch a hole 1/16 to 1/8 in the center; thickness varies by weight of leather and you can glue 2 or 4 together depending on the thickness you want. Throw an extra in the package so the buyer has a backup if he needs it. -
There's some video on youtube that I found worthwhile.
-
I figured some of the saddle folks would comment on this. If you look around in the saddle section you'll probably find an illustration, by Verlane and/or Bruce Johnson, of a wedge shaped piece of leather being used to "wedge" the buckle in its proper place of alignment - keep it from shifting around. The thick end of the wedge is jammed up against the bar of the buckle, the tapered end allows your fold to transition into the 2 straps. The wedge is the width of the straps. You glue it in and when you stitch you only stitch along the sides (edges) of the straps and of course the wedge since it's the same width. As Verlane constantly reminded us that the holes we punch for stitch are like perforation - she say, "Think tear along the dotted line." Stitching across a strap like a belt, halter, reins weakens them to no end - bad juju and insures a short life of the strap or belt. The wedge should be the same thickness as your straps, a piece of scrap works fine. If you don't have a splitter you can skive the wedge edge with a round/head knife or a safety beveler. I used to use a small wood plane and block of sandpaper. An electric belt sander will also work, or a drum sander in a drill/drill press can suffice. Here's one entry: http://leatherworker.net/forum/index.php?showtopic=7455
-
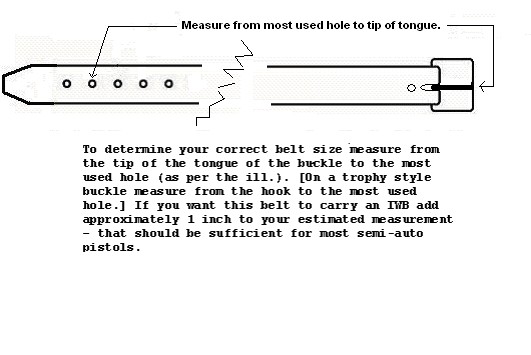
Measure an old belt if you can. If you measure a person's waist put the tape or a string that won't stretch through the trouser's loops and pull the slack out of it, but don't pull it tight - that's the waist size the distance from the tip of the buckle's tongue to the center hole you're going to punch. Maybe the pix will help.
-
It doesn't have to get direct sun light. You could lay it on the back seat or rear windshield deck. Improvish a cover of plastic sheet or screen and lay it out in the yard. Lay it near a window where the sun shines in for several hours. It'll take some time, but it'll work.
-
The line will show if you just oil it or use a light color. Use a medium to dark color dye. You may be able to cut a small piece where the shows and test. What I would do is lay it out and let mother nature even the tan - she will. If you lay it out keep in mind things that fly drop stuff, trees and shrubs drip stuff, pets and vermin may be a problem, as well as 2 legged varmints. UV tanning takes time, but it turns natural russet into a beautiful golden tan.
-
Duke - Western Holster Rig
Billsotx replied to mattsh's topic in Gun Holsters, Rifle Slings and Knife Sheathes
Re: 5 - It's folded over because it's a copy of a money belt, as mentioned above. On the backside of the buckle end there should be a slot - it'll hold a bunch of silver dollars if you can stand the weight of it. Of course the silver dollars probably didn't last long if the cowboy paid a visit to the Bird Cage or Buffalo Heifer's Parlor ... lol! -
Mags, this is pretty much SOP. The neatsfoot should take care of it. Next time before you dye, clean it with rubbing alcohol to get dirt, oil from your fingers, etc. off and while it's damp from the alcohol apply the dye with a dauber, piece of shearling, or piece of soft cloth - you can spray it if you have a sprayer - an air brush. Don't over oil it. You'll have to learn by doing, but too little is better than too much. You can always apply more oil. Pure neatsfoot is best. I wouldn't mess with compound neatsfoot. As mentioned Lexol - real good stuff in my opinion. Esp. if working with natural russet as it doesn't darken it. It's easier to work with than neatsfoot, soaks in better, less residual esp. at the surface. After you oil, let it set at least 24 hours. Neatsfoot may take even longer than Lexol. I like to let a fan blow over it. Next step is to buff heck out it. Once it evens out and you're not getting rub-off you can apply a finish coat - or - another coat of dye if it needs it - it usually doesn't need any more dye if you cover it well. Plenty of people dip dye things like gun leather so you can daub it on heavy and not go overboard. From you last post you had pretty much figured it out. You on the right track. Don't be discouraged with a few splotches and uneven hues. Where ever you burnished, slicked, matted, i.e. compressed and sealed the surface you'll have to add more dye and give it a change to penetrate those less porous areas. You're getting there!
-
I don't know about your Singer. I happily use a Boss. Leather - you get what you pay for. I use Wickett & Craig or Herman Oak if it's cowhide. As far as skins and horse I always got them from Siegels CA - http://www.siegelofca.com/
-
I don't have any experienced with what you're doing but going on what you describe I'd have a heat gun (on low power) or a hair dyer (on high), just in case it started to setup on me. An extra hand or two wouldn't hurt. I melt wax into leather straps all the time with this method. A lot of times I'll heat the strap before I start. Right now here in South Texas you can just lay it out in the sun for awhile to get started. There's probably someone here that's done what you're asking and hopefully they'll jump in here. Good luck and if you find time report back how it came out. Leather clothes are cool, esp. frilly under things (fringe, hair, feathers) ... ;-)
-
Thanks Rick. I appreciate the info.
-
Where you say you burnished, you were actually slicking. Search around on these forums for "slicking." Most saddle makers will slick their leather to compress it, stretch it, hence take the stretch out of it. Ultimately, you'll mat all those little fibers down so they are less apt to catch, ravel, whatever you want to call it. Gum trag is a good coating, but I'm used paraffin, just take a bar and rub in on; that's after it is slicked and dried. If you're going to build more stuff like this, then buy your leather with the flesh-side already treated. Herman Oak calls it mossback and Wicket Craig call it gummed. You'll find some folks turn their nose up at gummed backs, but it's a mainstay for custom gun leather. On occasion I'll build a halter or harness and I use WC gummed without problems. Even if you order this, you should look into slickin'. When I'm building something that I want to be light and fast, high-speed low drag - I slick it even though it's mossback. Gum trag is a derivative of the legumes. This might help you track down the baking aspect: http://en.wikipedia.org/wiki/Gum_tragacanth -or- http://www.bakedeco.com/detail.asp?id=6196&catid=204 Good luck, and let us know what you ultimately come up with.
-
How To Make A Double Action Revolver Holster And Gunbelt
Billsotx replied to bronco72's topic in How Do I Do That?
Here's a photo of a clamshell holster made by the now defunct Safety Speed Holster Co. It was made popular by the TV series Highway Patrol in the early 1950s. The again made an appearance on Adam 12 in the 70s. I have never seen one as a shoulder holster, but there are high ride models. The company eventually ceased production of clamshells due to a flood of lawsuits. The clamshell design was one of the first attempts at a retention holster. The so-called secret button located inside the trigger-guard invited a finger on the trigger even before the presentation was started. In my files of self-inflicted gunshots, I have some 40+ incidents involving this design. I personally witnessed 5 of these injuries. This design was used mostly by police officers, with double-action revolvers, but there were semi-auto models too. All of the semi-auto models that I'm familiar with, were activated by a thumb-tab, rather than a push button located inside the trigger-guard as seen on this model. Safety Speed Holster Co. also made breakfront holsters, which have a open front; the breakfront employs a flat style spring rather than a coil spring as found in the design pictured here. The most poplular breakfront holster was the Berns-Martin, and they usually cover the trigger guard and depend on pure friction rather than a mechanical action or spring actuation as seen here. If you're interested in copying one of these the metal shell is fabricated from sheet metal. All that I have seen were covered with chrome tan leather, but I recovered a number of these back in the 60s and 70s with veg-tan. I didn't know the differnce in leathers back then, but at least one of those I reworked still functions. The officer has owned it for more than 40 years, but it's been retired for at least 20 of those years. Anyway, I was surprised at how crude the metal fabrication actually was. I happened to have this photo handy so thought I'd post it since clamshell was mentioned. You won't see many clamshells outside of collections nowdays. They were once touted as fast, but my experience with a Pact Timer proved otherwise. The draw is two distinct movements - there is an actual pause while you wait for the spring release to allow access, i.e. let it pop open. As far as the retention aspect - even kid in the projects knew the secret button was right there next to the trigger.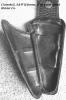
-
How Do You Cover A Belt Clip With Leather?
Billsotx replied to Ladykahu's topic in How Do I Do That?
Check these flicks. May help. Install the clip the same way but let your pouch hang outside instead of tucking it in; at least that's my understanding of what you're after. It'll work if it's small and lightweight. If the tool is heavy, it'll shift and flop around, and may not be there when needed.