


Billsotx
-
Posts
533 -
Joined
-
Last visited
Content Type
Profiles
Forums
Events
Blogs
Gallery
Store
Everything posted by Billsotx
-
Belt Hole Centering?
Billsotx replied to LowRent's topic in Purses, Wallets, Belts and Miscellaneous Pocket Items
What Luke said is pretty much SOP, that book is worth the $$$. For me, gunbelts never stop stretching, so I punch 7 holes, 3/4" on centers; I put four inside of the center most hole to compensate a little for the stretch. If you're making more than one belt, make up some templates from manilla folders, then you just align the template tip with the tip of the belt; mark your holes with an awl or scribe and punch them out. If you're going into real heavy production, make your templates from a piece of polymer trash. I always save all those senior-proof packages that frustrate my baby-boomer friends ... lol! -
My New Purse
Billsotx replied to anne newkold's topic in Purses, Wallets, Belts and Miscellaneous Pocket Items
Nice! -
The phatom strikes ... LOL!
-
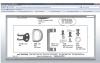
You don't buckle a Sam Browne per se. Once you put that buckle on the billet end in the correct position (i.e. size it) all you do is hook it onto that little hook in your photo. Then you push the billet down over the Sam Browne stud and slide the keeper over it. If you want a buckle-less Sam Browne belt Safariland LTD. makes (or made) them. You might search for that and be able to find a shot that'll show how that one is made. You may not be able to find their exact hardware, but Siegel's of CA. has (or had)a hook that would work. Then you'll need good velcro if you're going to copy it exactly as the Safariland buckle-less was designed as a set, having velcro lining and a velcro covered under-belt. See if you can get to this page, it's page #162/163. The hook you showed is on the left side, bottom row. The Safariland hook I mentioned is there also: far left, bottom row. The Sam Browne studs are there also. http://www.ohiotravelbag.com/FlipBook/hardware%20catalog%20p210/index.html?pageNumber=154
-
I get notifications when a new topic is posted in the various categories I've subscribed to, but I don't get replies to those new topics. There used to be a button where you could get immediate notifications to that but I no longer see that option. I could no longer find that page where I subscribed to those categories. When I get an email and come to the forum from the link in the email I get what looks like the usual LW page, but when I sign in it changes to a washed out page nothing like it used to be. Sometimes I get messages telling me to log-in, which I attempt to do, only to find out I'm logged in. ... Duh ... What am I doing wrong? Thanks for your reply. ~Bill Name: Bill UserName: Billsotx IP Address: 68.89.137.67 Email Address: bill.45.70@gmail.com
-
What weight leather did you use? I've picked up several old notebooks of high quality at garage sales for next to nothing; bought 4 off one guy for a buck, and all four were excellent quality. Did like you did, drilled and punched the rivets and used Chicago screws when I put them back. Always looking for ideas. Thanks for sharing.
-
How do i put it all together?
Billsotx replied to Larry's topic in Purses, Wallets, Belts and Miscellaneous Pocket Items
Not bad. You might consider doing that same design on a piece of scrap when you have some time. The do it a few more times. Experiment with different tools, shaders, bevelers, cams, etc. and use a modeling spoon to iron out some of the tools marks and to round-over sharp edges. And deco cuts, those can really set it off -or- detract from it. The deco cuts are definitely an art. Anyway, after you do it again over a few months or a year compare it to the original you did; it's inspiring to see improvements. Repetition is the mother of skill! -
How do i put it all together?
Billsotx replied to Larry's topic in Purses, Wallets, Belts and Miscellaneous Pocket Items
Larry, You can cut it oversize if you want, however, I think you'd want to lightly mark or layout the area you're going to tool. When you tool a piece of leather it generally stretches - especially if you use tools that you hammer on: bevellers, pear shaders, cams, etc. To minimize stretch either temporarily glue the piece to a poster-board or scrap piece of heavy cardboard or tape the backside. I use 3M packaging tape; the 2" wide stuff because it does not cushion the blows of the maul and gives better impressions. I have also used old cereal boxes and similar cardboard also. I was taught this was SOP in carving/tooling but there may be another way to prevent stretch. Anyway, after tooling I carefully pull the back loose before the piece is dry. Some folks say wait until it dries. I find it easier if done while the piece is cased. Hope this helps. ~Bill -
How do i put it all together?
Billsotx replied to Larry's topic in Purses, Wallets, Belts and Miscellaneous Pocket Items
Larry, I don't think this was mentioned yet. Before you tool your leather, either glue it, backside, to a piece of poster-board or tape the backside with packing tape to keep the leather from stretching. After you're finished peel the back off and then rub the residual glue off with your fingers or a gum eraser. Barge glue will do, but only put it on one side - either on the leather or the poster-board - that way you won't have an almost permanent bond. Look forward to seeing the finished piece. -
James, I think a bleed knot will do the trick. Check this one: http://www.rudedogleather.com/id183.html I think we talked about this on here before so you might search for bleed knot. It was in the adult sector as I recall.
-
Hello Curtis, We'd all like to know if you're able to find a good source.
-
Take a look at the thumb piece on the 8th snap down from the top (3/4" Heavy Square Eye Brass Snap Hooks-3" long) http://www.cdwplus.com/brassS.html. The thumb pieces appears to be smaller, i.e. flatter and slightly tapered. It's similar to my old Ray Allen snaps, but they aren't brass. I found that low profile thumb piece less apt to catch and open inadvertently. Your dog shaking the leash loose is due probably due to too weak a spring. I had a Dobe that would do that. He learned he could shake it free. It drove him crazy when I got a better snap. He would also lunge against those cheesy snaps and pull the shaft out of the ring. If you find good snaps let us know. I've always held onto my Ray Allen snaps and just make new leashes because I've not found good strong ones with low profile thumb pieces, but I'm just keeping up my personal gear and not trying to market anything.
-
I'm not familiar with K9 Force and the photos aren't clear on that site but it looks like he has good snaps. That said, the best (mil spec) K9 equipment, including leather, is Ray Allen - it's par excellence in my experience. You might look at his site and get other ideas: http://www.rayallen.com/. The USAF dog school used to buy their supplies from Ray Allen and still may. We bought our patrol dog equipment there also because we saw it in action at the AF dog school and knew it was top quality. I saw quite a few snaps broken over the years. Usually they pull through and separate at the swivel. I'd bet you'll see that happen in the one with the hole. You're right in being leery of that one. I don't know whether the round or square swivel is stronger. I've never see brass snaps - they were all stainless. Still you see brass snaps on horse leads, so I wouldn't write brass off. You might search for the mil spec on snaps and leads, leashes, K9 leather, etc. and see if you can find some specifics. I'll look for some tomorrow, can't now. Two other things to consider; problems I experienced. 1) How high the thumb piece sticks up. 2) How strong the spring is on the thumb piece. The lower and flatter the thumb piece is to the body of that shaft it's housed in the less likely it will inadvertently get catch and tripped. I'd like to have a dollar for every dog I saw that got off a cheesy snap that was tripped when the handler flipped the leash while correcting a dog when teaching the "out" or some felony behavior that needed a stern correction, and then there were those times when a dog simply ducked back under the leash and then lounged back out and the inertia was such that the weak spring allowed the thumb piece to open and the dog was gone - talk about feeling helpless ... not the dog, but You! ... lol. I mean the handler not "you" specifically, but you knew that. I have seen good snaps on horse leashes but I don't know a source for snaps. I haven't seen any good snaps on dog leashes that I've seen commercially - Wal-Mart, Target, Pets-mart, or Pet-whatever. Weaver may be a source of good snaps. Sorry, I can't provide anything solid.
-
OK > > > > > > > > > > > > > Here's your sign! ... lol
-
What you describe as more stiff is the hooks, the fuzzy side is the loops.
-
It does here. After it's dry, a very light coat of Lexol or gum trag, if you don't want oil, resolves that. I mostly finish with Tan Kote and that also resolves the white residual if you want a finish; I apply with a piece of shearling.
-
Here what Hide House emailed me: "Unfortunately there is currently no base or setter for these conchos other than your basic rivet setter. However, many of our customers have been using modeling clay such as Fimo to create their own bases to keep from marring the face during riveting. Simply knead the clay into a thick flat shape and press the concho directly into it so that the rivet stands striaght up. Then bake the clay as per the instructions on the packaging. Once cooled, this type of base seems to be able to withstand general riveting and saves the face from any damage." I was thinking about ordering some of those rivets, but I'll pass.
-
Tom Threepersons holster
Billsotx replied to Lobo's topic in Gun Holsters, Rifle Slings and Knife Sheathes
Oh, I got it Rob! I looked at your link. I didn't think you implied it was me. I think I know what Obama would say about such an impostor too ... LOL! -
Tom Threepersons holster
Billsotx replied to Lobo's topic in Gun Holsters, Rifle Slings and Knife Sheathes
So we've been exposed to a holster-maker impersonator? Oh, brother! ... -
I don't know about the size, strength of those at OTB, but those at Ryan's to are too flimsy; they're like those you'll see on Uncle Mikes stuff. I've yet to find a sturdy brass sling hook. Brownell's has them, but they aren't brass, and they are painted black. They are stout - search for competition sling hooks.
-
Just work one side and not the other.
-
Blue gun frustration
Billsotx replied to carljc72's topic in Gun Holsters, Rifle Slings and Knife Sheathes
Carl, Too late on this one, but woolfe is correct. I discussed this with John Ring, owner of Rings Blue Guns, and he advised to order direct and ask that the final dye be skirted. If you tell them it's for building holsters, they'll know what you need. The gun will still be blue, just not as pretty. Not sure it's worth it anyway; one day in a retention class and it'll look like it's been drug down a gravel road ... This ordering direct has been mentioned in other posts ... I know, it's hard to read them all. I think Jeff's walnut bead blast would be your best choice now. Barring that, careful with acetone or strong chemicals. I'd lean toward #0000 steel wool and order from Rings in the future unless you're assured it wasn't dyed. I work mostly in natural russet color so I go straight to Rings. ~Bill -
Leatherwork from Germany
Billsotx replied to Handwerker's topic in Gun Holsters, Rifle Slings and Knife Sheathes
WHAT'D HE SAY? . . . LOL! -
First "classic" holster in a while
Billsotx replied to Shorts's topic in Gun Holsters, Rifle Slings and Knife Sheathes
It's the humidity down there. Cut it 1:1 with water. If you do try bottled, or test on scrap, y'all have a lot of different minerals as I recall. Still your tap water is soft and soft is good when it comes to tooling and molding. Nice piece of work! -
Machine Sewing and edging holsters
Billsotx replied to LarryDonaldson's topic in Leather Sewing Machines
What's a dumb question?
