Billsotx
-
Posts
533 -
Joined
-
Last visited
Content Type
Profiles
Forums
Events
Blogs
Gallery
Store
Everything posted by Billsotx
-
Duke - Western Holster Rig
Billsotx replied to mattsh's topic in Gun Holsters, Rifle Slings and Knife Sheathes
I think Dan is describing a bleed knot: http://www.rudedogleather.com/id183.html -
Gun belt question
Billsotx replied to ps0303's topic in Gun Holsters, Rifle Slings and Knife Sheathes
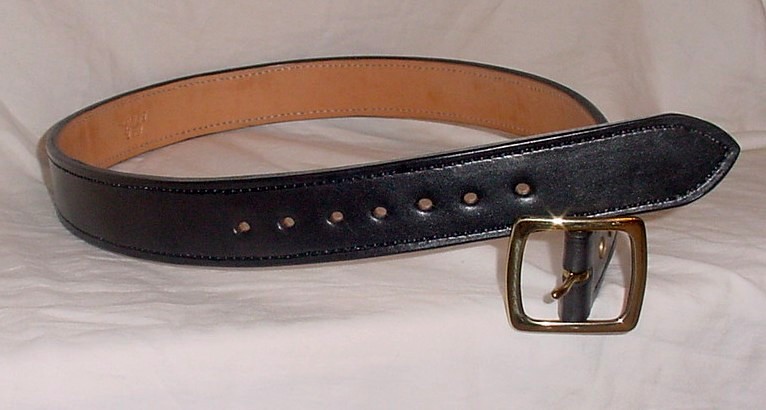
I use two 8 oz. straps glued and stitched. Start stitching at the buckle end about 4 stitches in, go out the four to the fold end and come back, that ties it off, then go around the billet and back the other side to the buckle end, back stitch about 4 stitches and you're done - tied off. I use oval punches like Shorts and others mention. I place holes in the billet end 3/4" center to center and put 7 holes, unless the customer has other specs. I split both straps only at the billet end starting about an 1.5" out from the closest (tightest) billet hole, and 3 inches in on the other strap so there's not an obvious step down. The buckle end is simply folded back and two Chicago screws are inserted so buckles can be changed easily. You can also step down in width, especially if you're a buckle short, and the buckle is an 80 mile drive round trip ... lol! I copied this from an old Bruce Nelson belt and it's good as any, but not the only way. Most of the Nelson belts I've seen have only one screw, so my two are probably over kill. If you get a copy of Al Stohlman's Belts Galore, I'd be surprised if you didn't find ideas there you like. At the very least, his blueprint is easy to follow. Hope to see some pix of what you end up with. Good luck....

-
Machine Sewing and edging holsters
Billsotx replied to LarryDonaldson's topic in Leather Sewing Machines
Which W/C did you get, carving? I'd suggest 207 thread on 6/7 oz. The Tandy/LF freehand groover will work, and it's low price, BUT you've got to practice with it. I hardly ever pickup my adjustable groover any more. On edgers, you want a round-bottom edger not those run of the mill Tandy/LF edgers, as those will not give you a rounded edge - actually they scoop out, and don't round up - like you want on gun leather. I prefer the Jeremiah Watt edgers: his #1 for belts, and #0 for holsters, mag pouches, cartridge pouches and butt cuffs - that said, mine were modified to work. You're going to learn that leather ain't just leather, no two tanneries are alike, and you'll have to modify tools and sometimes just make your own. Keep in mind a lot of work working tools will do what we do. Let us see some pix of your stuff when you can get some. -
Using the diamond awl punch your holes diagonally along your stitch line, as Al Stholman illustrates in his excellent book The Art of Hand Sewing Leather. He also explains how to get those awl holes in alignment on the back side. Looks good regardless, so build some more - repetition is the mother of skill!
-
OMG - What will we do with two ... LOL!
-
Took a while to find this: Stevenson-Paxton Sales Ignacio, CA 800-648-1622 I didn't find an url for them.
-
You may find them here: https://www.siegelofca.com/default.asp I know he has the pippin punch.
-
I've bought from Goliger: http://www.goligerleather.com/index.html
-
dye and neatsfoot oil ???
Billsotx replied to carljc72's topic in Gun Holsters, Rifle Slings and Knife Sheathes
You'll find as many ways, methods, and techniques as there are people using them and they're all the best - just ask them ... lol! Develope your own through trial and error, expect something different if you use something different (any one item, especially the leather - leather just ain't leather) and keep good notes. If you buy econo leather from the variety suppliers expect something different everytime you buy. Good luck, and share some pix when you get something worked up. We're all here to learn. -
Check here: http://leatherworker.net/forum/index.php?showtopic=2260 ... and scroll down to CitizenKate's thread.
-
Open the pix in a photo editor, look for image size and change it, then click File, Save As and give it a name. That will Save your original so you'll always have that.
-
Once you have backed-up everything I'd look for a restore point before you noticed the first glitch and see if that might resolve that. You didn't say what version OS, on my XP the email is in My Docs and every once in awhile I just open two Windows Explorers and drag my email folder onto the email folder on my ext. HD. At least you haven't fooled around and been caught just wringing you hands. Good luck with what you decide.
-
Stich spacing for holster?
Billsotx replied to adaman04's topic in Gun Holsters, Rifle Slings and Knife Sheathes
Seven is all I've even used on gun leather - but I'm old fashioned. -
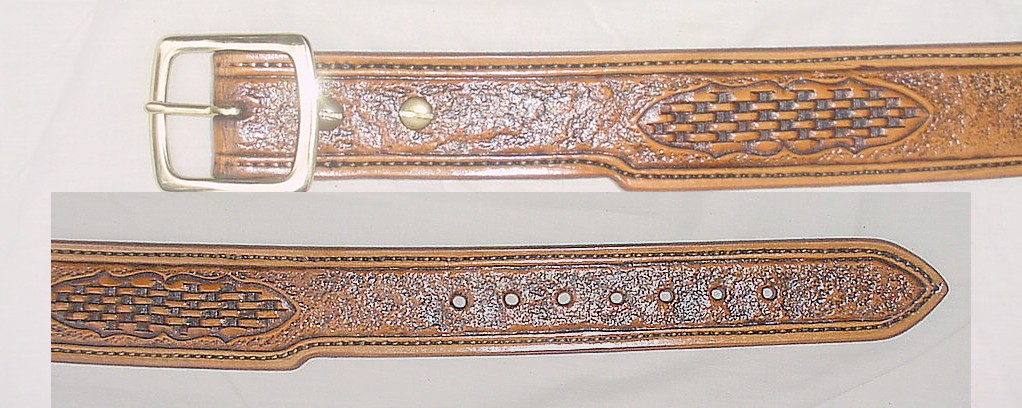
Checkout this tutorial on the basket weave: http://pslac.org/public/02_feb05.pdf I assume you intend to carry the mags reversed, the tips of the projectiles should face forward assuming that's for a right hand operator's carry. They should be worn on the left side, as pistols are reloaded with the support hand. Otherwise, with the bullet tips facing toward the operator's six, he/she will have to contort the wrist -or- juggle and flip the mag around to get the proper grip on the mag for loading (reloading); the extra manipulation, therefore increases the chance of fumbling and dropping the load/reload mag. Maybe you just stuck the mags in the pouch that way for the photo - so I'm preaching to the choir! That design with the snap-on straps on your mag pouches, if they become unsnapped inadvertently, will dump the mags on the deck. If you want snap-on-and-off pouches, you might consider reversing the strap design s0o they run in the other direction, from top to bottom, i.e. put the snaps down at the bottom of the pouch, that way if they do unsnap at an unopportune time, you won't loose the payload (mags). Of course, we assume the pouches remain hanging on the belt IF they become unsnapped when that's not wanted. What I'm describing has been around for a long time, and the design is based around sound tactics.
-
dye rubbing off on gun
Billsotx replied to Bronson's topic in Gun Holsters, Rifle Slings and Knife Sheathes
What color dye? -
I would also like to see your jig and if you have time give us a lesson in it's use.
-
Now we're missing some stitches. Primary Stitches! Sorry to hear that. Condolence to all his friends and family.
-
Finish washers Lowes or Home Depot.
-
Bar-B-Q ... does the stocks justice!
-
Belts - straight or curved?
Billsotx replied to Shorts's topic in Gun Holsters, Rifle Slings and Knife Sheathes
Shorts, Just build your lined belt as you normall would - glue the liner on, stitch it, finish your edges completely, punch your holes in the billet and slot for the buckle if applicable and the fold and holes for screws or install snaps - whatever - just don't apply your final finish - then case it and mold your curve. This has been around for a long time it's not a whim. Saddle makers have built breast plates like this as Brent mentioned for a long time. I've said it before - don't ignore what these saddle people are doing. I used to hang out in a saddle shop just because I might learn something. I can't build a saddle but I know how to watch one being built ... lol! Once you build one of these belts you'll know one when you see it. Just take a text drive - get a couple pieces of scrap, something to represent a belt in thickness and width, glue it up, stitch it, finish the edges - do it justice. Case it and mold it - then apply the finish. It's not wasted - you've got a mock up to block you belt loops - something else that not being done anymore because everyone is out to just make money. When you get back we'll have to meet down in Wilson County and get ol' Brent to bounce for a taco. I don't know if Carvajal Saddlery is still there in Floresville but it's an interesting visiting if it is. I'm not familiar with any saddle shops in Corpus. Of course there's always Yoakum but they think they have all the secrets locked down ... lol! I'll go feed the seagulls ........ -
Belts - straight or curved?
Billsotx replied to Shorts's topic in Gun Holsters, Rifle Slings and Knife Sheathes
I'm with Brent. You can mold your belts on a curve up to about 2 1/2 to 3 inches wide. Three is getting iffy. Build your belt right up to the finish application then case it. Don't drown it - case it - just like you were going to tool it. I see gear over hear all the time that's worked too wet and moisture or the lack there of is key in building good looking gun leather. After you case the belt lay it on the workbench and work it with your palms flat beding careful not to kink or bow it - go slow - if you cased it correctly you've got 20 to 30 mintues to mold it. Work from the center out toward each end. I have an arch marked off on my bench that I shape to so that I get some consistency from belt to belt - sort of a method to the madness. Once you have the proper contour let it dry 24 hours or more and then apply your finish. Bruce Nelson was probably the first custom leather smith to build curved belts on a large scale and he did that for all reasons listed above - comfort, kinking, stiffness, chafing, etc. It adds time to your build but it doesn't require a lot of leather and it accomplished the same thing as cutting it. The problem with cutting it is you have to always go back to a straight edge; if you continue to follow the curve of previously cut belts the curve disporportionately gets deeper and way out of line. -
Belts - straight or curved?
Billsotx replied to Shorts's topic in Gun Holsters, Rifle Slings and Knife Sheathes
There's a sea gull sailing around Parade Island calling your name girl. You've been gone too long Texas woman! -
Another source of foam that will work in a press is those floor matts, those big squares about 20 - 22 in. sq. with inter-locking tabs. It's textured on one side and that will transfer to the leather if you want a texture, and smooth on the backside if you want smooth. It won't last as long as gum rubber but it's inexpensive and it works.
-
My first holster
Billsotx replied to bruce johnson's topic in Gun Holsters, Rifle Slings and Knife Sheathes
Buce, There's nothing wrong with that design for what you're describing, especially is he's particial to that type. I'd think light and tight for horseback in my limited experience. Yeah buddy, I caught the keyword - "down" cow! Them pines and redwoods are slow to climb even with a steer on your rear ... lol! -
My first holster
Billsotx replied to bruce johnson's topic in Gun Holsters, Rifle Slings and Knife Sheathes
Bruce, Kevin pretty well covered it from what I can see. He's been building good gun leather for a long time. What he's telling you on those belt loops is good advice - gospel. You want those belt loops as tight as Dick's hand-band. You don't want the holster to move on the belt unless you intentionally move it - it should take some effort. It should look like a man attached to a gun. Also what he saying regarding the grip clearance. You "must" be able to grasp the weapon with a perfect firing grip right from the get-go. We're fond of saying if you can't get a firm and final grip on the piece then modify the holster or pitch the thing. Only your life depends on it. What's that worth? You'll not get a good fit, retention wise, with 11 oz. leather. As far as the retention strap tuck it in tight before you install the snap. That'll be one of the last steps if you're bent on a strap. At first you will want to have to fuss with it a bit to snap it because it'll stretch out all too soon. Along those lines, if you're presentation is done correctly you should knock down the snap before you start drawing the piece from the leather - that goes a long way to reducing stretch and stress on that strap and your leather in general. Sometimes when a strap stretches you can drill out a snap and relocate it and tighten it up - only time will tell on that one. Most people let them go far to long before they fix them or pitch them. It's ideal that you start it off real tight and have to work a little to break it in. It's main purpose is to keep the gun from falling out, and it might give you an edge to react if someone attempts to grab the weapon. No strap is going to stop a gun grab. As you know I spent most of my adult life teaching cops how to fight with guns and all my thinking is along those lines. We won't drift further into that here, it's not the forum. If you decide to get real serious about your firearms handling you've got one of the best training schools right there in your backyard - Thunder Ranch Oregon. Shootin' a small part of it. Being able to run and maintain your gear is what too many take for granted. I haven't been up there to TRO, but I know it's the still the same doctrine we taught down here at Mt. Home. You can't go wrong, and there's others of course but not a close to you. I know you value schools from all the saddle schools you've gone to, and you can better yourself with your firearms skill if you reach out - bottom-line, the gun's just a tool, the mind's the weapon. Email me off list if you want to get more into the training arena. Look forward to seeing your next holster. You'll never know how much you saddle guys taught me about building gun leather - it's appreciated. talk later, Bill