cjdevito
-
Posts
118 -
Joined
-
Last visited
Content Type
Profiles
Forums
Events
Blogs
Gallery
Store
Everything posted by cjdevito
-
Things I Made Today
cjdevito replied to cst's topic in Purses, Wallets, Belts and Miscellaneous Pocket Items
A discussion (and eventually a couple of how-to's) of imprinting leaves into leather.... http://leatherworker.net/forum/index.php?showtopic=4133&hl=%2Bimprinting+%2Bleaves -
Old post, but I recently talked to a friend of mine who's a tattoo artist about this very question. Turns out most tattoo 'ink' is actually composed of metal oxides. I have to wonder if these would (over time) discolor veg tan in much the way vinegaroon does. If applied as a dye you could expect little to no penetration, the color would just sit on the surface and would be prone to getting scratched off. I was specifically curious if white tattoo ink might work as a form of white dye, but after talking to my friend it seemed like the results wouldn't be anything worth pursuing.
-
Dying/painting White + Blocking Out
cjdevito replied to Milton Penflick's topic in How Do I Do That?
Brush is fine, but it's more finicky. You not only have to get the resist exactly where you want it and everywhere you want it, but you have to try to get it on evenly. If you brush it on heavier in some places and lighter in others more of the stain/antique will penetrate in the areas where you didn't brush it on as heavy. Which can look good, if you do it deliberately, planning out sections of the work where you want more penetration than others. But if you do it accidentally the final result will look streaky and uneven. It's one reason why it's often recommended that you resist with multiple light coats. -
From the album: cjdevito
-
From the album: cjdevito
-
I'm anything but a seasoned pro, but I heartily second Aaron's recommendation. I love my SK3. Best leather related purchase I've made.
-
I honestly love the RTC. It's become my go-to product for both finishes and resists.
-
Finishing Problems
cjdevito replied to ShawnM76's topic in Dyes, Antiques, Stains, Glues, Waxes, Finishes and Conditioners.
Yeah, I'm sitting here trying to figure out why the original poster's experience happened and I only have one idea. OP, how heavy was the coat of supershene you applied? I've actually done what you have, used the tandy gel as an all-over color with no resist and when I've done it, it came out very even. I'm wondering if you really used a lot of the supershene in one coat, that might explain what happened on your project, both the streaking and the milky bits. I'm just guessing though. You might try using a very light initial coat of finish, let it dry, then come back with a second coat. -
Finishing Problems
cjdevito replied to ShawnM76's topic in Dyes, Antiques, Stains, Glues, Waxes, Finishes and Conditioners.
I mostly agree with you, the exceptions being their two pro line finishes. The conditioning creme pulls up a ton of color, more than anything else I've tried, but it does give a nice finish. I usually use the gel and I don't have that problem, but I'm either using tandy's pro gloss finish or RTC over it most of the time (the fish in my avatar was done with RTC as a resist, tandy gel antique, and RTC as a top coat). I did just give Fiebing's paste a try for the first time this past weekend and liked the stuff; it's definitely more predictable in it's application than the gel is. Still, I used RTC as the top coat over the piece I antiqued with the paste and did get about the same amount of lift off that I would have expected if I were using it over the gel. Which is to say not much, but some. -
I'd be down for a NYC meet up at some point.
-
I sympathize. Last year I had emergency surgery on my left elbow and forearm after contracting flesh eating bacteria. They had to flay my arm open and cut out a great deal of the muscle there, which has definitely weakened that arm a great deal. Also left me with nerve damage in the last two fingers of that hand and my grip with that hand is a shadow of what it used to be. It gets in the way when it comes to leather work but I've mostly been able to work around it. I really have a hell of a time trying to walk tools but everything else I manage okay. If you think building up the shanks on your stamping tools will help I can make two suggestions, both from my familiarity with aquariums. The first, vinyl tubing, has already been mentioned.... you should be able to buy it in varying widths from any large aquarium supply outlet and can layer one size over another until you get the thickness you want. The second is to use two-part marine epoxy, used all the time in reef aquariums for a variety of purposes. It's essentially sticky, moldable clay that you can build up and shape any way you want and it hardens to rigidness in a half hour or so. You could build custom grips to fit your hand on any of your tools and it will hold up pretty well over time. Won't be the prettiest option - your tool handles will look like they're wrapped in white or purple (depending on brand) clay, but it really will let you build up the handle exactly the way you want to.
-
With the pro waterstains I find I have to use a damp sponge on dampened leather. If I don't, it goes on unevenly and much too dark. First time I used one was saddle tan and I made the mistake of using it full strength, end result was a dark red. The blue is especially bad at going on evenly without dampening first. I've had a completely different experience with the pro black than olds cool, though. That one I has gone on like a dream when I've used it, full black with no uneven-ness and no rub off.
-
There are a very few NYers here. I'm in Brooklyn.
-
Problems With Rtc
cjdevito replied to Old Chief's topic in Dyes, Antiques, Stains, Glues, Waxes, Finishes and Conditioners.
My own experience with it is that one coat will work, 2 is better, and 3 is overkill. I believe MikeSmith identified the issue, though - the fiebing's antique is not acrylic and the RTC won't block much of it. It does work very well with tandy's acrylic gel antiques, though. -
If you don't mind and still have the price list, I'd like to see it as well. I haven't heard anything further from springfield leather since I posted about it in january, so looks like I'll have to buy direct.
-
With the eco-flo hi-lites I find you have to first buff the hell out of them. After that, either spray on the finish or apply a light surface coat with a slightly dampened sponge. Once that tries come back with another coat or two. You'll still get some of the color pulled off with the finish, but you minimize it to a great extent.
-
Selling "kits" --- Clicked Parts ---
cjdevito replied to J Allen's topic in Leatherwork Conversation
I agree with Billymac. I'd be interested in seeing these. -
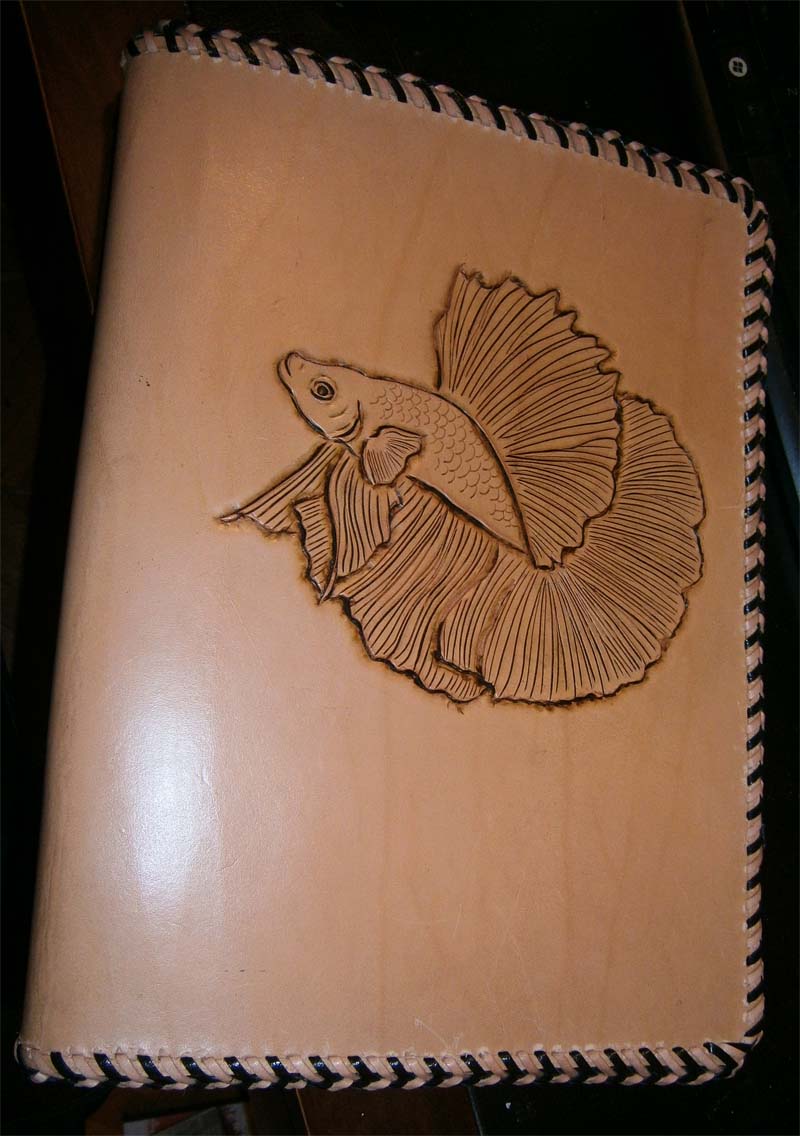
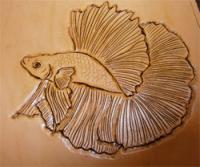
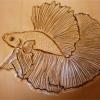
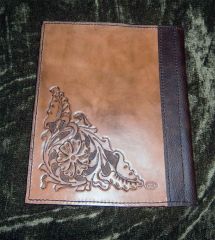
I honestly find that SuperShene makes a crappy resist when used with Tandy's gel antiques. Anything less than three coats of it just lets too much dye through, and even with three coats the resisted areas still pick up a bit of the dye color. Block Out is better with the gel antique, but again, I wouldn't trust it with anything less than three coats. On the other hand, I recently gave BeeNatural's RTC Sheridan Resist a try with the gel antique and it did a superior job to anything else I've tried. Two coats seems plenty, three almost completely stops all penetration into the uncut/tooled resisted areas. The carved betta in my avatar was done on undyed leather with three coats of the RTC followed by dark brown gel antique. Here, let me attach the full size shot so you can see it better. A lot of people here have low opinions of the tandy gel antique (compared to the paste made by Fiebings) but I've found it just takes experimentation to get the hang of. And using the right resist, and enough of it.
-
What did you use for the resist and the antique this time? Just curious. They also still sell the physical, printed patterns for a few bucks more. Convenient way to sidestep the print shop and/or the jigsaw http://www.tandyleatherfactory.com/en-usd/home/department/leather-craft-patterns/6033-00.aspx
-
Very nice Renee. For what it's worth I see a lot of things about this bag that you've improved on since doing that notepad holder.... the lacing looks neater, the tooling looks good, and you definitely seem to have gotten the hang of resisting & antiquing. Not that the notepad holder didn't look great, just that I can see visible progress in your work from that project to this one.
-
Tandy Leather Expedition Briefcase Kit
cjdevito replied to Hooper26's topic in Leatherwork Conversation
Sam Browne stud: http://www.tandyleatherfactory.com/en-usd/product/sam-browne-buttons-washers-1309-057.aspx The round stud goes through a slotted hole in a leather strap, slipping it in and out fastens and unfastens. If you look at the briefcase photo, the small middle strap between the two buckle straps is secured with a sam browne stud. Not sure offhand as to the actual pocket dimensions, but it's big. It runs the full width of the bag and about 2/3rds of it's height. As to how protected it is, it's an open pocket of mid-weight veg tan (the pocket is the same weight as the bag back). -
Tandy Leather Expedition Briefcase Kit
cjdevito replied to Hooper26's topic in Leatherwork Conversation
The buckles are actually used to open and close it, although it could be altered. As-is, though, the bag is designed with a sam browne stud in addition to the buckles... you could leave the buckles unfastened and just fasten the stud. There's also a full size pocket on the back you could use for things you want to get at quickly without having to go through the hassle of opening the buckles each time you need to access them. -
Tandy Leather Expedition Briefcase Kit
cjdevito replied to Hooper26's topic in Leatherwork Conversation
I have that one, actually. As well as his 'Small Patterns Pack'. His instructions file in both cases is actually a very good walk through and I wouldn't hesitate to recommend either. I just wish there was more out there. -
Tandy Leather Expedition Briefcase Kit
cjdevito replied to Hooper26's topic in Leatherwork Conversation
I agree with you. If someone out there wanted to try to put together patterns or even more advanced kits (say, unpunched base leather pieces cut to the pattern & instructions) I'd likely be first in line to buy them. Unfortunately for me there's no tandy closer than several hours away, and no local leatherwork resources I've been able to find in my area. So for me the learning process is just read then try to do and learn from experience as I go. So anything that provides a sort of 'guided learning' experience is worthwhile in my book. -
Tandy Leather Expedition Briefcase Kit
cjdevito replied to Hooper26's topic in Leatherwork Conversation
I'd hoped to snap some photos of the kit for you WScott over the weekend but I've been ill and just haven't found the time. I'll try to describe the gussets for you, though.... First, it's a double gusset. From front to back you have the front of the bag, then the first gusset, then a divider, then another gusset, then the back of the bag, then a full size pocket on the back of the bag. Each gusset is three pieces, two sides and a bottom. The sides pieces actually wrap around the bottom corners of the bag and cover a couple of inches of the bottom on either side. Then the bottom piece of the gusset attaches between them, and probably covers about 75% of the length of the bottom (with the reamining 25% being the wrap around ends of the side pieces). As for an opinion on the overall kit, I'm not sure yet. Just as an FYI, counting straps and tabs there's over 30 pieces of leather in this box. It's a degree of complication far beyond anything else from Tandy I've seen. I think at this point my biggest reservation about the kit is that lots of slots and rivet holes are already cut, locking the purchaser into using the exact arrangement of straps and tabs and anchors that the kit intends (unless they're willing to cut other pieces of leather to duplicate the pattern parts without the slots etc). Most of that arrangement is fairly sensible, but I've noticed a few things I wouldn't have done on my own that I'll have to live with if I make the kit as-is. Chief amongst them is an alternate fastening point under the handle to turn the briefcase into a backpack; not a feature I'd ever use. It does include a couple of tooling patterns. A fish (that doesn't appear at first glance to actually fit the dimensions of where it's supposed to go), a geometric design and a flaming skull. Because nothing says you're a professional like a flaming skull on your briefcase, I suppose