


bruce johnson
-
Posts
4,412 -
Joined
-
Last visited
8 Followers


Recent Profile Visitors
59,470 profile views


bruce johnson's Achievements
Leatherworker.net Regular (4/4)
-
 I have been out of that loop for several years. At that time though the Lone Star Guild accepted members for the purpose of being able to enter the contests at IFOLG shows.
 -
I could sure see that shape from the side view being a staple puller. I have a few reservations with that though. With that hollowed out edge in front, I am leaning away from a staple puller. It would be more durable if it was solid in the front. I was also thinking a push type stitch groover or gouge but the raised offset would make that really hard to line up and use. The flat tail and the gouge-y looking front make me want to shy away from a creaser. Back side staple lifter/front edge gouge? I guess I am more of "here is what it probably isn't" vs. "this is what it is" but sometimes that's where I end up. Not a common leather tool and not a can opener that some old guy had in his tool set to open his lunch.
-
How Did You Start Your Business?
bruce johnson replied to DavidL's topic in Marketing and Advertising
I have to admit that I cringed when I saw this thread from 2014 resurrected. It was probably the most moderated thread in the history of LW.net. Keeping it on track, personal insults, comments, You'd think differently but no. I think everyone of us on the moderation team had a hammer in hand. For old time's sake I read the whole thing again. I stayed out of the fray back then but Heck, it's time - here is my story. I learned leatherworking and doing my own repairs in 1985 from a family friend who had a saddle shop. I merrily went along doing my own hand sewn repairs mostly. In 1993 I broke my pelvis in a horse wreck and one of my "real job" clients was a Tandy manager. I didn't have much to do that winter and leathereworking was walker and crutch friendly. I took classes, made a few belts and small stuff. As I healed up I kept at it. I got to the point I was making a headstall a day plus a few other things. Once I could compete again I'd sell them off my saddle horn at ropings and cuttings. Still all hand sewing and carried it on for a few years as an unofficial business. In February of 2000 my first wife was diagnosed with an aggressive form of breast cancer. Competition all but stopped and we stayed close to home. I made some association awards and had a little word of mouth market for my stuff. I needed to get past handsewing everything and bought a Tippmann Boss stitcher for $1600. At that time anything else that stitched leather was either wore out or $5000. I was exposed enough at that point I filed for a business license and resale number as a sole proprietership. Jan 3rd 2002 my wife passed away after 3 days of hospitalization. Due to combination of factors, I was left with a little over $90,000 dollars in medical debt the insurance would not cover and the hospital would not write off. In spite of making a salary of $45,000 a year the hospital was gracious enough let me pay their $90K over 2 years. All of the sudden the little leather side hustle needed to be a serious money making entity. I put it out that I would do awards, semi-production stuff, whatever. I had a few outlets that really stepped up. I needed a powered machine and Ferdco had an Adler for $2500 and could give me a month to pay it.. I told Ron to send it and literally had no idea how I was going to pay it off. The day it came I got an order for $5000 worth of association awards from a rodeo group. They wanted to send a $2500 deposit. The Lord provided. The first year seemed like it wasn't going to happen to that debt paid off. I had no credit cards and a debit card to one account that was usually low. I had gas cards and some weeks the groceries all came from the Shell station minimart. I ended up with some big award orders that winter and accounts that were steady with belt orders, custom rope bags and cans, purses, etc. I did repairs that maybe paid $5 but that $5 more than I had. I did a lot of barrel saddle rebuiilds from the tree up. Rundi and I started dating but nothing was going further until I got that debt paid. Some dates were her stitching belts on the Boss and edging while I stamped. That next summer and fall were good - minimal sleep at times but the light at the end of the tunnel was either daylight or a train engine coming to run me over. At the National Finals Rodeo that year I drove and Rundi was going to fly in the next night. I went to the trade show that day and check the sellers there who had my stuff. Both had good sales so far. The first guy had a few thousand and the other lady had about $7000 and wondered if I could do a few custom rope cans before Christmas - yes I can! I maybe made it 20 feet out of that booth before I started bawling like a baby. It was frickin' paid off with a few thousand and two months to spare. Along that way I had made every pricing and time estimate mistake in the book and a lot that never got written about. In that two year time period, I had bought exactly two tools total - #2 Osborne edgers that I wore completely out. Rundi and I got engaged that night. I continued to do awards, more new saddle builds again, and a bunch of rope bags and rope cans - enjoyable stuff. I had a website and Johanna here did my first one. It was not easy to do them back then and she got me up there. I was expanding my shop tools from absolute to need-to-have bare minimum to the nice-to-have and better quality. I had an old guy next town over that had been in the leather and tool trading business for about 50 years at that point. I learned a bunch from him. I'd end up with some duplicate tools from buying sets that sat in boxes on my shelves. April of 2010 I put 8 tools on a page of my website and they all sold. Several messages - "If you get more, I am interested". Next day 8 more and they sold. I expected the tool deal to grow to maybe 10% of the leather business. By three months it was 30% and by the end of the year monthly it was 50-60%. I was still working full time and something had to give. First was new saddle builds, then bulk award orders, saddle repair. The last thing I gave up was rope cans, I loved doing them. If you did a Google search then for custom rope cans it was either me or Ellensburg Saddle that were always swapping first or second listing. It was a hard personal decision for me to stop rope cans (in an ironic note - our friend now Julie Baugher was Ellensburg Saddle Shop back then). The leather tool business has grown from a website page to a fully dedicated website. We have done trade shows for several years. It started as refurbished vintage and used tools only. We still do that for sure. It is a big part of the website business. Now we also carry a few selected lines of new tools as well. We have now handled approaching 18,000 tools and about 5000 stamps. My business has always been a work in progress from leather repairs to rehab to entry fee money, a serious support leg, a legitimate side business, and morphed to this now . I retired from my day job this past year and the tools are a full time thing for me now. The guy who got me started in 1985 sewing splint boot and skid boot repairs buys tools from me now. The guy who bought the first tool from me - still buying. I have a few people I can float business ideas by who tell me their honest thoughts. I would not be here without any of them. I have been beyond blessed. I didn't "stay in my lane", I followed what seemed to be the trends(or necessity) as I saw it for me at the time and it has worked out. -
Old school Weaver creaser (like a Randall)
bruce johnson replied to ChaChi's topic in Leatherwork Conversation
Maybe I am missing the question here. The set up is like every other creaser. Mount on a bench, hole for the tension cables to go through, and a base for the foot pedal for the tensioning cables. If you are talking about the extra rollers - the single and double line use the same bottom roller. The domed top roller mates with the convexed bottom roller. The roller pairs are swapped out, not all mounted at once. I haven’t had a Weaver through here for several years but it look like those socket heads are unscrewed and the rollers are swapped. as far as motor, you want something with some torque. It might have a hole in the pulley/flywheel for a hand crank too -
Fender repair...
bruce johnson replied to Brokenolmarine's topic in Saddle Identification, Restoration & Repair
I missed this string earlier but here's the grumpy old guy evaluation. "I did get to do some Clean Up work on the blevins, removing old glue, rust, staining... We'll be reusing the old beat up ones. They tell me they can't be seen, So why not." Plain and simple - because the pins are corroded and partially eaten away. At some point those pins may fail and even though this is a favor to a daughter's friend, shit gets real if that happens. She may have said not to change them because they can't be seen. If she lands on her head, somebody else may not be so casual about it. Yeah they can't be seen when riding but they are seen now. The only reason they haven't been seen is that she didn't care or know enough to look at them once in a while. Pretty basic part of a routine maintenance and safety check. This is like being asked to change the hubcaps and finding the brakes are about shot. Seriously, for the cost of stirrup buckles - change them out. You have more cost in leather than a set of new buckles. Have I seen worse, yeah. What would I do if somebody dropped this repair off and said don't change the buckles? Even in the black hole period of my life when nickles counted, I would not have done it. They would get a call about "hey, we need to change the buckles". If no, they would get the pieces back to go somewhere else along with best wishes finding a shop that would do it. -
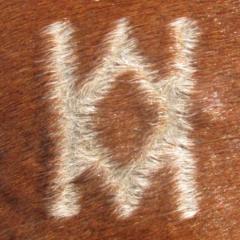
Helps to evaluate leather thickness in places that a thickness gauge can't reach.
-
I have no idea of the maker and their intended market. Can this be done better? It sure can and most of the suggestions and comments so far are right on. We can all agree on that. It may have come from a kit, may have been clicked out in shop with the holes as part of the die. Simple and easy for most anyone to put together. It's easy for us to evaluate and make a better wallet, but that is why we are here to help the OP. That said, there are some makers who target a market who prefer simple, rugged, or rustic. There is a guy who puts together wallets with copper rivets, lots of them. He has a market for that look. There are belt makers who don't slick edges. Seriously, people intentionally buy jeans with holes in them, why not an unslicked belt? Bag makers can leave raw edges. I carry a pony express satchel my wife made in Aaron Heiser's class at a show - heavier hardware, raw edges, etc. I got 4 or 5 comments in every airport last year. She made a turned seam construction purse at the leather show in Las Vegas, all of the inside seams are bound. Yes, the inside seams that nobody sees but the user - that is a high level of finish you don't see much. Is the simple look their target market for wallets? Are they selling upper end stuff and this is the base? Not uncommon in business to have a bare bones version to drive a higher end more finished product. The bottom price sets the top price. Lot to consider here.
-
Recommended Source for Hermann Oak Tooling.
bruce johnson replied to Latigo Smith's topic in All About Leather
Have you looked at Panhandle Leather? That's another source and good feedback. Personally I have been dealing with Matt at Maverick for at least 25 years (before it was Maverick). They knew what I liked and I never had an issue with any side being misrepresented that I bought from them. If I said "I need clean" it was clean. If it was going to be fully stamped I told them and got a probably B. If I said I need the crappiest side of 8/9 you have to test splitter blades and tools - it was crappy or had some test pieces cut out of prime areas. There is something to be said for that kind of a relationship. Since I transitioned to leather tools, my wife started doing leather work. Her source? Maverick. Good people, fast shipping, and no surprises for her either. -
As a follow-up, at one time when I was doing a lot of semi-production work I figured up the cost per hit of my one-pound Jueschke maul. It is on some posting on this form someplace. On a rope can cover between beveling, border, and basket stamp or floral patterns, I had at least a thousand hits. At that time I had done about 150 rope cans. On that $90 maul, it had cost me 0.06 cents per hit. Good tools generally pay you back in either dollars or ease and pleasure of use.
-
With no disrespect, anything will be a step up from a rubber mallet. The soft face of the rubber mallet absorbs a lot of the force so it doesn't transfer to the leather. Once you upgrade there are a ton of choices. There is the mallet style, not as popular as the maul but available. Materials may be urethane, versions of nylon, or rawhide. There are fans of each. If you look at mauls, there are a lot more options. If you've never used a maul they look a little intimidating. You are hitting a small object with a round object. The learning curve goes pretty fast though for most people and once they use a maul they don't go back to a mallet. You can buy mauls in all kinds of quality and price levels. I have had mauls through here from $15 Amazons up to $225 custom-made's. Head material could be a whole topic by itself – urethane, nylon, Delran, other exotic plastics, rawhide all have fans. Some materials are more slippery than others, some are more durable, and some just have a certain "feel" that a person prefers. Straight versus tapered – again fans of each. With the straight mauls you need to hold your elbow higher than you do with the tapered maul. The tapered mauls for many people are easier to use for longer runs, especially if you've had shoulder injuries or just have large projects. With the tapered maul I can have my elbow at my side instead of up level with my shoulder. That makes a huge difference. Handle material is another factor. Wood and plastic handles tend to transfer more vibration than leather. That can also be a fatigue issue. There are some rubberized sort of handles or foam covered that are okay. I prefer the stack leather handles - less vibration and better grip for me. Finally handle shape – everyone has a favorite. I like a handle shape that is fairly narrow behind the head so I can almost ring my thumb and index finger to grip it. Then widening out past that so the maul doesn't slide up my hand as I use it. Some like a big fat bulb at the end, some like a gentle taper. It's all personal preference and definitely one size does not fit all. Everybody has a favorite, some for me just fall right into my hand like an old glove and others feel like I'm holding the fat end of a bat. You get into weight of the mauls and that is another factor. My belief is that everyone tooling leather needs a 1 pound maul. That will do most stamps with little effort. You may find with larger basket and geometric stamps you want something heavier. Then the 1.5 or 2 pound mauls fall into place. You may find for small faced sharper stamps like seeders and bar grounders that a lighter maul is easier, and I like a 12 ounce maul. I sell mauls from Wayne Jueschke. I do that because I believe in them, I've been a user for probably close to 20 years. The first maul I bought from Wayne is still in great shape after thousands of hits. Like pretty much all leather tools I was a user for a long time before I became a seller. I like the handle shape, I like the material, I like the balance of the Jueschke mauls. Other makers to consider for better quality mauls would be Barry King, Clay Miller, and Ed LeBarre. I know that Barry and Clay make mallets as well as mauls. I'm not sure if Ed makes a mallet. Hope this helps, – Bruce
-
If i get this tagging right @Johanna will know. You know those ads featuring the most interesting man in the world? In my humble opinion Billy 2-Shews has a claim to that title. Before the days of phone plans I had a couple $100+ phone calls with him, and several chat strings. You never knew when you'd hear from him and it was worth it everytime. Interesting factoid - Leatherworker.net started because of Billy 2-Shews and a pizza baking mama from Ohio.
-
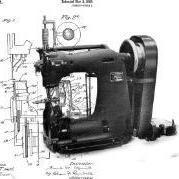
Info on machine. Looks older and huge.
bruce johnson replied to bigsig11010's topic in Leather Sewing Machines
As Wiz said - American Straight Needle. Old, heavy, and no new parts available. The guy who taught me a lot about tools repaired and restored a lot of the old needle and awl machines in this area. His advice to me was to never buy a needle and awl until he was gone. He'd worked on his last one. He said when if I did buy one, get a Landis 3 and second choice a 16, Champion deep throat next, and run away from the Americans. Sam had a shop in Canada for a while. He had a pretty good story about a guy who moved up to that area. He tried to sew some saddle skirts on an "ol' wore out loose straight needle sloppier than the back end of a gummer Holstein cow". The skirts got chewed up and that guy vowed to hand sew the rest of his life, and according to accounts - did that in fact. You may have read about him doing this. -
Jason, First off, just a tip. linking your pictures to outside sources like Imgur is a bit sketchy for some people to click on. Attaching them here on this site where they show up in the post will get more interest. I have had enough Palosanto edgers through here to say those are really suspect. I don't recall any being that rough on the bottom side. that looks unfinished, really unfinished. It looks like they did the first step, they stuck a handle on, and sent it on. Does the groove actually stop before the end of the edger? if so, it's like a flat chisel. Depending on what the top profile is, it could sure be scooping and not cutting a round over.
-
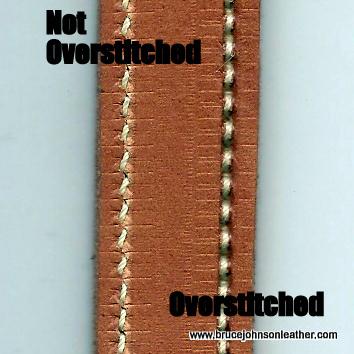
Yes, but only in the sense of the older hook and awl machines. They have an awl that prepunches the hole followed by an needle that carries the thread. They can pull a tighter stitch by nature and a cleaner looking bottom stitch. I know that is not your question but it is my answer. As far as the closed needle machines I don't think that one particular machine will shine above the others once you get to decent machines. The variables of thread size overall, one size smaller thread in bobbin vs same thread top and bottom, needle size, type of needle (straight vs slanted), stitch length, leather thickness and consistency, chrome tan will pull in tighter than veg tan, bottom feed dog, tension top and bottom, and probably more all affect the appearance of the bottom stitch more than the model and mechanics of the machine. We have three closed eye machines - Ferdco 1245, Ferdco 2000, Cobra 26, and have had others. I can make one look better than the others if the others aren't set up optimally. I can make them all look the same too with the changes above. What does improve the bottom stitch on all of the closed eye needle machines? Overstitching. Roll the bottom side stitch line with the appropriate size overstitcher. It sets the stitches, rounds the stitches between holes, and gets as close as you can get to the top side appearance. It is the 2 minute time difference that makes a big appearance difference. This example I did on the fly several years ago. I purposely put an old needle back in the machine to get some "blowout", probably 207 thread, 9 or 10 SPI, same size thread top and bottom. hard leather, heavy presser foot pressure. I think it looked pretty rugged right out of the machine. The right side looked the same as the left in the picture but was then rolled with an overstitcher. All it needs after that is the presser feet marks rubbed out to be pretty nice appearing stitching.
-
Thinner leather - grain side only. Skirting leather - heavier on grain side/lighter on flesh side. The fibers on the grain side are denser and slower to wick through. The flesh side is looser and wicks in faster. Butt and top of the back is denser, lower belly and neck is looser on grain side so that is a factor also. Just because a piece of leather sucks in the oil does not automatically mean it is dry. Likewise oil that sits and does not absorb right away does not mean the leather is well oiled already. Apply light coats and wait. I applied my oil to nearly every project with a fine napped paint roller and paint tray. Dip the roller in the oil, roll off the excess on the ramp, and apply. I did 3 to 4 belts side-by-side, spur straps arranged in a single layer, and most other small projects. If I needed to overlap for wider projects I just butted up the next roll to the last one, I didn't overlap and over oil that section. It will wick over to the dryer areas faster that it will wick away from an over applied area. After a few times you develop a feel for how often to wait and decide to reapply and how much oil to leave on the roller for thinner or thicker leather.