bruce johnson
-
Posts
4,409 -
Joined
-
Last visited
Content Type
Profiles
Forums
Events
Blogs
Gallery
Store
Everything posted by bruce johnson
-
Mike, For the simpler things like card cases, checkbooks, or simple wallet insides, I make mine. Otherwise I use unpunched TLF inserts. That old mission grain whatever-it-is is pretty durable. I bought a sackful of the Chaylor-Finelli inserts last year. I have durability issues. Also I think they are harder to use. The sewing margins are pretty narrow on some. Some of the designs you almost need to sew from the inside to keep from sewing something shut. I have had one tear out. Not sure what I am going to do with the rest. My experience.
-

how do you decide prices for lessons?
bruce johnson replied to Rod and Denise Nikkel's topic in Leatherwork Conversation
Rod and Denise, A guy I took a carving class from also teaches carving privately at his shop. I think he said he charges somewhere in the neighborhood of $300 a day (an average day's take), and expects about 3 full days. He devotes 100% of the time to the student. During this he does not work on any of his own orders. It would be a little different learning to make trees. They would need to use your equipment. Also it is much like a saddle school. In a couple weeks they may pick up some "how-to's", but dang sure are not going to see it all. I think what to charge really depends on what they expect to learn, how long a time period they have to learn it in, and how much previous experience they have. I dodged Denver yesterday and drove up to Sheridan. I spent part of yesterday and today talking to Luke at Sheridan Leather Outfitters. We talked about the real demand for handmakers of trees. Although giving away trade secrets is a bit of a factor, it is probably not a huge factor. I think making trees should probably be on the order of saddlemaking. If they expect a lot of hands-on training they need to pay totally for that time taken away. If they have experience and want to look over your shoulder and discuss things as you do the work, that takes less time away. If they want to work, and pick up on the job training over a longer period, pay accordingly. My thoughts. -
Ed, They get leather from all over. I think the archives are public. You only have to join to post and maybe get into the "philosophy section". Try www.thehcc.org. I think the forum and archives are set under the subtopic of The Crispin Colloquy. They are mostly all in Delavan WI this weekend toasting and celebrating the St Crispin's Holiday.
-
I am starting this thread kind of as a travel planner. If you go to another shop, and learn something or do "market research", it may be deductible too. Feel free to add other places worth the stop. Currently I am in Denver at a go-along deal with my wife at a conference. Yesterday we went up to Brighton Feed and Saddlery. A lot have probably seen their ads in the magazines. Give this place a definite "honey, we are going to Brighton" if you are in the area. Fine folks to talk with. They are not kidding when they say they have 450 saddles. They have the room of factory saddles like everyone else. Also a bunch of McCalls, but that is expected. The new area is pretty cool. Where else do you see new saddles by Platte Valley, Cary Schwarz, William Hape, Pedro Pedrini, and the last saddle that Chester was reported to work on, with his son William? Brain freeze this morning, but also a couple by a pretty handy maker in Sheridan (Dutch sounding last name). The semi trailer out back has the used. Forty of them - Dale Harwood, Kent Frecker, and others. It is like going to museum, but you can sit in 'em. We spent a few hours there. The devil is in the details. They also have a good book section, spurs, bits, and the usual assortment of silver jewelry. I can't have too many books, and she can't have too many earrings.
-
Ed, That will probably be my next machine if my business continues to trend in the two directions it is going. I am on a boot and shoemakers forum, and those guys use them and talk about them quite a bit. The post beds can be roller foot or walking foot, belt driven or gear driven feed mechanisms, and old or new. I see a need to sew down inside bags with them, and some repair work. Sounds like the Mitsubishi ones are good, and I think it was Lisa Sorrell who posted good experiences with an Artisan. The old ones range from good to wore out scrap. A patch machine may be able to do what I am looking for also. Seems like other than an Adler that handles heavier thread, most of the patchers are light sewers. Patchers are pretty common, but so are the wore out ones.
-
murphys soap.to clean saddles?
bruce johnson replied to broncobuster's topic in Saddle Identification, Restoration & Repair
I sometimes still use Murphy's for the biggest reason that it is what my grandfather said to use. I much don't like paste saddle soap for the original cleaning of most pretty dirty saddles. I use it for a lot of things, but not cleaning saddles. I find the paste even on my hands doesn't lift much, takes some fairly warm water to really rinse very well, and leaves a pasty wax. It gets into nooks and crannies, and is heck to get out for me. If not Murphy's, I like the glycerine soaps. Being in northern California, a lot of guys prefer Bentley's liquid glycerine soap. I have used it, or the bar glycerine with about equal results I guess. Some folks are really touting the Leather Therapy products, but I haven't used them. I rinse a lot and want the saddle to be pretty clean before I go back and condition it. It may take 5 or 6 soapings and rinsings to get it there. -
narrow double toed presser foot
bruce johnson replied to esantoro's topic in Leather Sewing Machines
Ed, The stock narrow center foot that came with mine is smooth on the bottom. I have not used the blanket foot. My old buddy gave me another narrow presser foot. It was an Adler foot with the ridge behind the needle guide hole on the bottom. The ridge pushes your stitches down and recesses them deeper into the leather, especially if there was no groove made first. He elongated the hole to make the allowance for the different needle realtionship/foot relationship of the Adler vs 2000. I like the look especially for straps and saddles. I groove deep anyway. It is my favorite foot for that work. The only problem is for doing tight corners like a 90 degree at the corner of a checkbook. When you turn the work, the ridge lays behind the corner and makes an impression. -
Ed, I mostly sew with the peasant color, but also need black, brown, or white on occasion. I use the drill to wind bobbins for the most part. On some of the off colors, those bobbins might be used to sew a single strap or repair, and then sit for weeks. I have seen no problems with using them later. I sewed with a brown last night that was probably wound a year ago. They are stored on a pegboard, but not in direct sun. To wind my bobbins with the drill I use the stem out of an old bobbin winder. One of the winders that tension up against the drive belt. Chuck it, pinch the thread for tension, and hit the trigger. A few seconds and I am good to go. I find I can wind them faster and more even on the drill than setting them up and doing them on the machine winder, even if I am sewing at the same time. One of my friends used to wind bobbins off his top spool, after thread came out of the lube pot. I tried it, but didn't see a difference if the bobbin thread was lubed or not. Doesn't have to pass through and around as many things as a top thread. Some of the guys who have used more machines than me may have some insight on doing that. I do use the lube pot on top thread, even with prelubed thread. It was explained to me that the lube helps to cool the needle and prevents it from sticking to the needle and not looping underneath, resulting in skipped stitches. Those needles can get pretty hot, and I did notice a difference running the top thread through the lube pot. Anybody got any idea of the shelf life of thread? I know storage conditions and uv exposure probably play a big factor.
-
Clicker dies, either with a shop press or clicker, or made with a handle for small circles. My wife makes coasters, and handcutting could reliably get about 75% to be round looking. With a $35 die she gets them all round in less time. For my big circles like a rope can or rope bag, I got the biggest divider that Osborne lists (12"?) and use that to mark, I then cut with a round knife.
-
thigh length for a saddle tree
bruce johnson replied to Rod and Denise Nikkel's topic in Saddle Supplies, Tools & Trees
Denise and Rod, Thanks for the cantle pics. That clarifies things even more. I also have say a great big THANK YOU to both you and Rod, and also Dennis Lane and Blake. What I thought I knew about saddle trees 6 months ago is not even a blip on the radar screen to what I know now. My sincere thanks to all who have contributed questions, comments, and knowledge. It is appreciated. -
Wolvie, I have got tools like that too. If they are pitted, they still might be OK depending on the detail needed in the stamp. As far as replating them, I wouldn't. That I think is an issue with some of the new stamps - too much plating filling in details. Some of the old guys reportedly would remove the plating off their stamps to improve them. On the rusted ones I got, I did the soft wire wheel on a be4nch grinder or cream of tartar deal and was fine. If you use them enough, they don't seem to rust again. My old buddy would treat tools with kerosene if he wasn't using something. A few taps on some scrap or swipes if a hand tool and good to go. I have some of the old McMillens along with some no-name handmades and older things, just handling them keeps them fine. Rust will freckle wet leather, but once they are cleaned up, I have not had a problem.
-
OK, This tip paid for my dues on another group years ago. People still are amazed at it. I astound those who come to my shop. I rarely hit a round punch anymore, even for one hole. I chuck a normal mini-punch or maxi-punch into a benchtop drill press. Sixty bucks for a basic at Harbor Freight, a hundred gets you a cool one at Sears/Orchard Supply. Put a piece of cutting board plastic on the table. Turn on, pull the handle. It effortlessly spins its way through the leather and backs out with equal ease. Even on thin goat or thick wet sticky skirting. It leaves the hole CLEAN on the bottom, and slightly burnishes the hole. With a keyless chuck, changes are a snap. These punches are also cheap enough you can have 2-3 of the common sizes set up, and then just change the whole punch handle/tube out. Don't have to worry about one handle and changing tubes. Some of the more high tech presses have laser crosshairs to line up on your registration marks, and a fence to set and keep the holes centered down a strap or edge. Standard warning - WEAR eye protection. Once the tubes fill up, subsequent punchings are ejected in random directions. I find them in coffee cups, casing water, etc. Open mouth once when talking.
-
thigh length for a saddle tree
bruce johnson replied to Rod and Denise Nikkel's topic in Saddle Supplies, Tools & Trees
Denise, No reason I can think of why we can't post whose trees these are. They are just measurements and no mention of quality. I will go back and add that too in a bit. As you said cantle and fork angles will change the thigh length. Until there are some standards among tree makers, we are just going to have to ask a lot of questions when going from one maker to the other. You hear makers and riders talk about "this saddle has a 16" seat, but it is a long 16 or a short 16". Thigh length I think is the factor here for those saddles. Another question comparing the two Wades I have. Does the cantle shape and width make a difference on how far forward the cantle points come? The Timberline has a more oval cantle, and yours has a round cantle. Seems like your cantle points come a little more forward, the fork angles seem pretty similar. -
thigh length for a saddle tree
bruce johnson replied to Rod and Denise Nikkel's topic in Saddle Supplies, Tools & Trees
David, I went back and edited the previous post to include the cantle heights. I also added another new tree at the bottom of that list I just got. The Rowell listed is a "rebuild Grandad's old saddle" deal. It is stripped down to the tree and groundseat. -
Greg, I was thinking kind of along the same lines. I guess there is some kind of pliers looking thing with round jaws that some tool makers use too. I have heard that some of the Weaver or Beilers rein rounders are off enough that it takes a pretty good machinist to get it right. Might mark up the ferrules too. I haven't talked Hansens lately about one either. My wife usually picks stuff up, and I rarely see them except at shows or around town. When I missed the one, Tim told me to keep looking and when I find one, let him know. They wanted a machinist to duplicate it. If you could send me some pics, that would be great. I'll give Bob a call, too. Is Keith Pommer the guy who lives by Sioux Falls?
-
Greg, They look really good, and set off the silver well. Do you have a source or alternative for a ferrule crimper? Brownie and I were kicking around ferrules the other night. Neither one of us has seen one for a while. I let one get away from me a couple years ago, and haven't seen one around since.
-
looking for the Ben Veach "fast buckles"
bruce johnson replied to bruce johnson's topic in Saddle Supplies, Tools & Trees
Ken, Thanks for the link. That was him, and I just got off the phone with him. He has sold the rights, and no longer has any control of them. Intersting talk. I like those old guys. I am still looking for more if anybody has some. -
Doughnuts for everyone!! (except Clay's dog). Actually my specialty is carrot cake, and I can clean and reorganize a leather shop pretty well. I can apply Leathersheen with the best also. Thanks for the fine comments on my patterns, and I will continue to push the envelope with the stamps. Now to just not be intimidated sewing on the 2000. Thanks to all. Rundi
-
Drilling through the front lacing on a tree?
bruce johnson replied to Rod and Denise Nikkel's topic in Saddle Construction
Rod and Denise, Being only an occasional driller until recently (advice of Greg, thanks), I can share what I have seen on some of the repairs. A few (high front jockeys) have had only one hole drilled through the bar, the other string was over the bar edge. Same as you sometimes see on trees with a shallow place below the cantle ear, and only one throught the bar. I have seen others through the very edge on the front that have rotted out. barely caught any wood at all, and the rawhide let go. I haven't seen too many that had been drilled into decent wood where the wood has rotted out that the rest of the saddle wasn't pretty thrashed as well. I believe I heard (someone check me) on the Dale Harwood DVD that he sometimes drills throught the lacing and has not seen a problem from it. Likewise on repairs, I can't recall one that I had seen that was through the laces that was an issue. Usually if there is a gap, it was there from the start or laced with nylon and not very well at that. -
looking for the Ben Veach "fast buckles"
bruce johnson replied to bruce johnson's topic in Saddle Supplies, Tools & Trees
Mike, A little more info today. I talked to a medium sized shop that uses (used) the Veach buckles a lot. Apparently the patent and rights were sold to a company. That company has reportedly decided to keep them as "their" thing for now. It is not Circle Y. Apparently this guy and a guy fairly high up in CY are friends, and that is how Circle Y got started with them. The trail is kind of cold at this stage. It would have to be someone big enough to justify keeping something like that for themselves. Equibrand (Dale Martin), maybe Cactus, someone like that I would have to guess. It will come out eventually. Meanwhile I am thinking to go to Superior buckles. I think a while back Greg said we need to harass Sonny Felkins enough to make 2 hole ones. I have just enough of the Veach to finish this deal, and then I am out of the 2-1/2". -
looking for the Ben Veach "fast buckles"
bruce johnson replied to bruce johnson's topic in Saddle Supplies, Tools & Trees
Mike, Ben Veach was working in Brackney's Western Store in Greencastle, IN. When I got going on this deal, I used to order them directly from him at the store. I read somewhere (ShopTalk?) that they were looking for someone new to make them. Now the numbers I have for "Fast Buckle" and Brackney's are coming back as disconnected. When I google "fast buckle" it leads me to Circle Y saddles. They are listed as standard on some saddles. Calls to Circle Y are a dead end. Nobody there knows anything nor do they know within who might. These buckles are pretty handy for some people, but they do require a keeper. They are made from round rod, and ride over a latigo pretty smoothly. They also twist in a shorter radius than Blevins. I have some barrel racing clients who like them. I have also put them on grand entry and a couple utility saddles for timers and flaggers because they can be changed quickly. They use the same hole spacing/size as Blevins which is nice. My next option will be to have them try the Superior buckles if I can't find a source for more of these. -
Clay, Wow, sounds like no fun, I just get things like dislocations, rotater cuff tears, and the latest was viral encephalitis (probably not West Nile). Since Rundi caused the problems with misuse of a tool, she is definitely on the hook for either a breakfast or beverage. BTW, I just finished stamping a shaving kit, and I am sitting here drinking my 3rd cup of coffee, eating a chocolate drizzled rice crispie treat, and bacon. If you want to take Rundi up on that drink before Sheridan, we will be in Denver starting next Friday for a week or s0. Before we go, I am trying to sneak a soft purse in for her with that snowflake pattern on the yoke. I have some water buffalo calf that is nice, and some peanut brittle colored elephant that would work.
-
I am looking for the Ben Veach "fast buckles" (stirrup leather buckles) in SS and 2-1/2" width. I have enough 3" for now. I have some barrel racers that like them. The contact numbers I have for the store that he worked at and other listings are all disconnected. I remembered a while back that I read they were looking for someone to cast them, their previous guy retired or something. If someone has some spares to sell or has had recent contact I would appreciate it. Thanks.
-
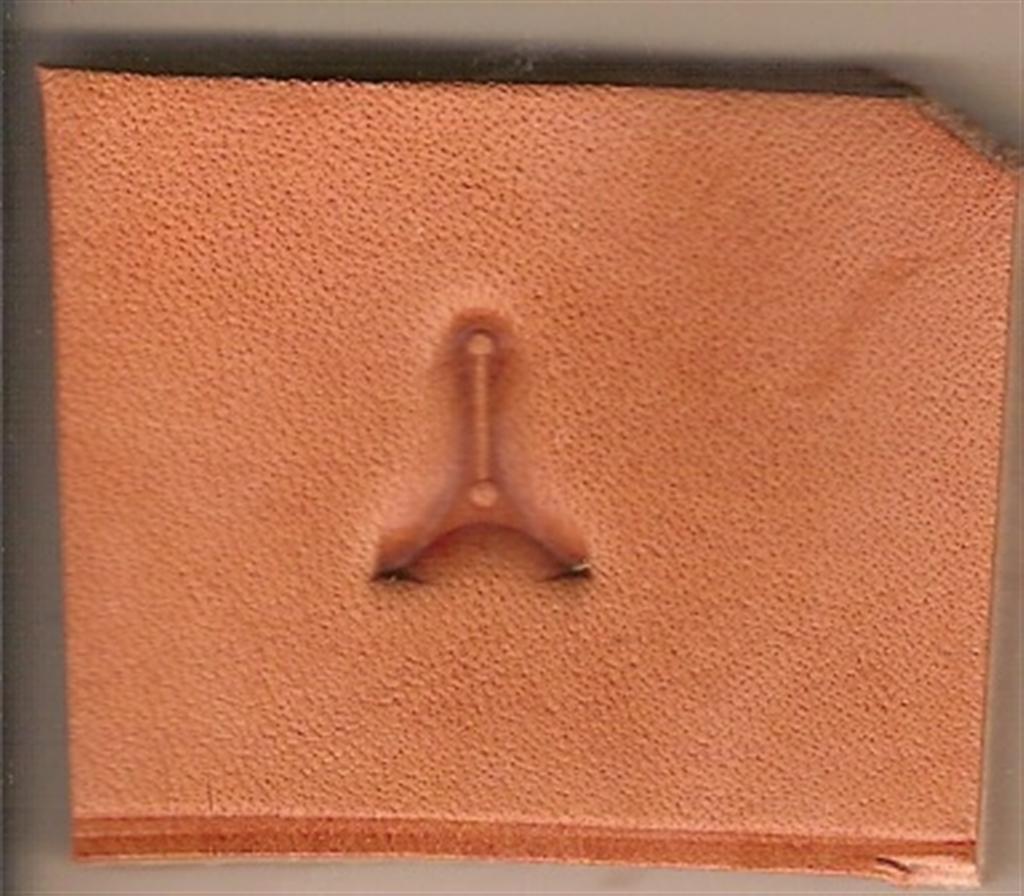
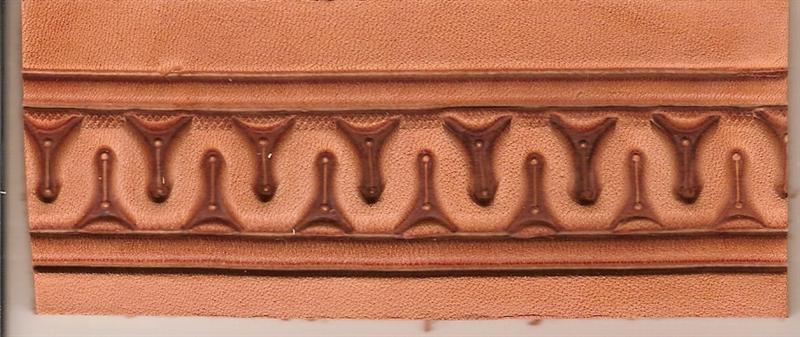
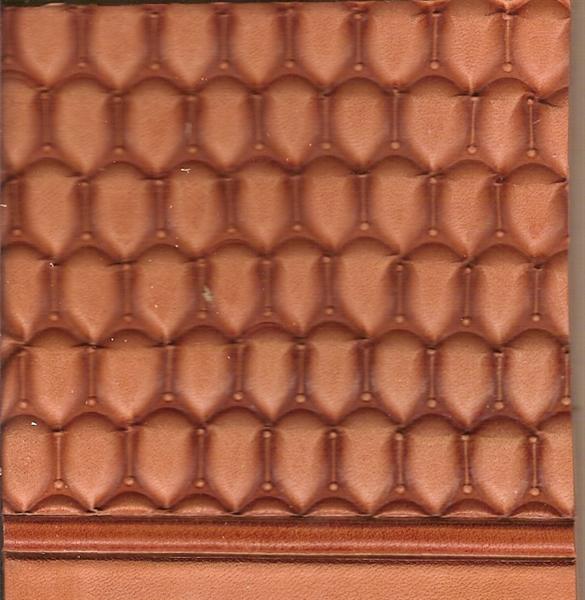
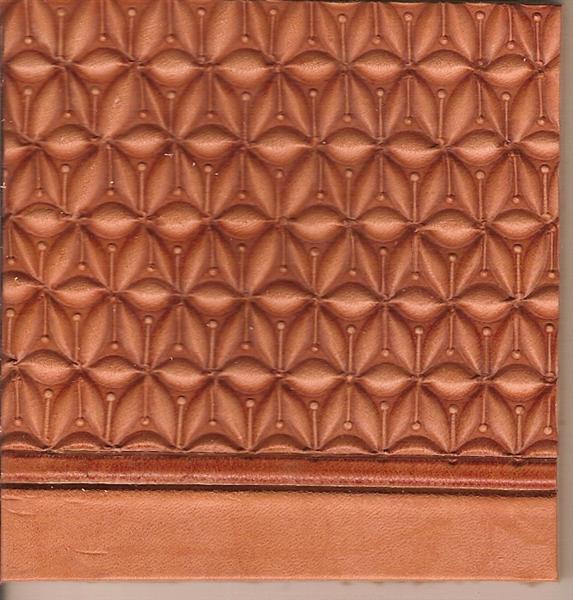
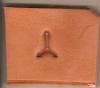
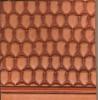
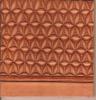
This is the only meander stamp I own. I generally don't care for them. A buddy sent me a scan of some stamping tools Don Butler used to make. I saw a likeness of this stamp and remarked that it was the only meander that looked like I might want. Few days later this old McMillen showed up on ebay. It has a little different base (arched rather than flat) which I found interesting, and the little groove with the dots at each end was kind of cool. It arrives and my wife has it open and played with it before I got home. She showed me what she did. If you want to do something with a tool that it is not designed for, give it to my wife. I am attaching a scan of the stamp, a quick border done with it, and her two renditions of a geometric pattern with it. BTW, the geometric patterns cover some acreage in a hurry. No real names for them yet, but I am calling them the "Rundi shell" and the "Rundi snowflake".

-
raised needle holster or stirrup needle plate
bruce johnson replied to esantoro's topic in Leather Sewing Machines
Ed, What I meant was roller GUIDE, not roller foot for the Juki 441/2000. My 2000 came with two guides from Ferdco. One has a single roller that follows scallops and contours. The other guide has 2 rollers and is good for straight runs. These are not roller feet. Sorry for the confusion. I had been talking to a guy who had a post-bed machine, with a roller foot. I can only see limited use for what I do, but he uses one for inside purses and that sort of thing.