bruce johnson
-
Posts
4,410 -
Joined
-
Last visited
Content Type
Profiles
Forums
Events
Blogs
Gallery
Store
Everything posted by bruce johnson
-
I am sure that HO and W/C are still soaking hides. If they weren't Dr Dan from Shoptalk would have it cover page news and probably put out a special edition. He was Johnny on the spot for a few other rumors that proved out to be true lately. They are right though, that nobody in the US is doing double shoulders, or at least was at last count. Regarding the stretch marks on double shoulders, that just comes with the territory on shoulders sometimes. Hides behave the way they did on the living beast. The head is going up and down all day with eating and chewing. Backs don't move much. Flanks move a lot. Some of this can be used to our advantage. For instance, orienting a checkbook, photoalbum or planner so the fold is parallel with the way the cow moved makes it easier to stretch and make that fold. Trying to fold a strap from 4" off the centerline of the back is tighter fibered and might crack at a buckle fold. Some customers think you are using dry crappy leather when they see a stretch crack, when in fact you are using a prime part of the side. Obviously warm water and working the fold can prevent cracks, but you have to know what the hide did. Bellies are thinner usually and expand and contract all day with breathing, filling up on feed and water, and emptying. They are stretchy and not as tight a fiber. Flanks are constantly moving, they are the most stretch. Some guys take it pretty far. The rumen fills up the left flank. Throughout the day on some cattle, it can stretch and contract a lot. I had one OLD saddlemaker tell us that in the old shops the foreman would cut stirrup leather for the good saddles only from right sides. They thought the left sided straps had a little looser fiber and more stretch. Old men are generally wise, and I try to follow that rule out of respect (and a good story). It is pretty important in saddle work to use a part of the hide that will work for the application. Some things need to have little stretch like leathers and riggings., Others need to mold by stretching and compressing like a swell cover. Others just sit there. Some will curl if cut from too loose area. You really learn how sections behave doing that. Shoulders are kind of unique. They flex front to back and are looser fibered than further back. They also cup over the shoulders and wrap around the neck. The lower aspects are getting down into the areas of the upper leg with some motion. It can get looser again. We cut this off the animal and are taking a bowl and making it flat. Because of the looser fibers it compresses together and makes a flatter piece. The excess can however make these ridges that are often called fat wrinkles. There are probably more wrinkles on the neck of a skinny old butcher cow than a fat steer. I think it is more a factor of excess skin than fat. Another factor are the heavier cattle and Brahma influenced breeds that get a little (or big) hump in their shoulders. Some of these shoulders are sold as "V cut" shoulders. They will have a V shape were a slice was made into them to provide relief so they could flatten out the piece. I have seen some shoulders in the flyers at times that even had a piece cut out of the center, that was excess hump leather cut out. Because of the natural stretch being front to back and less stretch side to side, most belts cut from shoulders are done crosswise. If the shoulders are long enough, they won't get into the looser ends with most belt ends. also because the wrinkles (compression) is linear with the belt, there will be realtively less stretch. When I was doing a lot of wholesale work, I did a lot of photoalbums and planners. I liked shoulders because I could orient them so the wrinkle worked to my advantage when making folds. Make the fold parallel with the wrinkle. Also the fat wrinkles on those sort of things added interest to the piece if they weren't tooled. They usually tooled OK and weren't noticeable when they were. That leather will also fold and compress and stay pretty flat. I could wet and stretch back leather OK, but when the fold was flattened out again, it wouldn't compress back and stood up as a wrinkle. Minor issue usually, but why cut hard firm leather and fight it when shoulders were less expensive and worked better for that application? There are some that argue that belts shouldn't come from shoulders. we should be cutting them out of backs where the leather is firm, less stretch on the billet ends. Probably true to a point. In reality, I have stretched faster than any belts I have made for myself in the last several years. In fact, would welcome one that gave me about an inch every few years. My next Wranglers might move me into the $2 upcharge. Probably more than you wanted to know about leather, but I am waiting for finish to dry and then set some snaps.
-

Sewing machine comparison and Selection
bruce johnson replied to bar-j's topic in Leather Sewing Machines
I started out with an Adler 205-64 when I upgraded from the Boss. It was a great machine, but had a couple drawbacks. It didn't have needle guide or center presser foot. It had a feed dog underneath that came up through the throatplate. The hole in the feed dog was fairly small. If I got much deflection with heavy leather (like reusing holes sometimes, or sewing tunnel loops onto back cinches), the needle would miss the hole and hit the feed dog. Then I for sure snapped the needle, and on occasion broke or bent the feed dog. Finally got a heavy duty feed dog that just snapped the needle. I now have a two year old Pro 2000, and a Juki 2000 when Ferdco was still using the original Juki frames. They have the bigger hole in the bottom (diamond shaped). I am with Ed, not sure how much that helps, but the center presser foot dang sure keeps the needle from deflecting much, and my backside lines are straight. I have not snapped a needle in either 2000 yet. Curiosity question for the other 441 clone owners. I have never seen the underneath of any but mine. What kind of feed dog do they have? Also for the different Artisan 4000 models, I know the head is lighter in one of the 4000s, is the feed the same in both of them and the 3000? -
Dave, You asked in the thread on clickers about my bell knife skiver. I started this thread to keep things on track and more searchable in the future. I bought a bell knife skiver last spring. I have a Landis handcrank skiver, and at one time I had a pair of 3-in-1s sitting around too. I still have the Landis, and have it set up for skirting, great job getting the meat off the edges of ground seat buildups. Poor for softer leather. Originally I was going to buy one of the new skivers that Artisan. Ferdco, and others all have a version of. A friend told me of Melanie Machine in LA. Kind of a warehouse of leather machinery. I called and talked to Arnold Kay, the owner. This is an aside here. I told Arnold what I was looking for. He had the new versions, as well as a couple used Fotunas. We talked on the phone for a while, and he told me to just bring my leather and come down. He would make the 700 mile round trip worth it. In talking with other guys who have these, they universally told me that a bell knife skiver will not do a good job on vegtan leather unless you have a top and bottom feed. Those were a little over my price range. I threw some vegtan into the sack anyway, and hit the road. You have to realize that I hate driving south of the "grapevine", so Arnold impressed me with his knowledge. Melanie Machine is a museum of working leather machinery. He has one guy that pretty much just walks around dusting machines and cleaning all day. It is not your typical equipment warehouse. Arnold has been in the business for a good while. At one time he had a shoe factory kicking out 5000 pairs a day for Sears. He knows machines, and when the domestic shoe business dried up, went into machinery. He has stitchers, flatbeds, a ton of kickpresses, bandknife splitters, and clickers looked like you could crush a truck with. Arnold had a couple skivers set up for me, the new one and a used Fortuna. They both did the job on chap leather and latigo. I asked about doing vegtan, and he said no problem up to about 11 oz with the bottom feed. The key is changing the feedwheel. They all come with a stone feedwheel standard. It does a fine job feeding the softer leathers. On vegtan if it slips a little, it glazes up the wheel, scorches the backside of the leather, and won't feed. Exactly what everybody else told me it would do, including some other sellers. Arnold put in a steel feedwheel. It has grooves like the feedwheel on handcrank sole splitter. The presser feet for vegtan have rollers in them. With this combination, it feeds well. I ended up and bought the Fortuna because of the heavier casting and ease of changing the wheel. I was planning to haul it hime and save shipping. He wouldn't let me. He wanted his mechanic to change out a belt and a few springs, and tune it up. Stuff that would have taken more time than expected, so he shipped it. Good guy to deal with. I use mine for skiving edges of chap leather for seams in bags and purses. I use it to split mulehide and latigo for horn wraps. In fact I had some really heavy mulehide I split a strip and the skiving was usable also - 2 for 1. Biggest thing I use it for is thinning edges evenly on vegtan for projects. I can use heavier leather than I might for planners or checkbooks, stuff like that. I thin the edges down so they are not so clunky looking and then I put in my folding grooves. Then I have a little more meat in the tooling area than with thinner leather, and can tool deeper. I can use up more scraps that way from heavier leather. Other than a side of thin leather for wallets, I haven't bought any tooling leather under 7/8 since I got the skiver. The skiver is pretty easy to use. I dealt for the stone and steel feedwheels, and the presser feet it looked like I would need when I bought it (have used tham all too). I have never changed out the wheel, the steel will feed the soft stuff too. The feet change out easily, and adjust easily also. By sitting down with Arnold and trying the machines, I got some tips and tricks that probably aren't in the manuals too. There are still some things I handskive, but between the Landis handcrank and the bell knife, not much.
-
Elton, I use a hydraulic shop press. About all I plan to click is small stuff, no saddle parts, so it works for me. A piece of steel on the bed with a piece of HDPE cutting board for the base. I put another piece of steel big enough to cover the die on the leather and crank away. You only need to let off enough to slide the work out and another one in. The detracters of the shop press say that it is like jacking your car up every time. I guess it would be if one is practical thinkingly challenged and lets the it go all the way up every time. I find that 4-5 strokes will cut through my skirting, less for thinner leather. I have a 20 ton. I also use it for press molding cases, back cinch tunnel loops, stuff like that I couldn't do as easily with a clicker. I also use it for embossing plates. The cost difference from 5-20 ton is not much, but the beefier frame on the 20 ton was noticeable. When I researched this, I had a guy who I trust tell me he had broken a lighter jack, and I expect it made a mess. I trusted him and forked over the extra $40, figuring that $40 wouldn't cover my time to clean up hydraulic oil and the leather it would ruin. Then there is that whole other bad words and falling from grace issue that would probably happen too. I have dies from Big Sky and Texas Custom Die. The TCD dies are very good and I got them quickly. They were 4" round and square dies for my wife to convert my scraps into coasters and $$$. I have latigo and cinch carrier dies I ordered from Big Sky along with a few spur strap patterns. Good prices and quick shipping for off the rack dies. Good quality also. I wouldn't hesitate to recommend either place. I picked off a few spur strap dies on ebay a couple years ago also. They are the shorter dies (3/4") but work well also. Another money maker and project is that the tab end of spur straps also double as key fobs (more $$$). In the words of my good friend Go2Tex, "one man's scrap is another man's key fob". Dave, I was looking into clickers a while back, and then kind of priced myself out of one (got a bell knife skiver instead). Both Artisan and Ferdco are now selling hydraulic clickers in a few sizes, along with the other big time clicker folks. I found that the price difference from small to large clickers was percentage wise not a lot. There are a bunch of used ones around, but with what they weigh, you don't just go pick one up and try it out. There are some happy campers with the Tippmanns, and some that aren't. Not being able to move the platen looks to be a bit of a handicap to me with those. Tippmann referred me to "satisfied customer" who offered to sell me his small one. Not sure where you are, but Melanie Machine in LA had some big hydraulics. I think that the guy from TN who sells used machinery here probably has a line on some too. For saddle parts, I would talk to someone who clicks out their pieces like Crates or one of the other factories and see what they are using for clickers and die makers.
-
Contest Drawing - Thank you
bruce johnson replied to Regis's topic in Special Events, Contests and Classes
I got my modelers yesterday. Thanks to Jim and TLF for donating these. I REALLY did NOT tell Clay that the the modelers I use the most are ball modelers and the undercuts (deerfoot?). That's what I got, thanks mi amigo. I ceremoniously dumped the old ones and played Taps on harmonica. That old gray plastic coating had chipped off long ago, and the duct tape handles were not the most attractive. -
YR, Nice work. A couple questions though too. Whose trees are those and what is the coating? In the pics, it almost looks like there are seams in the covering, but then it is a smooth finish? Any special concerns with the finish peeling while you are working it or anything? Also on your seat on the finished saddle it almost looks like there is a separate piece used to finish in the cantle dish. Is it my eyes, or just the way the tooling makes it look? Welcome aboard, glad you found us.
-
Freak, I haven't had much of a problem. I got some raggy kind of leather once that looked pretty fuzzy afterwards, but that has been about it. The label tape defintely will mess up your day. It grabs and doesn't want to let go. Carton tape has been my choice for quite while. It may make the backs just a bit fuzzy with loose fibered leather, but I haven't had the tackiness problem some talk about, and even the fuzz lays down. I mostly line things anyway. I have used 3M, Office Depot, and Staples tape with equal success. I can normally peel them all off in one piece, starting at a corner. Office Max tape was a bit more fragile. It shredded some and I never tried it again. I had more of a mess anytime I have glued the backs, like with rubber cement to posterboard or Xray film. I do so many things with basket and geometric stamping that I have to do something to limit stretch. I used to do my basket stamped belts without taping them. I would have to allow 1/8" in width for stretching. A size 34 belt would gain 1/2 -1" in length depending on the size basket I used and the leather weight. I have taken classes on floral carving where we never taped the backs and didn't get much if any stretch. I think what tools you are using makes a big difference. I used to not tape my skirting, thinking that the heavier leather would resist stretch. It took a fully stamped saddle seat to convince me otherwise. That thing grew all the way around, and took some finessing to get it to lay back in.
-
I am not a computer guy, and had dial-up plus at home before. Good connection speeds were 24. At times I got 14.4. I went to Verizon's cellular deal about 6 months ago maybe. I got the choice of a USB setup or the card. I went with the USB so I could plug it into my PC at home (since trashed) as well as the laptop I carry. At work I get smoking speeds, and am very happy. I can download emails quickly, and was able to watch live feed video from the snaffle bit futurity and you tube. At home I am in a different service zone. I get much faster service than before, but the youtube takes time to load, and the horsehow videos are chopped. The advantage of the USB service was proven to me last fall. I pulled off between Midwest and Kaycee WY (remote) and had 4 bars and fast speeds from the side of the road. I would have them prove what it can do at your place, if it works, great. I live within almost eyesight of town now. The only highspeed involves a dish or antennae, and hardware and setup costs. We don't want to sink that into a place we are renting. The ironic thing is our landlord is one of the guys who developed DSL and bringing it to the masses, and we can't get it on his property. Go figure.
-
(resolved) It's kicking me out again
bruce johnson replied to Rod and Denise Nikkel's topic in Feedback and Suggestions
Johanna, It is doing it to me intermittantly, I am not messing with Beaverslayer's hat and I left the tinfoil union suit at home. Will duct tape work?? Denise, As some may not know, Denise is a retired veterinarian. I am sure she has done the deceased feline incantation (we all have), but may not have as ready an acess to the makings now. -
I am a groover. I groove front and back. One of the skills to be learned in handsewing is to make the front nice and even. Everything in a line, even spacing, and same angle awl holes. Then when you can make the back the same, the next level has been achieved. With good handsewing you shouldn't be able to tell the front from the back. It takes a lot of practice, riding that stitching horse and building muscle memory. Go slow, and really concentrate on even spacing and awl angles on the front. Run a wheel in the backside groove and make each hole come out in the dimple back there too. After a while you won't need to do that anymore. It ain't a race. Go slow, and gradually a rythm will come. Speed follows that. The Stohlman book on handsewing is the best instruction here. The best advice for keeping the awl coming out in the groove in back is to have the piece held solidly. I think a stitching horse is necessary if you are going to do much, and especially fine work. Keeping the groove close the jaws will minimize deflection. Using a sharp blade is paramount. There is only one blade I know of that comes ready to use, and that is from Bob Douglas. The others need reshaping, honing and polishing for me. I don't know who all is making good horses now. I have one that I think Ken Allen in NM made, but haven't heard of him for a while. An old Irish harnessmaker spent an afternoon with me several years ago. He made himself "ta home" and took a rasp to my horse's jaws to thin and taper them and make them more user friendly. He took my bad awls and made darts from them. He then whipped off 12 to the inch stitching by eye. I saw some good stitching horses at Sheridan Leather Outfitters a couple months ago that someone locally was making. Not sure who else is doing them right now.
-
Sewing machine comparison and Selection
bruce johnson replied to bar-j's topic in Leather Sewing Machines
I think it would feed it OK. You might need to back off tensions a bit. I have sewn some deertan cow on my 2000 and it did fine with it. Art?? -
Sewing machine comparison and Selection
bruce johnson replied to bar-j's topic in Leather Sewing Machines
My thoughts based on your constraints. You need the 3000. I have Ferdco's 1245. It is an awesome machine, it will do what you are looking to do up to a point. A few things that a flat bed won't do as easily. It will not do gussets in saddle bags as easily as a cylinder arm. It will not do thread over 207 I am thinking. That may be enough, might not. The 3000 will do heavier thread and the cylinder arm is more versatile. You can buy more "tack friendly" attachments for the 3000, like stirrup plates, feet, etc. You can make or probably buy a flat bed attachment to make the 3000 a flat bed when you need it. The ends of my breast collars would be pushing the limits of the 1245, it is midrange for the 3000. Either way you will get a servo motor, so that is not an issue. Neither is service and support with your choices. Tippmann's Boss used to be the entry level machine. It held its value pretty well, and when it was time to trade up, it brought back most of the original price. Almost like using it for free. I think the 3000 has taken that spot over now. If you decide later you need more reach and decide to get an even heavier stitcher like the 4000 or Ferdco's 2000, you won't take a bath on the 3000. It would also make a dandy heavier machine, and get a flatbed to do the lighter stuff. If your business goes that way, it is nice to have two machines setup for different weights. -
FarmerDave asked about this in another thread. There are several methods to prevent stretch in leather that is tooled. Some leather stretches more than others, and that can be due to hide quality and tannage, where in the hide the piece is cut from, how thick the side is etc. Other factors are degree of moisture in the leather, the tooling pattern, and type of stamping or tooling done. Some geometrics will really push, and some florals, not much. Personally I use carton sealing tape in overlapping layers. It is important (I think) to use only carton tape if you use clear tape. Label tape has a much stronger adhesive and will be harder to pull off. I have used Scotch and Office Depot brands, and have seen little difference. I have also used masking tape. It works too. Other people use contact paper similarly. Many of my pieces are large, like a briefcase or ropebag. The tape is handier to put on and take off for me. I put the tape on before I wet it, and have not had a problem with it coming loose. I usually remove it after I have oiled the pieces. In the past I have rubber cemented leather to kraft paper, posterboard, and Xray film. They all do OK, too. The problem I have is that some of these are pretty unhandy for me to maneuver around my stamping rock. Some people also glue down to plexiglass, but I have the same problems with bigger pieces. It all comes down to the size of what you are doing and how big your work surface is.
-
FarmerDave, There are several methods to preventing stretch. I am going to start a new thread on that in the "stamping" section.
-
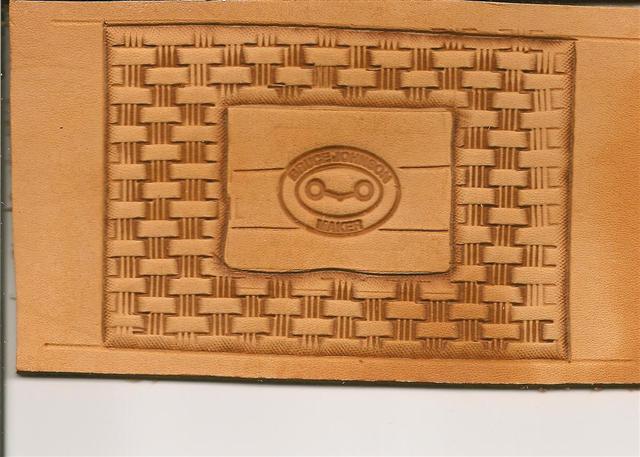
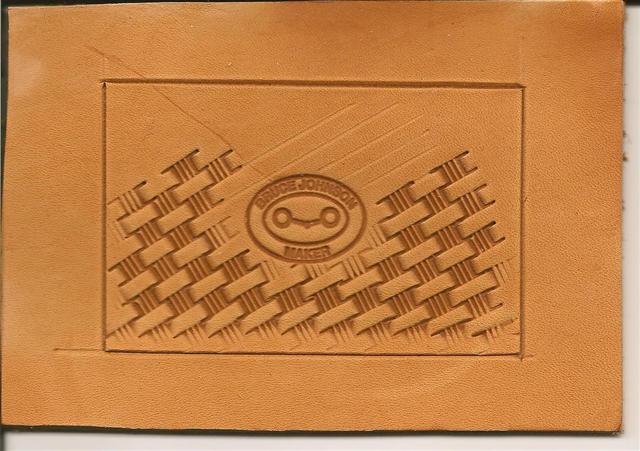
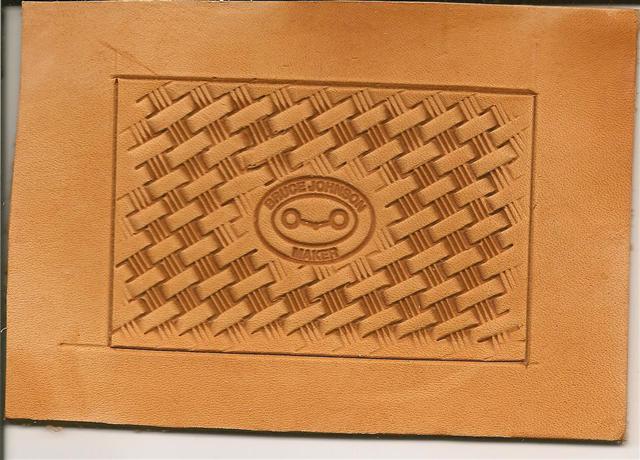
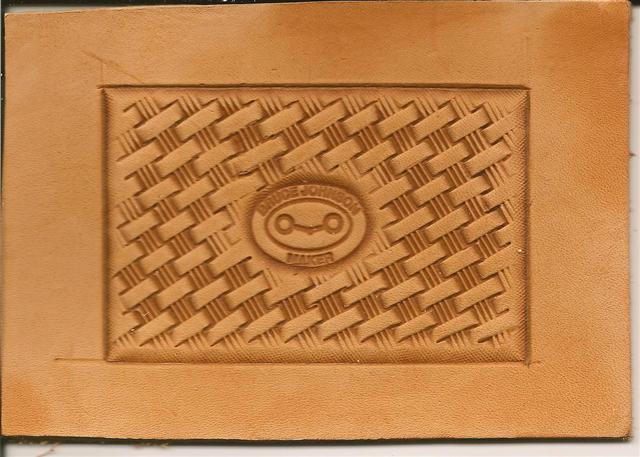
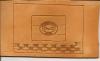
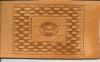
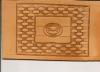
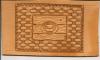
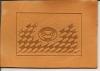
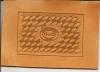
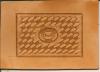
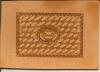
On this pattern, I generally do it with either a horizontal basket pattern or my larger block and geomtric stamps. I find it follows the "flow" of the hotizontal lines better. The first picture shows the stamp centered, and a cut line border around the makers stamp to resemble a board sign. The first few rows of baskets are also in place. On this pattern I try not to fade the stamping into the sign area too much. I want to make a distinct definition of the sign to make it appear to be standing above. The second picture shows the stamping pattern completed. It also shows a few mis-hits on the baskets. I didn't tape the back, the leather stretched, and I kept having to push it back to square. I took two minutes in the penalty box for that. The third picture shows everything beveled. I stood the beveler up a little more around the sign. I purposely made the lines around the sign a bit wavy to appear "rustic". In the last picture I have stamped the border and detailed the wood. I used a small matting tool to make knotholes, and chips out the boards. I used a stylus to add the appearance of woodgrain, and the tip to put in the nailheads. I ran a stylus through the seams of the boardss to lightly round them over and then lightly ran a skwivel knife over that trough to make the illusion of a distinct seam. There are some chatter marks showing up on the corners of the sign from the beveler. I would go over those and stamp them out. Another 2 minutes in the box.
-
I think it was Pete who asked how to do this pre-crash. I posted this little demo the night before cyber cardiac arrest. Here goes again. I used some scrap I had, didn't case it very well, and here it is. I do this a couple different ways, and will demo this one first. In the first pic I have centered the makers stamp, and started the pattern. I usually stamp a row at a time, and start at the top. For no particular reason, I started this one at the bottom. Once I have stamped up to and kind of around the makers stamp, I shot some faint lines to guide the stamping on the other side of the makers stamp. I stamped partial tipped impressions around the cut border and the makers stamp to fade them in. In the second picture I have filled in the pattern. In the third picture I have gone around the cut border and makers stamp with beveler. You can see that it took out the crisp outer line of my makers stamp. In the final pic, I have gone around the makers stamp and cut border with a border stamp. To crisp up the makers stamp and re-establish the outer line, I carefully reregistered the makers stamp into the original impression and tapped it.
-
Hilly, I have used the ProCarve for several years, and like it. It contains an antifungal, and I was having mold problems before I started using it. I have not tried the new Ecoflow alternative, and my TLF guy doesn't know for sure if it is antifungal. Does anybody know?? He was out when I last ordered, so I have yet to try it. I really started using the Procarve after a couple guys from down south told me that gear they made from leather that had been cased in Procarve failed to grow mold even on the finished product. Whatever the antifiungal is (reported to be a eucalyptus derivative) remains in the leather enough to slow mold growth? I am a little old-fashioned I guess. Most all of my stuff has been cased. I tape the backs, wet it up good, wet it again in about 10 minutes, and bag it for 8-24 hours. That leather (doesn't matter whose it is) will cut better, stamp cleaner, and give me better color. Ocassionally I have to do the Tandy class quick case, but the results are never the same as if I had let it sit and really soften, even out, and the fibers swell. It takes some palnning ahead, but the results are worth it to me. A few reasons I can think of as to why your leather seemed to dry quicker with casing solution than without. The amount of moisture may be the same, but the CS water has lower surface tension and penetrates faster. That water doesn't evaporate any faster, but will penetrate to the deeper layers faster, leaving the surface realtively more dry. The other may have to do with the leather. Some tannages with more oils hold the moisture in the upper layers, while the CS water penetrates that faster.
-
I sent a copy of the ebay listing to a tool guy. It is probably a Eureka pattern channeler. It is designed to edge and cut an angled channel with one one pass.
-
I sent a copy of the ebay listing to a tool guy. It is probably a Eureka pattern channeler. It is designed to edge and cut an angled channel with one one pass.
-
Luke, It is on ebay, and the picture of the working end is pretty out of focus and probably not the best angle to show the working end. I suspect it may be a shoe makers tool of some kind, probably is a variation of a channeler. The ebay pic shows a tip on the shank almost like a common edger. I am not finding anything quite like it in my Salaman book, Dictionary of Leather Working Tools. There are some sort of similar looking channelers. It is an HF Osborne, so that narrows down a time frame on it. It is not the run of the mill tool for sure.
-
geometric design using Wayne Jueschke's tools
bruce johnson replied to cjbleather's topic in Stamping
Carl, I posted a geometric pattern my wife did with a McMillen meander stamp. Someone else did post a picture of some work with one of Wayne's block stamps. I have about 4 or 5 of Wayne's block stamps, a braid stamp, and a propeller (3 point snowflake) from him. You used the right adjective - "intricate". Big Wayne does some great stamps and is good to deal with. I'll be calling him after the first of the year (new tax year) for some more stamps. Got my eye on a few. -
want to build a drawdown stand
bruce johnson replied to Timbo's topic in Saddle Supplies, Tools & Trees
Tim, The angles on the top of the wooden ones I have made are 90 degrees (45 per side). At that time 90 degree bars were the standard. I padded the top of the forst one with carpet only. Issues - the bars racked on it. Second edition I added a piace of old 1/2" saddle pad at the front and back. Then covered it with carpet. It made a pcket for the rock of the bars to sit down into. Much more stable. Do it like my second. -
Ed, I see, said the guy who didn't read closely. I missed the part about you changing the feed dog too. I was visualizing my Adler's toothed feeddog beating on the bottom of a slotted throat plate. You might need to grind a bit off, or if it has the elongated screw hole like a toothed feed dog, just lower it more. It is strange that it seems to require less bobbin tension. You would think the pull of the takeup arms and tensioners on top and the bobbin tension on the bottom shouldn't change. Listen to what the machine is telling you it wants, it doesn't always read the "book". I don't see a big difference between the oval or diamond hole in the smooth feeddog on the 441s. Biggest problem I had with the Adler was the smaller round hole in the feeddog. The 205-64 doesn't have a lower needle guide and the needles will deflect on some hard leather or following old needle holes in curled leather. When I used a bigger needle and it deflected even slightly, it missed the hole, made a spectacular sound as the needle snapped, and sent you looking for the end. I had been forwarned of that happening, and heard the stories of not finding the needle end. It rolls around in the race, makiing grooves in something that ain't supposed to be. It can also bend or break feed dogs, so that needed to be checked too. Regarding the oil hole, mine get changed enough that oil spot gets hit.
-
Ed, I have never had to change the presser foot height on mine when I change plates. Your setup with the Neel machine is pretty different than mine, so you might need to. My edge guide is also way different than yours. The Ferdco guides are not a low profile guide, but I usually am sewing with a right foot with the stirrup plate, and that does limit the effectiveness of the edge guide. I am usually sewing closer than the the foot width. Your feed dog system on the Neel and mine on the Ferdco are way different. Mine is smooth and has a diamond-shaped hole to bring the needle into line as it passes the hook. It does not skim the throat plate. My slots line up on all the plates the way they came, so I never had to mess with them either. The screws for my plates are pretty thin headed. If you can't find them at a decent hardware store, the sewing machine folks can ship them to you. Surprising how many screws and bolts can be bought at the local hardware store. Regarding your question in another thread about your feed dog coming up through the slot in the throat plate, that is very reminiscent of my Adler 205-64. I think you will have to change settings to go with a new setup. FWIW, I liked my Adler a lot. I am happier with two 2000s sitting here than one 2000 and the Adler. I would set it up with the smooth plates and leave it. The one thing we have in common is that my raised plates don't have that center oil hole either - never noticed until you brought it up. Your current setup is so different than mine, and I think talking to Ryan and seeing what he says about heights and grinding would be prudent. As an aside, my 2000 is pretty similar to the way Artisan sets them up. You can download the manuals off Artisan's website. Happy Holidays,
-
Kevin, Thanks, I think the beveling really sets this off. I used to see this stamp used with no beveling and it looked like the rope was pressed into the mud. I never liked it much. Ropes are dimensional. I have done this so much now I go by eye. I scribe an outside border line lightly first. I set the first impression and line the next one up on it and eyeball the border lines. I have taught a few people to do this type stamping. The big key is to maybe stamp 3-4 impressions, back off and look to make sure the angles and borders are lining up. Kind of like setting posts. Back off and look at the whole line once in a while. You really can't get too far off in 3-4 impressions, and can slide the next couple back to whatever you need to get back in line. If you go a long ways, then it is pretty obvious. The big key is not to try fix a mistake in the next impression. Fix it a little on the next, a little more on the one after that until you are back to right. You can do two parallel scribe lines to keep the stamp lined up, but much like my basket stamping, I line up the angle and right side of the stamp. The left side just has to follow. I have also seen templates and devices (LCSJ article?) to line this stamp up. I would find them cumbersome and more time than they are worth. Like most basket and geometrics, train your eye to see the little places you are getting off before they become big things. This is one of those stamps that a little practice pays off. I can run one of these pretty fast and accurate. Even though there is a stamp impression of the rope and one bevel hit on each end, I can run it. This is among my "included-no upcharge" borders, like the cam/half round border stamps. I have had a few emails about this stamping today also. Mostly this question. I also stamp brands and initials with this stamp. I will work up a little tutorial on making curved corners, center ovals, and brands/initials. It is gonna be a few days, because of the holidays. Want to try something else cool? Try matting around a barbwire stamps. That makes what I consider a pretty overused and stale pattern (although popular) more palatable. It really looks like barbwire then.