bruce johnson
-
Posts
4,411 -
Joined
-
Last visited
Content Type
Profiles
Forums
Events
Blogs
Gallery
Store
Everything posted by bruce johnson
-
I wet it good. Then put a lot of twist into it, and secure while it dries. Usually I use binder clips, clamping 4-5 strands at a time. On the old posts, someone mentioned twisting and putting a small tack in the end of each strand as they dry. I know guys who spray with felt hat stiffener too. Haven't tried it yet.
-
Marlon, If it was the pages and pages of tools shown in ShopTalk, those were tools and equipment from the publisher, Dan Preston. He has a regular sort of tool sale from his finds. The website for ShopTalk is www.proleptic.net. It is not particularly updated. I tried to buy a tool shown in the magazine. It let me go all the way through the checkout, took all my info, and that was that. I printed off my receipt and waited for said tool to arrive. after a week I called to inquire on shipping. They told me the tool had been previously sold, but they have no way to pull each tool off or flag them as they were sold. Nothing will tell you that on the site. Lesson learned, just call them. Dr Dan also refers quite often to several other guys who refurbish old tools. Keith Pommer in Worthing, SD is one. The other is Bob Douglas in Sheridan, WY. Shoptalk had an article on Bob a while back. Neither of these guys maintain a website that I know of. I have talked to him once or twice, but not dealt with Keith. He has a good reputation, just didn't have what I was looking for at the time. I have a fair amount of used and some new tools from Bob. Good guy for me to deal with. I have been happy with everything I have got from him. I always get off the phone smarter than I was before when talking to these two guys.
-

Knowing if they're a Good Tree Maker
bruce johnson replied to ArtS's topic in Saddle Supplies, Tools & Trees
Cop out answer here first, Art. If they fit your horse on the bottom, and you can build on the top, they are a good tree. The worst tree maker can make a crude old rough looking tree to fit, and the best can make one that looks like fine furniture that doesn't.THat is really the bottom line. After that then we get to pick apart or praise their woodworking skills on top and their rawhiding or LineX spraying ability (or both now). About the only thing most of us can evaluate is the finish on a tree. Some gaps are going to happen with the best rawhiders sometimes. We worry about gapping, and then drill or screw right through the laced line sometimes. Not an issue for some pretty reputation makers whose work has stood the test of time. Rock is one of those things we all check. I have had a lot of discussion with some folks on rocking trees. Some is no doubt opinion, some probably not universally accepted, First off, it doesn't take much of a difference to give some rock. It can be from twisting, one bar pad being a bit wider than its mate, the cantle or fork not exactly square, etc. If it is from a bar being a bit wider, the bottom sits on the horse, not the edge. Those four points we are evaluating on our level surface probably should not contact the horse at the same time. If they do, there is not much relief built into the bar edges. . So the horse has 1/8" more bar width on one pad than the other. If the angles are the same and the bottom geometry is too, shouldn't matter. If that is the cause and we try to fix it by jumping on it or cranking on it, we are going to change the geometry of the bottom and introduce twist, a worse problem. Some companies fix rock by beating down just the high corner. If it from a twisted tree and differing angles, they haven't fixed anything, they just flattened the pivot point. It doesn't rock, but that doesn't make it right in this circumstance. If a tree is solidly put together and square in the wood, and the rawhide pulls it out of square, something loosened up. Did it twist, can they twist it back and it will be as solid? A lot of these are rhetorical, but food for thought. Trees rock for different reasons. Ideally they shouldn't, but when they do, it is not always bad. When they don't rock, it might be worse. After that we evaluate centering of the horn, cantle and forks even. Are the bars the same length? How can we measure bar angles? Are they really 90 degrees/93 degrees? Are they the same? Can I see one degree difference for one side to the other? These are all mechanical things that are not the easiest for the customer to evaluate. Are the bars exact mirror images or does one have more twist or rocker than its mate? Things that make an even bigger difference than rocking or lacing, we can't reliably or don't measure. Scary for me sometimes, I just have to have faith that the guy sticking the wood and rawhide together is doing their job. If I can see a problem, it is then a big problem, because the minor stuff is probably going to get by most of us. So I guess my bottom line is if I can put a tree on a horse like the customer rides and it sits acceptably, then it is a good tree. After that I have to decide if nylon vs rawhide lace, lumpy lace, abrupt cantle to bar transitions, staples vs nails, rawhide vs. whatever, or other factors are big or small to me. That is what seems to separate the treemakers bottom to top. I have to decide if I want to plug cantle transistions, rasp, Bondo, or just cover lumps, or order a tree from a maker whose work lets me forget that stuff. I think once we have a consistant way to communicate back geometry to the tree maker, and they can use it to fit the general type horse (not microfitting one horse usually), then we will be able to compare these other factors and their influence on our decison of tree maker. -
Betty, Many thanks for joining us here. also for advertising the book again. As Clay said, many of us refer to it. For a while it was hard to find where to refer people to who were looking of it. A good resource.
-
I tried this with some 100% felt a few years ago. Your mileage will vary, but I built up enough static electricity the first time to light up Las Vegas. Being a slow learner, I did it again to see if it was repeatable. It was. If it matters, I have rubber mats on the floor.
-
Doug, the stone feedwheel doesn't sharpen, it just feeds. It is kind of like that coarse side on the back side of the bench stones that you raely use except on the mower blade. The stone sharpening wheel inside is a whole different piece. I have not changed out from the steel wheel. It feeds the softer stuff as well. I am not sure of the advantages of the stone feedwheel other than old technology or price?? Maybe the stone surface is more easily redressed. The feedhweel on crank splitters, when they lose their bite, it takes a machinist.
-
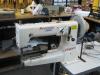
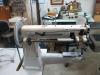
Doug, Dave from Artisan can probably address the specifics of the NP 4, and what presser feet and feedwheels they can get better than I can. I test drove one of theirs at Wickenburg. It was the first time I had sat down at one. That is what opened my mind up to the possibilities of what it could do for my skiving of vegtan, althoough Jerry and ?? were more leaning towards telling me I needed to get the top and bottom feed machine. Good advice sure, but more $$$ than I had at the time (My wife had just visited Ron Edmond's booth and bought his hydraulic drawdown stand). They told me that the bottom feed would glaze, smoke, and not feed vegtan over about 4-5 oz. The top and bottom feed will do skirting. Same thing I was told by the guy who sells them on ebay on the $900 deal. The guys on the boot and shoemakers forum referred me to Arnold at Melanie. He was the first I heard of the steel feedwheel from. He told me that the vegtan also feeds better with presser feet with rollers. He set it up and ran some 8 oz though like nothing. Switched the wheel over to the new import model, and it did just as well. The wheel was harder to change on the import, one factor at the time. He had a bunch of new feet for the Fortuna. Obviously they went right on the Fortuna. On the import the pin that secured them was a bit short, the pin off the Fortuna on the import was a bit long, and they were slightly wobbly, but worked. The stock feet for the import were OK, but he didn't have the selection that he had in Fortuna. There are feet to do straight skives, channels, a channel and thin outer edge for a turned edge, all kinds of configurations. All in all, the Fortuna was just a handier buy for me. As far as ease of use. In a nutshell they run off a sewing machine motor. You step on the pedal (wide open is best) and they feed and do it all. Way easier to learn than a sewing machine. The angle of the skive is controlled by a thumbscrew setup that changes the pitch of the presser foot. The height is controlled by a thumbscrew set up on top. An adjustable guide fence controls how far in the piece rides under the presser foot. That can help control how far the skive is and the thickness of the finished edge. The knife has a sharpener that you dial the blade against a stone. Then there are dressing sticks that you use to take the burr off. About 10 minutes of playing with scraps will get you pretty far along. Arnold was doing pretty tight inside and outside curves in a single pass like nobody's business. When I change from one setting to another, I check with some scrap. Getting to where I am close by just eyeballing now. Takes me about a minute now to change a foot and set up a different skive. I don't use it every day, but I use it a bunch. It is fun to use.
-
Pete, I know there are guys that can tool something as thin as 1-1/2 oz, but I am not one of them. I use it for lining and pockets like you did. I normally touch it lightly with oil and then use an acrylic finish to seal it. I also have a wee bit of X-1 left, and it makes a nice finish coat for insides. I usually prefer the biscuit or wheat pig that TLF sells. One of my customers like the natural. Pretty sure it is a chrome tan, and I can use it as a back lining for checkbooks, wallets, and planners with no wrinkling. I ask for glazed pig when they have it, and they know what I mean. Sometimes they have had a nice copper color too. I haven't used that black or brown pig lining stuff for quite a while. The pig I get feels a little better to me than the mission grain. On the higher end albums and things I use vegtan goat to line with, a little more interesting texture than the commercial oak, more body than the lining pig. Again a little oil and acrylic finish to color and seal it.
-
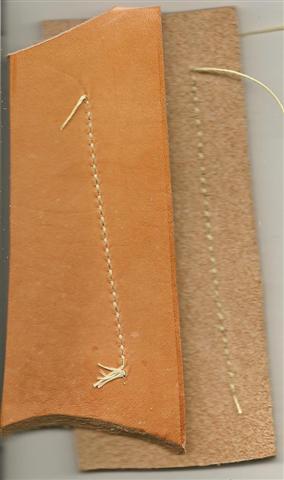
Maeshin, Are you trying to cut some time of leather like chrome tan vs. something more firm like vegtan or latigo? If so, any of the draw gauges or strap cutters are going to have some drag, stretch the leather, bunch up, and do what you are saying happens. Luke's suggestion of the roller knife and mat is right on for those flexible leathers. You can make templates from firm cardboard, printers press blankets or other relatively stiff material to use as cutting guides. Roll the blade right along the edge. For the stiffer leathers, the wooden strap cutters or draw gauges are the easiest for me. I use razor blades in my wooden strap cutters. Cheap and pretty sharp to start with. I have found that the TLF ones are sharper and maintain their edges better than the Osborne bulk pack blades. For some really good ones, I go the platinum injector blades from the drug store. I use my wooden ones for the odd sizes. I have a few traditional draw gauges also, and the one associated "learning scar" on my knuckle most folks who use them can relate to. I use my old cavalry 6" for cutting blocks for reins. I have a wooden insert handled 4" also, both of those I put blades I got from Bob Douglas into. They are made by Bill Buchmann, and really are nice. Hold an edge and do the job. I had another draw gauge I was about to ebay away. One of the old local guys decided to take a liking to me. He told me he has gone to using utility knife blades in his. He only uses "Irwin" bimetal blades with the blue label. I haven't tried them in the other handles, but they fit exactly into my newer Osborne handle (keeping it now). I think a stropping would make them even better, but I am pretty impressed with them for now.
-
Saddle treemakers-sub topic
bruce johnson replied to Hidemechanic's topic in Saddle Supplies, Tools & Trees
Just when we think we know the players, someone else jumps in the pool. Now it was pointed out to me that there is a tree for sale on ebay from a guy in Cornelia, Georgia (My son and I used to watch pro wrestling from there). According to the description, this tree was made this month and covered this week. It was first covered with bedliner (tuffliner) and then rawhided. Couple things I see here, doesn't it take at least a week for rawhide to dry? The other thing is I can now add another category to my definition of "paranoid" - 1. a guy who wears a belt and suspenders at the same time & 2. a guy who bedliners and rawhides his tree. In all seriousness, the bedliner probably is no different than primering or varnishing a tree prior to rawhiding it. -
Marlon, At the time I bought the large one, it was the only string beveler that would do 1/2" saddle strings. Now there are a few other bevelers that will. The large one will go from about 1" down to lace. It only bevels, doesn't split. Jim's new improved atomic powered model features two slots for the choice of angles. Mine does one, but works for me. I think Clay B got him to make some left handed models also.
-
Ferdco Juki Pro 2000 Leather Sewing Machine (Bruce Johnson 0001)
bruce johnson replied to bruce johnson's topic in Old/Sold
Just got off the phone, the machine is spoken for. Thanks all... -
Ferdco Juki Pro 2000 Leather Sewing Machine (Bruce Johnson 0001)
bruce johnson replied to bruce johnson's topic in Old/Sold
Ed, That top post does screw in, the hole is threaded. It doesn't tension anything. It just holds the thread up. On my other machine I go from the spool to the lube pot, and use the guide on the lube pot instead. I took the lube pot off in anticipation of selling it. -
I am selling a used Ferdco Juki 2000. It sews like a champ, and comes with the saddlers package of accessories (lube pot, single and double wheel roller guides, holster plate, stirrup plate, blanket feet, wide double toe and wide left toe feet, narrow center foot and narrow left toe foot, bobbins, needles). It was basically unused before I got it. I put a servo motor on it, and it has a speed reducer already - total control stitching. It did not come with a light (Artisan sells a good one) or thread stand (think inexpensive, mine wheels of the top spool on the wall). I have used it for a couple months, and have had no problems. I have another 2000 already, plus a flat bed machine. This machine is a great second machine, but I need to cash some things out right now. Now the down side, and a lesson learned. It was shipped to me via The UPS Store and UPS. It was dropped in the delivery truck and broke off a corner of the casting. Three bolts still hold it securely, and picture is attached. Even though insured, UPS said it was not packed correctly (it wasn't) and denied coverage. The UPS Store in Ohio blamed UPS and denied coverage, even though they packed it. The shipper didn't want to take anymore interest in it, and he paid for the insurance not the receiver (me). THe UPS Store said I was welcome to file a claim against them in Ohio. Seeing a trend here? Nobody is the advocate for the receiver. Lesson learned there. Picture attached. It has not affected the machine at all. I have figured this into my pricing. Price for everything is $3500. I won't take PayPal on this - cash or good check, subject to clearing, all that. Due to past bad experience I would seriously like to avoid shipping. I live in north central California (Oakdale). I would be willing to deliver it within these parameters - north to Red Bluff or south to Bakersfield. I am not chaining up to cross the Sierras, sorry. I have attached pictures of the machine, the break, and stitching example (top and backside). The stitching was 346 top/277 bobbin. The single layer of 11 oz was 7 spi, The doubled layer (22 oz) was about 8 spi (I didn't change the setting from the first).
-
Mike, I hadn't heard that Gore was back up and making tools. Do you have the contact info for them? Are they putting out a catalog again? Same tools as before? Thanks.
-
Nylon lace - nylon stretches and slides. Rawhide shrinks back and nylon gives. Nylon breaks and the whole line slides and loosens. Rawhide breaks and the ''memory" in it hold the line better. Staples - I can have a stapled saddle apart in about 15 minutes. There is very little holding strength in staples. They pull out easily, usually with no tools - just pull the piece off. I would suspect that shrinking rawhide in gullets could pull them just as easy as I can. Cut tacks could probably pull easily too, especially as the rawhide and wood shrinks back a little. I would suspect that most guys are using ring shank nails. (Maybe the Nikkels will weigh in with what they use). If staples were better, they would put them on their best tree, not the lower end. They can use a gun to slog them in, that is the advantage. Same as the furniture business. Screws or ringshanks will always hold better than staples, they just take more time to put in. The trees with loose forks have always been stapled up from the bottom in my experience. Not sure how standard that attachment method is. They have been trees from a company that has grade A, AA, and AAA trees. For the cost differences between these trees, it may make a difference to the guys making the Buy It Nows on ebay or competing against the low ends. Not to sound snobbish, but if you are handmaking one, why start with what the tree manufacturer is essentially telling you is their lowest quality tree?
-
Restoring a McClellan saddle
bruce johnson replied to karl's topic in Saddle Identification, Restoration & Repair
Karl, Those are all before my time. Not sure how to age them. A source might the cavalry unit in Oklahoma. a coupe years ago ShopTalk had an article on the cavlary unit at one of the army installations there. Dr. Dan might get you in contact with someone who can age your saddle for you. As far as hardware, Weavers have a few pages of re-enactment hardware in their catalog. Not usre who all else has some. -
Saddle treemakers-sub topic
bruce johnson replied to Hidemechanic's topic in Saddle Supplies, Tools & Trees
Just to throw another duck into the puddle here, anybody ever used one of the poly trees the guys from LaPorte put out? -
Where's the bootmaker's?
bruce johnson replied to solidspace's topic in Shoes, Boots, Sandals and Moccassins
Zack, There are a few boot makers on this forum. Another one I would suggest is The Honorable Cordwainer's Colloquy. www.thehcc.org. There are some serious makers from all over the world, boots and shoes. Guys doing stuff dating back to the 1400s discussing things with guys using celastic. I joined to learn about skiving and inlays. Ends up I learn a lot more along the way. Some is over my head, some things I actually know. Some of the philosophical discussions have directly impacted some things I do in everyday life. Good bunch to follow along with for me. -
Don, Not sure if it is a regional deal, or different shops doing it one way or the other. I have seen some oldies done with 2 separate straps too. I see the advantage of the one piece as Keith describes. By having both straps together, there would be less tendency for a ring to be pulled more to one side or the other with the straps separate. I am not sure which method came first. There is some question of where the Sam Stagg rigging originated, and some historians even cast doubts on the existance of a saddlemaker named Sam Stagg (and occasionally referred to as "Sam Stack"). There was a saddlemaker in the San Joaquin valley (Visalia area) by the last name of Samstagg I am recalling. This is where the proponents of a real Sam Stagg usually refer. I have not had the opportunity to see a saddle or picture of any of Samstagg's work. Would be interesting to see how his were rigged. Anybody know where one is sitting?
-
Hardspots are sometimes seen in that heavy leather when it doesn't tan all the way through, and has a rawhide center. Usually not cheap leather either. I have had round (not rotary) knives "climb out" of the cut. That will scare the crap out of you when it just rides up that hard edge and pops up. Draw Gauges will just plain hit the wall. It takes some effort to cut through this. Biggest thing is just knowing it is there, then you can deal with it. Either one of the weapons that Wolvie showed will do the job but will require that you cut carefully. When I was using one of the leathers with a history of hard spots, it was usually in the necks and shoulders. Groundseat pieces for me, and I could do final cuts on them with my 3-in-1's cutting wheel too. Then soak them up and they worked OK for that.
-
I get a lot of the regular stuff from Hansen's Silver. They are local and I don't have to inventory much. My wife picks it up on her way home from work. They are at most of the trade shows. In 2006 at the NFR, I bought some stuff from Dale Bass. He is from Amarillo or some place close by in the panhandle of TX. He does nice work kind of close to the par of Greg's list.
-
Saddle treemakers-sub topic
bruce johnson replied to Hidemechanic's topic in Saddle Supplies, Tools & Trees
GH, First off, all I have ever built on have been rawhided wood trees, nailed, and rawhide laced. I probably followed the same progression a lot of people do. My first few trees were from Bowden, and were and still are OK. I built some barrel racers on a pattern that Hadlock&Fox has. They were alright too. Some issues with lumpy rawhiding on both of these, something to deal with. I had a guy bring me an epoxy dipped tree from H&F and had the seat glassed in already. We opted out of that. I was looking for a little further up the ladder, and started ordering from Timberline. Rawhiding and finish was smoother. Better cantle transitions, more taper to the bar edges, not as clubby, and higher quality for not a lot more money. In 2006 I came home from Sheridan and ordered the exact same tree from Superior, Timberline, and Sonny Felkins as a comparison. The Superior was rugged - thick cluibby bars, lumpy lacing, not what I prefer. The Timberline and Sonny's trees were pretty similar in shape. Nod goes to Sonny's for smoother rawhiding. Was it worth $100 more and 2 months more wait for the rawhiding ? Can't say. I picked up a few here and there that guys had - old Superiors and Hercules. Good trees, but both no longer made. Some I built on, some I have resold. I still want to move up the ladder for the better customer, and my own philosophy. Started loking at the handmades. I got one from Nikkels via Sheridan Leather Outfitters, recently bought a Jeremiah Watt tree and another Nikkel tree from this list. Another level up of quality in those trees. I have a couple Timberlines in the roper pattern I like. Also have a bronc tree to make myself a toy on. I quoted a guy a NUTS price last week on a bronc saddle, and he is considering it. Living room display model. -
Saddle treemakers-sub topic
bruce johnson replied to Hidemechanic's topic in Saddle Supplies, Tools & Trees
Bugsy, Everyone's expectations and experiences are going to be different, whether we are talking saddle trees, leather, or pickups. Example - My Chevy has 420K miles, cows have run into it, and it starts everyday. My wife was driving the Dodge, hit a 600# feeder steer at 55 mph in the dark full on, and she and the Dodge both survived. The Ford packs the Capri camper around, and hasn't really been baptised yet. I am not sure which truck or saddle trees are the best. LOL. -
Right now I have a couple ropers from Timberline. I have also got a couple of Nikkels - one through a drawing at Sheridan Leather Outfitters, and one from another guy who ordered one, but the customer needed a different size tree. I pick off here and there too. I just got another tree from a guy who decided to buy instead of build. I am not big enough to have a steady order with anyone at this point.