bruce johnson
-
Posts
4,409 -
Joined
-
Last visited
Content Type
Profiles
Forums
Events
Blogs
Gallery
Store
Everything posted by bruce johnson
-

inexpensive tool for roughing up leather prior to gluing
bruce johnson replied to esantoro's topic in Leather Tools
Ed, Another alternative to the rougher brush deal is a welding brush from an industrial supplier, usually a couple bucks. There are some with stiffer bristles than others. I also use coarse sand paper sometimes for spot areas. -
center presser foot on Artisan 4000R
bruce johnson replied to Doug C's topic in Leather Sewing Machines
Doug, I know the center foot you are talking about. It is designed to push the stitchline down into the leather. As you have found, it will not track true going around a tight turn. The pivot point is the needle, and the bump or ridge is behind that. That is just the nature of the design. My Ferdco's center feet are smooth on the bottom. I stitch in pretty deep grooves usually so the bump would be redundant. One of my old pals gave me some parts when I bought some tools from him. One was a center foot from an Adler that he had modified the center hole to line up with my 2000. It has the ridge. I use it on straight line projects like breast collars sometimes. Nothing that has to make a turn. If you don't want to invest in another foot, you can grind that ridge off smooth easy enough. -
Tina, My point was not Chicago screws breaking, it was the screws backing out of the post and falling off. Most are 3/8" as Keith said. Some of the low end imported stuff will have 1/4" posts. I have not ordered from everyone, but I have some posts that came with screw with no more than 1/8" of thread. Obviously those are not intended for headstalls. I have some that came with longer screws 3/16 or more of threads. These were all just regular orders from normal suppliers. The 3/8 posts usually have the 3/16" screws. I got one batch of 3/8 with the 1/8" thread screws (usually came with the 3/16" screws -explanation - That's what we were sent"). An 1/8" of screw is not a lot of thread. Conchos are another issue. Many of the regular ones have a 1/4" post soldered onto the concho. If the concho is domed much, there is not much protruding post to catch threads of the screw. Try to use a 3/16" screw and it can be dicey. My main concho supplier offers long post and short post conchos, and has screws of different lengths. The XL screws are 3/8" of thread. I have some longer than that, I think they came from Ohio Travel Bag a few years ago. There is another issue. Some of the conchos imported by the big sellers have 4 mm metric screws. The regular ones are normally 8/32.
-
Patrice, When TLF discontinued carrying the ProCarve, I asked them if the new EcoFlo replacement was antifungal. They told me it was not. It won't be a surprise to them that you had a mold problem, although I would be glad it is just in a rag and dish, and not on a project. Perhaps if enough people let them know that antifungals in a casing solution is a good thing, they might have whoever is making it for them reformulate it. In my old shop, I had a heck of a mold problem, and new bags each time, refrigeration, etc didn't make a huge difference. ProCarve stopped it. I am in a new place and I have not had an issue. I think that resident spores are the big issue. I have had guys in damp southern climates tell me that finished products cased in ProCarve are pretty resistant to mold on the finished products in use. Enough of whatever is in it remains active in the leather according to them. Weavers carries ProCarve and has it in quarts as well as the 8 oz bottles. I have recently switched over to using the Lexol/baby shampoo formula shared here a while back. I like it a bunch. I had a belt I cased up 10 days ago. Put it in a ziplock bag overnight, didn't get to it and meant to take it out of the used bag before I left for a week (didn't). I pulled it out of the bag today, no mold and quick swipe of more casing and let it sit two hours and whacked out the belt. If I find a mold problem, I will be trying to add an antifungal to this mix.
-
Steve, Neat old saddles, thanks for posting them. I like seeing the oldies, expecially when they have a story.
-
Tina, The quick and dirty answer is to use whatever post and screw length combo gives you the MOST threads in the MOST post. I have seen some that only catch two or three turns. When they loosen that same two or three turns and it comes loose, the wreck is on. There are a ton of headstalls with Chicago screw or concho with post backs that hold well, and stay tight. There are laces that hold up well too. There are laces that wear and break. There are riders that are fastidious about tightening and rechecking screws or checking laces every ride. There are some that never do, but have a good story about how they got that scar. If looks don't matter, then the open top post and long screws really give you some purchase - the whole post length. Plus is that you can see if a screw is backing out at a glance. There are ways to lock threads. Loc-Tite makes a few different grades of locking compound. Some people coat the thread with things like Elmers glue, nail polish, Goop, adhesive caulk, etc. My first wife was taught to use strong iodine, it theoretically corroded the threads into the post threads. Made it hard to remove conchos. The JP tack tool pliers work well for me to loosen these. They are selling them in ShopTalk and ebay, maybe LCSJ too.
-
Jon, Great work. I have liked seeing everything posted. I like your tooling style, and like Art said, we all have something to aspire to. And as an aside to everyone, I personally want to thank ALL of the talented makers and just as importantly the folks asking questions. Especially in the last couple months, the amount of knowledge kicked around here has been phenomenal. It can only improve the whole industry when the bar is raised, and there are so many hands pulling the rest of us up and over. Thanks to everyone.
-
Clay, Happy Birthday, from Rundi and me (who is also 47 as we speak). We are singing Happy Birthday, but Rundi is still sick, and my solos stink acccording to anyone who has ever heard me sing except my mother (and Rundi, but she is just being nice). Just imagine that Froggy and Alfalfa from Little Rascals are singing you a birthday duet.
-
Peter, I buy the SS clip and dees from Weaver. They are the unpunched ones with about a 6" strap. The strap is a pretty heavy gauge, and the dees look a little more finished than the regulation ones that come prepunched from most suppliers. I can cut them to length, and I use two rivets in them. Many of the single rivet ones will work around and stretch out the leather over time, or is sandwiched in a an edge will cut the stitching on either side. Small holes and two of the rivets keeps the dee more stable. I was drilling the holes on the drill press - low speed and cutting oil. Usually the first hole went OK with the titanium bits, and by the second hole, the edge was starting to get suspect. These were Vermont-American bits I am thinking. Now with the Cobalt bits, I just run them slow and a little oil. They drop through. Troy, I got back tonight and drug some thrown away fenders out of the garbage. I tried your trick with the spikes. I started off with one with a good point. It punched right through the burr,leather, and onto the shoeing anvil. Grabbed a dullish one (really dull), and the burr folded up like a taco shell. Came right off, no need for the nippers. Repeated on 3 more fender top rivets - worked like a champ. I am not sure why, but I cant get it to fold up the burrs holding the Blevins on. Maybe the peens were a little fuller or less worn then the fender top ones. I grabbed a cheap flatblade screw driver, and hit it on either side of those. Worked just like the spikes on the upper rivets. They either popped off or easily pulled off. I am going to set some the way I do them tomorrow and see how it works. Good tip - Thanks.
-
howardb, I can't answer how companies price the same goods. The #70 CSO knife is $35.95 from Siegels website, it has been at that price for a while. TLF used to carry a more complete line of CSO tools, but have scaled back. Isn't the TLF price 90 something? I have a CSO knife. It is OK, and will sharpen up well. I have a few old Clydes, and they are my favorites. I batch my sharpening, use a knife for a while, grab another, until I have a few to sharpen. MY anecdotal impression is that the Clydes go a while longer than the CSO before the need to strop and sharpen. Brings me to my thoughts on buying a knife. I think that the original post about buying a sharp one ready to go is a good idea. Remember that feel, because it won't be that way in a week, and maybe not in an hour. First skill is to maintain the edge. There seem to be several new knife makers coming on the scene. Some new ads in ShopTalk and LCSJ. Some of the old line makers like Linneman, Jolly, and Buchmann are not making many/any. The guys making knives for other uses have seen the void, and the need for quality tools that has always been there. There are some new or old-but-new-again steels, and steel treatments being used. You will need to talk to the maker to see what they recommend for stropping compound and sharpening. Some of the knives come sharp and hold a an edge quite a while. They also require a lot more effort to bring back to original. You can't afford the downtime to ship one back for resharpening, and many local knife sharpeners have no clue what we need. Some put a very thin fine edge that immediately rolls, and others leave a chiseled edge and hone marks that aren't close to sharp. Herb French put out a pretty good little book on sharpening leather tools. I think Sheridan Leather Outfitters sells it for around $11. Worth it.
-
Regis, Ditto on the Bersa 380. That is my "travel" pal of choice. I've had it 4-5 years, and run a few through it every month as well. Also the last thing a few down cattle have seen at our place.
-
For the double caps and the like, I center punch and then drill the cap loose if I can't get an end knipper in under them. For splash rivets I just drill the star until the prongs pop off. For copper rivets I smack the peen to flatten it and then center punch it. Then drill the peen off, and punch the stem on through. I slow speed on the drill press makes drilling these out easy, as does the right bit. I was given this next bit of advice by my Michigan pal, LittleJohn - credit to him. I was having trouble drilling SS strap on some SS clip and dees. The titanium bits would melt and puddle trying to drill the strap. I was getting about 1-1/2 holes per bit. Apparently SS gets harder as it gets hotter, and titanium gets soft. He told me to try cobalt bits. I am still on the first one. It does a great job on SS, and eats copper and steel rivets like I eat flan. I have replaced the commonly used ones as they wear out with the cobalt.
-
My 1st attempt at a cover for my Bible
bruce johnson replied to Jordan's topic in Books, Journals and Photo Albums
Jordan, The Bible cover turned out great. Ya know, I never looked twice at that cross meander stamp when I see it by itself. Seeing it done gives me a new appreciation for it - good job. Regarding the other cover with the heart on the front. I don't always think outside the box. I am sitting there thinking "OK, what IS that heart stamp?" Then I saw the hourglass meander in the corners and it hit me. Good job. That can't have been real easy to keep lined up, and you pulled it off like champ. Congrats. Looking forward to seeing more. -
Ed, I tried one. It is designed for bookbinding. It will do leather up to maybe 4 oz pretty well. The blades that come with it are sharp, but won't hold up for long, or stand up to leather with more body like latigo. They are designed for bookbinding type leather. Several of the bookbinding websites sell them (or used to). I looked at one that was bought with a set of bookbinding tools and was told to bring it back if it didn't work for me. It was for $150. Sometimes they show up on ebay. What you really need for your leather is something stouter. A handcrank skiver with a rerally sharp blade will do latigo and firmer chrome tan like diamond-tan OK. Not good for soft chap. The Landis or American B (?) both have a smooth top feedwheel, and won't mark leather. The blade has to be sharp and the blade adjusted right or softer leather will bunch up against the blade. The ideal machine is a bell knife skiver. This machine is designed for just what you are expecting one to do. They are a bit pricey - low enders on ebay from $900. I have a used Fortuna. These are kind of like a sewing machine, you have to make friends first, then dance with it. There is a thread on bell knife skivers in I think the sewing machine section. It just depends on how much you need one, and how good it needs to be whether you can justify a hand crank or bell knife. I have both and wouldn't be without either.
-
I am not home to check, but I recall the Weaver model is pretty pricey. I turned the crank on one, and they are a good machine. The only new ones that I know of. You can probably buy an old Landis or American from one of the reputable dealers in used equipment for about a third the price. Shipping should be the same new or used. Another source might be Pilgrim Shoe. They have a ton of parts and have bench machines listed on their site. Pretty knowledable folks when I have talked to them. As far as being worth the money. I hven't ever seen one sell used, but the old Landis and Americans bring the same or money back when you go to resell them. I would wager you would take a hit on reselling a Weaver you paid new price for.
-
Use it up, wear it out, make it do or do without!
bruce johnson replied to Johanna's topic in Leatherwork Conversation
Warren, While you are at the print shops, ask them for particle board. I get it at the same place. Once all their workers have a lifetime supply, it is free to haul off. Some of their paper comes in on pallets and the particle board is put on top of the boxes and then the pallet is strapped. The particle board prevents the load strapping from digging into the paper. I use the particle board for cutting on, especially with the roller blade knife. Once it has chipped out and rough, it is yet recycled. It goes to the glueing table or I put it on my oiling/dyeing table. I think I have related that I oil with a paint roller. Any overflow absorbs into the particle board. Once the oil has pretty well saturated the board, then an oil saturated board makes a dandy fire starter. I am sure about three of these will burn a wet mule. -
Larry, I buy them in the 5 blade pack. Shop around and you can find them cheaper at places like Michaels or department stores. They are more costly buying them singly. I never sharpen them. Use them until they don't cut clean and toss them. Mine go a long time. I usually chip one before they dull up. On a tight crner I have snapped off a section sometimes. I think cutting surface plays a part here. I cut on partical board for no other reason than I get it free. I probably go through a blade a month, and use mine a lot. I am not sure how safe I would be resharpening a round blade. I would forsee the bleeding gash in my palm. That makes the disposable description of the blade even cheaper. I don't like cutting on the self healing mats they sell for them. More drag and seems to dull faster.
-
Thanks for all the replies so far. Keith, by the way, I do ask a lot of questions sometimes, but I figure lay them all out and let it roll. Just a few disjointed ramblings and observations. I am with Keith on thicker leather absorbing wrinkles better. That is how I was originally taught - skive the area where the swell base meets the bars to maybe 9-10 oz and not any thinner. Too thin and the wrinkles don't absorb, they fold over. Still flat, but a rough look. I like low center of the belly right in the middle. Usually the thickness is consistant side to side. I found when I used low neck, one side was thicker. One side always laid right in and the other side wanted to fight. If I am going to fight one, I want to do it on both sides - then just go ahead and welt it. One thing with doing a lot of repairs is that I have cut covers from about everywhere but the butt. I have had some shoulders lay in nicely cut vertically, not every one though. Not enough to make me want to cut them all there either. I also was taught to visualize the excess in thirds. Pull it down and tack so that about one third of the excess is towards the front of the swell and 2/3 to the rear. I have talked to guys who go half and half and welt more than I do. From where I cut the ones that work - that front third is denser so will take up less slack and there is more fudge room over the groundwork to work wrinkles into. Case with warmish water. Seems to work a little better. Working out wrinkles - can o' worms. In the Bruce Cheaney videos he tacks a strip on the side down low where it be covered, and then pivots it around and uses it to beat against working from top to bottom. ("wiping strip"?) I was taught to nail at both ends. Divide the excess in half and put a small nail in the middle. Work that excess in each "bubble" as much as it would compress, then divide that excess in half, tack again in the middle and so on. All the time dividing the bubble rather than chasing it side to side. Jesse Smith taught last year to tie surgical tubing (heavy elastic) in a double wrap around each side of the swell like a big rubber band on each side. Work the slack down under that elastic and it pretty well held it. That has helped some of mine, in conjuction with a few nails. It will sure suck one in tight on the bottom sometimes. I have had some I was about to give up on, came back a couple hours later or next morning, and the temper was just right - one pass of the slicker or tap and that bubble is gone. Some swells just don't lend themselves to unsplit covers. I have found that the thinner forks like the BW and the barrel racers are bears, undercuts and severe leg cuts ditto. JUst plan on welts from the start. The low TM roper swells are cake - no welts. I can usually do the Dee Picketts, Bowmans, Olin Youngs alright. I am with Andy, slick forks are the way to fly. Anybody charge extra to cover or recover swell forks vs. slick forks? Upcharge for welts vs. no welts?
-
Warren, I routinely cut up to 16 oz with my 45 mm. I use a 48" rule as a straightedge. The blades go quite a while too. Where I think they really shine is cutting soft leather like chap or deer. There is no distortion from stretch like with other knives. I also use the scalloped and wave blades sometimes to cut overlays. They will track a pattern edge well for that too. I used to have a 60 mm, but cut myself a few times on it. Lost it and don't miss the bleeding.
-
Tiffany, Right about that. Every time I talk to Bob, I come away smarter about new and old tools, and how to take care of them. When you get ready to upgrade edgers, Bob makes some dandy Bisonette edgers. My wife likes them a lot. I prefer another style, but use hers on occasion (especially when she is not looking).
-
Krains, You can buff off any seams or pits from the plastic mold it was formed in. That said, Osborne makes a real bone folder that I use a fair bit. I just got a wooden one made by Riley Cornelius. They are members here on the forum. It has a nice shape and the edge varies from fairly crisp at the tip to a nice round edge. The variance allows you to use what part you need for the effect you are looking for. Nice tool.
-
Pete, I vein opposite just "because". LOL. It just makes it look rounded and "cupping" away from me. By just making a light short impression (I use the thin scalloped veiners) on the cupped side, it gives me that illusion. When I do it with the veining the same, it makes it a little more "same old, same old". try both ways and see what gives you the effect you are looking for. I look on veining the same as decorative cuts. You can take exactly the same leaf and totally change the effect of cupping toward you or draping away from the stem by just changing the direction of the veiner or the cuts. My thoughts are that by changing this up within the same piece, can add some dimension of leaves coming toward you and others going away. It can make a pretty flat pattern kind of pop a little. Mix in some front and back leaves, and it will really go somewhere.
-
Pete, The leaves all look interesting. You are doing fine. On the one you want to have the 3 leaves, and make the front one showing the back. I have done that some. Not much of what I do lends itself to embossing, althought that is a really neat idea. What I do is to tool the back leaves totally opposite of the faced leaves. In other words. On the leaves I show the front of, I usually pear shade the convex scallops, some guys go out to the edge, I still leave a little halo. I vein "tip down" usually, with the veiner blending and flowing into the leafstem, not "cupping". I undershot the concave scallops of the leaf margin. On the back facing leaves I pear shade the concave scallops and do go to the edge. I make my veiners "cup" and not do as "long'' of an impression to give the illusion of roundness. I undercut the convex scallops and then lightly lift them with an undershot. Deeper at the tips and fade from there to each concave scallop. I normally use a lined shader on the front leaves, and smooth veiner for the back to further separate the look.
-
Changing gears from trees here. Randy's post on the Hamley saddle and his comment about "Someone took a lot of time to form those swells" got me thinking. I had an old guy talk me through it several years ago about covering some swell forks without welts. I took a class from Jesse Smith last year at Wickenburg, and he had some more tricks that have helped. I have still been beaten by some, and then gone ahead and welted them. I really don't have anything against welts. I think mine turn out well enough, but just don't like to do them if I don't have to. I would like this to kind of go in a few directions. What kind of swells can you more consistanly not welt? Particular selection of leather? Skiving or casing tips? Forming and compressing tips? If you do welt, do you use a single welt, folded welt, or blind stitch? Laces instead of a welt? Welts to the front, down the sides, or pulled to the rear? Tips and tricks are always appreciated.
-
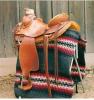
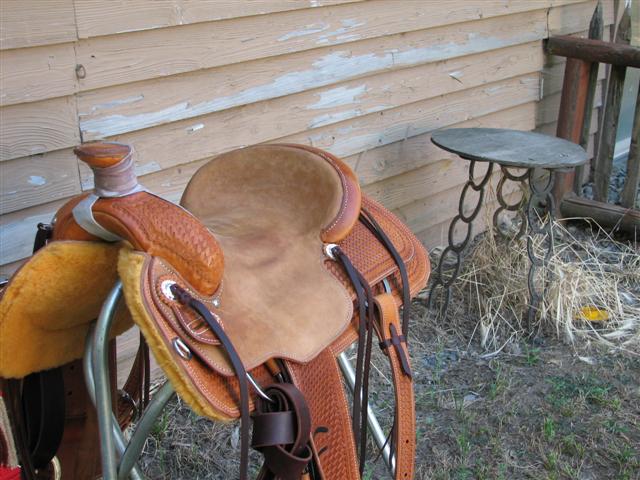
Steve, Bucking roll are an "add-on" for slick fork saddles. The swells (part of the saddle the horn attaches to) in a swell fork saddle sticks out a little on both sides. It serves a couple funstions. It gives you something to kind of lean into when your are standing up and forward leaning out to rope. Some swell patterns allow you to get your legs underneath them to secure if a horse goes to bucking. I look on them as a sefety valve. If I am loose and going forward and my horse stops short, I want something to stop me before the saddle horn does. Human anatomical considerations apply. Swell fork saddles come in a bunch of different styles, but are all characterized by having these "swells" sticking out to the sides a little. Slick fork saddles don't have this. Originally all saddles were slick fork, being that the swells or forks were really made from the forks of tree branches. At some point someone tied a jacket across the front to inhibit his forward movement. In the later 1800s, a guy developed bucking rolls, little add-on pads that went on each side of the fork. A further development was swell forks - originally reported to be a croquet ball sawed in half and each half screwed into the slick fork - adding swells. Then forks were actually made with a swell pattern and no longer carved from tree forks, and the two camps of though divided into what we have today - the swell fork guys and slick fork fans. It used to be more regional. Swell fork most places. The slick forks kept popularity in the great basin and Northwest and areas influenced by them. Now with guys moving around, horse training clinicians riding slick forks and selling them, it is less defined. Bucking rolls were stuffed with hair, wool clippings, some guys use synthetics, etc. though a flap in the bottom. Anything to pack in there and give shape. It takes a while to pack in there, some packing then mashes down in use and they need more stuffing or they get raggy. If these foam inserts work as expected, you just build your rolls around the foam core and you are done. To compare, swell forks are more solid, less forgiving when you smack into them. Bucking rolls are softer, but not as solid to lay into. I am attaching a picture of a moderate swell fork saddle, the one with no bucking rolls. The other is a slickfork with rolls, you can see where they attach, and kind of what they do.