bruce johnson
-
Posts
4,408 -
Joined
-
Last visited
Content Type
Profiles
Forums
Events
Blogs
Gallery
Store
Everything posted by bruce johnson
-
Papa Wolf, As one who has made about all the mistakes you can make and still be floating, here' s how I do it now. Some of this I got from a small business advisor, quite a bit of the principles as they apply to leather from Bob Brenner's book "How to Establish Prices for the Saddle Maker or Leather Worker", some from talking to other guys, and a lot from keeping books and tweaking my formulas. It seems unwieldy at first, until I realized how much I was losing by not accounting for it both in materials and labor. I used to do this all by hand, but have since made up spreadsheet templates in my computer that do the calculations. I use these formulas for pricing all my personal and custom items. Breaking it into materials first: For each piece of leather used in a project - width x length in inches, then add in a 25% cutting waste factor. If it goes into the scrap bin, I am still not getting paid for it on this, so it is waste. Divide this by 144 to get a square foot measurement. Multiply the square footage by the cost per square foot with shipping figured in. I use the highest price I paid in the last year to figure this. I add in special hardware like zipper tape and slides here too. This gives me a materials cost sort of. To allow for things like oil, dye, finish, thread, rivets, etc. I add 20% to the total leather costs for a project. It has been borne out to be about that (maybe a little less on some things) from past years records. This gives me what my costs really are, I then double it. Labor: I kept timesheets on a lot of steps. I did enough wholesale and award stuff, I got my timerates down to be pretty consistant. Everybodys will vary. These are based on measurements of the final project. Cutting time - I struggle with this, but for the sake of calculations I made it a flat 15 minutes. That pretty well accounts for getting out the cutting pattern, unrolling the leather, cutting, and putting the leather away. Obviously you are going to make it on a checkbook, and go over on a briefcase with pockets. The 15 minute average is ..... average. I add 5 minutes to tape backs and case for small things, 10 minutes for larger. Stamping - I can medium basket stamp/simple border about 40 minutes per sq ft. Larger baskets and geometric stamps are a little faster, but I still use that same 40 minutes per sq ft. Special stamping like simple floral or oak corners are 15 minutes each. Again, an average. Other stamping by guesstimates. Assembling - glueing in linings, trimming linings, glueing pockets, - 7 minutes /sq ft Sewing - handsewing - 6spi - 1 in/minute plus 5 minutes for threading needles, polishing awls etc. Machine sewing - 10 inches per minute with a minimum of 10 minutes to account for machine oiling/cleaning/maintenance/changing feet and plates. Zipper - It really doesn't seem to matter much whether it is a planner or a rope bag, it takes me about an hour to make up a zipper from scratch, sew it to a gusset, and fit it. I just add 60 minutes. Edging and finishing - Averaged out, it takes me about 15 minutes/sq ft to run an edger, slick an edge, apply finish, etc. Background dye, special treatments, etc all add in plus too. Installing hardware - buckles, conchos, Chicago screws. Depends on how many, but 5 minutes at least to punch the holes and screw a couple down, guesstimate past there depending on how many. I add up the minutes and multply it by my rate. Add materials and labor to get a price. These numbers are all based on a "one-of" item. Obviously there is econmy of labor by doing several at a time, and I try to do that when I can. My labor time rates are not the same as probably anyone else's. Every so often I will hit the kitchen timer, and then not look at it again until I am done with that step to check times. That's how I do it.
-

question about covering stirrups
bruce johnson replied to Duke's topic in Saddle and Tack Accessory Items
I do them pretty much like Darcy with one exception. I make the inside from one piece, and the outside from one piece. No particular reason why I do them in one piece other the same reason we do a lot of stuff - that's the way I saw the first guy do them. Other than that, same basic technique as Darcy. I crimp them with cantle pliers, and use the crimp line as a guide for my stitch line groove. I want that line right next to the wood. I handsew them too for the most part. I will admit I have cheated on two pairs playing since I got the new machine. The stirrup plate from Ferdco has a really narrow left ledge. A lot thinner than some of the other ones I have seen, or had with my previous machines. It gets in there pretty tight. We'll see how it holds up. -
Don and Crystal, As was explained to me by the historians, the reason for the cinch ring covers was due to the cinch rings. They were all handforged and not necessarily all that well sometimes. They were also subject to corrosion from sweat and exposure, which then made them abrasive. The leather chapes/chafes/safes were added to protect the skin from rubbing. Over time, these covers would get hard from exposure and were replaceable. Some of these were lined with woolskin scraps to cushion them. The woolskins were prone to pick up cheatgrass awns and burrs in that kind of country too. That brought another set of issues to the skin. One guy I worked for used to use sections of inner tube as a sleeve over his buckles to prevent galling and protect from those old buckles.
-
Doug, Historically the "big classes" like saddle making, chap making, introductory leatherwork, started on Monday or Tues. The usual lineup of halfday or full day classes are Fri and Sat. There are some 2 day classes, can't recall for sure when they started. It might be worthwhile to call back and talk to a live person. They might have something sort of finalized as to when something you are interested in is scheduled. It also might be an incentive that maybe they will learn peoiple do need to make travel plans ahead of time to take classes they are interested in. The official schedule I posted above still stands. King's reception thurs night, Trade show Fri morning at 9:00, and Sheridan Leather outfitter's reception Friday night. Don't be bashful, the receptions are open to everyone, and good friendships have come out them for me. If you haven't been to Sheridan before, Don King's museum is well worth any time you can spend there. If you can get to Sheridan a day ahead, plan on a few hours. Gets kind of crowded by Thurs afternoon. See you there....
-
Steve, I think they look great too. I really don't see any criticisms. One question I do have is your source of the apron split. Mine is that blueish gray, and yous looks more to the tan shade. I like the color of yours better for stuff like this.
-
I am always on the outside of this "whose leather is the best" deal. I liked Caldwell-Moser, they closed. I went to WesTan, they closed. I have now been using Siegel's golden skirting sides for a few years, since they started offering it. I have seen it change and improve over time from the first lots. You either like it because it is a bit softer and has a nice temper or you don't. I use their tooling sides for the lighter weights, but they only get down to 6/7 or so. I can make about everything but wallets from it by judicious use of my skiver. I could split down for them I guess. They aren't that wide. I have ordered I think 3 sides of the 4/5 tooling sides from HideHouse in Napa in the last year and a half or so. (not talking about the commercial oak type sides here). The price is good, and it works up and tools the way I like. It does oil a bit darker than the Siegel leather. Both of these leathers give me a bit more roundness and "pop" to my basket stamping the way I case my leather and the way I stamp than brand X. If you are looking for an online or remote supplier of 4/5, might be worth calling Roger there. I mainly use it for my molded and covered picture frames, and the center cut out gives me enough for a checkbook or wallet. I don't make a ton of wallets, so I can pull from the scrap bin and not buy a dedicated side for them.
-
Tim, I am a little biased here. Hansens silver is right across town, great people, and pretty close to my wife's route home. They have pretty good plated silver, overlay, and antique iron/silver patterns. Yes it is imported from the south, but is affordable, and heck of lot of shops stock and sell it. Don't confuse it with Montana plated stuff. Way better base metal and deeper cuts in Hansens offerings. They probably have the biggest range to meet your customers needs from a little sparkle up toward custom. Once you get to stepping up and custom, Ashley's suggestion for Dale Bass is right on. Dale is pretty darn talented and a nice guy to deal with too. I have got some cool work from him. I think he is in Canyon or Amarillo. There are a lot of custom makers when you get to that level. Greg had several suggestions on another thread about his favorites.
-
saddle cleaning
bruce johnson replied to superchute's topic in Saddle Identification, Restoration & Repair
I am curious what everyone is using for their cleaner, and then conditioner afterward. Any types of finishes afterwards? -
Saddle ID No Name Saddlle
bruce johnson replied to 3arrows's topic in Saddle Identification, Restoration & Repair
Ron, Nothing against your saddle and how it rides, but I am with Andy. Is there a Hereford stamp on it? Hereford was a pretty well recognised maker in 1971 and would most likely have marked their name somewhere on everything they produced under their label. One thing that is not fitting with this being one of their higher end saddles is the horn hole. It is way off, and doubtful they would have let it get past quality control. I am sure they had quality tiers of saddles, much like most of the other makers of that era. The deep carving on a lot of these saddles was not the result individual work. These were production saddles, and the patterns were applied with large embossing plates. They would go back and add the dec cuts and muelfoot stamps to call them handcarved. -
Elton, The Sheridan schedule is official: 5/15 - evening, King's Reception; 5/16 - 9:00 am - Trade show opens, 5/16 - evening; Sheridan Leather Outfitters' reception. I hear the entertainment is going to be excellent there. Ok, that ought to put out your "antsy's" for now. The remaining schedule is originally scheduled to be done todayaccording to my phone call a month ago. Since I actually got my journal prior to the month of issue, I am only expecting one miracle this year. I think we'll have to wait on the rest. As we get closer to the event, I think we need to post pics of ourselves if we want to be recognised, arrange to meet for coffee Fri morning 7:30-8:00ish Friday morning in the terrarium, and make up a secret handshake.
-
Troy, Maybe I am reading something into this picture that is not there. Is the stirrup hobble strap an extension of the wrap for the stirrup leather? I thought it was at first look. My mind is kicking around an idea here. I like the looks of the braided wraps. Could a guy leave his two ends coming out the bottom of a short barrel braid in the front, one shorter and attach a buckle, the other longer end make that the billet end? Hmmmmm.
-
Tim, Great job covering those swells with no welts. That takes some doing for sure. I have chased some of those bubbles around, and some time away seems to either make them behave, or convinces you that welting is gonna be next.
-
Troy, Very cool design. Question on your "insert-state-name-here" twist stirrup leathers. Is the wrap portion that comes on around and makes the stirrup hobble strap secured with a buckle or a hackamore hanger type knot? Yeah, I know I'll catch some flack. Here is a really different saddle with your distinctive floral patterns and all I can come up with is question on a skinny ol' piece of latigo. I promise I'll come up with a better question on the next one.
-
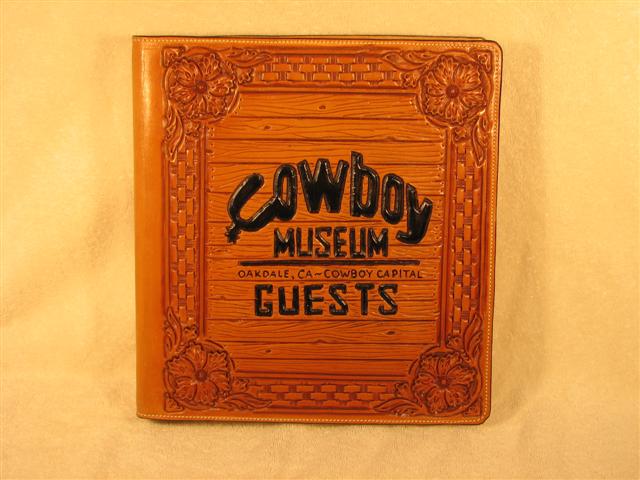
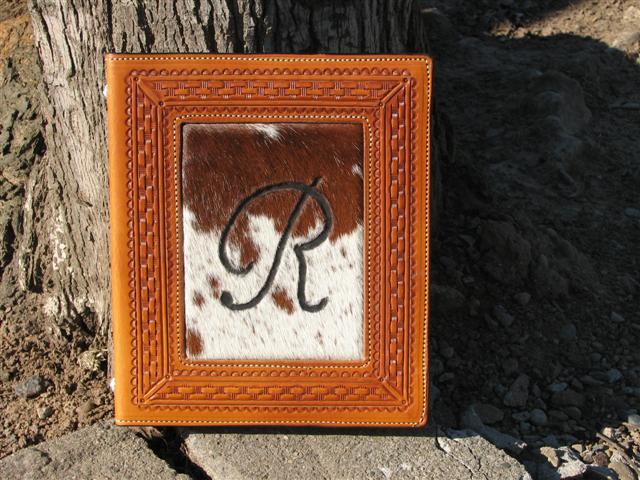
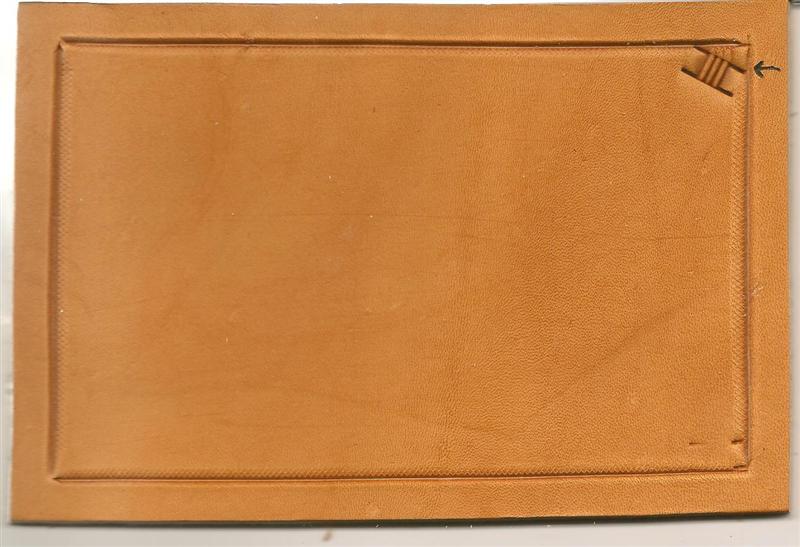
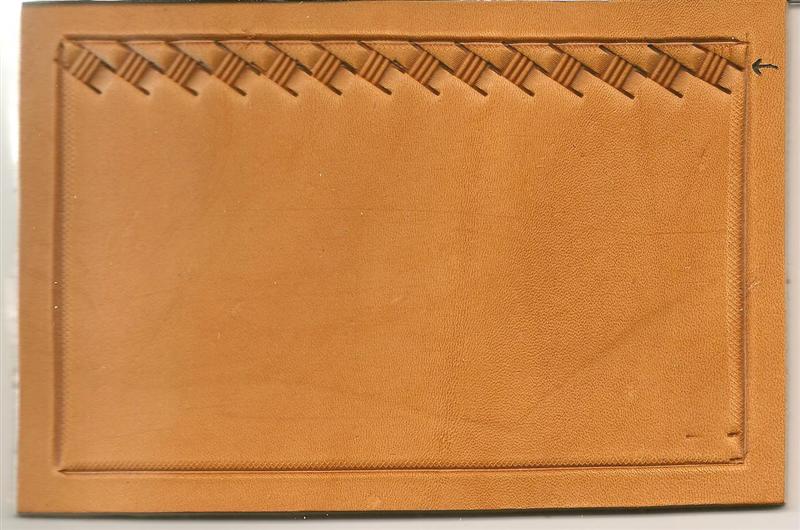
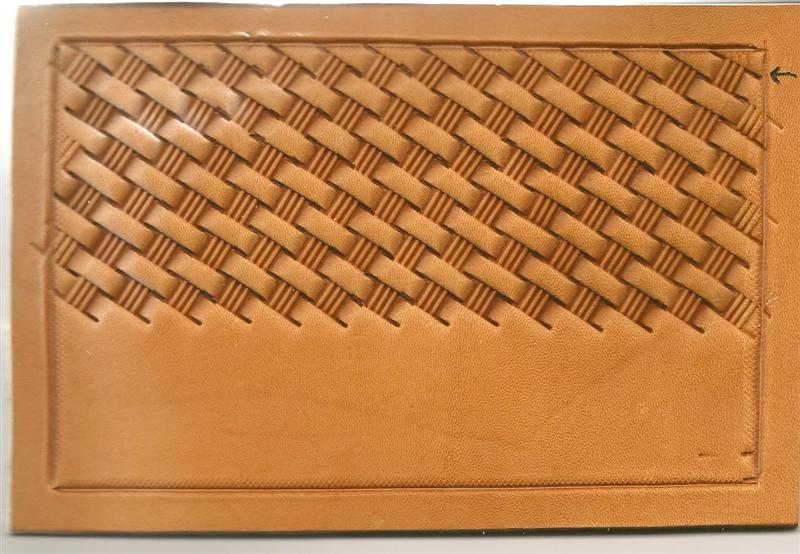
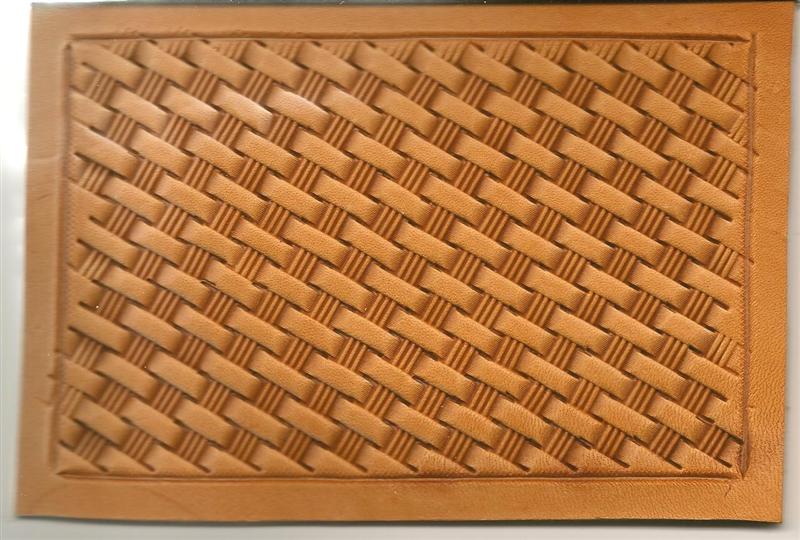
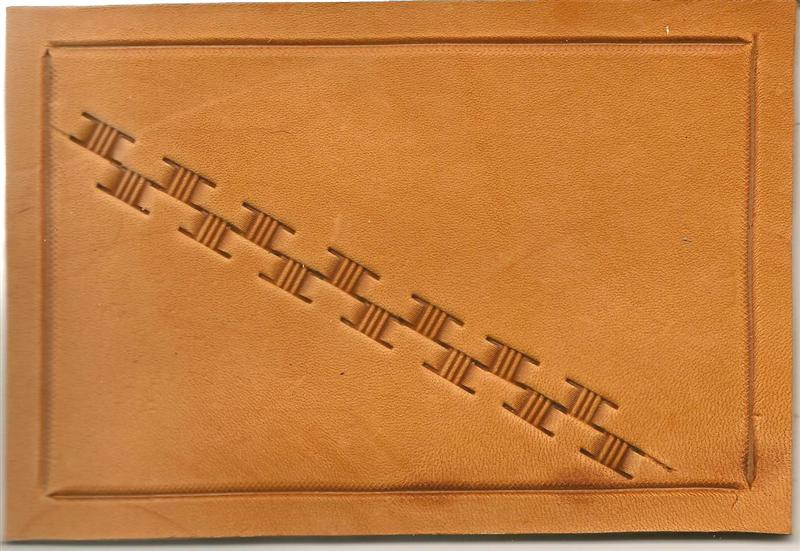
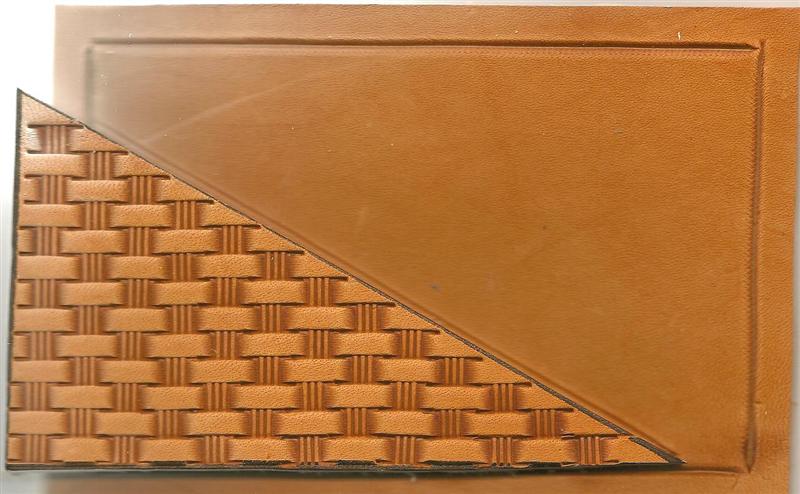
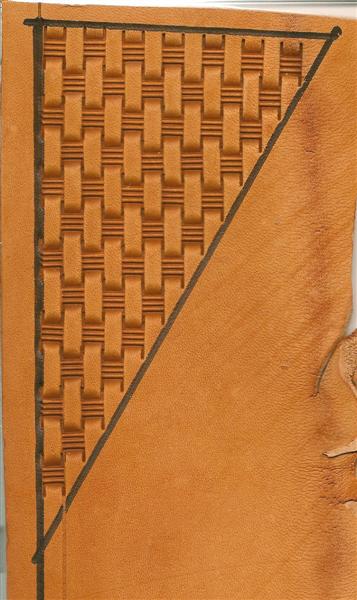
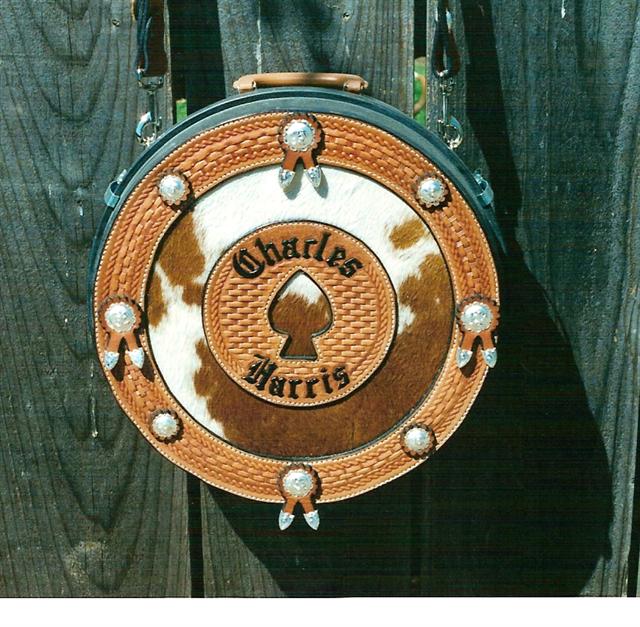
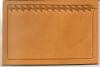
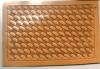
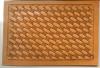
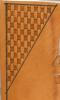
Crystal, I do a fair amount of the basket borders too. I don't like to do the curved basket stamp going around tight corners. It gets way too spread out on the edges to look good. I treat corners a few ways. On some I run them into a corner element like a floral or oak. On others I make them "panels", and have a break for them in the corners. I am attaching a couple of things I have done recently that show what I do. Both of these are three ring binders.

-
Angled Basket stamping and making a template
bruce johnson replied to bruce johnson's topic in Stamping
Alex, Good question. I like my weaves to be parallel with the top and bottom borders. Otherwise, the weave will run up or down and look off to me. Some guys l just use any old angle and not care. I like things to be pretty geometric and symmetrical. -
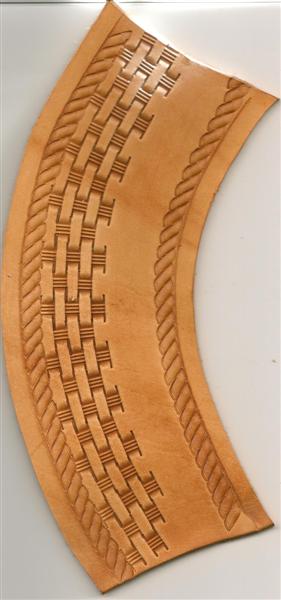
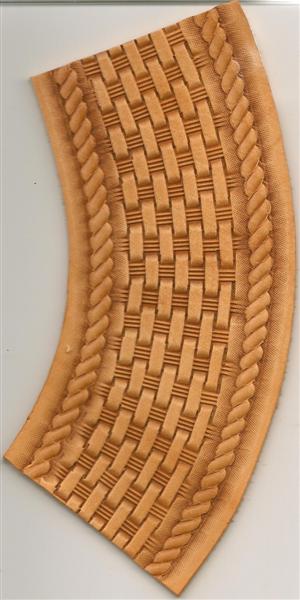
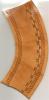
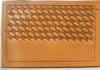
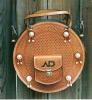
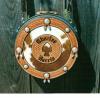
I do a lot of this type border around inlays or to break up a large area of basket stamoping on round things like rope bags and rope cans. I put in the border I use on a lot of these too. I scribe my borders inside and out, and then stamp in the rope stamp impressions. I normally start on the outside for wider borders or tighter arcs. I think these cans have a 15" circle or so. I used that pattern to make this arc. I line up the first row of impressions with the legs just barely overlapping, They will overlap more as we work in. If you start on the inside of the arc, Murphy's law says your impressions will be too wide and not meet when you get to the outer row. Murphy stamped leather too. I go all the way around the circle. Then I go back and fill in the next row. It is key to keep the centers lined up between the previous impressions. This will make the look of the centers radiating out from a common center. I stmap row by row all the way around until I get to the inside row. I finish off my rope stamps with a modified curved beveler to make the rope stand up a little and hide the inside row not coming out quite even in spots. To me it is more obvious if the impressions are not even on the outside than the inside, another reason I start outside and work in. Sometimes your legs will not overlap evenly and look a little jagged. A light tap with a flat bladed screwdriver will clean that impression right up. I did it around the outside row, just for illustration purposes so you can compare it to the more inside overlaps.

-
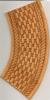
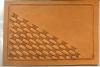
Here is another way I lay out angled baskets. Actually this is the way I do most of them now, especially for strap work. It involves no templates, and the angles may be just a bit different for the same stamp than my template method. First off, I make a light horizontal impression to establish a stamp width mark in the corner. I exxagerated the impression a bit for illustration purposes. I set one leg on this mark, and the other end of the same leg on the base line. This is my first impression. I then use that angle, setting the next impression against the base line and lining up the leg with the previous impression. I stamp an entire horizontal row. I then line up the centers, line up the legs, and stampm another horizontal row. I am building all the way up (or down) horizontally. Again, other than some leather stretch, the impressions top and bottom aor parallel with the cut borders. They don't run up or downhill. This might be a little trickier than using a template, but it results in cleaner borders for me usually. Every so often I eyeball the top of the impression row vs. the remaining open space. If it is not parallel, I fudge the spacing a bit up or down to make it work. Check every few rows, and it can't get too far out of line. Don't change it all in one row, but crawl a little with each row and it won't be noticeable except to another stamper. My wife had heck on straps using angle templates. She would get off a little on her angle, and was meticulous about lining the centers up. That made the weave start to run off one way or the other. I would fudge it back, and 6" later, same thing. I couldn't explain it right to her. I got this tip off Jeremiah's layout tape, and the light came on for her. Worth the price of admission right there.
-
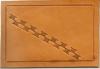
First of three little tutorials on how I lay out basket stamping. This first one is using a template to establish the angle. To make a template, I take a piece of firm scrap and lay out a base line. I stamp one row, then a row above leaving off one impression until I have a triangle. I marked the outline on the scrap of how I cut that triangle. Depending on your stamp and your personal amount of overlap, that exact angle can be different even with the same stamp. Next I took some rectangular scrap, cut in a border line and lightly beveled the inside cut. I took my template, layed the flat side on the cut line, and scribed the angle line in. Next step was stamping alternate impressions along that line, mainaining the same overlap of the template baskets. Fill in one side totally going up and down along that scribed angle. I eye ball the centers from the impression below to maintain my spacing usually. Take care of the centers, soft-eye the leg overlap, and the angles take care of themselves. The top impressions and the bottom impressions line up parallel with those cut lines (more or less, a little stretch to this belly scrap I used).

-
where can I find 6 ring binders for a 3x5 notepad?
bruce johnson replied to Doug C's topic in Suppliers
I get them at Walmart. They come in a little zippered purse size planner. I just made up a couple last week. I haven't entered that receipt yet, but want to say the planner with all the inserts was about $5. I haven't seen them anywhere else just as the binder clip. I drill out the rivets and make my own covers for them. -
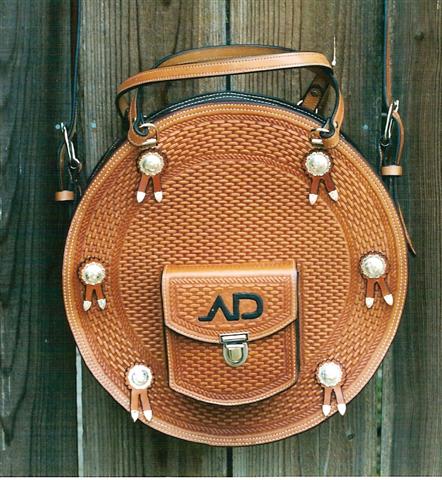
Hilly, Keith had some good points about moisture being critical to getting the right effect. Too wet and you don't get a burnish, and the weave is flat. Just right casing with good stamps and the weave rounds up and looks real. I have found that an overnight casing maintains my moisture level the best. I am not fighting moisture soaking in and evaporating at the same time. If the moisture is even and deep already, I only have to deal with evaporation. As far as the pattern getting squishy, I am assuming you mean the centers are getting closer together as you go then? Everyone stamps a little differently. Some people will butt the legs of the stamp up against the center. That makes an OK marker, if you get closer, then the legs will overlap and be obvious. I probably space mine about 3/4 or a skosh more of the length of the leg. That gives me a little sliding room if I need to fudge a line back into alignment. Personally I don't like real long rectangular stamp or patterns with a real long weave. Some guys do, and some makers make their stamps like that. I bought some last fall that I liked the centers, but the overall stamp was just too long. Last night I ground of both ends of these off to shorten the weave and then filed them out deeper on the ends betweenthe legs to re-establish that depth. Makes a whole other look to the patterns now. I like the dimensions of Barry King's baskets as well as anyones. I agree with David too about getting a rythm going. I usually play Deep Purple's Smoke on the Water with my maul and stamp. That gives me 13 hits, and it is time to set my hand down for a second to rest the shoulder with the heavy maul. It is just muscle memory moving to the next impression, and only time and practice can give you that. I like that idea of softening your eye. Some people are just worn out after a checkbook front and really focusing on it. I concentrate on lining up the centers, I focus there, and just kind of let the legs fall into the previous impression lines and let it go. Wavy center lines (the warp) are more obvious on large areas. Wavy weaves on straps like belts. If I am doing a curved basket pattern, then lining up the centers is critical. On the curved patterns, I try to make the outside row overlap only slightly on the legs. As I work in, then I may end up overlapping the centers on some radiuses. It really breaks up a circular object in my eye to mix the curved basket stamp and a horizontal stamped center. I have attached an example of a rope bag without an arced border, and a can and bag with it. Also on baskets, I like a heavier single hit rather than a couple strikes per stamp. A few factors here, less effort overall and more speed. That means less rewetting. I also use a heavier maul than normal stamping. Last year I damaged both rotator cuffs at different times. I like straight mauls for general stamping. For geometrics and baskets, I like a tapered maul. It is a lot more of suspending the maul to stamp patterns and less moving the piece around and that millisecond of rest and movement you get doing that. With the tapered mauls my elbow is down close to my side and less fatiguing on that area of my shoulder. I am not one of those guys who can rest their elbow on something and stamp. I like Wayne Jueschkes mauls for this, they seem to be weighted a little heavier toward the end and have a good dead fall effect for me. I use a 2# for the bigger stuff, and a 1-1/2# for medium stamps. Barry's mauls in my hands seem to be more neutral and I prefer them for general stamping or the little baskets.

-
In the same vein, there was someone selling a rigging gauge at Sheridan last year. I wasn't there, but see it advertised in the LCSJ. Looks like a clear plastic setup. Anybody seen it or used one?
-
Tim, The Wades I was talking about came from Timberline. I also got Dee Picketts from them as well that I like. Then I shopped trees a couple years ago just to compare, and ordered the same tree from them and Sonny Felkins on the same day. The rawhide lacing was a little smoother on Sonny Felkins. The rest of the tree was pretty much a twin to the Timberline. Bars, swell shape, cantle, could have interchanged them. Price difference was $150 more and a longer wait. That is is just what I saw. Some guys have had better luck with one or the other, and all treemakers for that matter. Obviously regular customers are going to get a little better delivery times from some makers too. There is however a bigger price difference between these trees and the Nikkel trees I have bought from other guys, as well as other handmade trees I have seen. The handmades are a step up. Problem is with more saddle makers, there is more demand on the good treemakers, and they can only make so many. For a saddlemaker who has a longer list, this is no problem. For the guy who gets an order and wants to get started, it is. I have now built up enough trees that I have a few options on hand and feel comfortable using any of them.
-
Tim, This is all somewhat independent of the gullet/handhole width and height to a degree. The barpattern itself is just narrower at least through the center. Since these are the only Timberline Wades I have used, I am not sure how it corresponds to their "standard" width bars. I don't know if the overall pattern is narrowed or just through the waist. I measured it at the rear stirrup leather cut as that looked to be the narrowest spot. I compared it to a Nikkel Wade tree I have with the same handhole width. The Nikkel tree was wider, but that is a bit deceiving because the bars on Rod's tree are deeper all the way through and should have more surface area on the horse. This particular customer's complaint with his last saddles were they were too wide. He likes a dropped 4" round ring rigging, and wanted a narrow ride. I called Timberline and told Randy what I needed to do. He suggested the "half-narrow" bars to narrow things up a little. The first worked out well. He ended up and ordered another, then his sister ordered one. He rides that one too. Later I heard the half-narrow bars are the Lady Wade pattern. I haven't ordered another Wade from them, and didn't think to ask last time I ordered other trees from them. I am not entirely sold on the concept of narrower bars to make a narrower seat. The right ground seat build up will make a wider one sit narrower, and a lower build up will make a narrower on sit wider. Also does that extra 1/2" of bar extending down my thigh where I can't bend anyway make me get a closer grip? It is on the same plane as the horse's side. Sitting on them bare on the stand you can tell a difference. Sitting rigged and covered on a horse I am not so sure. The groundseat work I think plays a bigger part in this.
-
Tim, I am not sure what they specifically do with the ground seat on the Lady Wades. We have a little discussion going on the trees themselves and groundseats for ladies over on the "Saddle Supplies, Tools, and Trees" section under the thread of "tree modifications". I have a Timberline Wade on the shelf, and have been told the "half-narrow" trees are the Lady Wade pattern. They are made with a narrower bar and the bottom bar spread width through the waist of the tree is narrower than another similar tree I have from another maker. I have built three on the narrower bar pattern for a guy who likes them.
-
Steve, I have bought some off the rack ones from Big Sky and they are good. I had a couple made up by Texas Custom Dies in Mansfield TX. They were very good and quickly delivered. I have referred several people to them, and everyone has been happy.