


bruce johnson
-
Posts
4,411 -
Joined
-
Last visited
Content Type
Profiles
Forums
Events
Blogs
Gallery
Store
Everything posted by bruce johnson
-

What are some tools that changed your leatherwork?
bruce johnson replied to Kenzi's topic in Leather Tools
Tooling - Wayne Jueschke stamps and mauls, the mauls are ergonomic for me and the stamps are about as fine of an impression as you will find. Knives - I still go back to my Dozier knife. I have had knives from about everyone and I still will never part with the first Dozier. Bob Dozier no longer makes knives. Tooling bench - I have a granite inspection plate inlet into a bench I made. Solid support underneath. No bounce and the only noise is the soft "tink" of the maul striking the stamp. -
In a word - yes. With a splitter you can split down the heavier leather to have keepers that are the same tannage and color of the strap. When I was doing production belts I made loop stock from the piece I cut off straightening the side at the top. I cut all my belts down to the "break" in the side. On the remainder of the side I made one or two passes with a strap cutter in the mid area between the top of the flanks for more loop stock. My loop stock from the top was usually firm and good. From the lower hide i cased it heavy and used a slicker to run some stretch out of it before I cut the stock to final width down there. Stitch the ends (didn't have a loop stapler then) and slide them on a loop stick and tapped them to square them up and then leave them to dry in the rectangular shape.
-
Las Vegas Leather Trade Show - January 2026
bruce johnson replied to bruce johnson's topic in Leatherwork Conversation
Nick - Great idea. I am not sure what the official "Leather Show Socials" schedule is right now. There is an Friday night event for sure. Thursday might be a good night. -
Las Vegas Leather Trade Show - January 2026
bruce johnson posted a topic in Leatherwork Conversation
Illume magazine (the leather trade magazine) has been a sponsor of the Pendleton Leather Show for several years. I just got home from Pendleton last night and it was another great show. They are now adding a new show in Las Vegas Jan 7-10, 2026. The lineup for classes looks to be really good with some fresh faces and topics. The entire event is held at the South Point. Special room rates, good place to stay. Here is a link to the event - https://illumeconnect.com/pages/event-las-vegas As a shameless plug, I am going to break out as an instructor there. I will be leading my first class on Second Hand Tools. I will be discussing why to buy them and places to look. We will cover historic tools as well as common and more modern users. Next will be evaluating condition, things to look for and the problems to avoid. We will plug all this together and come up with a number value for you and your individual needs and budget. We will discuss closing the deal by making an offer or accepting the seller's price. Class will close with a special guest and a really fun event to pull it all together. By the end you should be comfortable buying anywhere from a yard sale to a trade show to a fast paced auction. -
DIY Tooling Easy Carve Concentrate
bruce johnson replied to thecodyvance's topic in Leatherwork Conversation
Totally agree, with the different recipes out there it is a for sure that everyone makes their casing cocktail a little differently and still get results. The exact recipe I was given is 1.5 cups water, 1/2 cup Lexol conditioner (brown jug), 2 tbs baby shampoo (for surfactant to help the moisture penetrate faster and stay more even), 1 tbsp brown listerine (source of thymol to prevent mold). My real recipe evolved into making it up in a 2 liter or gallon jug by eye. three parts, one part, some shampoo and some listerine. The variable that not many consider is the tannage of the leather. Every tannery's leather is a little different. That is why I generally stuck to a single source. I figured out the amount I needed to apply based on weight of the leather, how much time in the bag or covered to penetrate and equalize, then how often I needed to reapply for large projects. I used a lot of Sadesa and understood it's behavior well. Rundi uses mostly Hermann Oak now and it takes more casing solution and I would take a longer time for the same "look". -
Kevin, I am sure not an expert but here is what works for me. I have a website, personal FB, business FB, IG page, and email list. The personal FB page mostly stays personal - what I eat, where I am out and about, not much business stuff. The business FB was kind of poorly maintained by me at the start - started off as leather work and transitioned to tools. I would add content every so often, but not regularly. Once I got on IG I linked the IG page and FB business pages so adding a post on IG automatically added it on the FB page. Over time I have gone to regular updates 5-7 days a week. The frequent updates definitely will drive you up the ladder on what shows on somebody's feeds. It is interesting, this week I have not updated in 5 or 6 days, busy with tools coming in and getting them ready for the Pendleton show in a couple weeks. With no social media/website updates, I have been getting 3-5 contacts the last few days asking if I am OK. (Yes I am, just busy this week in the background of this one man band). Website - the central focus of everything else I do is my website. That is the catalog of tools and resources. It is the most complete and current place I have. Granted I am bigger in inventory than most any leather business, but I look at a lot of business websites and the social media of my customers. I am truly curious what they make, level of experience, and a little more about them. Personal bias, but I feel like a website is pretty much a necessity to say "I am serious". They don't have to be fancy, just functional and some eye appeal. There are enough plug and play platforms out there that really it is not hard to set a website up. You may not get the search traffic right off or ever, but you have a place to lead people to from your social media for more information and likely to see things they didn't know they needed. The other thing is that websites don't follow the whims of social media. A few years ago it got tough for several people. Social Media went through a stretch that anything with the word "knife", "pistol", "gun", etc was a weapon and got taken down. OP got banned or a timeout for posting. People started spelling the key words out or incorrectly to get around it, calling holsters a pew-pew holder, no-go after about a week there after the social media enforcers caught up. (no reason to argue the reasons - it happened). Josh at Montana Knife lived it. He was growing on IG like crazy and then in about 2 days, they decimated that. He had enough following to lead them away for his updates and in the long run probably created more interest. Some knife and holster makers didn't have any websites to refer their customers. I was calling leather knives "leather reshaping and resizing tools" for a good while. I had one guy who didn't get it make the comment "That's a round knife idiot, don't you even know what it is?". Thanks to that comment I got a 10 day timeout. Instagram and FB business posts - Short regular posts often help more than a long post less frequently. I have a few reels and they go over well, but mostly I am adding still pictures of fresh tools added that day to the website. Personal FB - I try not overlap much and keep the business/personal separation line kind of there. My high school classmates, old horseshow friends, and old coworkers probably don't care about my latest round knives or splitters. However my business customers sometimes appreciate seeing a glimpse of my personal life. MailChimp - I have a sign up list for emails when I add new tools. Some people just don't do social media at all and some infrequently but want notifications. The nice thing about this is that they have to sign up but have the option later to opt out. That is an intentional act and shows some level of interest, not just clicking a post. MailChimp is who my website guy suggested and has been good. People sign up to receive emails from me. Whenever I add new website content, I send an email. You've all got them from other businesses. The nice thing about MailChimp is that they handle the legal stuff. There is an opt-out link on every email. They are generally recognized as a safe sender. When I would send out 30 emails from my regular email, I would end up as spam more often by some filters. Now my list is a little over 700 people and usually only 2-3 that aren't delivered. They have a separate SMS service that sends text updates as well. I had people ask for texts and looked into it. That is a whole different deal and much more regulated. There is not a flat rate, you buy credits per month. Someone local might be one credit per send, but someone internationally might be 3 credits. There is a legal time of day window for text deliveries and if you fall out of that, there are lawyers waiting. The SMS services allow for that but I don't want to be "that legal target" when the automatic send messes up and somebody gets a 3:00 am text.
-
I am not going to be a lot of help. I watched the old man who taught me a lot do some stapled loops one afternoon. He was cutting the slit with a knife. I can't remember if it was angled, straight, or what. That was years ago and he has long since passed on. On a more helpful note...I was just thinking about getting a hold of you. I got some nice loop press dies in an estate shop purchase. There are probably about 40 of them. If you are interested send me an email. Thanks! - Bruce
-
I'd say 9 mm just because that is what I've got and it makes ammo purchases easier. I do have one .380 Auto but opted out on putting that on my last CCW renewal. Todd, True enough and generally the higher they are up the food chain, the less they know or care. I had a guy come in with a high dollar belt several years ago and tell me the edges looked like s**t after a month of wear. At that time the maker was pretty well known. ( He posted one time three swipes and I'm done, that's all you need. I'd believe it.) It took me maybe 15 minutes time to burnish and I was going to charge him $15. He picked it up, tried to scratch the edge with his fingernail, and gave me $100 at a time when I needed it. He became one of my first discerning customers. Two using saddles, rope bag, purse for the wife, bunch of reins over several years. Every time he called I wondered if I screwed up something. Nope, another order. I saw him about 5 years ago. He said the belt was a daily wear then but the edges still look good except where the cell phone pocket clips on. Edges mattered to him and he still remembered that damn belt.
-
First off this is kind of tongue in cheek, but I think about some of the guys gone-on. I learned a lot from them and some pretty good stories and history. One that sticks with me is whenever edges and treatments came up. Some of them were pretty hard boiled and others were "whatever". While it isn't as contentious as discussing religion, politics, or the best pickup, whatever we call edge working could bring up some pretty heady discussions with some of the viejos. It is interesting be on the sidelines of some of these discussions. The one camp said that burnishing was bonding the fibers to smooth them. Slicking was simply laying the fibers down without bonding. The other camp just called it all slicking or burnishing to goad the others into a fight. The strict say - Burnishing is usually done with heat with pressure to bond the fibers. Your leather needs the right moisture level much like casing and then apply some sort of pressure with heat to bond the fibers. Friction through either speed, pressure, and roughness of whatever you are rubbing with provides the heat. The other option would be using a burnishing iron. The fibers bond to each other and seal the edge. Most all will accept the hardwax edge done with rubbing or an iron to be called burnishing. Slicking - Simply laying down fibers but they don't bond to each other. We all know that you can't burnish most chrome tans well. We can make a smooth edge with pressure and some treatment and those strict interpreters call that slicking. This where apply soap, dressings, soft waxes comes to be called slicking by the hard liners - it is laying down and smoothing fibers but they don't bond to each other. Looks nice and smooth but doesn't last as long. It starts discussions when you say "I burnish the edges of my latigos". The strict ones will tell you that is not burnishing and for even saying such a statement you will now be tending fire for eternity instead of playing harp. Where are we at in the middle ground - no man's land? Is it slicking or it is burnishing? What about the old trick that used diluted white glue? That is bonding the leather and providing some heat from rubbing but is the glue cheating? There was the "Goodie Mix" that was a varied recipe of acrylic finish and Atom Wax. Bond and seal there and works well on chrome tans. Gum tragacanth, Tokonole, the commercial mixes? In the end - call it burnishing, call it slicking, call it what you want. I will be in services at the Blessed House of the Leather Edge Smoothers.
-
When I got the Ferdco 2000 I was dumb and didn't think I needed two machines. Sold the Adler 205-64 for more than I paid for it - $2500 with table, stand, and 1st generation servo motor. I talked to a guy who bought one last year for $2700 - table and no motor. He was happy.
-
Blevins buckle oxidation
bruce johnson replied to BlackDragon's topic in Saddle Identification, Restoration & Repair
Springfield Leather has them, K-S from Texas, - I didn't search it but likely a google search for "Stainless Steel stirrup buckle" would give you more. If you aren't married to the Blevins style buckles - Batz has the version originally called the Fast Buckle that Ben Veach developed, Toby Yoder at Ron's Tools has Farrow buckles, and Weaver and others likely still have the old Superior Quick Change buckles. -
Blevins buckle oxidation
bruce johnson replied to BlackDragon's topic in Saddle Identification, Restoration & Repair
That is actually kind of mild compared to some I have seen. I have replaced a few that one post was totally eroded off and the other was a nub. Unless they get the length changed, a lot of people never check. One advantage for the stainless steel knock-off makers. -
With a few recent topics on different tools and recommendations, it has come up that the "Resources" section of my website needs to get a mention. Tool Talk - this is kind of a blog/kind of my thoughts at a random time - https://brucejohnsonleather.com/links-resources/tool-talk Tutorials - Here are articles on choosing a particular tool and using tools. These can be read on the browser or downloaded as PDFs. - https://brucejohnsonleather.com/links-resources/tutorials Historical Catalogs and Information - Old tool maker catalogs and some dating back to the 1800's - PDF format for downloads - https://brucejohnsonleather.com/links-resources/historical-catalogs-and-information Leather Tool Makers and History - the page that started it all and a carry-over from my last website version - https://brucejohnsonleather.com/links-resources/leather-tool-makers-and-history Leather Worker Links - links to magazines, forums and websites, video and podcasts. - https://brucejohnsonleather.com/links-resources/leatherworker-links
-
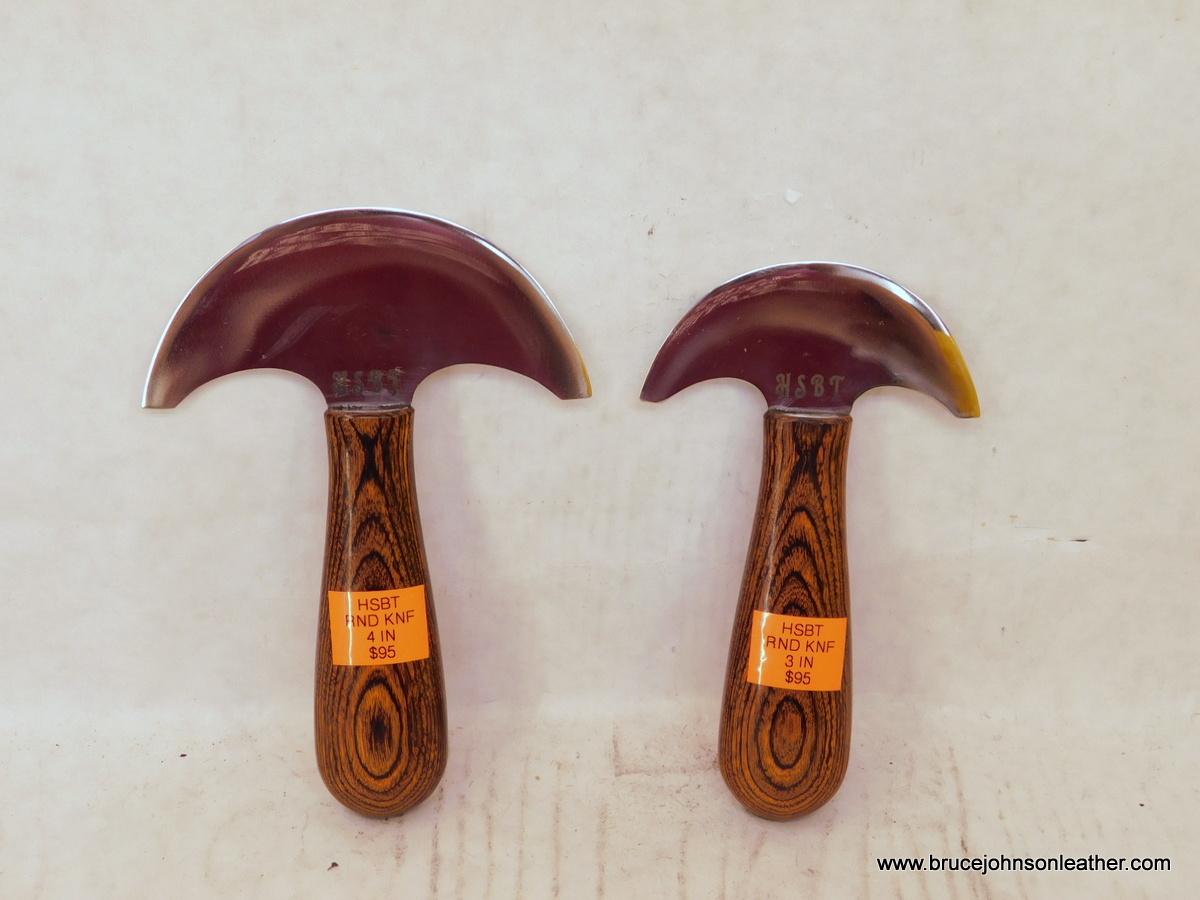
I have added two new knives to the website that I am stocking. These are the new fixed handle round knives from Jeremiah Watt at Horse Shoe Brand Tools. The steel is the same steel used in the original Gomph knives and the handles are laminated birch. I made a small order to start and tested one. Out of the box it was the sharpest on my edge tester of anything close in price, the only knives that test sharper are three times the cost. I did final edge sharpening, tested it and then used it on leather, then whittled some wood with it. It stropped right back to within 2 points on the sharpness tester. Needless to say I ordered more and have them stocked. I think these are the best price point knives available. These knives come in 4 inch and 3 inch widths - handy sizes and not intimidating. Handles have a nice size and shape. The price is $95, and all I sell are final sharpened by me. They carry my "Buy from me, I resharpen for free" - the same as all the other tools I sell. They are on my website on the Horse Shoe Brand Tools page of the new tool section and also on the "Knives" page. Here is a link to the website - https://brucejohnsonleather.com/ Thank you!
-
Removing double sided tape glue residue?
bruce johnson replied to memhave's topic in How Do I Do That?
Sanding belt cleaner - it is a crepe rubber block available at about every hardware store. It is the same as the glue erasers that the craft stores sell except about 100 times bigger for about 2 bucks more. -
Here ya go - they all ship every day. Oregon - Maverick Leather in Bend - worth the drive no matter where you live in OR just to see what all they have - https://maverickleathercompany.com/?s=harness+leather&post_type=product&wps-title=1&wps-excerpt=1&wps-content=1&wps-categories=1&wps-attributes=1&wps-tags=1&wps-sku=1&ixwps=1&_gl=1*4kuqv*_up*MQ..*_gs*MQ..&gclid=CjwKCAjwi4PHBhA-EiwAnjTHuRHS2rCUXiF0-aFPMVKTHpXv6pcWsXCieexGJyJ2nLQp4AQLcT9L7hoCxQAQAvD_BwE&gbraid=0AAAAAp5_iBoDKVnVemCTq9k8gNZoN4eEn . Montana - Montana Leather in Billings - We stay overnight in Billings on trips through just so Rundi can buy leather and I buy assorted parts, punching pad material, and stuff that I didn't see the last time. https://www.montanaleather.com/?utm_source=google&utm_medium=ppc&utm_campaign=Branded&utm_term=montana leather company&gad_source=1&gad_campaignid=1693802091&gbraid=0AAAAADRa0hbBL1qP6RO9Hq3Mkg58FONo7&gclid=CjwKCAjwi4PHBhA-EiwAnjTHuSxxfKuhlG64-vkBkBLaJSirb51pUPxYPSkhuALrcxa7Mrnpaa3K8RoCXEgQAvD_BwE&mot_q=harness Texas - Panhandle Leather in Amarillo, haven't been there but reputation is A#1. - https://www.panhandleleather.com/collections/leather/products/hermann-oak-harness-leather?variant=44642698494211
-
My general impression is that a single blade and a basic Craftool knife eventually trade hands for around $50. That is perfect with no chips. Sometimes you will find the right buyer who will give $60-$70. It looks like from the pictures one of the straight blades is chipped. If so, that makes it a part of the team but sitting at the end of the bench. Two good blades - I'd think expect $80-$100.
-
Fortuna Leather Splitter not turning on.
bruce johnson replied to Morgan311's topic in Leather Machinery
My first call would be to Campbell-Randall. They are on here as a member but you will get faster results calling them. -
Part of the process of tanning is adding back oils/fats and one of the treatments is called fat-liquor. From what I read - not a single substance but various sorts of sulfonated oils depending on tannery. I was told years ago that sulfonated neatsfoot oil was one of them - one of the major ingredients in Lexol leather conditioner. The reason that the historic casing mix recipe I was given contains Lexol conditioner.
-
Yes, Obviously too wet when you are stamping and fluid squeezes out but I have had that milky fluid with some leathers. My thoughts are it is some of the oils and treatment in the leathers. Before we kick the can here, it happened mostly to me with Argentine vegtan leather from the Sadesa Tannery. Sadesa was some of the cleanest and finest leather I have tooled. Not all foreign leather is cheap urine smelling crap contrary to keyboard advice. Sadesa did not get as boardy after casing and tooling like some leathers do. The word was that it had more treatments. Casing is an art, but not rocket science. There are wipe and go/rewet as needed people, drown it and air it for a day people, and a lot of wet it/bag it, and set aside folks. Some good toolers wipe on something like saddle soap or baby shampoo and slick before tooling. My casing mix is milky to start with. Water- Lexol - baby shampoo - Listerine. Herman Oak and some others that tended to be "drier" I used more Lexol in the mix. This mix gave me more working time, better burnish, better molding, and more even oiling and dying afterwards. Everyone else's mileage will vary. If plain old water works - great. The bottom line is stay with a consistent leather tannage and learn what works with that leather. Then you aren't trying to figure out the moisture amount and time for even penetration on every new piece of leather you get.
-
My thoughts- Bundle leather by types. Veg tan leather/chrome tan/kangaroo separately. Rest of the tools - depends on makers. If these are makers like Barry King, Robert Beard, Gomph-Hackbarth, Ron's Tools, etc. - it is worthwhile to separate to the "each level". They are a whole different deal to sell If these are Craftools - i would bundle. Realistically in my experience - the common handled Craftools bring the same price each whether you are selling one at a time or 10 in a bundle. Stamps - ditto. I would suggest bundling into groups by type and not go further. I am going to politely disagree that you will get more selling them individually. What will probably happen is that a year from now you will have the dregs still on hand. The extra money you made is offset by the per-piece you have looking at you. At the shows I sell stamps for $5.00 each - over the course of the year, half sell and the rest are given to kids or veteran's groups. Handled tools used to be $5.00 as found. Now I sharpen them as much as my other tools, then sell them for $7.00 after shooting pictures, descriptions and loading them on the website. Am I losing money in the time vs return column? You bet but I am clearing totes and getting requests before many ever hit the website now. I am getting to the point where I am probably not going to have a "bargain table" at any shows except Prescott. The bargain table does better there than the rest of the shows together. Here is Option B- I am going to be a vender at the new leather trade show that Illume magazine is putting in Las Vegas in early January (South Point). I am doing a double booth as usual. I will not have a bargain table there. If you want to put your stuff on one of my tables, I should have at least a half table available.
-
That's a fact! I like playing with some of the old formulas. When I was handsewing a bunch, I made up coad (handsewing thread wax) with pine pitch and beeswax. Cook it all together and knead it underwater when hot and shape into balls. Fun stuff to use. The old timers had summer and winter formulas that varied the ingredients to make a softer wax for winter and harder wax for summer, since those old shop temperatures varied with the season. My leather edge wax for years was 50:50 beeswax/paraffin. Melt it together and pour into muffin wrappers. I cooked down dark brown spirit dye to make a thick concentrated dye-pigment additive for some cakes to color it. My handle treatment for hammers and tool handles is an old time boiled linseed oil/beeswax/mineral spirits mix to make a paste. It is also good for a rust preventative on knife blades that aren't used much or before storage for the season (filet and hunting knives). In the last couple years I have made a turpentine mix that substitutes for the mineral spirits also. That smells amazing while it cooks and good for handles. The big shop smells great for days. I also make a "finishing wax" with BLO/carnauba wax/turpentine for the final treatment on tight grain exotic wood handles. I pour those pastes into 4 oz balm tins to set up and store. The old guy that taught me a bunch about tools had the saying "Beeswax to stick/paraffin to slide". Old men are generally wise and I follow that advice.
-
Is The Dot Snapmaster Worth It?
bruce johnson replied to Joon1911's topic in Hardware and Accessories
Actually there was a post yesterday to this thread from Ahahn about pull the dot dies for a hand press. I quoted and replied to that. I don't see the post now. My fear now is that I my have have deleted that reply accidentally as I quoted it (most likely), or it was deleted by the poster (less likely). -
Is The Dot Snapmaster Worth It?
bruce johnson replied to Joon1911's topic in Hardware and Accessories
It would take special tooling for the setter and anvil and I haven't seen that as a "stock item" It would take special tooling for the setter and anvil and I haven't seen that as a "stock item -
I wax my dies sometimes but with paraffin. Much as I like beeswax for some things, I like paraffin better as a lubricant and also as a rust preventative - especially after clicking a bunch of chrome tan. I do the same with punches that don't see much use. The nice thing about beeswax is that it melts with a little friction but then solidifies and gets sticky and hard again as it cools. That's what makes it great for screws and handled tool treatments. Also why it was and is traditionally used in mixes for handsewing thread wax.