


ContactCement
-
Posts
91 -
Joined
-
Last visited
Content Type
Profiles
Forums
Events
Blogs
Gallery
Store
Everything posted by ContactCement
-
Who's making quality mauls these days?
ContactCement replied to SouthernCross's topic in Leather Tools
I have not tested this one yet for durability for use with leather stamps. Woodcraft has a Wood River smaller 14 oz chisel mallet. For $19.99 and a 90 day warranty it may be worth looking into. I'll probably get one from the local store and beat on those picky ill tempered leather stamps. I think the plating plugs the stamp design and can make a leather crafter think their current maul or mallet is ineffective or defective. There are some copies of it the wood river chisel mallet online for less and I doubt any are warranted. A I always say some off brands may be cash in the trash. Besides if it fails I may get a chunk of plastic and turn a replacement outer sleeve. Either way it not a huge financial loss. t*ndy charges $12.99 to ship their poly maul making it a bit pricy even when on sale. I don't have the Midas touch nor am I wealthy. https://www.woodcraft.com/products/wr-chisel-mallet-14oz?via=573621f469702d06760016cd%2C576328b569702d31fb000993 -
Thanks for the info. Hopefully the combined data helps others as well. The main drawback I see with my maul is the PVC pipe wall thickness. It is however epoxied to the wood. I suspect the metal weights / discs on other mauls compensate for the weight of plastic and stacked leather handles. I personally see threaded rod as a potential weakness if the wrong metal is used. It should be only threaded at the ends so it doesn't score hole in the plastic weakening it. The worst part of most retail name brand leather mauls is I rarely see any implied warranty or replacements plastic sleeves. Which is unfortunate the main reason I made my own.
-
I'm a woodworker and own a compact planer. That's an Extremely Dangerous idea leather on flat metal plate. Even very thin wood not recommended can flex / bend and get caught maybe ruined or thrown from the machine at very high speeds. A compact power feed planer like this can catch a wood knot & easily put a board through a wall. Its designed for wood (much harder and thicker than leather). The input feed rate and cutter rotations RPM are designed for lumber only. Slowing planer input feed increases cuts / rotations per inch. The adjustable speed and feed rate planers are very expensive..(my out of reach dream tool for a while) Lol. The right tools and their proper application will save wasted money / leather and keep you safe out of the hospital or at least reduce injury to yourself.
-
Who's making quality mauls these days?
ContactCement replied to SouthernCross's topic in Leather Tools
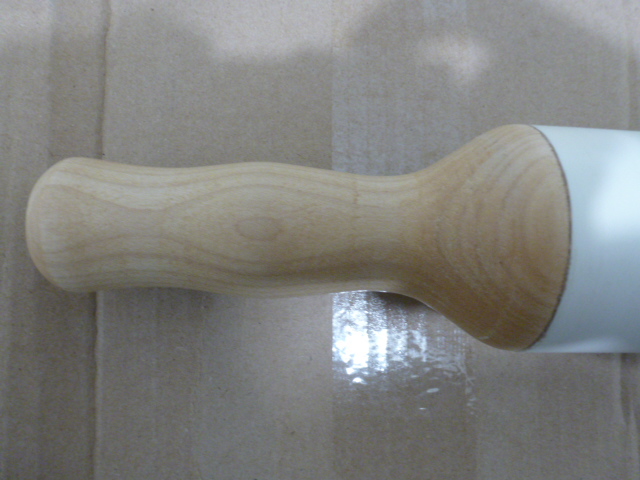
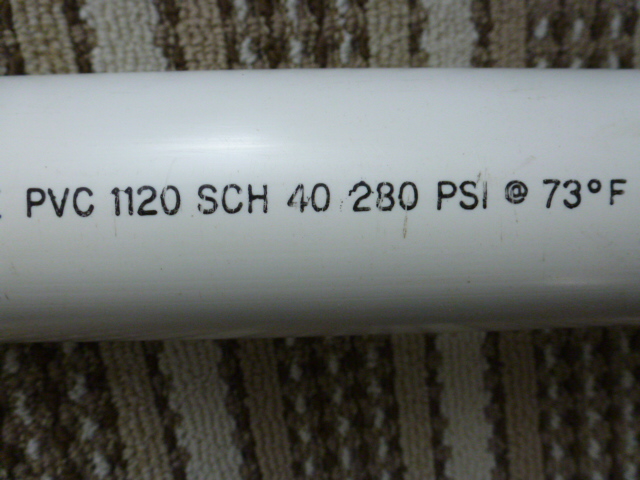
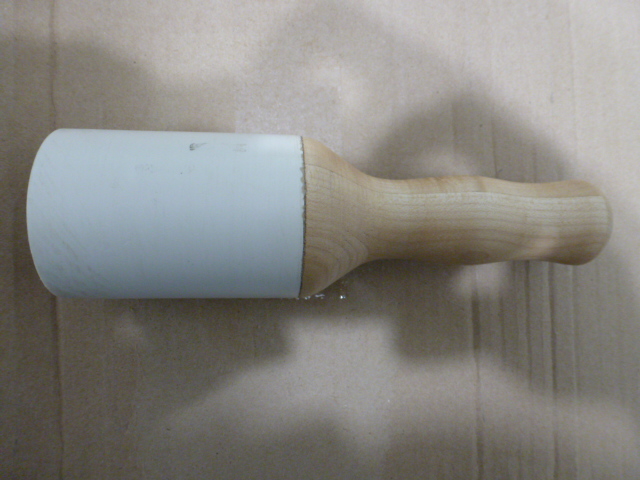
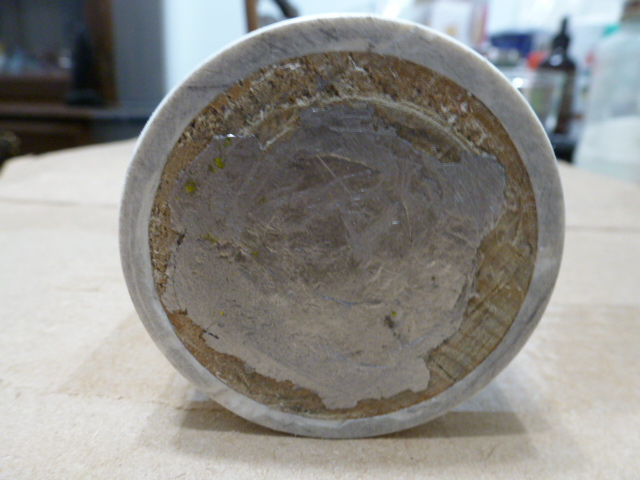
I recently made this PVC Pipe Leather Maul. Here's how. I used hard maple turned it to a perfect cylinder with a slight waste wood taper on the working end and a shoulder the thickness of the PVC pipe. Flatten and fine tune its diameter with fine sandpaper and a hard sanding block using the wood lathe. Check the diameter as you go using cheap digital calipers in several places Do not make it too loose. If it slips on by hand you have made it too small. Make sure its a snug fit. But not so tight it damages the PVC. The Two part epoxy used will act as a temporary lubricant work fast. Use a mallet larger than the handle diameter and a hard flat surface to contact the PVC pipe then drive the wood into the pipe. Now let the epoxy harden and cure. Place the whole mallet back in the lathe and trim both the wood and PVC pipe even. The PVC maul was tool light all alone so I pounded a lead bar round on my anvil. Next I drove the lead through a 1 1/4 hole in hardwood to shape it. Finally I drilled a 1 1/4" hole into the maul then drove the lead into the mallet. Yes the lead hit bottom out and mushroomed a little. No big deal. This is a nice diameter and weight. This PVC plastic is in my opinion very tough 280 psi and currently is not leaving dandruff and it has not cracked or split. I have not noticed indentations so far in the surface of the PVC maul. No its not the celebrity brand name with an exotic wood handle and metal turned in a metal lathe. The stamps and tooling leather frankly don't care who made it or what brand it is. Keep in mind not all plastics are the same and the picky stamps do not tolerate every type of plastic. Some black plastics dent easily and others will either chip or flake or split. I don't know how long mine will last but its dirt cheap and it works good enough for me as of now. Buyer beware I purchased a name brand stamp set and a magnet will not even stick to them. Yes you guessed it the basket weave stamp broke. Cash in the trash. While I can still edit. The overall length is 8" and the PVC pipe length trimmed in the lathe glued to the wood is 3 1/4" Nothing magical about these measurements. The diameter doesn't block my view like a larger diameter wood maul with similar weight. This is my first functional PVC proto type leather maul. A harder denser wood and a little more length may increase the weight a little. The lead really added weight fast and cheap. The outer PVC diameter is approximately 2 3/8" Also friends or handymen even stores may simply give you the cut off plastic pipe scraps too short to use for plumbing. My final closing thought about brand name mauls. Are they throw away? Do they last forever? Are they even warranted? I have never seen a replacement striking sleeve for the super expensive fancy machined metals turned on a metal lathe. If your leather craft projects sell for big money and allow for cash in the trash that your choice and fine by me. I can barely afford to purchase stamps and leather. Have fun everyone.


-
PVC PIPE LEATHER MAUL. UNFORTUNATELY TOO MUCH TIME PASSED AND THE ORIGIONAL TITLE WAS INDEED CORRECT. I am correcting the dimensions from the earlier post. The Outer Diameter is Approximately 2 3/8" and the Inner Diameter is 2" ( I used a ruler not vernier to measure the outer diameter ) The photos are proof. Anyhow this PVC pipe maul takes a beating and hasn't become indented as of now from tools. The length is 8 1/4" and the striking surface length is 3 1/4" The bottom line and reason for the post is to prove that one does not need a metal lathe to make a decent leather maul. Simply put: The tooling leather most likely don't care how much you wasted on a brand name designer leather maul.


-
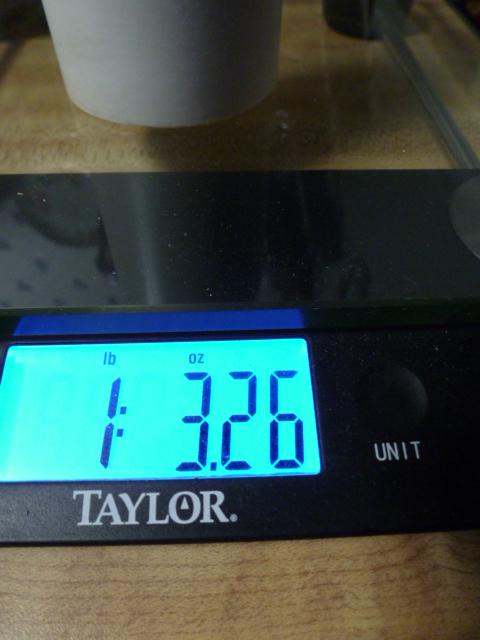
What is needed for the project. Advanced wood turning skills to turn a perfect cylinder matching the inside diameter of the plastic pipe. Two part epoxy. Lead bar which I pounded to shape on an anvil then pounded though a hole in hardwood. Finally I pounded it into the 1 1/2" hole and added 11 oz to the wood mallet. A grand total 23 oz mallet. The plastic pipe seems to be pretty tough and keeps the wood inside from splitting. Do not drill too deep for the lead. A little lead adds weight fast. Its winter and I didn't need to melt the lead bar to shape it nor did I wish to breath the fumes. Oh hard maple was used and 2 1/2" plastic pipe. Let the epoxy cure well before use. No glue needed for the lead. It simply expands to fit when pounded into the hole. I forget the abbreviation on the 2. 1/2 " plastic pipe as if was buffed and trimmed to length on the wood lathe. Its worrking good enough for an easy impression with a couple strikes.
-
Imported leather edger first impression.
ContactCement replied to ContactCement's topic in Leatherwork Conversation
Here's the link. http://www.ebay.com/itm/Wuta-Leather-Edge-Beveler-Edge-Skiving-Tools-Belt-Makers-High-Carbon-Steel-/152609445287?var=&hash=item23883b55a7:m:mjJUQWMYjVohDQCJcKDwltQ https://en.wikipedia.org/wiki/Carbon_steel -
What are fancy bellies good for?
ContactCement replied to CaptQuirk's topic in Leatherwork Conversation
The leather belly quality varies. The marks or imperfections tell a story about the animals life. Depending where they were raised indoors vs outdoors there may be marks from bug bites, animal attacks, rocks or sticks or stretch marks and scars from everyday life. The occasional 1" -2" cuts may be from careless butchering or poor attitude of its a belly sell it to the poverty pickers who cares. -
Affordable quality leather edger right out of the box. When placing the order I knew very little about the manufacturer or how well they would perform. These were reduced and had limited quantities under $10 each with free shipping. The listed or advertised measurements or specifications for the bevelers is accurate. I think some manufacturers have different specifications or ideas about what a defines their #1, #2 or #3 This #2 is much smaller than another #2 I purchased. Material:High carbon steel + solid wood. 135mm,(5.31") long. Manufacture process: Quenching treatment. Sharp and smooth. No.1 comes with 0.8mm wide bevel, works better for 1.0-2.0mm thick leather (thin) No.2 comes with 1.0mm wide bevel,works better for 1.75-2.65mm thick leather (medium) N0.3 comes with 1.2mm wide bevel, works better for 2.2-3.2mm thick leather (thick) The metal sounds like its tempered (just like other tools in my wood shop) when gently flicking it with a fingernail. The edge beveler does in fact cut veg tan leather right out of the box. The edge beveler arrived faster than expected. The cardboard box described was inside 2 bubble mailers. The edge beveler has a clear tubing to protect the cutting edge and was inside a mini zip lock bag, then packaged in a foam lined rectangular cardboard box with the brand name on it.
-
Overpriced for the quality. Craftool 3009-00 I did not pay full retail I bought mine new at an auction. The one tool does all concept is nice or appealing somewhat and is probably for the casual leather crafter. Just by looking at the quality I cannot say how well the removable punch tips will hold up as I have my doubts about the design. This removable punch set should give me the same stitch spacing as the more expensive set. The punched holes were easily made (no brute force) using a light weight skinny craftsman mallet. The punched holes looked pretty good and the punches pulled free from the leather easily. I cannot comment on any final hand sewn results yet. I'm still waiting for some inexpensive 1mm and 1.2mm waxed thread to arrive from another country. When I find the stitch spacing, appearance, number to teeth I like or use most using the screw in punches I will later on purchase the more durable individual diamond chisels. The more durable black coated solid single stitching chisels listed appear to be described as having the same tooth / prong specifications and spacing. It should be an easy upgrade if I like the end results. NOW FOR THE BAD The handle and punch tips both have threads. The handle and punch tips both have machined flat areas or shoulders that should be in contact with one another when fully tightened. If they don't make full contact vibration from use may cause damage to the male and female threads over time. Several of my punch tips did not fully tighten and make full contact and had a 1/16" gap. I had to use a rotary tool to remove excessive coating from the threads of a few punch tips. Oiling the threads in my opinion was not even an option as it would get onto the leather and ruin it. After gently securing the punch tips in a wooden clamp, I screwed and unscrewed the punch tips 7 - 8 times each until all of the punch tips eventually made full contact. I will buy solid punches from now on when I find my favorite stitches per inch needed for projects.
-
Are Prongs Different Sizes Seiwa Stitching Chisel?
ContactCement replied to Docott's topic in Leatherwork Conversation
I recently purchased some craft tool diamond chisels. 88046 - 1,2,4,6 prong diamond chisels. I used a metal ruler to measure nothing fancy. The teeth / prong approx. 2mm width & maybe 1.5 mm thick. Space between prongs is 4mm as described. Using a steel rule SAE these are approximately 4 stitches per inch. I noticed the metal handle diameter increases with the number of prongs / teeth. The tools teeth / prongs are reasonably sharp, smooth and went through the leather easily with very little effort. -
Are Prongs Different Sizes Seiwa Stitching Chisel?
ContactCement replied to Docott's topic in Leatherwork Conversation
It depends on the manufacturer. A lot of stitching chisels appear to use the same tooth or prong dimensions and just vary the spacing. I recently bought a single tooth pricking iron and just use a stitching wheel to get the spacing I want. My little experience tells me this... More teeth or prongs = more friction when removing a stitching chisel. It was simply faster to pull fewer prongs out of the leather. If I buy more high quality stitching chisels in the future they will be a 1 & 2 prongs. -
Pricking iron vs stitching chisel vs lacing chisel
ContactCement replied to Markwell's topic in Leather Tools
Yes a simple refresher of what I researched online. Yet I have other questions to address regarding various brands and dimensions before blindly experimenting dumping money on pricking or stitching chisels. My biggest complaint is how sellers attempt measure and describe stitching chisels. They demand top dollar for an often times poor description of their products. Most don't even attempt to make their product work and measure the actual stitch length and put that very simple yet necessary information on their advertisement. I read that some measure from the inside flat edges of prongs yet fail to give the tooth width or thickness. Again other sellers measure from the tip of the tooth to tip of tooth and often fail to give measurement for the tooth width or thickness. If I was manufacturing this stuff, the tool length, metal type, tooth width and thickness, stitches per inch and stitch length and even suggested thread size would be in the advertisement. -
The local Tandy store is 60-120 miles away and the local hobby stores don't much thread for sewing leather. Its either sinew or leather lace. I would really like information for stitches per inch required for various leather thickness. I will be hand stitching and have learned the 2 needle method quickly. I do have a roller spacing wheel set. I'm still not any good with a diamond awl haft. So to avoid an ugly project (hopefully a messenger bag) I just chose the more expensive modern approach or shortcut to get me started a little quicker. I purchased a Craftool Pro 3.5 mm Fine Diamond Punch which works great. I however have purchased various thicknesses of bagged scrap leather to perfect my hand stitching using 40%- 60%coupons and will someday need another stitching punch to get the spacing / stitches per inch correct for each type of leather and thickness encountered in this journey. My very first attempt at hand stitching went well and I hand sewed a replacement purse strap for my wife. Friends say it looks a lot like a machine did it. It was enjoyable and very relaxing, even very satisfying. I just need a little thicker thread to properly fill the punched diamond holes for a better appearance. I'm experiencing the slight frustration of scattered and incomplete information which basically slows down my attempts to eventually master this hobby. There are so many types of thread sizes and what they are made of and then combining that with correct needle. Leather crafters really need a needle size, thread weight, and stitches per inch chart for various thicknesses of leather in pdf. If any chart exists lets put it somewhere that is easy to access if not maybe someone will someday make one. Thanks for your time.
-
I'm just sick of paying mechanics tool prices (and most mechanics tools are lifetime guaranteed) for non warranted garbage or tool shaped "specialty" objects imported and sold to leather crafters at the customers expense to make a quick profit.
-
I may have gotten a recently manufactured Craftool Pro Fine Diamond Chisel 88057-08 3.5 mm or just very, very lucky as the handle and prong surface my 6" ruler is resting on in the photos was that way when it came in the mail. The angled surfaces between the teeth did have a few light horizontal machining lines as shown in your photo. But they weren't as deep as the photo of your teeth / prongs. I sure hope its not a gamble every time a order a stitching punch from them.
-
I'm an advanced woodworker that's a plane iron. Yes I can read newspaper print through my thin wood shavings. Under high magnification the machining marks on a blade look like tiny hack saw teeth at the cutting edge. When this catches the grain and fibers in wood it is like slamming on the brakes of a car. Lay the blade / plane iron flat bevel side up on some wet dry sandpaper approximately 1/2" from the edge work it until its flat and shiny like a mirror. Next hone the bevel until its shines. When its razor sharp no light will be reflected from the sharpened edge. If the sharpened edge looks like a tiny shiny, wire it is still dull.
-
Brand names or popularity contests for tools mean nothing to me. Quality does. The bevels when properly made should be flat not round. The consumer in an ideal world should never feel the need to flatten and hone a brand new product fresh out of the box. When an edge is razor sharp you will not see any light reflected from the sharpened edge. If the sharpened edge looks like a teeny, tiny, shiny metal wire it is still dull and pretty much useless until it is sharpened properly.
-
My 2016 very simple yet very tough 2x4 workbench with a 3/4" plywood top was be made for $35- 40 add $12 more for another plywood project panel if you want to double the thickness of the plywood bench top. Screw the 2x4's for the top together first squaring it up. Next screw on the plywood top and flip it over. Next clamp the legs in place checking they are vertical and secure the legs. With it upside down use 3/4" thick smaller plywood panels screwed to the legs on the ends of the bench this remove most if not all wiggle. Next flip it the entire bench right side up and add long horizontal 2x4 stretchers or 3/4" plywood lengthwise to join the leg for a very tough cheap workbench.
-
I prefer a longer fixed handle like longer handle like a craft knife when compared to a wiggly jiggly hand cramping swivel knife. Get a cheap bag of scraps with a coupon and practice with either tool. The swivel knife bevels are supposed to limit the depth of cut. Other than that they both cut.
-
Torture stick. I nearly stuck my finger with an awl haft the other day not to mention the holes left were undesirable and inconsistent (my fault) I now use a very simple modern tool which is the single tooth Craftool Pro Fine Diamond Awl 88057-01 and it works great when used with the Craftool Spacer Set 8091-0 If your really dedicated to using an awl haft and handy with a hammer and propane torch go get some inexpensive drill rod or tool steel. Heat it, pound it then quench it in light weight motor oil then sharpen.
-
Sharpening Or Polishing Stitching Irons, Pricking Irons Or Chisels
ContactCement replied to YinTx's topic in Leather Tools
A stiff Revlon diamond fingernail file wrapped with wet dry sandpaper worked great to hone my Craftool Pro Fine Diamond stitching chisel 8 tooth. It looks like you have some heavy burrs or bent tips. When using buffers or grinders take care and dont overheat the metal. -
I agree about quality issues. It makes me want to buy some 0-1 precision flat ground tool steel and hacksaw my own custom teeth then quench it in oil. I have never hand cut any long prongs / teeth before though. What the number of the stitching chisel in the above photo ? This will help others avoid it or in the very least know what they may end up with. I tinker with metal and restore metal hand planes. Your stitching punch will require more than a simple final honing. If your lucky the teeth will have the same dimensions and equal spacing. When filing, shaping and honing your teeth / prongs keep the stroke length and pressure the same. Some people count the honing strokes for router bits. Take measurements as you go and try to avoid accumulative error in measurement. When making a box joint in woodworking even a 1/64" error will add up fast as each slot is made until you have a mess. I personally would call and email the manufacturer with a photo. Good luck.
-
Quoted wrong person.