


klaykrusher
-
Posts
85 -
Joined
-
Last visited
Content Type
Profiles
Forums
Events
Blogs
Gallery
Everything posted by klaykrusher
-
I'll have to do some searchin'. I believe I'm using the #25 LR right now with 277/207 or 277 top/bottom. My Cobra doesn't seem to like the #24 as it will randomly skip stitches with that and I don't want to have to pull thread out of an entire belt again......ever.....hahahaha.....
-
Chisel point 794 if that is the series
-
Ooops, sorry....for a Cobra4. Not sure what you mean by series though.
-
Any recommended sources for #25 LL needles? Would like to give this style a try.
-
Josh, that is real nice looking! Question on the holster build process, do you apply the color, stitch and then mold? Basically just wondering how you keep the dye off the thread and changing its color. Also, wondering why the saddle soap as a last finish step in your western rigs, just wondering what the benefit is. Appreciate it!
-
I'm an Android user but I'm sure there is an app for the iPhone. I just connect my phone to my PC and copy the pics to a folder. Then I go to picresize.com and select the picture I want to resize. I select the 75% smaller option and click the resize button. Once done you have the option to save the new size back to your PC. I know still a pain, but a whole lot easier than years ago....
-
 Here is one too, go to about the 32 minute mark if you don't want to watch the whole thing. He uses coconut oil and beeswax. https://www.youtube.com/watch?v=8mZ0UOdCwps His vid on taking a 3 year old sheath he made with this finish, dunking in water and restoring it also shows how he makes the mixture. Pretty simple of course. https://www.youtube.com/watch?v=DlqYJ2NMBQw
 -
Bob, I did exactly that. I should have tested on a scrap piece, but nooooo, I tested on the holster...... Now I have a leather frisbee....
-
That looks real good Bob! I like it!
-
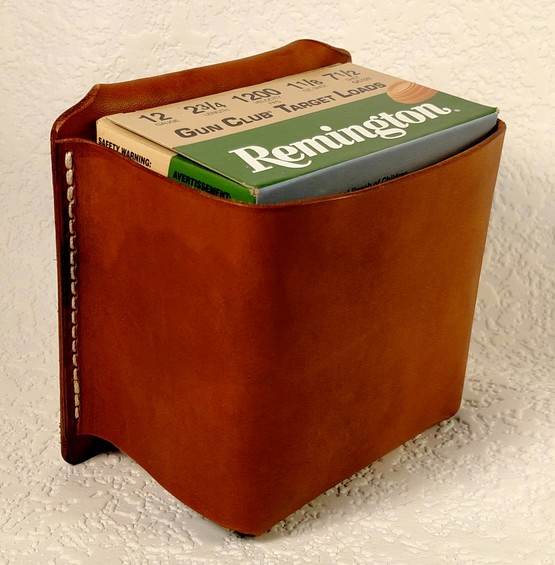
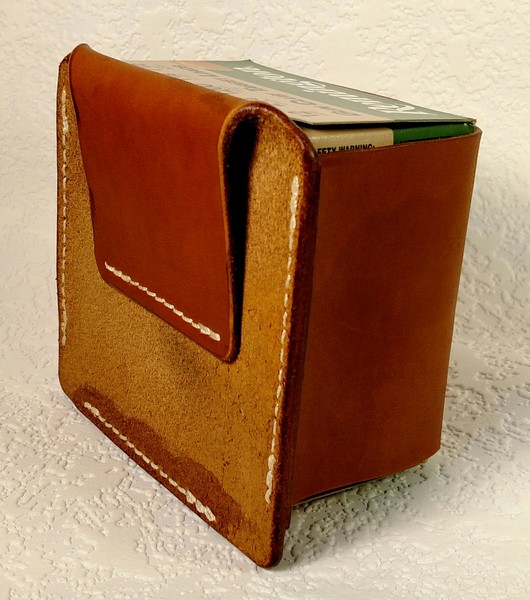
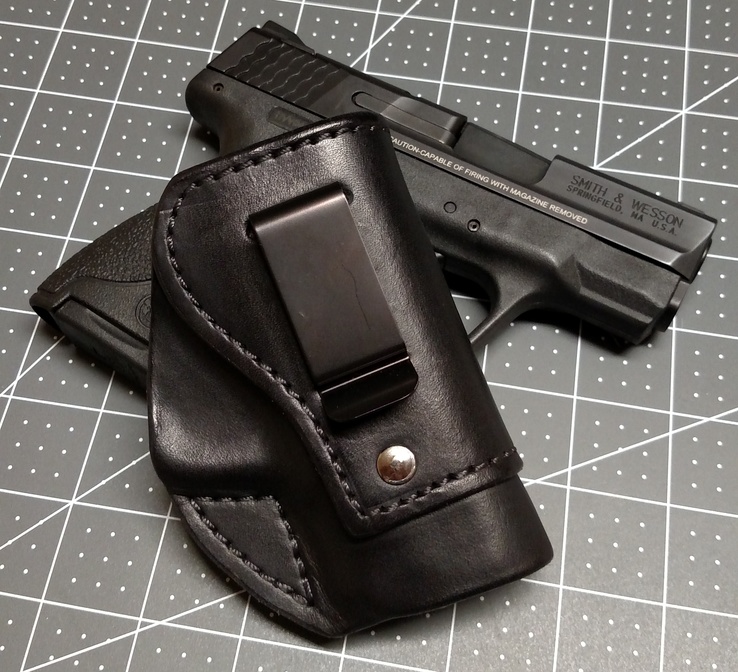
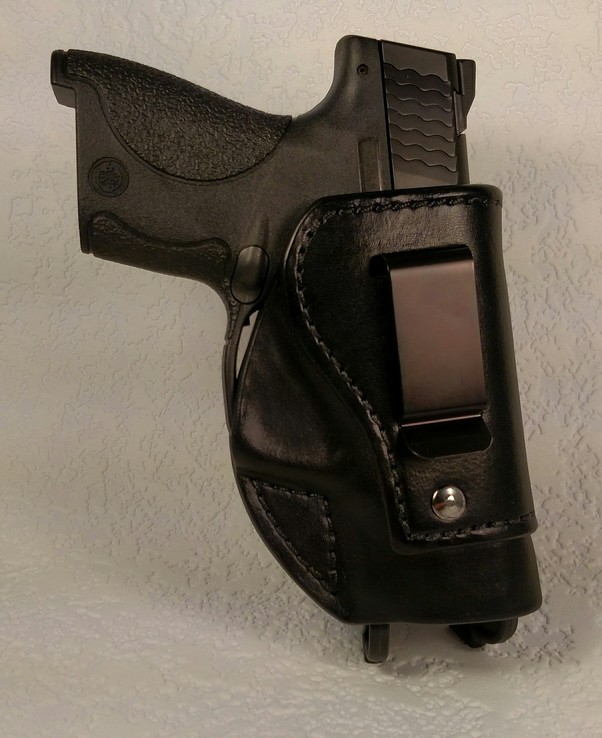
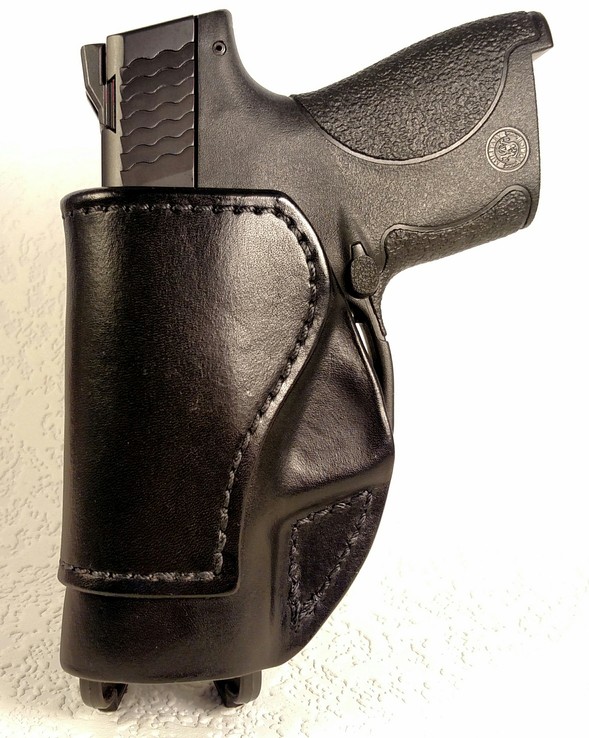
Working on a couple prototypes: Shotshell holder and Appendix inside the waistband holster for a M&P Shield. Gonna try another holster this time with the stitching coming up higher on the trigger guard just to see the difference. This has a snug fit and the belt helps pull it toward the body. Only issue seems to be I cannot get a full purchase on the gun when drawing it. Next one I am moving the belt clip lower so it will ride a little higher.
-
Mold box membrane
klaykrusher replied to Red Cent's topic in Gun Holsters, Rifle Slings and Knife Sheathes
Red Cent, here a couple links I found as I am interested in this also, although I will probably go Dwight's route. Didn't really compare items so not sure if pricing/quality is reasonable or not. Amazon Blugunstore Thermapress HD Design - Sells by the foot And a video of Particle using his vacuum bag similar to what Dwight explained. (Ifin you haven't seen this already) Particle's Leather Vacuum Press Forgot to ask: What are folks recommending for the pump? -
Glad to assist. Since this is a learning process for me it really helps to talk through it. Maybe you and immiketoo could collaborate on some real time instruction in the future. Yes the marriage thing...ditto... I think your last 2 lines above explain it better as I was not even figuring or thinking about the thickness of the leather.
-
I'll give it a go, but probably not short... Now to measure and draw the stitch lines: Grab your gun and measure the width of the top of the slide and divide this number by 2 Example: Slide width = 1" divided by 2 equals .5" Turn gun over and measure the width of the frame, at it's widest point forward of the trigger guard, and divide this number by 2 Example: Frame width = 1.2" divided by 2 equals .6" Now draw both stitch lines onto your pattern using the distances from steps 1 and 2 above Not sure in step 2, "at it's widest point" is correct, so please use use your words there.
-
Yep, new instruction looks good and image makes it clear to understand....Appreciate this!
-
Okay. i'll get the new one. Yeah see, that's my confusion. If I follow the instructions and measure the "thickness of the gun from the outline", then yes, the G19 is 1.5" thick on the outline. If the intent is to measure the thickness of the "top of the slide", then I would be at 1" thick (width).
-
Looks good! For me, everything was easy to follow except for the "Add the stitch lines on both sides of the gun, equal to the thickness of the gun from your outline". Just when reading that and looking at the picture I struggled and had to take a bit to understand. So I went to my G19 and traced it, measured 1.5" thickness, divided that by 2 so I have equal stitch lines of .75" on both sides. Again, probably just me.....
-
You probably have this completed already but was just thinking why not use a simple catch system. Basically you would attach a flat piece of metal that has a small raised lip on it to the case. On the belts, replace the magnet with another piece of metal only this one has a curved end like a 'J'. When closing and securing the lid you would pull the strap down (has the hook) just past the raised lip piece (on the case) and the hook portion would slide up into it. From the outside you would not see either piece, just the strap. When the case is lifted/carried by the handle, the hook will always be secure.
-
Good topic, thanks for bringing this up Jeff. Always wondered how some makers had crazy wait time. Didn't think to deeply about it though, just figured word-of-mouth and social media based on product quality was the determining factor. Particle, I didn't realize you were holding down a full time job, just thought ALW was your full time gig, and I assumed that from your 16-18 week wait.... don't know how you keep up....
-
IWB Holster for Sig P229
klaykrusher replied to particle's topic in Gun Holsters, Rifle Slings and Knife Sheathes
Very nice indeed! I like the detail. -
Hi Michelle, would you expand on your method for a properly treated interior? I've been treating other projects with Bag Kote for interiors, but don't have enough long term feedback on it yet as far as usability and durability.
-
A simple basketweave holster
klaykrusher replied to Boriqua's topic in Gun Holsters, Rifle Slings and Knife Sheathes
I like these a lot! Very nice Boriqua! Gonna have to experiment with your dyeing process.... -
Once the double layers are glued and set up, just stitch the portion that will not be stitched when joining the two double layers together, around the sweatguard and around the muzzle end (optional I think). Then after finally gluing the the front and back double layers together, just follow the regular pattern stitch lines. hope that makes sense.
-
Since you are using the JLS pattern I would recommend reading Jeff's comments to my first attempts with his M&P Shield pattern over at Critique. I was off a bit on the stitching with caused the gun to sit higher than what the pattern was designed for. Although retention seems to be fine to me, he was able to notice that right of the bat, and it didn't even occur to me. He also discusses what to do with stitching for heavier or lighter leather. His pattern's are designed for specific weights and adjustments need to be made when changing them. I would say focus on cutting the pattern as close to spec and take your time. I'm currently gluing up his G19 pattern now so we'll see how it turns out. I'm using 8/9oz and will dip dye the whole thing. Looking forward to seeing your project....
-
Not sure if this is suites your needs or they can direct you, but you can try 'em...Superior Threads
-
Any one know what happened to 'ol Richard? He hasn't created any new vids for a long time. I enjoyed his creations and down-to-earth style.