


supercub
-
Posts
135 -
Joined
-
Last visited
Content Type
Profiles
Forums
Events
Blogs
Gallery
Store
Everything posted by supercub
-
I'll admit to a similar level of ignorance on the subject, but doesn't a "shoe patch" machine do exactly what you are asking?
-
Snapcake Practice
supercub replied to supercub's topic in Gun Holsters, Rifle Slings and Knife Sheathes
It does - a lot! Thanks for the tips. I've been very impressed with your holsters. What weight leather do you use for the holster body? -
Snapcake Practice
supercub replied to supercub's topic in Gun Holsters, Rifle Slings and Knife Sheathes
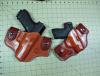
Tried a little different process this time with a Colt Commander. Still a molded flat back with the front of two layers of 4/5 oz. This time I used fresh Herman Oak. It molded much better than the old dried out leather I had been using. It also remained quite stiff after drying. It didn't oil quite as well as I had hoped, so I airbrushed a light coat of light brown oil die. The photo doesnt really capture the colors properly, but I'm satisfied with it.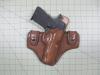
-
Yep, pay attention to tension. You will likely initially set more tension than what you need. Loosen the bobbin tension to only around a pound or two and adjust the top thread tension for a good stitch. Also, pay attention to sewing technique. Make sure the needle is still in the leather ( around a quarter inch up from the bottom stroke) when you make a turn. Don't short stroke the handle, make sure you make a complete motion of the handle or you WILL get missed stitches. The Boss takes a little effort to get used to, but once you get it set up and understand its quirks, it will do a good job for you. Even though I have a Pro 2000 that usually works very well, I still use the boss for a lot of work that needs close accurate stitch placement.
-
Thanks, I've got an order in for a replacement part with one of the other vendors on this site - but the part is backordered. In the interim, I'm winding the bobbins with a cordless drill like one would do with a Tippmann Boss. Cumbersome, but it works. I'll note Beiler's number for future reference. Does Beiler's have a website?
-
Best Way To Attach Iwb Straps
supercub replied to glockanator's topic in Gun Holsters, Rifle Slings and Knife Sheathes
The "stand off" piece or spacer helps for a tuckable holster to provide a little more space between the holster body and strap so you can tuck a shirt over the gun and between the holster and belt for maximum concealment. It also helps a little on a non tuckable IWB - saving wear on the underside of your strap loops where they rub. -
Snapcake Practice
supercub replied to supercub's topic in Gun Holsters, Rifle Slings and Knife Sheathes
Thanks Jake. Having seen the stuff you make, that means a lot. -
I've been playing with a couple of new (to me) designs for a removeable pancake holster. At the same time, I've been using up some of the old dried up leather in the scrap bin before I order some new sides. The Glock holster is an attempt at a flat back with double layer of 4/5. The S&W Shield is a conventional pancake made from 7/8. As you can see, I had some issues with my stitching since my sewing machine tension went haywire and I ended up finishing with another machine. I like the flat back style, but it seems the more I try them, the more I need to learn about the process. I've read most of the posts on doing the flatback, but getting it right seems a little tougher than I thought it would be. Suggestions and comments are welcome.
-
I bought a Boss when they first came out. After a couple of years I sold it and bought a Ferdco Pro 2000. While the Ferdco was a lot quicker on long runs like belts and saddle scabbards, it had a few faults - not least of which is the learning curve. I eventually bought back the original Boss and still use it for small projects like holsters and knife sheaths. You can't beat it for getting into tight places and placing stitches exactly where they need to be. The slow speed is actually an advantage for precise stitch lines. I use the Boss on about 50% of my projects and the Pro 2000 on about 40%. The rest, I hand stitch. The only downside to the Boss is the need to pay attention to technique and watch your thread tension. If I had to keep only one machine, it would probably be the Boss.
-
Osborn makes a good compass style groover that can be used free hand. Tandy/Leather Factory sells both free hand and edge groovers that work okay. The best awl blades I've found are made by the Douglas saddle folks in Sheridan Wyoming - they are spendy, but perfectly ground and extremely sharp. I've found that I usually start by buying inexpensive tools and eventually upgrade to pro quality stuff. If I had to do it over again, I would start with top quality tools - they do make a difference.
-
The stitches will look a lot better if you use a diamond shaped awl blade and make sure that the flat sides of the blade are all parallel with the stitch line. You can use a drill press and 1/16" drill bit, but your stitching holes won't look a whole lot better. If you haven't yet read Al Stohlman's book "Handsewing Leather" - I would definitely get it. I bought it many years ago when I first started, and it is the best reference I've ever seen.
-
Not too much tougher than pulling the arm on a slot machine - not that I've had any recent experience doing that....... Actually the Boss is pretty easy. I find it much easier and less fatiguing than punching holes with a diamond awl and sewing with harness needles. You will probably need more effort to pull the presser foot up with the hand grip. As long as your needles are in good shape (sharp) the leather thickness doesn't seem to have much effect on the effort required to cycle the handle.
-
Thanks, I'll call them tomorrow.
-
My old Ferdco Pro 2000 finally is showing its age. The internal rubber tire drive wheel for the bobbin winder broke and I'm in need of a new one. I understand that Ferdco has sold out and no longer services their machines. Anybody have an idea where I might find this part? The Juki TSC-441 parts list that came with the machine does not show this particular style of bobbin winder so, I'm guessing it's a Ferdco part. Anybody have a source for Pro 2000 parts?
-
Best Way To Attach Iwb Straps
supercub replied to glockanator's topic in Gun Holsters, Rifle Slings and Knife Sheathes
The reason I use the t-nut rather than the snap post is that it gives you the option to replace worn out straps, or to substitute longer or shorter straps when wearing different width belts. By using the snap post you are pretty much stuck with one size belt loop. Nothing wrong with that, the t-nut just gives a little more flexibility. -
About Vacuum Forming
supercub replied to Dwight's topic in Gun Holsters, Rifle Slings and Knife Sheathes
I've used a piece of plastic mesh from the bag air valve intake to the gun to provide a path for the air to evacuate. It works okay, just don't get the mesh between the wet leather and the bag unless you want to leave permanent grooves (mesh impressions) on the leather. I've also used an empty plastic pistol ammo box (with holes around the perimeter) as a platten - it worked, but I like the mesh better. -
About Vacuum Forming
supercub replied to Dwight's topic in Gun Holsters, Rifle Slings and Knife Sheathes
Thanks, found some at NAPA. -
About Vacuum Forming
supercub replied to Dwight's topic in Gun Holsters, Rifle Slings and Knife Sheathes
I'll check out O'Reilly's for the oil - thanks. I pretty much copied your set up when I put my unit together. I'm using the vinyl bags right now, but will likely switch to the poly bags if demand increases. The vinyl works, and is relatively inexpensive, but I can see how a more flexible poly bag would create a little tighter line on the wet leather. I started using food saver vacuum sealers and bags 20+ years ago when I made lots of knife sheaths. I used them on holsters as well, and they worked okay. The current set up with a higher volume pump is lots better - not to mention not having to buy lots of freezer bags. One trick I used with the freezer bags to preserve the mold lines, was to put the sealed bag (with holster and mold) into a freezer and let the leather freeze solid. When It was frozen, I'd remove the holster from the bag and put it back into the freezer to "freeze dry". When it was almost normal color, I'd pull it out and let it air dry. Of course you need a frost free freezer to evaporate the ice. This kept soaked or wet leather formed to the mold so that it didn't "relax" and loose the mold definition. If you use quality leather and properly wet it so that it isn't too soggy, this process isn't necessary. It did work for old dried out leather that needed some help. It worked especially well for leather parts like molded box fronts or the face of flat back holsters that were not yet attached to a back. -
About Vacuum Forming
supercub replied to Dwight's topic in Gun Holsters, Rifle Slings and Knife Sheathes
I have pretty much the same system and it works well. I find I'm running low on the pump oil. Does anybody have a good source for the "High Vacuum Oil" for the pump? I don't find it at Harbor Freight (where I got the pump). Is there an automotive equivalent? -
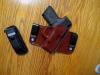
Revolver Thumb Break Question
supercub replied to Eagle Crest's topic in Gun Holsters, Rifle Slings and Knife Sheathes
I usually make the thumbbreak out of two layers of leather. The inner layer (next to the gun) has a hole punched to the same diameter as the snap socket. I set the snap so that the socket is almost flush with the inner leather. The double layer (along with a thin metal shim) keeps the thumb portion rigid and makes it easier to un snap. The buried socket doesn't drag on the gun as it is unholstered. -
Latest Rig For A Coonan 357 Magnum Auto
supercub replied to George B's topic in Gun Holsters, Rifle Slings and Knife Sheathes
Nice job! Where did you find a dummy gun for the Coonan 357? -
Flat Back Pancake
supercub replied to chiefjason's topic in Gun Holsters, Rifle Slings and Knife Sheathes
I tried a couple of new (to me) processes on the two holsters and mag pouch below. The metal belt clips are the second try after a less than quality experience with kydex. Still looking for a better option for clips. The Colt holster is a double front layer of 4/5 molded and then sewn to a 9 oz back. I had not used the vinagaroon process before - I like it, I think I will use it more! The S&W holster is an OLD piece of W&C drum dyed chestnut in 9oz. This brings up the question - how old is too old when dealing with leather? Most of my existing leather are remanants left over from 8 or 10 years ago when I was building a lot of knife sheaths for custom makers. I moved away and sort of got out of leather working for a while. Now I'm back to making the occaisional holster for myself or friends. The leather was stored in cool, dark, dry storage and loosely rolled. It is dry to work and needs a little moisture to cut cleanly. It will bend without cracking, but it is a challenge to get good detail molding. Most of the horse butts I had, did not store as well. They tended to crack when trying to bend or mold. I know, I need to buy new leather, but I hate to throw away useable stock - any suggestions?
-
Best Way To Attach Iwb Straps
supercub replied to glockanator's topic in Gun Holsters, Rifle Slings and Knife Sheathes
Thanks, this should save a lot of head scratching and frustration. -
1911 Iwb Just Finished
supercub replied to IngleGunLeather's topic in Gun Holsters, Rifle Slings and Knife Sheathes
Very nice holster. Where do you get the "Boothill Bob pattern pack"? Sorry if this has been discussed previously on the site, but I'm new here and have been slowly working my way through old posts - only several hundred more pages to go before I get caught up! -
Best Way To Attach Iwb Straps
supercub replied to glockanator's topic in Gun Holsters, Rifle Slings and Knife Sheathes
Do you have a part number for the 8/32 screws from McMaster Carr? Seems like every 8/32 screw I've tried (obtained locally) is just a hair too big to fit inside the snap stud and work reliably - even when using the pull the dot snaps. I'd much prefer to use 8/32 screws rather than 6/32 - can use Chicago screw posts as well as t nuts to attach the hardware. Thanks


