supercub
-
Posts
135 -
Joined
-
Last visited
Content Type
Profiles
Forums
Events
Blogs
Gallery
Store
Everything posted by supercub
-
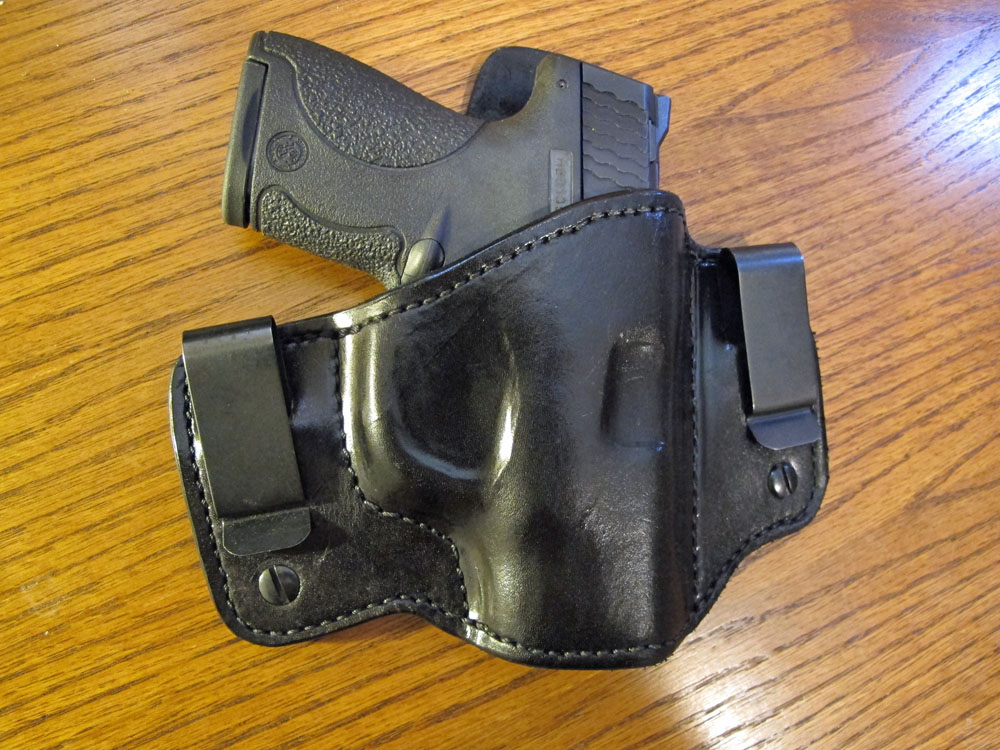
I got to thinking about a new IWB holster for my S&W Shield. I wanted it to be a flat back with a reinforced throat. I didn't care too much for the usual exterior leather band sewn across the throat so I decided to do something a little different. On the front panel I glued together two pieces of 4/5 oz with a 1.5" strip of galvanized steel spanning the width between the stitch lines. It seems to make the mouth much stiffer, but it does make it nearly impossible to detail mold the front. This one is just the first attempt. Next time I think I'll forego the attempt at detail molding. The holster seems to work, but it is UGLY.....
-
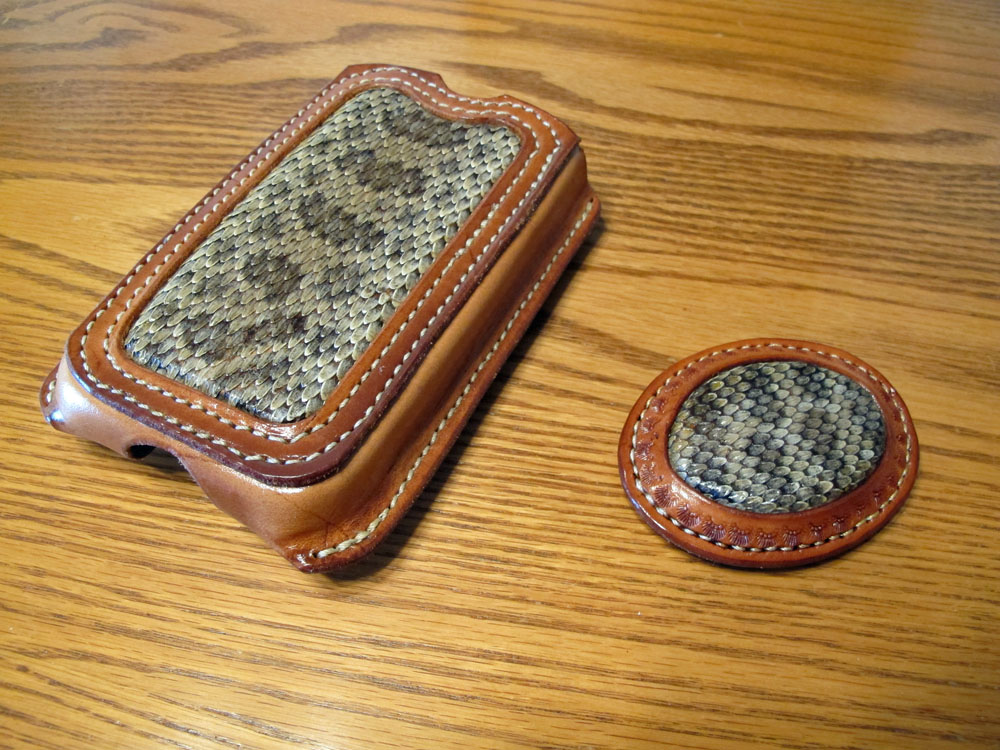
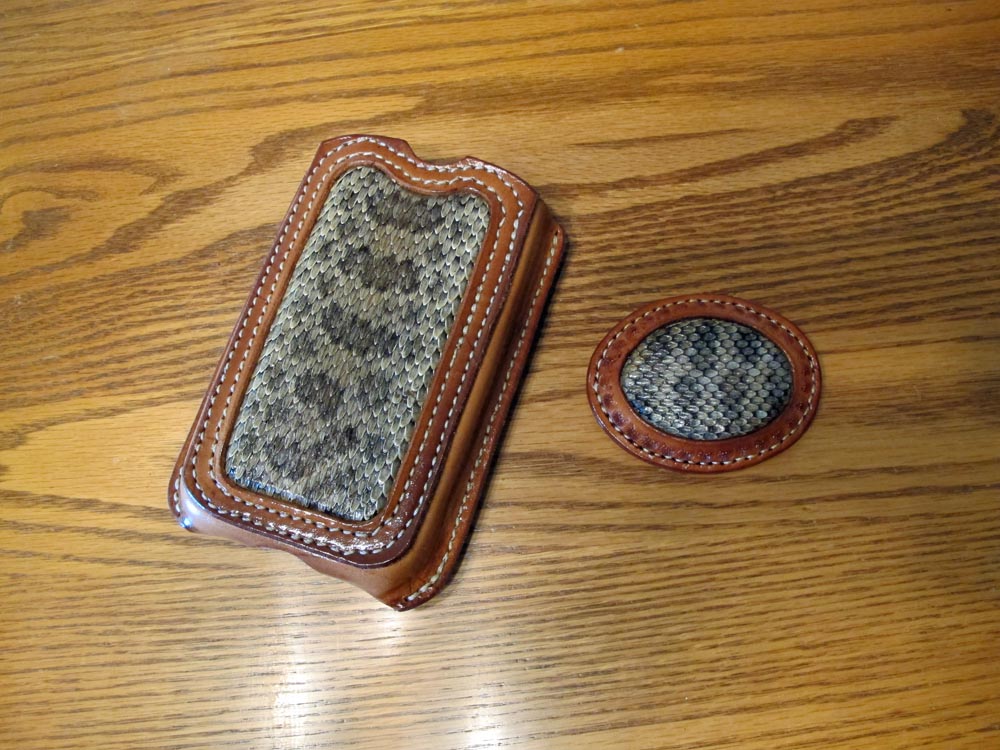
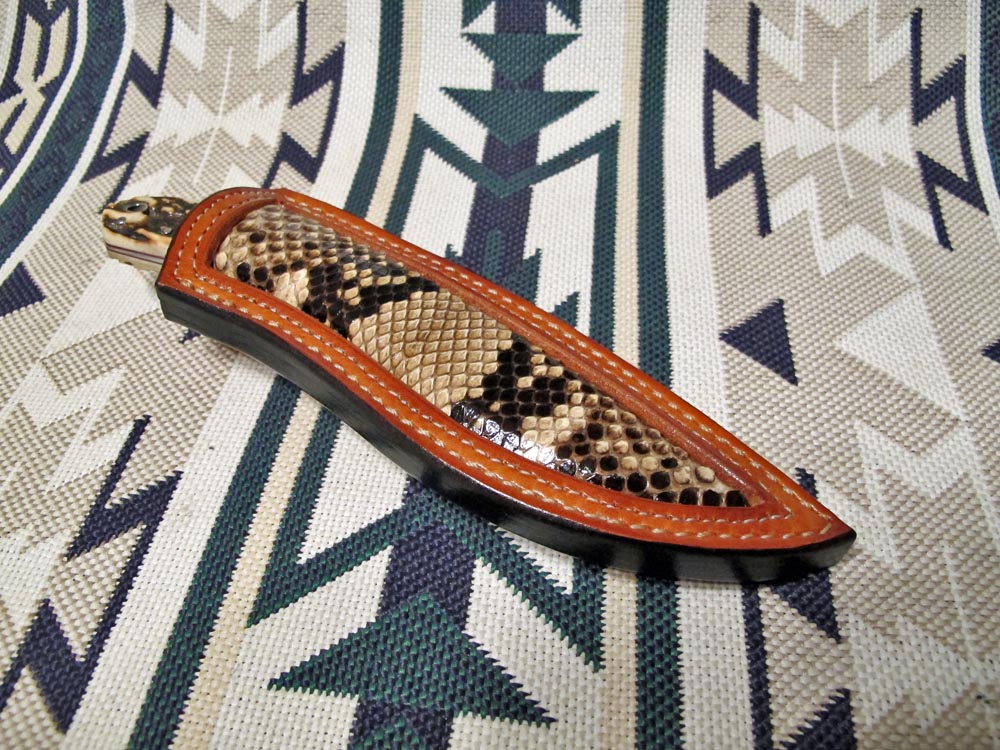
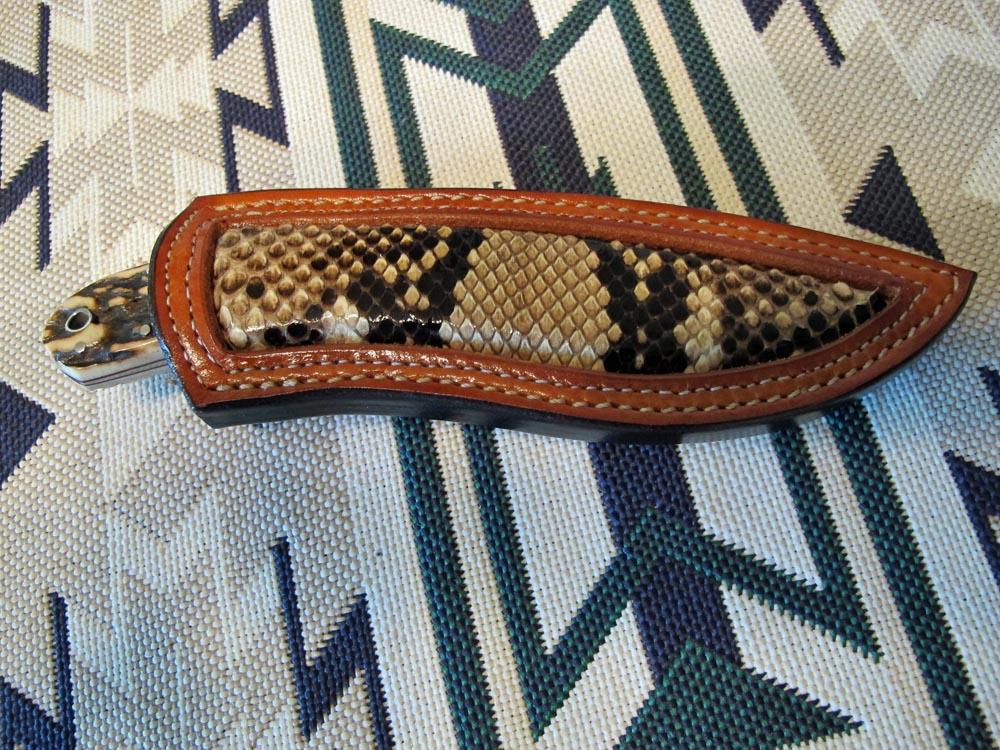
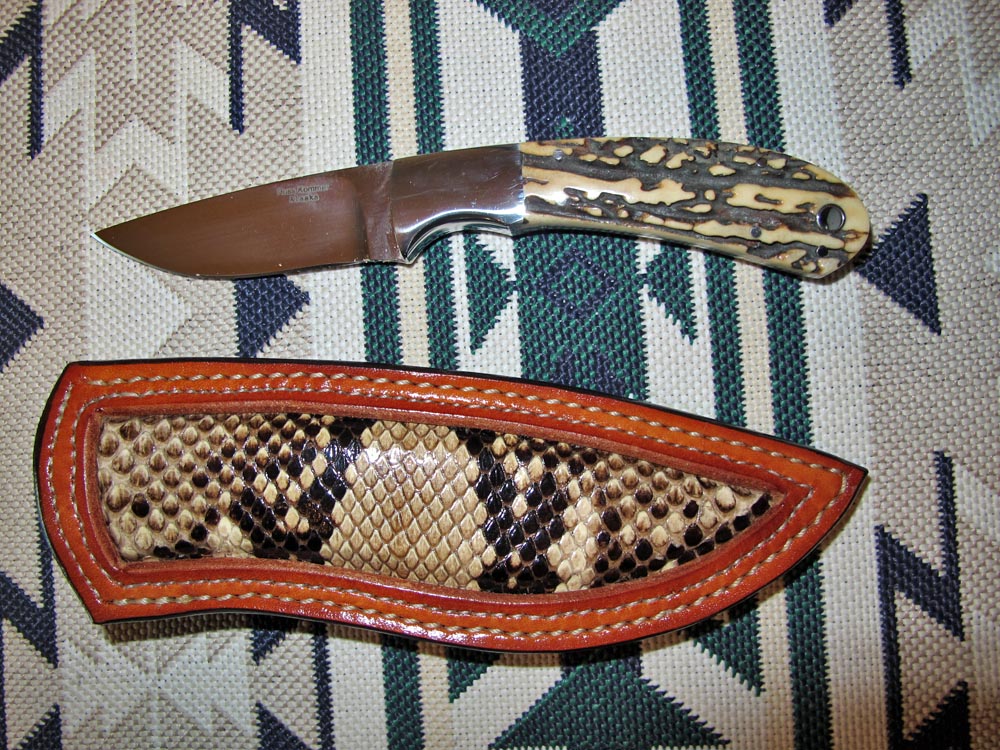
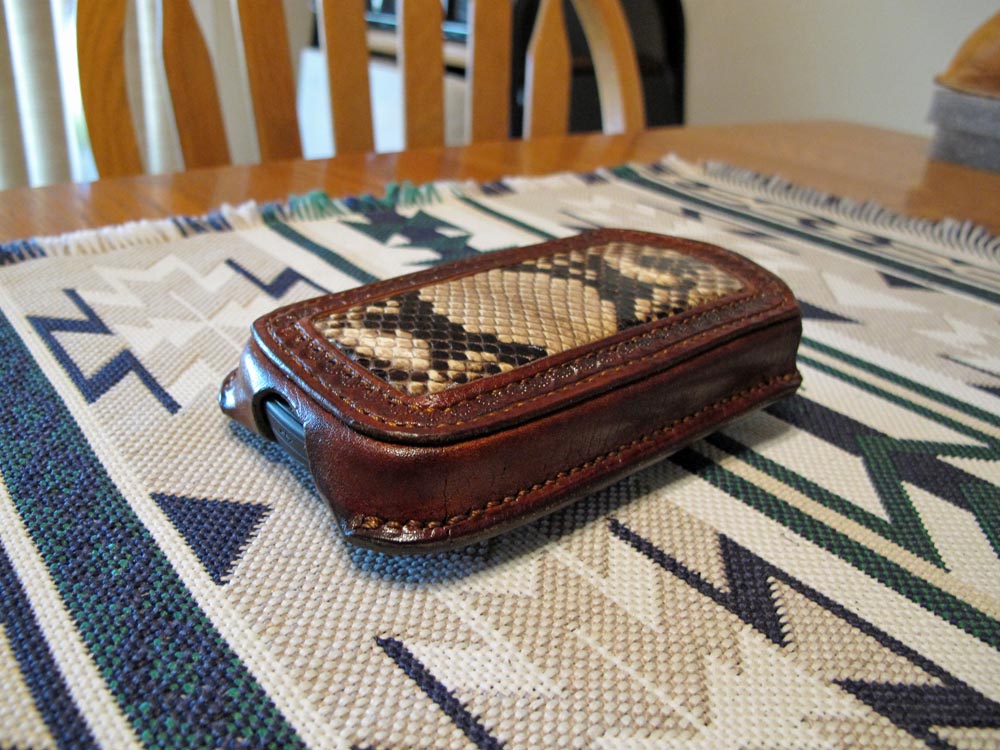
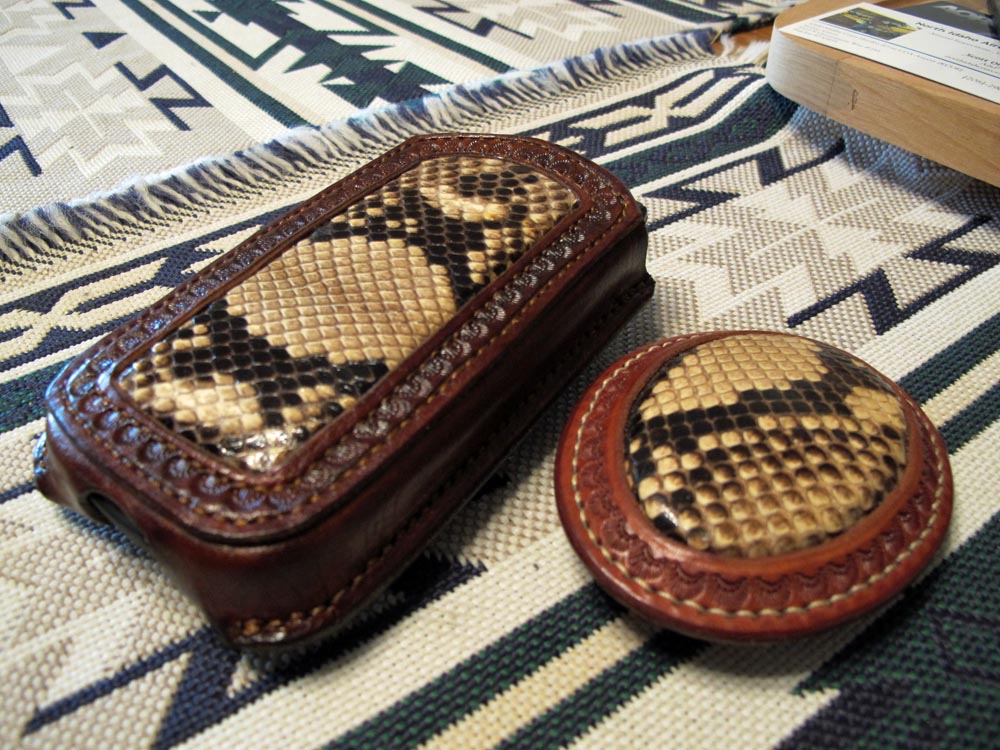
A friend recently sent me the skin of a prairie rattler he collected a few years ago. It had been home tanned and was a little worse for wear. He asked me if I could make something from it and since I had just made a cell phone case and belt buckle from some scrap python, I told him I would give it a try. The cell phone was almost too wide for the snake skin inlay. I told him next time get a smaller phone or a bigger snake.
-
python knife sheath
supercub replied to supercub's topic in Gun Holsters, Rifle Slings and Knife Sheathes
Thanks for the positive comments guys. I was a little disappointed with the inner line of stitching (done on a Boss). For some reason the stitch length got out of adjustment during the run. Next time I'll probably hand stitch - a little slower, but more consistent. -
I had a small remnant piece of python left from my last project (cell phone case) so, I decided to whip out a knife sheath. I have one small piece left that I'll probably use for one more project. The more I use the snake skin, the better I like it. Slowly learning how to do the inlays by trial and error. Might have to start collecting road kill rattlers.

-
Phone case from scrap leather
supercub replied to supercub's topic in Purses, Wallets, Belts and Miscellaneous Pocket Items
Thanks for the comments guys, I'm still trying to figure out how to do this inlay stuff. -
Looks like there's a new Sheriff in Nottingham! Very nice work.
-
I was cleaning up the shop and stumbled across a small piece of Python leftover from a belt buckle project years ago. Since I need a case for a new cell phone, I picked through the leather scrap pile and found enough pieces to put together the case shown below. Not sure I'll do it the same way again, but it was an entertaining project and a chance to practice hand stitching, I tried to color match the belt buckle, but I wasn't able to get the same leather and the air brush was not working. So, I used a dauber and sheepskin pad to apply the dye. As a result the dye job turned out a little too dark. Oh well.....

-
Small Revolver Holster
supercub replied to Josh Ashman's topic in Gun Holsters, Rifle Slings and Knife Sheathes
I'm pretty sure the holster three posts up is a paddle. It looks like a sewn down loop, but I believe it is a paddle. It's the one I was referring to in my post. If I get another paddle order, I'm gonna try something similar. Again, first rate work! -
Small Revolver Holster
supercub replied to Josh Ashman's topic in Gun Holsters, Rifle Slings and Knife Sheathes
Beauty! Looks a lot like your previous paddle holster. I like it! -
When you wet form
supercub replied to Ledbeter36's topic in Gun Holsters, Rifle Slings and Knife Sheathes
I used to wet form the fronts in a kitchen vacuum bagger too. The cost of bags got a little excessive and they were not as durable as I liked when boning detail thru them. I have since switched to a stand alone vacuum pump and heavy weight vinyl woodworking bags. They will pull a lot more vacuum and will last for a long time. Well worth it if you do a lot of holsters. When I used the kitchen vaccuum bags I would take the vacuum molded and sealed bag ( including the gun) and put it in the freezer for an hour or so until the leather was completely frozen. I'd then open the bag and remove the gun and put the leather back in the freezer overnight to "freeze dry". In a frost free freezer the moisture would mostly evaporate (sublimate) and the holster would be ready to assemble the next day. The detail molding would be retained without any heat damage to the leather. The leather would be firm, but not hard as a board. I don't use the kichen bags or freezer anymore since I got the vacuum pump, but it did work ( especially if you accidently over saturated the leather before molding) -
When you wet form
supercub replied to Ledbeter36's topic in Gun Holsters, Rifle Slings and Knife Sheathes
Awhile back someone posted a short illustrated tutorial on laying out stitch lines for a holster. I wish I could remember who and give them credit, because it was excellent. I'll try to describe how he did it. It takes all the guesswork out of stitch layout and has worked perfectly for me every time I used it. Here goes: Lay the gun down a a piece of paper (I use cardstock or light cardboard). Carefully trace the outline of the gun while keeping the pencil vertical. I usually only concentrate on the trigger side of the gun from the top of the trigger guard down to the end of the barrel. Carefully cut out the paper until you have a piece of cardstock that you can fit perfectly against the trigger side of the gun. Save this template piece, it will create your lower stitchline. Lay the gun on the inside of the back piece of leather. Take the top piece of leather and lay it on top of the gun. Using spring clamps or binder clips, pinch all four of the top and bottom corners of the leather together over the gun. Usually the top of the barrel will be a relatively straight stitch line and that seam can be sewn without using a template. Make a light pencil mark on the top piece near the trigger guard where the two pieces of leather are pinched together. Do the same at the bottom of the barrel. These two points are where your lower stitch line begins and ends. Lay your pre cut template between the two pencil marks you just made. Trace the template with a pencil - that is your stitch line. At this point I run the stitch groover and glue the top and bottom pieces together while flat. Sew the holster together. After sewing, dunk the holster in warm water (briefly) and stick the gun in the holster. Now you can mold and bone with whatever tools you like. When it dries, it will fit perfectly and the stitch lines will be exactly where they need to be. This holster is one I did that way: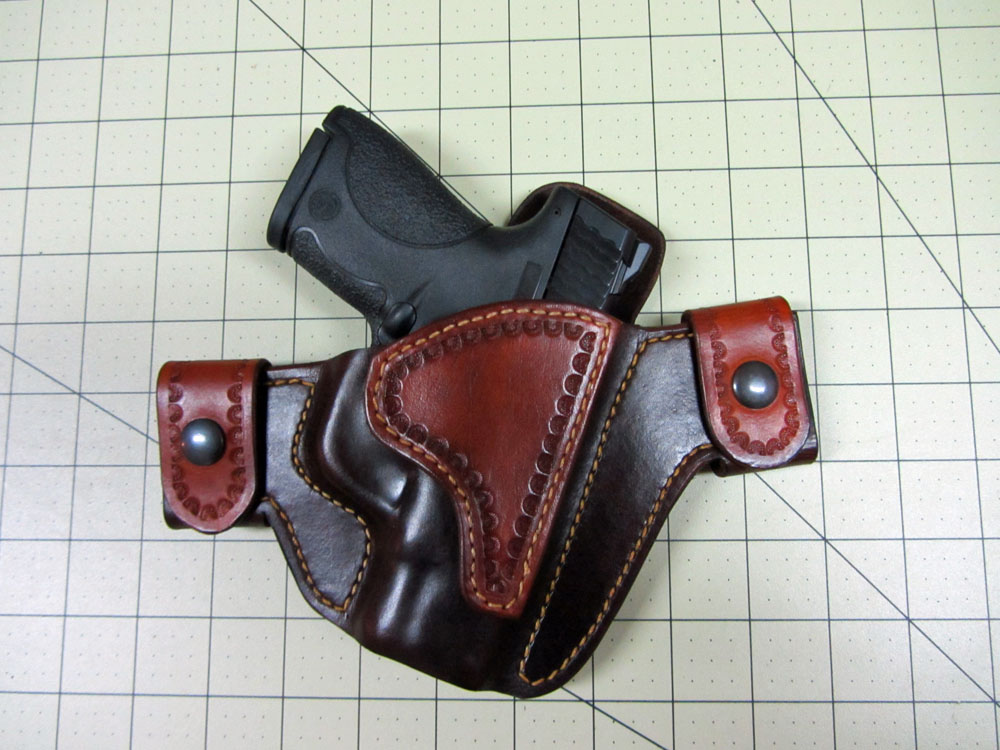
-
When you wet form
supercub replied to Ledbeter36's topic in Gun Holsters, Rifle Slings and Knife Sheathes
There's nothing wrong with the way you are doing it. In fact, it is the way I make "flat back" pancake holsters. The only difference is that I don't "cook" them. The advantage to this method is that your stitch lines will usually be very close (which is not always the case when you sew together two flat pieces). There are lots of ways to calculate where your stitch lines need to be before molding, but they can vary somewhat based on leather type and thickness. You may go thru several attempts in layout before you get the stitch lines perfect. If you are making a lot of the same holster, then making a pattern with proper stitch layout will certainly be faster, but I like the flat back style. The results are predictable, and the holsters are more comfortable for the wearer. -
Snap Cake Snap Direction?
supercub replied to Boriqua's topic in Gun Holsters, Rifle Slings and Knife Sheathes
It looks like the straps in the second photo are attached mechanically rather than being an integral part of the holster. I've made a couple like that using a Chicago screw through the snap post. The advantage is you can make different straps for different belt widths. You can also change the orientation of the strap (up or down) easily as well. -
1938 22 Holster Question
supercub replied to cleanview's topic in Gun Holsters, Rifle Slings and Knife Sheathes
Heiser was a premium leather outfit that made saddles, holsters, knife sheaths, and various other leather gear from the late 19th to mid 20 th century. They made most of the knife sheaths for Randall knives and lots of the "hunter" style holsters. I suppose there are Heiser collectors out there - especially for their saddles, but don't know about holsters and sheaths. I still see the holsters in the bargain bin at gunshows. I do know knife collectors value the Randall knives with Heiser sheaths. I repaired a number of old sheaths by hand stitching the rotted thread that the customers wanted to look as close to original as possible. I believe the number on the holster is a model number rather than a serial number. -
1938 22 Holster Question
supercub replied to cleanview's topic in Gun Holsters, Rifle Slings and Knife Sheathes
That's a Hunter brand holster. It is still made and is a pretty common inexpensive field holster. Google "hunter holsters" and you'll find their website and catalog. The lower strap is riveted to the folded over belt loop and attaches via the front snap. I'd attach a photo, but this old ipad won't let me. -
I used to use these as well. If you put a thin piece of cardboard on the back of the holster against the diamond texture pattern of the bag, you won't leave any marks on the leather. I use a different method now for vacuum bagging, but I made many holsters and sheaths with a food saver. They work well, but the bags can be expensive.
-
Two-Tone Finish, Second Try.
supercub replied to BHPshooter's topic in Gun Holsters, Rifle Slings and Knife Sheathes
If it isn't perfect, it's as close as I could ever hope to get. Outstanding! -
Reinforcing Mouth Of Iwb Holster
supercub replied to asbandr's topic in Gun Holsters, Rifle Slings and Knife Sheathes
I've used a variety of metal thickness. Some of the old Milt Sparks holsters used a 20 gauge piece (.0359). I found that to be a little too thick for my method. It will work, but it is a struggle to form it around the gun unless you build an envelope style holster. I will sometimes use a piece of metal strap ( banding) that measures .75" x .0239 (around 24 ga.). It works pretty well, but it is not galvanized, so it can rust. The flashing I find in the big box hardware stores varies from 30 ga. .0120 up to 26 ga. The 30 gauge works okay, but it is a little thin and flexible. I have not tried to use a double thickness of the 30 ga., but don't see why it couldn't work. If you have trouble finding workable thickness, try a heating and cooling outfit. They should have lots of scrap sheet from fabricating duct work. -
Reinforcing Mouth Of Iwb Holster
supercub replied to asbandr's topic in Gun Holsters, Rifle Slings and Knife Sheathes
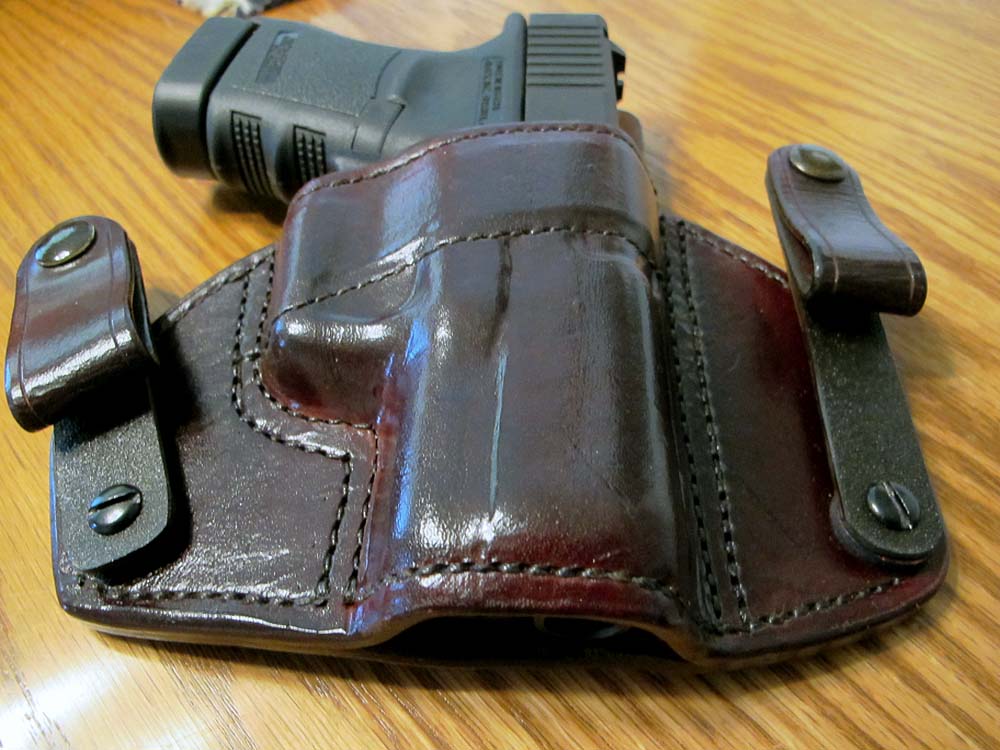
The steel is hardware store galvanized flashing. Lowes, Home Depot, or ACE usually has sheets of the stuff. Cut it out with tin sips. Since this holster is a flat back, figure out how long the strip needs to be to reach stitchline to stitchline. Sew (and glue) it between the two front layers and bend the front over the gun. Mold the front (wet) over the gun and let it dry. When dry, layout the stitchlines and sew it to the flat back. The metal strip is enclosed between two layers of leather and is captured in the form of a "bridge" between the stichlines. The steel is not all that thick and is fairly easy to bend to shape prior sewing. Once the metal is in final position, it can't move (since it is held between the stitchlines. I'm sure you could bend it out of shape if you exert enough force, but it seems to work pretty well to keep the holster mouth open. -
Reinforcing Mouth Of Iwb Holster
supercub replied to asbandr's topic in Gun Holsters, Rifle Slings and Knife Sheathes
IWB flat back pancake w/integral steel band. A strip of 20 ga galvanized sandwiched between two layers of 4/5 0z on the front piece of the pancake. The mouth has shown no propensity to collapse when the pistol is removed. Please excuse the crude construction and finish. This one is a prototype with leather salvaged from the scrap bin.
-
Reinforcing Mouth Of Iwb Holster
supercub replied to asbandr's topic in Gun Holsters, Rifle Slings and Knife Sheathes
Tried to post a picture of the prototype, but unable to do it on this IPad. I'll try it later on a real computer. I posted a pic of it sometime ago, so those who are interested can probably find it in an earlier post. Check out " tuckable pancake" using the search function. -
Reinforcing Mouth Of Iwb Holster
supercub replied to asbandr's topic in Gun Holsters, Rifle Slings and Knife Sheathes
I did one awhile back by sandwiching a strip of galvanized steel between the layers. It worked well, but was a bit of a PITA to build.Mine was a prototype and is pretty crude, but it keeps the mouth open as well as a kydex holster. -
Rawhide Insert Question
supercub replied to camano ridge's topic in Gun Holsters, Rifle Slings and Knife Sheathes
I've been kicking this idea around for awhile as well. I just haven't sat down and tried it yet. It should ( in concept) work well to stiffen the holster mouth for re holstering. I wonder how much the wet rawhide will shrink during the process. I too would like to hear if anybody has done it. -
Holster "fillers"
supercub replied to JLSleather's topic in Gun Holsters, Rifle Slings and Knife Sheathes
Don't get me wrong. I think a welt is absolutely necessary on a knife sheath to prevent the blade from cutting the stitches. Only time I wouldn't use a welt was if the leather was a decorative cover over a rigid liner (like a wooden liner for a sword scabbard). My complaint was specific to the large "unnecessary" stack of welting that substituted for proper fitting and design. I try to keep the welt thickness equal to or slightly thicker than the blade. It helps prevent the blade from moving around inside the sheath. The sheath I referenced was actually dangerous since the wide welt allowed the blade to move around and work a hole into the non welt side. As a design element in a holster, I can see it in a conventional (not detail molded) style. Yours looks great! -
Holster "fillers"
supercub replied to JLSleather's topic in Gun Holsters, Rifle Slings and Knife Sheathes
Many years ago I bought a custom knife from a pretty good knife maker. The knife was excellent, and I still use it. However, the sheath he made for it had a stacked welt almost an inch thick like what is shown above. It was just plain UGLY! I figured I could make a sheath that would't be any worse so I went down to the local craft store and bought a couple of scrap pieces of veg tan and Stohlman's book on how to hand stitch leather. I had not worked with leather since junior high shop class many years before. Using the book and a box cutter, I made a fair looking sheath ( though I inadvertently flipped my pattern and made it left handed) that I showed to another kniife maker. He liked it and asked for me to make some sheaths for him. One thing led to another, and for a number of years, I made lots of knife sheaths for custom makers - but I never made one with a multi layer stacked welt. Nowadays I still make the ocaisional sheath and holster as a hobby, but everytime I see one of those "fillers" I shake my head and remember how they caused me to start working with leather