-
Posts
55 -
Joined
-
Last visited
Content Type
Profiles
Forums
Events
Blogs
Gallery
Store
Everything posted by grumpyold
-
Slipangle you have no reason to thank me I'm the one who jumped of the cliff without a parachute. Your workmanship was never in question, your product is the best I've seen. This is not an excuse for my behaver but when a USA based seller tells us price USD it's usually a heart attack for most of us. At $36.00 USD in Canada that's ball park $50-60 with shipping. Thank you for accepting my apology.
-
I will fully admit that I did lose my cool and I’m sorry for that. If you review my first post, I will state that I could have done a better job of making my point, and it was not proper for me to question the price Slipangle felt would be fair and cover his expenses and time. It may have served me better if I would have posted that I’ve made these for my own use and here’s what I did and it may save others a few bucks. That said, I did when I originally posted, and still do truly believe anyone on this site can make something of this sort with simple hand tools. Would it be as well done, who knows, but I’m sure it would serve the purpose. I think what set me off, and I’m not condoning my flip out, was that those who posted after my original post seemed to feel that I had insulted, their product, or their abilities because they chose to purchase rather than make. That was not my intent and I think they read way more into my post then were there. A simple statement that they just didn’t believe they have the equipment to attempt something like this would have sufficed. I felt like because my grandfather, father and I have over the years collected a large amount of equipment to operate cattle farm, that I was being told that I had somehow insulted others abilities and lack of equipment. My original post may have been badly thought out, and worded but I have no idea where that would have come from, and yes it set me off. Once again sorry for, yes my rant, and any offence to other posters. When I posted I seemed to have ruffled some feathers I should have had the common sense to walk away.
-
Well that's going to be a little hard to do because this is a hobby and I don't sell anything. If some one takes a shine to something I've made they can have it. But if you want to buy a heifer or steer.... market price. Maybe you should be asking slipangle if after using this site to sell $144 of his product whether he pushed the donate button as a form of thanks for using the site for free marketing. Maybe some posters on this site should be reviewing the terms of use for the site, 'cause I don't recall anything that said "Feel free to market your business or products on our dime."
-
Here's a little more reality, this is a site for the exchange of thoughts, instruction, and a host of techniques pertaining to leather crafting. I do not believe it is meant to be a free source to sell your wears. If you have a web site you many post a http to redirect to that site if you so wish, I believe is allowed. If member wishes to list used tools they no longer require that's fine it's a one time thing. You sir along with a number of other are showing new items that you are manufacturing and using the site to sell said items without paying this site for the privilege of doing so. And yes this thread is about something else entirely, you using it as a venue to sell your stuff on the cheap. Like Dwight has posted in another topic this site is becoming a catalog. What I posted is by far better suited to the intent of this site then free ads. Maybe one of the moderators would like to step in.
-
Wow didn't mean to ruffle feathers.
-
This looks really good. I would agree with Goldlshot Ron that the details are not flowing, their just cuts. You may find his critique some what confusing, I would strongly suggest that you go to Paul Burnett's site and down load his Study Course, lesson 1,2,3. Opened my eyes! We all start cutting lines on patterns and not think about flow and creating depth. Look at the work of Hidepounder if you want to see flowing leather tooling that makes you want to run your fingers across it. Oh once you read Paul's work 12 times in a row, ' cause it will take that many times before it sinks in, then buy Bob Park's (Hidepounder) book and it will all fit together.
-
Sorry to be a spoiler but $36.00? I guess I'm just an old farm boy with lots of equipment in the shop but this is something I made up in the shop in half an hour and $2.00 cost and my time. If you can do the leather work I've seen on this site I'm sure everyone on this site can figure this out.
-

Flat Back Pancake Holster Making
grumpyold replied to Dwight's topic in Gun Holsters, Rifle Slings and Knife Sheathes
Mmmm I've seen something like this before, someone sent it to me. As always great info Dwight. Take care. -

Tandy Euro Bend
grumpyold replied to carguy4471's topic in Gun Holsters, Rifle Slings and Knife Sheathes
Not a lot of Herman hides around here, use Tandy leather. You have to go in and pick your hide. A pile of twenty hides will have 3 or 4 really nice hides, and about the same number of hides with nice sections. I would never let a Tandy employ pick and ship, you'll get the next one on the top of the pile. -
Go to Tandy's site and you will find their video library at the bottom of the main page huge amount of info. Also find the library site you can get free patterns, cheap patterns, and all their books can be down loaded in pdf format and their cheap compared to store prices. Just set up an account and you're good to go. You're on the best site I know of on leather work, a large number of posts and helping hands on here. A large number of the people on this site are some of the best leather crafters in the world in my opinion.
-
Switch to saddle needles and use an awl if your not already, plus what Clive said above.
-

First project - holster
grumpyold replied to mbelmores's topic in Gun Holsters, Rifle Slings and Knife Sheathes
Looks good. Agree with Sceaden cut tighter to your stitch line and even it out. Find Hidepounders tech write up on finishing your edges it adds that final touch once their burnished. -

Pancake Holster
grumpyold replied to grumpyold's topic in Gun Holsters, Rifle Slings and Knife Sheathes
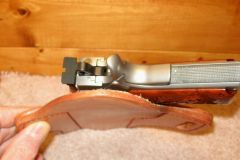
It clears not bad. The picture of the pistol in the holster is not exactly the best. I realized after that the gun was not all the way in. The rear adjustable sight actually sits just at the top edge of the pocket. I had attached a dowel from the front sight to the rear sight. I didn't do a great job of attaching it and during the molding it moved around so much I pulled it off. After stitching up the holster it was very tight so I wetted the front panel again and reworked the pocket, as well as strapped it down to get the overall curve as when I originally put on a belt and strapped on my hip the pistol was hard to pull from the holster. By rewetting this is solved and the gun fits snug but is easily pulled. -

Pancake Holster
grumpyold replied to grumpyold's topic in Gun Holsters, Rifle Slings and Knife Sheathes
Chiefjason Thanks for the comments. I think overall I made the sweat shield larger then needed and understand the point you've made. I thought about trimming it back once I finished the holster but I'll leave it as is and make another as some point. -

Bench Shooting Bag
grumpyold replied to Richard M's topic in Gun Holsters, Rifle Slings and Knife Sheathes
Very nice. The color contrast is out standing.. -
From the album: Flat back pancake holster
-
From the album: Flat back pancake holster
-
From the album: Flat back pancake holster
-

Pancake Holster
grumpyold replied to grumpyold's topic in Gun Holsters, Rifle Slings and Knife Sheathes
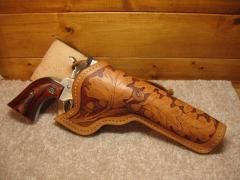
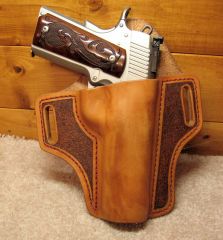
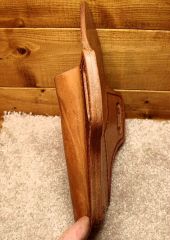
I finally had a chance to make a holster using the plans generously provided by Dwight. Had a few hiccups , not because of the plans, but due to my inexperience. Only the sixth holster I've made and I'm reasonably pleased with it. I seriously need more tools. Trying to figure out a way to do things without the right tools is get boring. Comment please. -

Tooled Holster And Belt
grumpyold replied to queenslander's topic in Gun Holsters, Rifle Slings and Knife Sheathes
Fantastic! -

Awl-Chisel-Dremel
grumpyold replied to harley45's topic in Gun Holsters, Rifle Slings and Knife Sheathes
I realize this is an older subject. There are various subjects on the site about drilling for stitching holes. I saddle stitch my projects, would love to have a sewing machine but can't justify the cost for the amount of work I do. I looked for different methods to get a nicer look to my stitching and also to move the process along a bit quicker. I tried drilling and as stated in lots of posts the results were not the best.. So here is what I've come up with and it works for me. I'll admit up front this is a combination of others techniques with tweaks I've come up with. I'll save time and space as to laying out, stitching groove, etc., and get to the drilling part. I'm using Maine Thread and like to use the heavier weights. I like the stitching work to stand out. Once I run the stitching wheel in the groove I head to my drill press. I do not use a drill bit instead I have a tray of finishing nails in various sizes with the heads cut off. If I decide to use .035" thread I sort through the nails and using a caliper find one that's close to that size or slightly larger, knowing that when doing the saddle stitch I'm going to have double the thread passing through each hole. Once I have chucked the nail in the press I take some fine sand paper and with the drill press running at low speed run the paper, cut in a strip, and polish up the nail then stop the drill and wipe the nail with acetone. With a backer of hard wood, at low speed, I use the nail to drill all my holes. Unlike a drill bit there is no grabbing and pulling and no bits of leather being pulled out, just nice clean holes. I tried just pressing the holes through without the drill running but I get the same results with it running and less effort. Once I get all my holes in it's back to the stitching horse and awl. I've set up my stitching awl by punching holes in card stock to get the correct orientation and then sanding a flat on the handle for my thumb position. The end result is the awl passes through the leather with little effort, and dead straight. It took a little practise to arrive at how far to pass the awl through so that when making the stitches the holes are still tight enough to require a firm push of the saddle needles, the first couple holes is all it takes. I can now stitch a holster in half the time, no sore hands, and no off line holes. I don't have loose holes they all close nice and tight around the thread. -

Pancake Holster
grumpyold replied to grumpyold's topic in Gun Holsters, Rifle Slings and Knife Sheathes
I'd like to see if it works out for me first. I'd also think that it's not mine to share, it was offered in a PM and e-mails by another member, think it's his to share if he wishes too. -

Pancake Holster
grumpyold replied to grumpyold's topic in Gun Holsters, Rifle Slings and Knife Sheathes
I received a PM from another member who kindly supplied me with detailed instructions and several drawings. I have only had a quick look through them but they appear to hit the nail on the head. Chiefjason, my own thoughts from the get go was that I would have to add extra to the front panel but never got to the point where I wanted to start cutting up leather. As a beginner I've all ready got a fine collection of failed experiments I tried using paper templates but, as I'm sure you know, not the most cooperative material to work with when you try to fold it into the shape of a pistol. I started this subject in hopes that someone with way more experience then me could give me direction, and you and others have really come through in spades. Thank you all.. -

Pancake Holster
grumpyold replied to grumpyold's topic in Gun Holsters, Rifle Slings and Knife Sheathes
Chiefjason I think we're on the same page. Can you give me some idea of how much extra you add for rough front panel? JLSleather I missed this video when I went searching, lots of good info. To bad the presenter didn't give some idea as to how much extra he adds for the front panel, it appears to be at least a couple inches. I guess some trial and error is going to have to take place, It's not like the mistakes don't add to the learning curve. I did notice that on the video that he still got an impression of the firearm out the back, I spoke to a gentleman in our area that does tack and saddle work. He said getting the right fit will be some trail and error. He told me when I go to mold it if I don't want the outline of the pistol out the back panel to make up a light sheet metal template, slightly undersized, of the pocket. Curve it to body shape, and insert it, wrapped in plastic, along with the pistol. He stated this will force the shape of the pistol in the front panel and the back panel will only show a slight impression of the undersized plate. He did say that I would probably have to add a strap of some sort as normally the fact the molded shape goes into the front and rear panels adds to retention of the gun in the holster. Once more I thank you for your assistance. -

Pancake Holster
grumpyold replied to grumpyold's topic in Gun Holsters, Rifle Slings and Knife Sheathes
Chiefjason, your post is following along what I'm trying to come up with. You state sized back panel and a larger rough front panel. This is where I'm stalled. My thoughts were; -Make a pattern of the pistol, deciding where to stop on the muzzle and trigger guard and mark these, -Use that pattern to design the back panel , cant, belt loop slots, stitch lines etc.. This where I'm stalled. If I measure the width of the slide do I double it and add thickness of leather? My thoughts , when doing the front panel,were if I get it to large it will be sloppy, if I get it to small when I go to form it it's go to need space to fit gun in and that's going to push it out the back panel which is what I'm trying to avoid. Once again thanks all for your thoughts and posts. -


