fishguy
-
Posts
110 -
Joined
-
Last visited
Content Type
Profiles
Forums
Events
Blogs
Gallery
Store
Everything posted by fishguy
-
Leatherwork at Ludlow Medieval Christmas Fayre
fishguy replied to UKRay's topic in Historical Reenactment
I have also heard of using beeswax (what they use on the bottels). Did you see any with glass or plastic liners? -
Leather covered flask
fishguy replied to Randahl's topic in Purses, Wallets, Belts and Miscellaneous Pocket Items
so do you guys glue the leather to the flask, or how do you get it to follow the curve in the back? -
Double Loop Holster Question
fishguy replied to bennadatto's topic in Gun Holsters, Rifle Slings and Knife Sheathes
Good sources for how to do a double loop holster are Will Gormley's patterns that they sell at Tandy and other places, and there are also some videos that Chuck Burrows has put out, as well as the ones by Bianchi (if you can find them). To answer your question, Yes, you do need to wet the holster before you put it through the loops, you also need to put the gun (oiled and wrapped in plastic) or fake gun in the holster after it has been put through the loops because it will stretch them a bit more. As for staining and stitching. Yes, you need to sew up the holster before you try to put it through the loops. Usually I stitch it up, clean up the edges, wet the holster, and insert the gun, when I am satisfied with the fit of the gun in the holster, I remove the gun, put the holster through the loops on the skirt, and insert the gun again. At this point I also flatten out the bend where the holster doubles over to form the skirt and turn our the lip of the holster if that is desired. As for staining, I usually do it before assembly as it is much easier to get an even finish on a flat piece of leather that has not been stretched. However, if you are concerned I suppose you could stain it after assembly and stretching. Something like antiquing could definitely be applied after that point. -
I was thinking that it would be neat to be able to produce your own conchos by casting them in lead-free pewter. Has anyone done this? Do you think they would be too soft to hold up to the wear and tear they might be exposed to?
-
Looks like all you need to do is drop the flowers and stick in the skulls. They are roughly the same shape so it should work OK
-
Sounds like you need to switch to an awl if it is too tough for a glover's needle. Seems slower but you will probably save time by not having to stop to bandage your hand after you ram the needle through it.
-
Map Case -- what weight leather , hints?
fishguy replied to unicornwoman's topic in Satchels, Luggage and Briefcases
You can stitch it too, however you need to learn to do either a butt stitch or baseball stitch as you are joining edge to edge. I might use a little thicker leather (makes sewing a bit easier), though the rings, besides being deocorative, will help the tube keep its shape. You could also find a thin plastic or metal tube and leave it inside permanently. This is what they do for fishing rod cases (this looks more or less like a small version of a fishing rod case) -
Cowhide Carving scabbard
fishguy replied to zhh660626's topic in Gun Holsters, Rifle Slings and Knife Sheathes
pretty cool, you did the hilt too right? It looks like rayskin (shark). Is that a stamped texture or did you do an applique of cow leather over rayskin? -
Very nice work. However, somehow the asymetric flap doesn't go with the very finished look of the rest of the bag. For a good example of someone who has raised the "rustic" look for this kind of bag to an artform go to http://www.kenscottpouches.com/ Cool stuff. Of course there were also finely finished bags too, with tooling, braiding, etc. There were also bags that were basically the tops from worn out boots sewed at the end with an old belt or chunk of harness for a strap. There is a very wide range of possibilites.
-
Hmm, wonder what the Norwegians ate before they brought potatoes back from the new world (rocks and cheese?) I am also of Scandahoovian extraction, but my Grandmother was not a big cook so about all that came down was lefsa. Don't know about this klug stuff, though it sounds strangley attractive. I place lutefisk firmly in "my ancestors moved here so they wouldn't have to eat stuff like that anymore" category. Here's another simple norse type shoe pattern and instruction: http://members.ozemail.com.au/~chrisandpet...nstruction.html a bit trickier to make come out right though.
-
Klug? Had lefsa but not Klug. Interesting how they resemble a drawstring bag. Modern Ghillies imitate the look of the uppers but with a modern sole.
-
Maybe you should make loops to hold pretzels or slim jims instead of bullets.
-
you could save time if you got a die made up to cut them out., You might also consider making them out of one long peice, with the front peice at the bottom, which is folded up and sewn at the sides, and the back flap where you are attaching the clip at the top- folded down and sewn, save you some sewing too, though it would change the look slightly.
-
Have you ever thought about "oxblood" dye, kind of a cool reddish color and actually a very popular color during the era of the 1851 colt and Slim Jim holster
-
Another possibility, if you have a metal scrapyard nearby is a piece of railroad rail. There are ususally all sorts of interesting shapes. I was able to find an 8" long peice of steel 4x4.
-
I did some selling at SCA tournaments rather than other "Rennisance Fairs" and had a pretty good time. The SCA has standards for authenticity in terms of setting up your stall, pop-ups are allowable, but the prefer you make it look as period as possible(there is usually some award for best stall). You are expected to dress in period costume, and stock goods that are reasonably period. With the SCA you have around 1000 years to work with. I focused on pouches, sheaths, quivers, bracers, and sounding horns (made from cattle horn). Sold a few things, the more I went to the more I sold (people became familar with me). Some people appear to make a significant amount of money selling at these things, enough to keep going anyway. Other than the products I tried, belts are very popular, and there is a real need for affordable period shoes. Haven't gone to any in a couple of years (shifted to cowboy gunbelts and blackpowder bags), but I found them to be quite enjoyable and the people were nice and pretty easy to work with. You can find guidelines , schedules, etc. on the web.
-
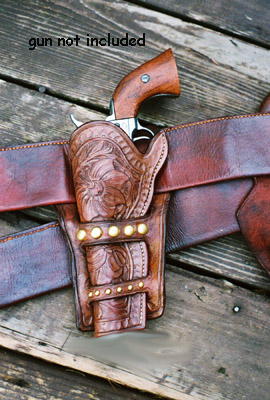
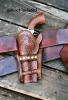
Well, guess I will stop lurking and put a couple of my holsters up for you guys to take a look at. Any comments or suggestions would be appreciated
-
So you glue the leather down (that solves the mystery of how to avoid gaposis at the back curve). What glue do you use?
-
Two new sheaths
fishguy replied to DCKNIVES's topic in Gun Holsters, Rifle Slings and Knife Sheathes
Now if I was gonna be a real geek, I would point out that technically that is an aikuchi not a tanto because there is no tsuba (guard) and that the rayskin inlay is neat because that is the same kind of rayskin that they use under the wrapping on Japanese sword and knife hilts (though the wrap is rawhide). But as I am not a geek I will not mention that. -
How do I do Grommets, Rivets and Eyelets?
fishguy replied to Ashley's topic in Hardware and Accessories
you need to go back to the leather store and pick up a copy of Leathercraft tools by Al Stohlman. It shows how to set rivets, snaps, eyelets, and how to use and take care of a whole range of leather tools. The dancing bannana does not mean anything, I just thought it was kind of cool -
Cigar Holder
fishguy replied to Crystal's topic in Purses, Wallets, Belts and Miscellaneous Pocket Items
If you did one of the three cigar style holders it would show off your tooling better. They are actually pretty easy to make. sew a flat pouch and then wet form it around 3- 3/4 inch dowels for the inside and form the cover around a pine plug. -
Is the body of the pouch veg-tan or chrome tan leather? What weight did you use?
-
Got my stamp from Gray Ghost too, pretty nice. I keep thinking of making some kind of press, but I use a jig to hold my stamp steady. It is two peices of 3/4" pine glued together with a hole the exact diameter of the stamp drilled through it. My stamp is a simple cylinder, for those big-head stamps you would make the hole the diameter of the shaft, and then add a couple of "legs" so it will clear the head. I push the stamp through the hole and set it on the work to get it lined up, then slide the wood down so it is in contact with the work and then give it a whack. Helps prevent bouncing and evens out the pressure a bit (I have the same problem with uneven stamp). Every time I get in a rush and don't use the jig, it comes out crappy, double stamp, one side much deeper, so I think it is a good thing.
-
I have used vinegaroon quite a bit on hunting pouches, holsters, etc. and it is pretty cool. All you need is vinegar and some form of iron or steel (smaller pieces make a good dye faster), usually it needs to soak at least overnight. The dissolved iron reacts with the tannins in the leather (so it only works on veg-tanned leather) to make a black compound. This compound is actually similar to old fashioned oak-gall ink (a good source of tannins that actually has been used in the past for tanning leather) which was made by mixing crushed oak galls with iron salts. If the vinegaroon gets old, with lots of rust, it becomes weak. I think you can just pour the old vinegar off and add new (if you can get rid of the rust scum when you pour off the old vinegar, all the better). How dark the leather will get will vary a bit between batches of leather. Sometimes you can only get a dark, kind of cloudy gray (which actually looks pretty cool), but don't worry, when you oil it up it will darken to black. I use a baking soda rinse and then hang the stuff up to dry. It still has a bit of a vinegar smell, but that is the smell of authenticity. At least it is not as bad as in the old days when they used stale piss to set indigo dye, that was a bit less pleasant smell of authenticity.
-
For Those Irish Whiskey Drinkers
fishguy replied to yaklady's topic in Purses, Wallets, Belts and Miscellaneous Pocket Items
Exceedingly cool For really good Irish whiskey I would suggest "red breast" Did you ever think of making bottle caddies for Irish or Scotch Whiskey, for what the good stuff costs it deserves a nice case