gringobill
-
Posts
161 -
Joined
-
Last visited
Content Type
Profiles
Forums
Events
Blogs
Gallery
Store
Everything posted by gringobill
-
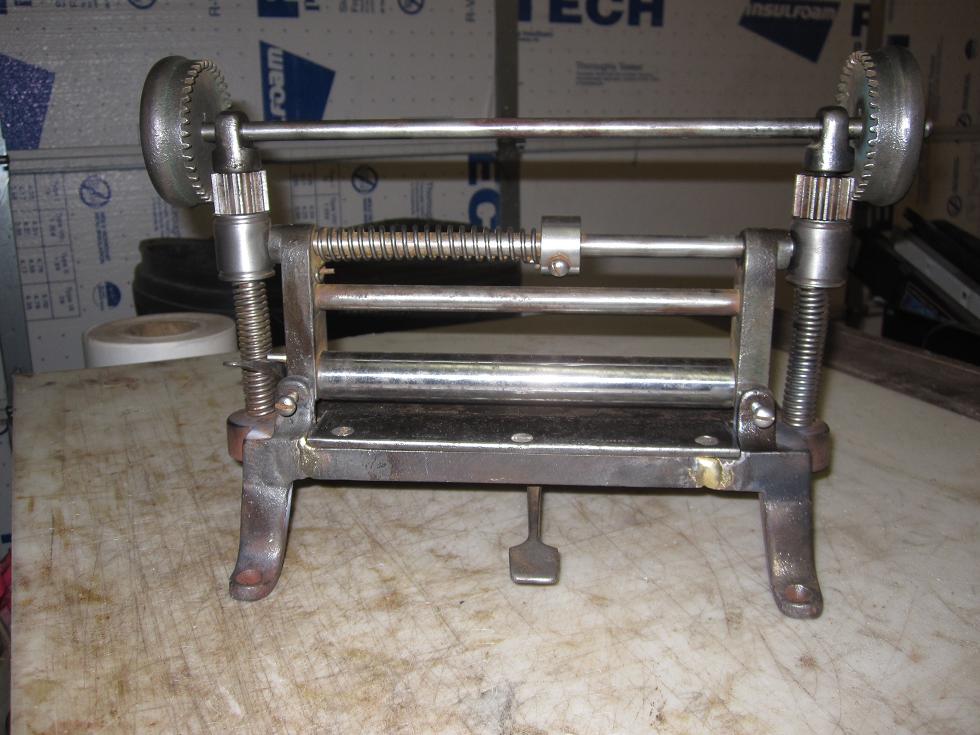
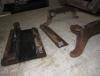
The Paul Harvey, "Rest Of The Story." I got all my money back. The seller told me to keep the pieces of the splitter saying that maybe I could "use it for parts somewhere down the road." So far so good. So I got busy disassembling it and cleaning it up so I could see if I could repair it. It took a good dose of penetrating oil, a long time on a wire wheel, some emery paper, a flap wheel on an angle grinder and a session on a belt sander but I got the pieces cleaned up pretty well. As I said the blade is pretty pitted but I have honed it and it will do in a pinch. Hopefully Bruce Johnson can find a better one. After getting it apart and all the parts cleaned up I partially reassembled the frame minus the springs, blade, rollers and anything else that might be damaged by heat. I bolted the four feet to a piece of sheet metal so that along with being put back together every thing was pretty square. I am attaching a "before and after photos of it. I also prepped the four places where it needed to be brazed filing out a "U" shaped groove to be filled with the brass rod and did a lot of scrubbing of all those joints with a stainless steel wire brush. Then started brazing which took awhile, I had to braze four sides of four breaks. When the brazing was done I let it cool as slowly as possible (I didn't bury it in lime or ashes to further delay the cooling,) and crossed my fingers. I was hoping I would not hear any cracking as it cooled and luckily I didn't. So it turned out pretty well, no cracking that I'm aware of and seems to be sturdy and pretty square. I am amazed that it broke the way it did because when the thing is put together it is sturdy, a case of the whole being greater than the sum of the parts. I reassembled it and it's taken a lot of fine tuning and adjusting. These splitters have a lot of places to adjust, a lot more than either of the other two splitters I have, one of which is another old Osborne model 86. Now I'm trying to figure out exactly how it works as it works differently than any other splitters I've used. So at the end of the day, a deal that looked like a real disaster turned out way better than I initially thought it could. I need to remember this incident next time something looks like it's headed south and I start twisting off because over the years I keep being reminded that most of the time things end up working out far better than I expect they will. I hope all of you have a very blessed Christmas and that 2012 is the best year ever! Bill

-
Hey Art, Amazingly I filed a claim with ebay this morning, mainly telling them that I had been trying unsuccessfully to contact the seller of the splitter and in about 30 minutes I got a message from PayPal saying the seller had refunded all of my money and I got an email from him confirming that he agreed that the splitter was sure torn all to heck. He didn't mention me sending him the pieces back so I tied into it today and brazed it back together and I think it's going to work. I sure wasn't going to attempt to weld it. I have done a little bit of welding of cast with nickle rod and it's pretty tricky with the peining and all of that. I just went ahead and brazed it with brass rod and I think it's going to hold together. I will try to post some before and after pix of it. I know Bruce is a fan of Chase pattern splitters and I may try to see if he might have a better blade for this one. The one on it is pretty pitted and at minimum needs to be reground and sharpened to be useable. Anyway, thanks for the reply and I'll let you know how it turns out. Bill
-
So I won a Chase Pattern Osborne splitter on ebay a week ago last Sunday. It looked pretty rough in the photos with rust and crud all over it but seemed to be intact with all the parts. I figured with a little love and a lot of elbow grease and TLC I could restore it to working condition and have a very cool old working tool. So to start with I have never had any communication from the seller (who has 99.9% positive feedback,) inspite of sending him emails after winning the item, paying for it within an hour of winning and to check to see if it had shipped. Never heard a peep out of the person. So the big day arrives this past Monday 9 days after the auction closed, and it arrives and the box is in tact and looks good. I open it and it's packed in that "styrofoam popcorn," and some empty boxes, it looked like it was well packed. It was sent by USPS Priority Mail. I don't know if it was insured because I can get the seller to respond. So when the splitter came out of the box it was in four pieces, it is totally trashed. The cast iron frame is broken in four places and I am just sick!!! I immediately start emailing the seller to figure out what to do and I sent photos of the carnage. It is now Wednesday morning and I have not heard word one from the seller. I should say here that I think the thing started out in one piece and that the good ol "Postal Service," threw the box off a 10 story building and when it hit.....that was it! At this point I'm really torn about what to do. What I'd like to do is get all or most of my money back and keep the splitter and see if I can braze it back together and use it. I'm a decent hand with an oxy-acetylene torch and I am semi confident I can put it back together. However brazing cast iron and keeping it from cracking is a bit of a trick and I'm not interested in a $255 experiment ending up with a pile of junk pieces. Of course trying to talk to a human at ebay is like calling Obama and getting through. They have all the "FAQ's" and their other handy dandy automated systems that we are supposed to use to solve all of lifes problems. I'm trying to maintain my composure about the seller not responding to any of my emails, giving him the benefit of the doubt it is right in the middle of the Christmas/holiday season and he may have gone to grandmother's house or may be in Hawaii or something. But my patience is wearing thin. My pragmatic logical brain is saying "box it up send it off, get my money back (maybe) and there'll be another splitter like it again on ebay sometime!" My emotional side is saying "keep it, hopefully fix it and have a great story to tell." Dang it's always something!!!! Bill
-
You might try Feibings saddle soap on the the back followed by a glass slicker, that will smooth it up some. Be careful not to get the saddle soap on the grain side/front of the belt.
-
Looks like oil not mold. I'm guessing it may have come from the oil/wax finish on the latigo touching the veg tan and the light colored latigo, especially if it was pretty hot where the hides were stored? Sure is a bummer, I can't imagine how much $ you get tied up in leather that you have to have shipped from the US not to mention the waiting for it to get there. Sure sorry about that. On that yellow latigo, you may be able to use cut some parts out of the stained areas and and by themselves they may not look that bad. It's just where there is a transition from the unstained area to the stain that it's really obvious. I am assuming that it's just stained and the leather is not damaged, stiff, or deteriorating? Good luck to you I know that has to be a real bummer! Bill
-

Ladies purse. Horses was fun for a change :)
gringobill commented on Anet du Toit's gallery image in Our Leatherwork Galleries
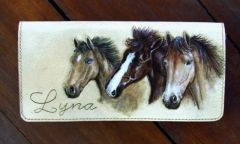 All I can say is WOW! Your work is amazing...superb !!!! I wouldn't call it "leatherwork," is more like "fine art on leather." Those piece look too pretty and impressifve to carry around or wear and ruin! Thanks so much for sharing, it's so different from most of what most of us do or see on the forum! Bill
 -
You said it, it is "SWEET!"
-
Those are a really beautiful and well make looking tool. From reading all the posts I'm afraid you've "created a monster!" People are going to be beating down your door trying to get one! Great job! Bill
-
Removing Ugly Blotches / Unwanted Stains
gringobill replied to cercyonis's topic in How Do I Do That?
That's really a shame because you've done a wonderful job with the tooling and coloring. But like the others have said, I'm not aware of any real "magic," fixes. You've actually gotten a lot of the spot out if the pix is accurate. A lot of the time that is one of those situations where the "more you chew it, the bigger it gets!" I believe all of us have got this t-shirt, but that's little consolation. I have tried oxalic acid, denatured alcohol and Barge cement thinner with a cotton swab at various time to try to remove stains and most of the time with limited results at best. Like the other poster said probably your best bet may be to dye the background to cover it up. Or.....start over, maybe the now tht you've done it once it would go faster and easier the second time? Sorry and good luck! Bill -
If you've only been tooling and doing leatherwork for 6 mos. you are really making huge progress! Your work and tooling is really "clean," looking which is something that really takes a long time to achieve! From all the items you made, it's obvious you've really been working hard at it and it shows in the quality of your work. Keep it up! Bill
-
Unfortunaltely those good little felt daubers seem to have gone the way of the dodo, I liked them a lot too. I am using the small round wool ones on bigger edges and cotton swabs on small things. Sometimes I burn one of the round wool daubers with a lighter and rub the burnt fuzz off to make a smaller, harder dauber and that works pretty well. One thing I saw suggested somewhere is to use a small square of sponge held with a clothes pin as a dauber. I haven't tried that but I think if you experiment to find the correct density of sponge that could work well. Bill
-
Thanks for showing that neat old quirt! You're story about the ranch hand hits close to home. I grew up right on a ranch right on the Mex border in southeast Arizona and we had Mexican cowboys working for us the whole time I was growing up. These guys were from Sonora and Chihuahua and the best ones came off ranches down there. From time to time different ones would be craftsmen and they braided some riatas and quirts etc when they were there. The gear they made was using gear and not art pieces. I remember them cutting a green hide into a long strip about 1/2"to 3/4" wide with the hair on and stretching it around the top of a waterlot fence and letting it dry. Then they would scrape "most of the hair," off of it with pieces of broken glass. I can kind of remember them making a notch in the top of a cedar post set in the ground about chest height. they could drive their pocket knife in the notch at the width they wanted their strings to be and start cutting the strings. They split the strings in a similar way if they need to. I can remember that there was still some patches of hair or short stubble on the finished riatas but like I said they were making them to use not for show. Some of them could work with horse hair too and one of them showed me how to get hair ready to twist and then how to twist it using an incredibly simple device that was a stick about a foot long, bigger and heavier on one end with a hole drilled through it a couple of inches from the smaller end. You stick a nail, bolt or another stick through the hole., then tie the start of the hair to a groove whittled around the short end of the stick below the hole and start whirling the stick around holding the shorter stick . It takes a two people to run this gadget, one to spin it and back up and the other one to feed the loose hair into the strand. It's not nearly as good as an old hand crank churn or of course a reversible cordless drill but it works. Some of those guys were pretty handy at making gear. I was pretty young at the time and looking back I really regret that I didn't pay closer attention to what they were doing, take photos or videos and preserve how they made the stuff. Sadly all of that has changed now. There are very few of those kinds of cowboys left and the remaining ones stay in Mexico. Thanks again, Bill
-
Macbook Air Sleeve, Cover
gringobill replied to leatheroo's topic in Purses, Wallets, Belts and Miscellaneous Pocket Items
That's a great looking and functional piece. Really clean lines and awesome attention to the little detail like covering the snap, that's what really sets it apart! Bill -
Really good lookin'!!!! Great design, different, and man what a lot of work went in to it. Awesome job! Bill
-
Great lookin' job Casey! I've been engraving for a couple of year and I can totally appreciate what you are saying about engraving on those cylindrical barrels. It's still a challenge for me to make it look ok on a flat piece but I've tried something domed or round it's a whole other story. That takes some getting used to. I also know what you're saying about working on something besides an order. I've been tooling leather a long time and it's kind of second nature now but it's different with the engraving and like you I get busy doing something other than engraving and get away from it for awhile and it's kind of like starting over when I go back to it. I realize I need to be doing some engraving everyday! Great job, those will be heirlooms! Bill
-
It's already been said, but.....it's one of those "pay me now or pay me later," situations. I've always felt it was opening a can of worms that I haven't wanted to get into yet. As others have said, if you get a tax id/business license you're going to be expected to keep good records and at some point the state and feds are going to expect you to pay sales taxes on everything you've sold. You're going to have to start keeping a set of books. I expect in many of our cases, we are buying enough tools, etc that we can show a loss and not show a profit, so there are no taxes due. However there is a limit on how many years the IRS will allow you to show a loss on a business, it may be 7 years. It's just not as simple as, setting up a business and getting a tax id and getting to buy things at a discount (most of the time the discount equals the sales tax you'd pay on your supplies,) eventually you're probably going to have to pay the piper. I have more dealings with taxing entities than I want already so until such time as I get big enough to be forced to jump through all the hoops I'll continue to fly below the radar.
-
That is one mighty fine looking cack there sir!!!!
-
I think you're right, the quality of some of the metal stuff sure seems to have gone downhill. I've noticed the same thing on both the what I call speedy rivets (I think the same thing you're talking about, )also snaps. I was buying some of that stuff from Tandy and it sure seems to have gotten flimsy. I have some of those rivets I got in a bunch of stuff I bought from an individual who was selling all of her dad's leatherwork supplies and tools and they are night and day different than what Tandy is selling now. Somebody is trying to save a fraction of a cent on their product. So I started buying snaps from Panhandle Leather, their line 24 snaps are way better than Tandy's. same thing with Chicago screws. Good to know that Ohio Travel Bag has some better stuff, I will give them a try.
-
I saw some at Sheridan Leather during the show this summer. Seems like they had them in a couple of different colors too. Bill
-
full oakleaf i-pad cover 004-2.jpg
gringobill commented on leathercrafter's gallery image in Our Leatherwork Galleries
 Great job John! Bill
 -
Dangit!!!! That's a bummer, I'd be mighty dissappointed if I were you. Most high end edgers (I would consider Dixons to be that,) come really sharp and ready to use. You've got yourself a dilema here! From your discription is sounds like those tools need some shaping before sharpening. From what I expect those tools cost that should not be the case. I don't know how you bought your edgers, direct from Dixon or from a dealer? I think the first thing to try is to contact Dixon direct or the dealer and ask them for help. If that fails then it's on to plans B, C, etc. There is shaping and rough sharpening and then there is the finishing up more like stropping. Shaping the tools requires some skill and you sure don't want to ruin them. Personally I'd be really wary of letting a knife sharpener who isn't familiar with leather tools attempt to sharpen them. They are somewhat precision tools and the groove in the bottom need to be pretty precise. I have no idea of how confident you are in your own sharpening skills, if you are pretty skilled at that you can probably do the job, but if you're in doubt you probably should seek some professional help. Some saddlemakers sharpen edgers on the sharp edge of a good stone. Or there are slip stones which are shaped with a sharp edge. Woodcarvers use them to sharpen the inside of gouges. I think the most common method used on most better quality edgers is to get a round metal rod that fits the bottom contour of the tool. With the rod flat on a hard surface, put a piece of wet or dry sandpaper over the rod then pull the tool towards yourself on the paper. If these tools need a lot of material removed (and it sounds like they do,) you could start out with a course grit and work your way down to some very fine grit like 1500 or 2000 to get a fine finish. You can also put what ever you compound you use to strop your other blades on the sharp corner of a piece of thick skirting leather and strop the groove of the edger on that. You can do the same thing with a piece of heavy cord charged with your stropping compound. Another method which is more high tech and requires some care and skill is to use an small rubber grit impregnated wheel ( a good hobby store should have some in different grits,)in a rotary tool like a Dremel or Foredom Flex Shaft. You need to make sure the wheel is spinnind toward the tool tip and not toward the handle. All of this stuff probably means you spending more money so.....this is probably not what you want to hear, but I believe if you can get your money back you'd be better off to do that and spend it on some Ron's Tools or Barry King edgers. I have some of both and both are of incredibly high quality and come very sharp. Another possibillity would be to find a saddlemaker or other professional leather worker , if there is one in your area, and ask them for help in sharpening. I feel you pain, good luck! Bill
-
Try Rite On Screw Products Inc (google them,) they make all kinds of very high quality screw products for silver smiths and leatherworkers. They are brass and come in many different diameters and lengths. I'm thinking of chicago screws, don't know if you know what they are. They are used in many applications in leatherwork and western silversmithing. The ones that Rite On makes are much higher quality than most that are available, they are precision machined out of brass and the heads are much flatter than most you can buy. I'm thinking they will have them in the size that you need. They are reasonably priced and ship the same day in most cases. Bill
-
A couple things you can do with paper patterns is to put a piece of self adhesive vinyl shelf paper on the back of paper patterns that you plan on reusing, you can also spray the back of paper with artists fixative, like somebody else said, use a ball point pen to trace the pattern, it's easier on the pattern than most stylus'.
-
Very cool vid!!!! What I like is how well dressed he is with his nice shirt and tie!!! Definitely old world craftsmanship lots of pride in their workmanship. You have to "look quick," but there is a lot to see even as quick and dirty as it is. Interesting to me that he uses a lacing punch instead of an awl. Also I'm kind of curious about the use of the brush on the leather, it looks like a horse brush, not sure what that is doing. I expect that leather has a really nice finish on it to begin with. Kind of a funky little knife he uses to cut out the parts? Seems like for a big outfit like Dunhill they be using a clicker and dies for the parts? Thanks for posting. Bill
-
Small Backpack; Big Pain In My Butt
gringobill replied to swivelsphinx's topic in Satchels, Luggage and Briefcases
Looks like you did a good job! And I can imagine the self talk and trying to figure out all the pieces and what had to be sewn first, etc, etc. A ton of planning and figuring. If you sewed it by hand you really deserve the PITA award that would be cruel and unusual punishment. I'm not sure there's enough money to entice me to tie into hand sewing a project like that! Good job! Bill