


gringobill
-
Posts
161 -
Joined
-
Last visited
Content Type
Profiles
Forums
Events
Blogs
Gallery
Store
Everything posted by gringobill
-

Women's Bag
gringobill replied to arbalet12's topic in Purses, Wallets, Belts and Miscellaneous Pocket Items
That's a great looking piece. I've seen your work before and it seems like you've developed your own carving style which is really enviable, it is different and looks really good. The design is very "old world," baroque looking which makes sense, since you are "over there," and I imagine are exposed to a lot of those old world classic designs. I believe the original tooling patterns that came to the Americas from Spain and Europe originated from those old classic designs but have been modified and "watered down," over the ages. You seem to have gone the other way with your designs staying truer to those old classic design elements. Also your coloring/antiqueing is different from most that we see and that is also good. Your work is very distinctive and recognizable. The construction and attention to detail is also very clean looking. Very nice!!!!! Bill -
What I've been doing is buyiing the whole day planner at Walmart or Office Depot and taking the insides out and using the whole thing. They're not cheap that way but you end up with the ring binder like you are looking for plus the calender pages and all the other stuff. The last ones I got at Office Depot. they have the day planners in several sizes and for different prices. The bigger ones I got that have 7 rings are 8 7/8' long. I belive the ones I bought at Office Depot with a vinyl cover were between $25 and $30 which is plenty but they had pretty nice pages, calenders, etc. The smaller ones only have 6 rings. Ohio Travel Bag has the smaller 6 ring model that has 3/4' rings not the 2' rings you are looking for. They also have 3 ring binder with 2' rings. I found some suppliers for different ones online but they only sold in big lots like 1000 I think. I sure didn't need that many. Someone else on the forum may know of other sources, I'll be interested to see what turns up. Bill
-
Guess I'll swing by Harbor Freight and check out what they have. I'm a regular there anyway. I have a compressor so maybe I won't have to rely on fart power but it's good to know that's an option. That's a nice looking rig there with the dark tinted edges, kind of like a sunburst guitar. It's kind of "space age," looking with the scope sight in the pistol, cool! Thanks again from one old fart to another, Bill
-
Mike, thanks for the reply and the airbrush idea. I have been out of town for a few days. I tried to respond to this thread while I was gone with my phone and it showed my response to you was sent but doesn't show up here? Anyway, I have wondered about spraying on oil with an airbrush and was wondering if it would spray properly, I was concerned it might be too thick. Maybe it needs to be warmed a little, then sprayed. I have used an airbrush before but never in my leatherwork. I may have to get another one and give it a shot. I can see how that would be a good way to apply oil and control the application. I know exactly what you are talking about when the areas turn different shades when you apply oil and the temptation to keep messing with it rather than leaving it alone and be absorbed on it's own. That's a sure fire recipe for applying too much oil. Pete, thanks for the tip on Bee Natural Saddle Oil, I've heard of it but have never used it. i will probably get some and give it a shot. Thanks everybody! Bill
-
That's a good idea. Least I could do is keep it in the house, that would help some. Thanks for the idea! Bill
-
Suicide, the blotching could be due to variations in the leather? It seems like it happens more often on real thin stuff like 2-3 oz HO veg tan that I use for lining. I noticed a weird think in some 5-6 oz that I'm making a briefcase out of. While I was carving/stamping the corners, notice little black flecks/spots in the swivel knife cuts when I beveled them. There was nothing like it visible on the suface. It was something within the leather. It wasn't isn't a problem but I don't recall ever noticing that before. I am wondering if I is just a weird side I got or something from a certain breed? I've just never seen it in my life. Colt Breaker. I have warmed my oil before and know that it sure penetrates/soaks in alot faster when you do that. It can get pretty chilly in my garage/shop this time of year even with a heater going and the EVOO is kind of thick. So a little warm sure wouldn't be a bad idea! I need to start paying more attention to that and take the time to prep the oil before I use it. Thanks ya'll!
-
Bruce, thanks for the paint roller idea, that sounds like it would work. I will give it a try on some scraps and try to figure out how much oil is needed on the roller. Where I have issues is on smooth veg tan rather than on tooled pieces. As we know person needs to be more cautious in applying oil to tooling because it will soak it up a lot quicker and more freely than smooth parts. Blotches that aren't excessive don't show up as bad on tooling as they do on a smooth area. And you can put quite a bit more on the smooth parts without it darkening. I thought I had the perfect idea one time and bought a kitchen salad oil pump sprayer and thought I could spray it on evenly.....not! That thing spayed it out in a real coarse spray rather than a fine mist, more like in globs. So much for that idea. It does work on salad though. Thanks everybody for your responses! Bill
-
I'm interested in hearing how some of you apply the proverbial "light coat of oil," and evenly to veg tan. In my case it's HO veg tan and I use extra virgin olive oil and apply it with a trimmed piece of sheep skin. I get along fine if I want to end up with a project that's slightly darkened. My problem comes when I want the project to end up pretty light colored. I antique most of my work. Pure neatsfoot oil turns HO veg tan a darker reddish tone, which is good when that's what I want and for some projects. But when it come to getting a light, even coat of EVOO a lot of the time it seems I end up with some darker spots. It seems that the standard method of application is with a piece of sheep skin. Do some of you only use the sheep skin until the actual "skin," starts to get saturated and then switch to a fresh piece where the oil is only loaded into the fibers? Thanks in advance! Bill
-
Need A Small Modeling Tool Holder --- Gizmo --- Thing
gringobill replied to Elizabeth Chase's topic in Old/Sold
-
Noobie Question (Spots Appearing After Moulding)
gringobill replied to Willbury's topic in All About Leather
Pretty sure Winter Bear is right about the iron/steel filings being the culprit. I've got that t-shirt too, it's one of the pitfalls of a mulitpurpose shop/work area. The good news is a little oxalic acid/wood bleach or maybe lemon juice will remove those pretty quick. Bill -
Shipping Out Some Fancy Pieces, Part 1
gringobill replied to Lobo's topic in Gun Holsters, Rifle Slings and Knife Sheathes
Nice lookin' stuff. That's a pretty cool and different thumb break set up than I've seen and done myself! That's a really nice color, what brand of cordovan did you use? Thanks, Bill -
# 2 and #3 are the most common size edgers used. Use the #2 on one layer of the type leather you are using, use the #3 for a rounded edge on a double thickness like you are using. If you have those two sizes they should work on most projects you'll have. Get those sizes and do some experimenting on scraps before you tie into your real project. Bill
-
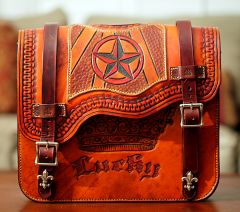 Way cool!!!!! Is it part Dia de Los Muertos? Anyway it's a real eye catcher!!!! Great Job! Bill
 -
The Trouble With Glove Snaps
gringobill replied to Happy Hooligan's topic in Hardware and Accessories
Hmmmmmm, what you're describing sounds backwards from problems I've run into. That is the female part, the larger hollow piece that a smooth cap goes on is usually the one that gives problems. What is supposed to happen is the inside piece needs to protrude above the top surface (outside,) of the leather, enough so that when you hammer the cap on the bottom piece mushrooms at the same time the edges of the cap are compressed inward gripping below the mushroomed part. What happens a lot of time is that the leather is too thick and the bottom piece is flush instead of protruding a little about the surface. I would call this the female part of the snap. The other side has a smaller hollow piece that comes through from the outside/back of the leather piece. A small button/knob fits over this piece and when you hit the setting tool, once again the longer piece mushrooms inside the little button securing it. Again the problem may be that the leather you're using is a little too thick for the male piece to extend through far enough to get a solid connection inside the knob/button. In either case you may have to skive or thin the area around the snap pieces to allow enough of the parts to protude to allow a good connection. A sharp french edger works pretty well to do this. If I've totally missed the point here, disregard all this blabbing! Good luck, Bill -
Hope I Get More Response This Time Around
gringobill replied to pete's topic in Patterns and Templates
Thank you sir, I appreciate your kindness. Glad you found it helpful, hopefully others who are starting out will as well. I would like to be able to include some photos and highight the things I attempted to describe. I am a visual person and it's helpful to me to be able to see what someone is trying to explain. Maybe I can edit my comments and add some photos. Thanks again, Bill -
Hope I Get More Response This Time Around
gringobill replied to pete's topic in Patterns and Templates
Hi Pete, I saw your first post and just laid low because I haven't been real happy with belt patterns I've drawn either. But here are some thoughts I have about belt patterns in general. Belt patterns are repetitive, so you figure out how long you want the segment/pattern to be and draw it once then make a tap off. The segments seem like they are usually between 6 and 12 inches long and repeat along the full length of a belt. Not only are they typically in segments but sometimes a segment can be divided with a leaf and a flower alternating, so there is a flower at the leading end, typically on the right side as you look at the pattern with a leaf in the middle, with stems in between. Some belt patterns have only flowers and stems and no leaves. Most belt patterns are created along a sine curve or "s" curve, the curve can be flatter or more curved (compressed,)depending on what pleases our eye or what works for our design. Sometimes the stems for the flowers and the leaves go in opposite directions in the same segment and intertwine as they go. I would start by laying out your pattern geometrically, if that makes any sense. Draw a top and bottom border depending on what width of belt you are drawing that pattern for. Figure out what kind of flower you are going to use and place it at one end of the pattern. I use graph paper or grid paper for drawing all my patterns. It just makes life a lot easier and faster when you have the grids on paper to work with. Essentially all decorative designs be it leather carving, wood carving, or engraving, are based around sine curves (S curvesor French curves,) and scrolls. People may not actually draw the sine curves or scrolls first but if they don't they envision them in their mind. I see that you are interested in Sheridan carving/designs. I'm sure if you draw your own Sheridan patterns you start out by filling the space you are working on with circles then connecting them. What you end up with is a series of "S" curves and scrolls. A belt pattern contains these same elements but you are filling a longer narrower space so the scrolls are more subdued and flatter. So you start out with a long gradual S curve that repeats itself as it runs the length of the belt. The S curve starts on the bottom or top of the left end of the segment and gradually flows along the pattern to the right making a long gradual "S" until it ends at the opposite or right side of the your segment, envision a long flowing "S" laying down. This is the basis for your pattern. It might be helpful at first to very lightly draw the S curve in between your top and bottom border. You want it to begin on the top or bottom and one end and finish at the opposite end. This long S curve is the general framework for your belt pattern. One flower or leaf is at the end on the right side and either another flower or leaf is in the middle. When your get the pattern completed and it moves along the belt the stems on one end should flow out of a flower or leaf. The S curve design should flow smoothly the full length of the belt. Once you get your flower and leaf in place in the middle and one end of the pattern then you will fill in the stems and what other decorative features you can dream up along the S curve. The leaves coming off your stem should be pretty close to the same width just as in other Sheridan style or western floral designs to achieve balance. Flow is a very important element in any design and I doubt that I can even explain what it is, but you can probably, "know it when you see it!" The stems should have a nice gradual taper as they go from the base of a flower or leaf back toward and meets the next flower or leaf That taper and thinning of the lines is what sets a really good design apart. I believe drawing a belt pattern is no different than drawing any othe type of floral pattern. It takes practice and you probably need to start out with more simple designs and ideas and then start refining them and making them more elaborate. One of the challenges is fitting flowers and leaves within the borders and having them look good. A lot patterns have a oval shaped flower and parts of it disappear under the border. Part of some petals can't be seen but your imagination can envision how they look. If done right this can look good. This is one of the more difficult parts of drawing belt patterns for me. To draw a flower that fits and looks right within the borders. I don't see a lot of belt patterns where the entire flower is visible, it seems to me that a pattern like that gets pretty small it's hard to make it look good. There are exceptions but you have to play with your flower to get it to look right. In the situation I mentioned earlier where the leaves and flowers are flowing in opposite directions there would be two S curves that are creating a series of flat flowing figure eights along the pattern. That is a more complicated and difficult pattern to draw and probably something to try after you get the hang of more simple designs. You mentioned having problems having too much background area. Drawing a belt pattern is the same idea as drawing a Sheridan pattern on a bigger space it's just a trickier because you are trying to fill up and long narrow space rather than a larger square, rectangle of circle. I just have to play with a design using trial and error as I draw in the stems between flowers and leaves. I don't know if all of this make sense to you, and I hope I am not insulting you with these basic design concepts. Maybe some of this might give you some ideas or possibly someone else of this board that is just starting out. What I need to do is take some pix of some tap off designs and post them then if I can figure out how to do it, put some arrows on them to show what I'm talking about. I think if a person looks at some belt patterns that you like this will make more sense. Anyway maybe some of this helps, I hope so. Take care and good luck! Bill -
Andrew, Bruce is the expert on these old splitters. I have bought a couple of them lately and have they were both in pretty rough shape when I got them. I tore into the first one like a bull in a china closet since it was torn all to hell in shipping anyway. So I have done a lot of learning about them. One thing I will warn you about, is that if you totally disassemble the machine it's pretty tricky getting it adjusted and fine tuned when you put it back together. It looks like your blade is in pretty good shape, better than either of my old blades. Like Bruce said you can and should clean up your rollers and you can do that with out totally taking it apart. I used a wire wheel on a grinder to get a lot of rust and crud off and then used a little 1" belt sander with a very worn belt to polish up the rollers. If you're not a mechanical kind of guy like Bruce said, you might be better off sticking with steel wool and some wet or dry paper of 400 grit and higher to clean up the rollers. Using the wet or dry with WD-40 or kerosene will take off rust. You can also use the same kind of solvent and a small wire brush or cloth to wipe down the rest of it to clean it up. Again, if you aren't a pretty good mechanic, I'd advise you not to take it completely apart. These spltters are a lot more complicated than the Osborne model 86 styles. Bill
-
It looks like you've got the thread threaded through the top tensioner wrong, it's running through the guide just ahead of the top tensioner TWICE, forward and backward, oing in and then back out. I think that means you've got the thread wrapped through that tensioner twice, it's only supposed to go through it once, straight forward through , horizontal, between the discs then down to the bottom tensioner. This has to be part of your problem. You may have the thread properly routed through the bottom tensioner. It is supposed to go through the chrome thread guide then immediately back to the left, counter clockwise and around the smooth groove twice and then back out through the chrome guide and then through the black guide and up to the take up lever. It looks correctly threaded from that point on. Now I'm wondering if all the "adjusting" to other parts of your machine hasn't exacerbated the problems originating from not having the machine threaded properly. Also, if you have broken your thread at the needle or the bobbin you may have small bits of thread stuck in you bobbin mechanism, I have done that before and it will sure throw everything off. You may need to remove the exterior plate that holds the whole bobbin in it's cavity and make sure you don't have pieces of thread stuck in there. Getting it machine threaded right should go a long way towards solving your problems. Good luck!!! Bill
-
Mighty cool Bob......congratulations!!!!!! Pretty special to win that honor in your old hometown and against some incredibly stiff competition too!!! Way to go! Bill
-
Great job, you're gonna love using that horse! I built mine so many years ago I'm not gonna say but have refined it some over the years. What I did for the spring was put a coil out a old set of bed springs and put it below the strap, that will give you a little more room in the throat which I think you'll find you'll want for some things. I also put a couple of pieces of sheet brass in the bottom of the slots where your strap goes through, it makes the strap slide easier. Most stitching horses have a fourth brace on the left side below where you tooth plate is. I don't know if that really matters but every one I've ever seen has that brace there. You'll probably want to glue some veg tan strips inside your jaws to keep from marring your work. I've seen some old ones that had something like fitted sewn buckskin covering the entire tip of the jaws. Enjoy that thing, you'll have it forever. Someday your grandkids will be asking you what that weird looking thing is. I have it on my mind to build another one someday myself! Bill
-
Are you using a big table to roll sides out on to cut them? I find that if you have a big surface to work on it will make the whole process a lot easier. It helps to clamp the starting end down to the work surface with a spring clamp when using a draw gauge. If you do that you should be able to start a cut on thicker leather with the draw knife. I believe if you can pull the leather through the draw gauge rather than pulling the draw gauge through the leather it will help keep your cut straight. I start with the edge of the side hanging slightly off the edge of the table, I'm right handed, I pull the strap I'm cutting with my left hand while holding the draw gauge in my right and walk backwards as I cut. Being able to cut straight consistantly with a draw gauge is an acquired skill that takes practice to get good at like so many other skills used in this craft. As far as truing up a strap with a crooked edge after it has been cut it can be done with a bench mounted pull through cutter but you've got to have one straight edge for it to work right. You're going to need that before you use your draw gauge anyway. You can cut that with a round knife or a sharp hand held trim knife. Once again, having really sharp knives is the key to sucess in all cutting. I don't think an Aussie Strander will work for you cutting the heavier leather, particularly the veg tan. I believe they work best on thinner more pliable leather. The disposable blades in them flex too much for the heavy stuff. plus about 1/2" is the max you can cut with one.. If you have veg tan split down pretty thin It might work. If you're cutting strips for sandals they're probably not real wide, l'm guessing they might be 1/2' to 1"? Seems like those narrower strips are easier to cut with a draw gauge than wider straps like 1 1/4" to 2" You touched on one key to success using any cutter, having the blade as sharp as is possible and taking the blade out and stropping it pretty often. A plough gauge does a better job on wider strips than a draw gauge. You are pushing the blade through the leather rather than pulling and it not only has the stop for the width but also has the adjustable roller on the top which holds the strap being cut down against the beam giving you more control. the strap can't ride up on the blade like on a draw gauge. Plough gauges are not too easy to come by and they are pretty pricey but IMHO worth it. The Dixon company in England is the only company I know of that still makes them, there may be others but I'm not aware of them. Bruce Johnson on this site usually has some for sale and if you get one from him it will be in good shape and ready to go. You can expect to spend between $350 and $400 for one which is a lot less than the "thousands," you mentioned. Good luck! Bill
-
Eletrathon is right a solid core door is as good a bench top as you'll find. If you want to go all out put 1/4" thick high density polyethylene sheet on top of that. It's tough , an awesome surface to cut and punch on and easy to keep clean. Not real cheap, but it'll be there for awhile I think I paid about $40 for a 4'x8' sheet? can't remember for wur3e Bill
-
Ok, I'll try to take some pix of the reins that do a decent job of showing that braid. Now that you mention the Argentine books, that may be where this braid came from because I know Gene has a couple of books from down there and I he spends some time with Nate Wald and I think has met Pablo Lozano and Armando Defarrari when they've been in the States. I will ask him what that little braid is, it looks like a herringbone of some kind. I'll try to get the pix in the next couple of days. Bill
-
Thanks for the reply! I think what you have done is an expanded version of the Mexican round braid, I think that one goes from hole 1 to hole 4 and ends up with the over 2, under 2 pattern. I have used it several times but have to go back to look at the instructions to get started. I guess I'd better grab this book, a guy can't have too many instructional books. LOL! I may play with your braid and see if I can do it, it sure looks good. I have a pair of reins that I got from Gene Flaten in a trade and on those he has wear leathers on the loops to connect the reins to the bit, he used some kind of elaborate edge braid on those and out of some tiny roo string. I will ask him what that one is called. I looks similar to yours only seems more "elongated," or stretched out, if that makes any sense. It's very full looking as well. Thanks again! Bill
-
I've been admiring your edge brading in some of your other posts and I have also wondered how you do this braid/pattern. I've seen your "1 to 5 and 1 to 7 and compressed," description but I've never seen and instruction for this method in print or on line. It there any instructional info on how to do this out there or is it something someone has to show you? I just read what you said about "in hole one and out hole 5," is this pattern similar to a mexican round braid just over a longer span of holes or are there some other differences? It sure does look good!!!!!! I like to learn how to do it. Thanks Bill