Oldtoolsniper
-
Posts
276 -
Joined
-
Last visited
Content Type
Profiles
Forums
Events
Blogs
Gallery
Store
Everything posted by Oldtoolsniper
-
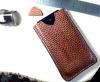
 Sorry, I have no doubt the lacing will hold up. I was referring to the coloring and texture on the leather..
 -
Small Oaks Notebook
Oldtoolsniper replied to BearMan's topic in Purses, Wallets, Belts and Miscellaneous Pocket Items
That is sharp. Where do we go to learn how to do that? -
Bear in mind there are a lot of scrollsaw blades out there. They make them for cutting about everything. I've not seen one for leather nor have I tried it on leather but since I make my leather forms with it I'll give it a shot on some leather. The blades are set up by material and thickness of that material. It has to do with the number of teeth doing the cutting and being able to clear the dust out of the cut. What are you trying to gut out? I mean shape wise and I'll give it a shot and post pictures.
-
That is really nice. I can hardly keep my stitches looking neat and organized, I can't imagine the mess I'd have trying that lacing. I know you have not used it long but I would be interested to see how long it holds up to everyday use. I'm going to get some to try it out too!
-
No plans on selling the tails. It takes about three hours time to process one over a few days. Not counting the price of tanning chemicals they would be expensive tails even at minimum wage. A commercial tannery would be the cheapest route if you can find one who does it. Bear in mind as well that here in Iowa some counties pay a $50.00 bounty for the tails. They really do a lot of damage to farmland. The pelt is only worth about $14.00.
-
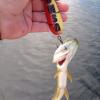
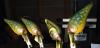
Get an MSDS sheet for both types and it will reveal what is different. If it's a chemical they have to have one for it. I airbrush fishing lures and have found that the major difference has been the grind of the pigment. Some will plug the brush but they all seem to hold up on lures In the water until fish hopefully tear em up. These lures take a beating and hold up very well. The finish is future floor acrylic, same stuff you put on the floor.
-
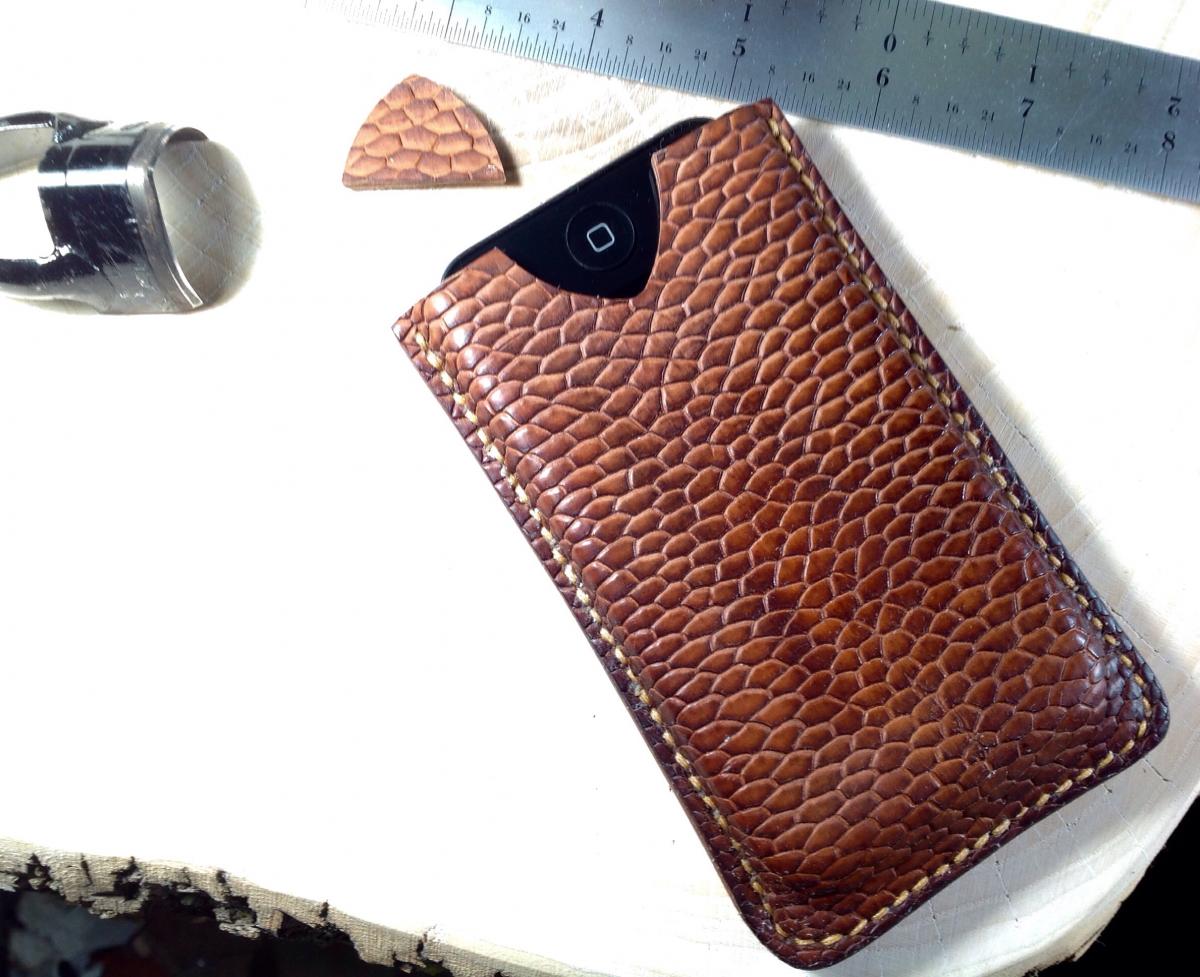
Thanks everyone. In the next day or so I will add more to the post from what I've learned working with the tail. That little project was pretty straight forward but there a couple of curve balls. The tail changes thickness both ways. Front to back and side to side. It presents a challenge for stitching. More later when I have time.
-
As a trapper I remove a lot of nuisance beavers around here for farmers. These are corn fed beavers so some get quite large. I've never found a maket for the tails. I've started to learn leather working. Here is my first go at using something that would otherwise be wasted. I tanned the tail and laminated it onto some 2-3 oz leather. The tails go from thick to thin and so you have to adjust thread tension as you stitch around the case. I was not really sure it would even work so this was an experiment.
-
Bone Folders Vs. Teflon Vs. Cocobolo, Vs Etc.
Oldtoolsniper replied to CustomDoug's topic in Leather Tools
I just saw up dog chew bones from the farm store on my bandsaw. Shape em with the 1 x 42 or 1 x 30 belt sander and go to town. If you want the white go to a beauty supply house and buy peroxide for hair, not the grocery store stuff, it needs to be for hair. Get the thick kind 40% peroxide sold by the gallon. It will turn the bones crispy white if that's what you need. A $2.00 bone will get me four folders in most cases. Shape em however you want. Look at the ends and make sure they are solid, some are porous and they don't work. Don't worry if they are filled with junk either feed it to the dog or toss it. -
Advice Wanted On Pricking Irons/stitching Awl
Oldtoolsniper replied to Grey Drakkon's topic in Leatherwork Conversation
Grey, A tip I picked up on here (sorry don't remeber who) was to use a wine cork on the other side of the leather to push the awl into. It works really well on items that ride higher in my stitching pony. I also have the industrial size box of band-aids handy. -
Advice Wanted On Pricking Irons/stitching Awl
Oldtoolsniper replied to Grey Drakkon's topic in Leatherwork Conversation
This has been a very informative thread. I'm thinking at this point as long as it looks good and is done properly a stitch up or down really makes no difference. I can't imagine it makes much difference strength wise. Now let's get the thread size and awl sizes worked out and this will be a phenomenal thread. -
Advice Wanted On Pricking Irons/stitching Awl
Oldtoolsniper replied to Grey Drakkon's topic in Leatherwork Conversation
Joe, What are your thoughts on the Seiwa chisels? -
Advice Wanted On Pricking Irons/stitching Awl
Oldtoolsniper replied to Grey Drakkon's topic in Leatherwork Conversation
I know this thread kind of drifted but I can't help but think this is valuable information for anyone looking to buy pricking irons. I have to do everything by mail order and this will be very helpful for reference. To bad it's not under tools where more folks would find it. Anyone have any ideas on how to do the awls? May as well get them in here to and make it a complete discussion. -
Advice Wanted On Pricking Irons/stitching Awl
Oldtoolsniper replied to Grey Drakkon's topic in Leatherwork Conversation
Are the Seiwa straight awls tapered at the tip and then the same thickness all the way back? I have about thirty or so awl blades but I have no idea who the manufacturer is. I'm betting Osborne since they came in a box of osborne awl handles. I have three different sized Blanchard diamond awl blades as well. These all taper and leave a big hole on the front and a little hole on the back. I would think a slight taper and then the same size would make for the best looking stitch both front and back. I'm only guessing, all of mine are tapered. -
Advice Wanted On Pricking Irons/stitching Awl
Oldtoolsniper replied to Grey Drakkon's topic in Leatherwork Conversation
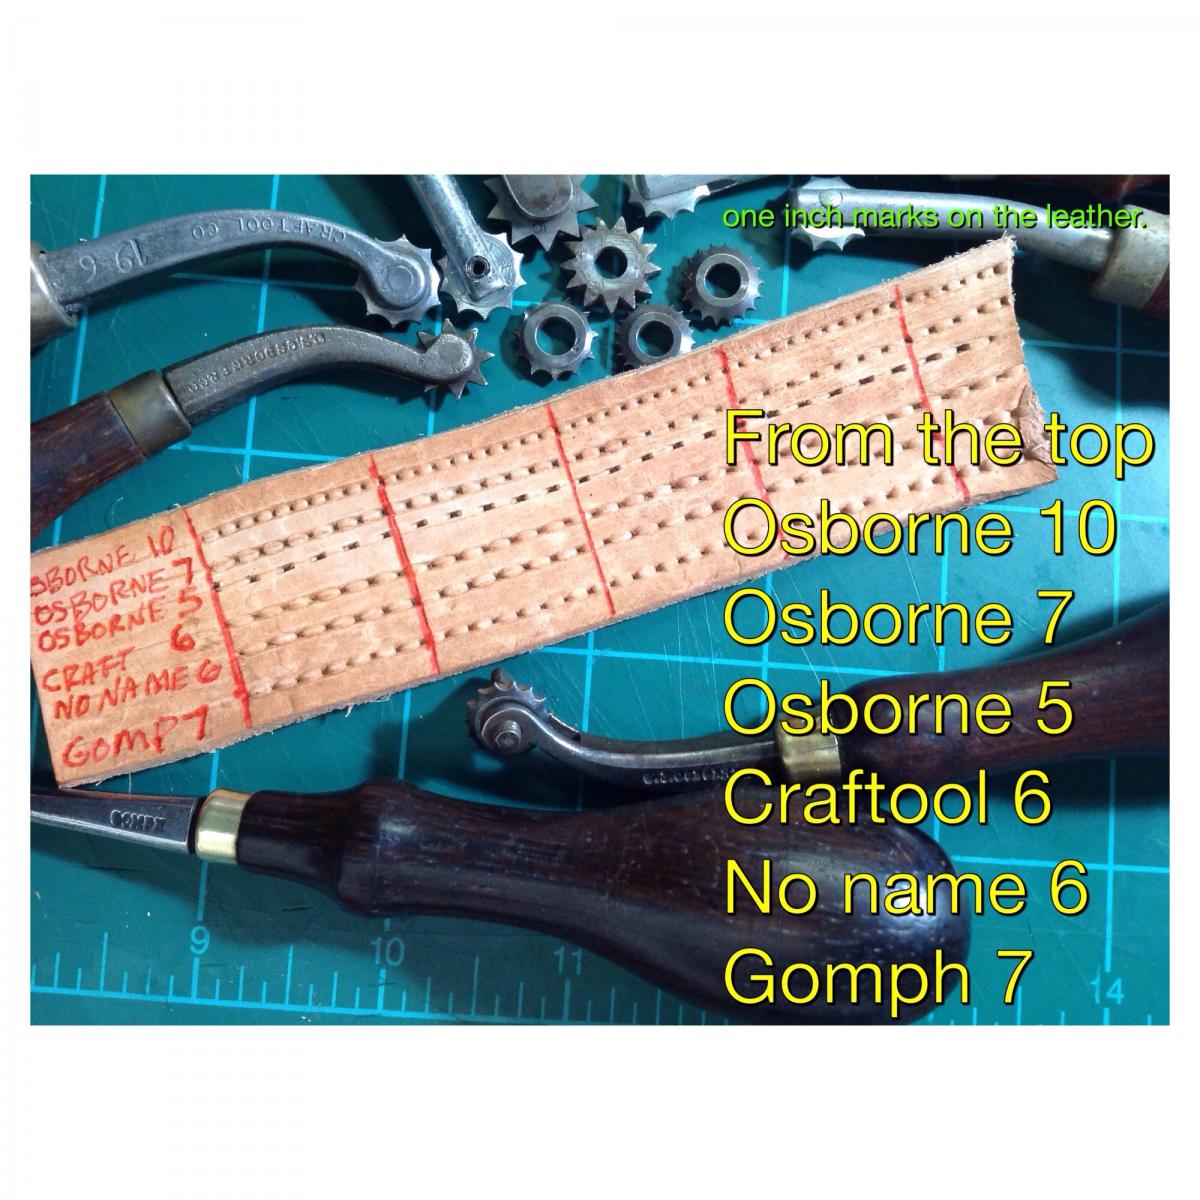
To further make this clear as mud. I have quite a pile of tools so I did a test run on some marking and overstitch wheels. I did a few inches so it can be seen that they are close at best. I think it's a fair representation of what's out there and how they line up. I know this is getting a little out there from what the OP was asking but there is a lot of good information being discussed and I think most folks start with these wheels for marking out stitches. The first mark starts in the red line on the left side of the picture.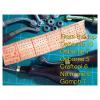
-
Advice Wanted On Pricking Irons/stitching Awl
Oldtoolsniper replied to Grey Drakkon's topic in Leatherwork Conversation
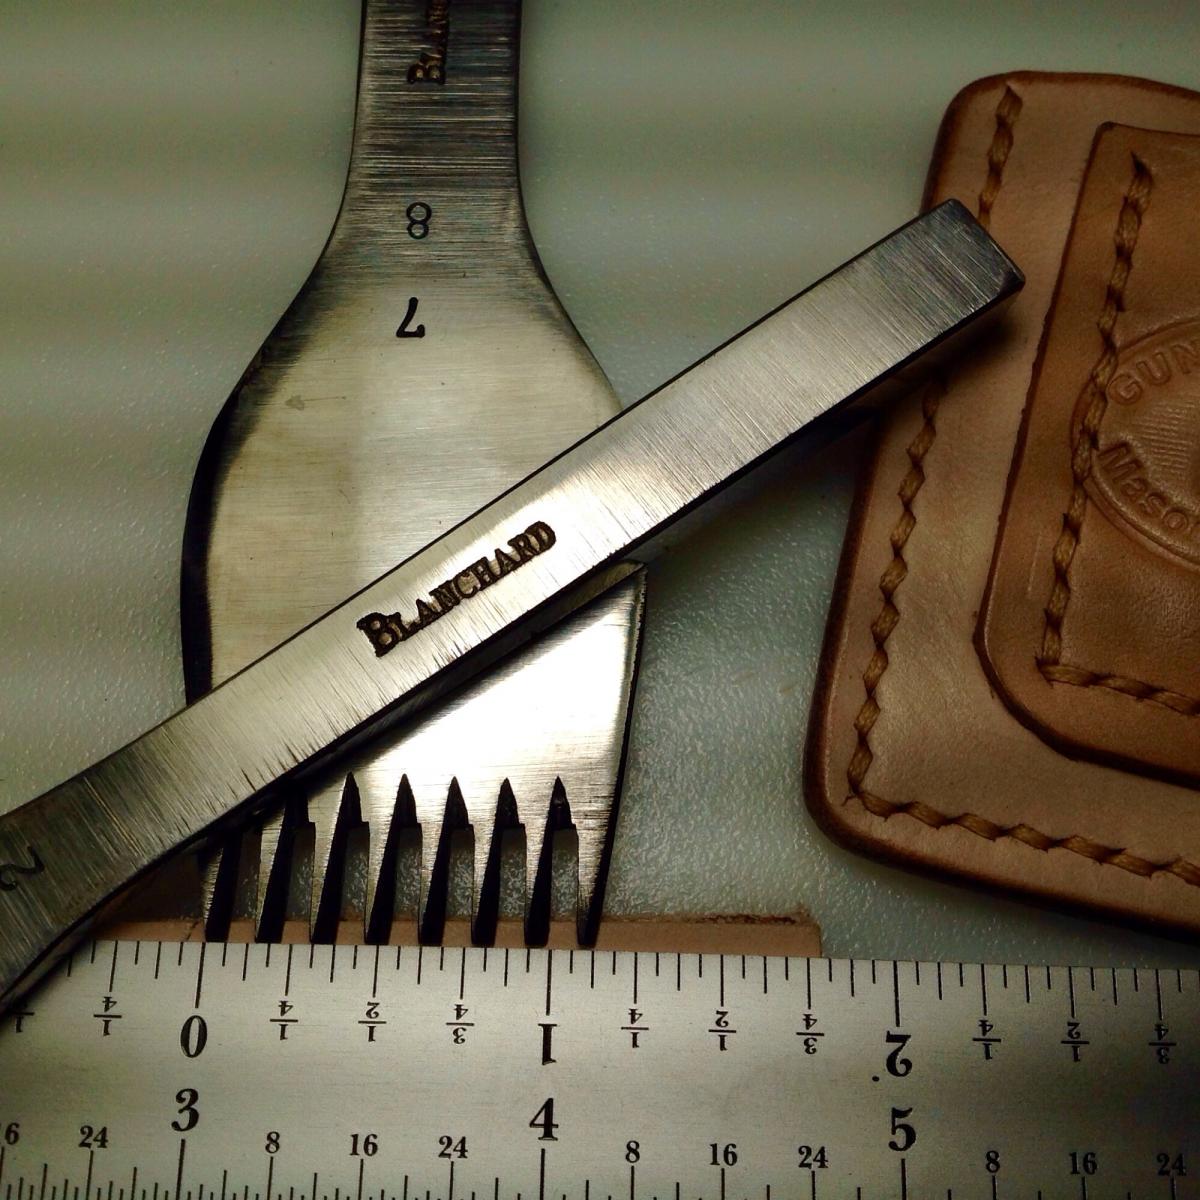
There are only seven prongs to the inch on my Blanchard 7 8 iron. So on Blanchard made irons everything is counted by the prongs not the stitches. I trust DavidL can post pictures of his tools so we can see. If I understand this correctly Blanchard counts prongs per inch and everyone else counts stitch per inch. -
Advice Wanted On Pricking Irons/stitching Awl
Oldtoolsniper replied to Grey Drakkon's topic in Leatherwork Conversation
I posted the pictures to clear up the confusion. My apologies, I assumed seven holes meant seven stitches. Seven holes makes six stitches. Perhaps DavidL can post pictures showing us his so we can see the difference between Dixons and Blanchards. I think that would make this a very helpful post for everyone looking at pricking irons in the future.. -
Advice Wanted On Pricking Irons/stitching Awl
Oldtoolsniper replied to Grey Drakkon's topic in Leatherwork Conversation
I must be lost. I count seven holes from the zero line to the 1 inch line on the ruler. That would give me seven holes to fill with thread in one inch. That says there are seven teeth to the inch or seven stitches to the inch. What am I missing or not understanding? I am new to this and I'll admit it is a little confusing to me. The fact that most if not all pricking irons come from countries who use the metric system of measurement, but then they have teeth per inch or stitch per inch measurements. If you ask how big the teeth are most everyone gives that as a metric measurement. This is also how I see the gaps between the teeth are measured. DavidL I'm an avid woodworker with hand tools, I sharpen all of my handsaws by hand with a file. I'm not sure how they are counted different. A five point per inch rip saw has five points per inch, the saw is stamped 5 or listed as 5PPI. -
Advice Wanted On Pricking Irons/stitching Awl
Oldtoolsniper replied to Grey Drakkon's topic in Leatherwork Conversation
Here it is from a better angle.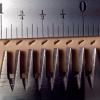
-
Advice Wanted On Pricking Irons/stitching Awl
Oldtoolsniper replied to Grey Drakkon's topic in Leatherwork Conversation
Not sure what you mean either. -
Advice Wanted On Pricking Irons/stitching Awl
Oldtoolsniper replied to Grey Drakkon's topic in Leatherwork Conversation
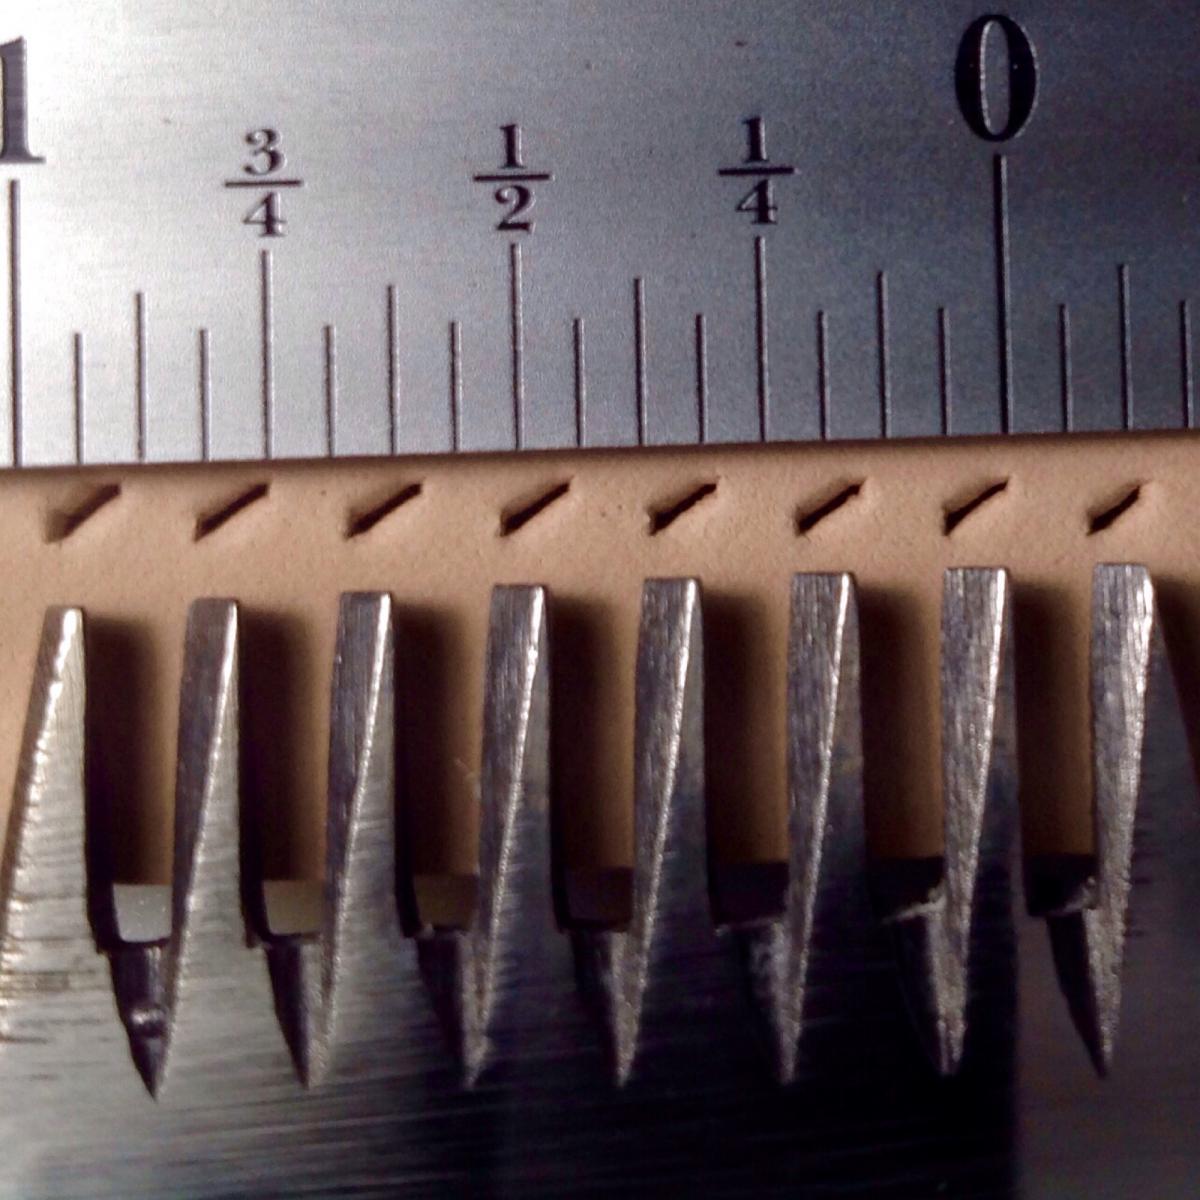
Here is a picture of the irons I own. Blanchard 7 8 and 7 2 7 indicates 7 stitches per inch 8 tells you the number of teeth on the iron. Again 7 indicates stitches per inch and 2 is the number of teeth on the iron. As you can see on the ruler 7 is the number of holes or pricks produced in an inch. I'm not sure how other folks measure an inch but I'm betting if it says 7 stitch per inch then most reputable tool makers will shoot for that when they make or sell a tool. As close as I can get it the tip measures at 1.8mm or about 0.071" but they obviously get wider as they go deeper into the leather.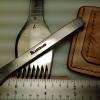
-
Looking forward to your report. Do you have any experience machine sewing leather? I'm asking because I'm interested in getting one and have very little experience on a machine with leather. Looking for the "new to a Machince" experience.
-
Help With Sharpening This Tool Please
Oldtoolsniper replied to Woodcarver G's topic in Leather Tools
One thing for sure is the difference between what is considered old in this country compared to yours. Something made in the 50's here is considered an antique here in the United States and I'm pretty sure something from the 50's in the UK is just considered used. In my previous life as a Marine I made it around the world twice. Never made to your country. The oldest modern country was Japan and it was an eye opening experience in wood working tools and how they are used. They are still doing the apprenticeship style of learning the craft, the workmanship that I saw was incredible. I've never seen anything like it here in the states. They have tools that cost a lot of money here in the states just piled up on the shelves in the hardware stores over there. Every kind of waterstone you could imagine for next to nothing. Perspective comes from where you are. I get hired to trap animals that are destructive to farming and roadways here and think nothing of it. I've only taken public transportation twice in my life, once in Australia and once in Washington D.C. I drive the majority of the time in the country on gravel roads. We have so many deer here that it is dangerous to drive from sunset to sunrise. If a tool is 200 years old in this country it most likely was not made here. Things are definitely different between our two countries. I would really be surprised if that knife you have was made for flooring. I betting it's a little older than that. The nice thing about knives is that they can be used for whatever the owner of the knife chooses to use it for. I bet there are a lot of head knives being used to chop herbs in kitchens around the world. -
First Shoulder Rig
Oldtoolsniper replied to Eaglestroker's topic in Gun Holsters, Rifle Slings and Knife Sheathes
There it is! The rig I've been searching for. Skinning knife on one side and a handgun on the other. Perfect for running a trap line from my four wheeler. Where do I buy the pattern? -
Help With Sharpening This Tool Please
Oldtoolsniper replied to Woodcarver G's topic in Leather Tools
Yes that was my post on the Rose head knife. I read a lot of these posts and learn a lot. I don't post a lot and I only post questions when I can't find the information any other way. I only post about things that I have experience with and have actually done with my hands. I enjoy learning about this stuff. In most cases the older tools are far better than anything getting produced today. I rehabilitate old wood working tools as well. I've learned to sharpen everything I own and most all of my friends drop their sharp pointy things off for me to sharpen. Sharp tools is what lead me into leatherwork, a sheath is cheaper than stitches. Sharpening is just part of the skill set you need for woodworking. When it comes to the old tools I work on it amazes me how many of them I get with blades installed upside down and how many folks think a grinder makes a sharp tool. Taking that skill set to leather tools was pretty easy. I also run a large trap line every year and I put up all of my fur so I skin, flesh, stretch and handle hundreds of pelts every year. Sharp tools are required for that too. I know this is off the subject but what do you do with straight razors?