-
Posts
276 -
Joined
-
Last visited
Content Type
Profiles
Forums
Events
Blogs
Gallery
Store
Everything posted by Oldtoolsniper
-

Dragoon Holsters
Oldtoolsniper replied to Virginian Southron's topic in Gun Holsters, Rifle Slings and Knife Sheathes
Jim, Thanks for the idea on the fancy screwdriver case, I have one or two under my bench! Didn't know what to use me for. I now use your 1" strap method and don't miss to often unless I have a brain fart. -

Francis & Ward Round Or Head Knife Information Help.
Oldtoolsniper replied to Oldtoolsniper's topic in Leather Tools
Bob, Thanks. I may do that if he doesn't post on here. I think these old tools are that much more of a pleasure to bring back to life and to use if some of the history is known. This one had a lot of rust and paint on it. I think it may have done time as a painters tool or a wallpaper hangers tool. Once I got that off I found the name. -

Iphone/smartphone Cases & Wallets
Oldtoolsniper replied to maritimemoose's topic in How Do I Do That?
If you have access to the tools the other way Is to buy a cutting board, same plastic ones we cut on and make a block out of one of those. The iPhone 4 series were the exact thickness of a cutting board I found at the dollar store. I have all the dummy phones now so I have not checked into the latest models. I use those cutting boards for a lot of forms. It's easy to shape, tough for tooling on, and waterproof too.- 4 replies
-
- iphone
- smartphone
-
(and 2 more)
Tagged with:
-

Messenger Bag
Oldtoolsniper replied to opus56's topic in Purses, Wallets, Belts and Miscellaneous Pocket Items
Thanks for posting that. I see the dewalt scrollsaw in the background, do you make cardboard furniture for proof of concept too? -
http://www.leevalley.com/US/wood/page.aspx?p=72867&cat=51&ap=1 These might be the ticket. I have used the bags out of wine boxes for different finishes. Pry the spout out, rinse the bag and dump your new stuff in. I use it for my vigerroon. You just want to make sure it's done off gassing or you end up with a beach ball sort of thing.
-
Just started cleaning this one up. Got the layer of rust removed and found the name Francis & Ward on the knife. Only information I can find is a little bit on Bruce Johnsons tool site. As you can see she's been used and sharpened quite a bit. Looking for any information on the maker. As always Thanks.
-

Binocular Case
Oldtoolsniper replied to Otto6294's topic in Purses, Wallets, Belts and Miscellaneous Pocket Items
I admire the fact you you stuck with it and managed to make a nice case out of it. Thank you for sharing it with us. -
The picture of that swivel knife in your hand says about everything you could say about what those tools mean to you. Thanks for sharing.
-
One thing to remember is that each piece of leather will take stain differently, even from the same hide. I doubt anyone will ever win that battle. Al Stolmans book on coloring leather mentions it on almost every page. Woodworking has the same issues and after many years of doing it you learn to embrace the color shifts as part of the project. Kydex will stay the same color but I'm not to fond of plastic holsters. How did you apply the dye? I've found on some leather if I pre wet the leather with denatured alcohol before I spray (airbrush) on the dye it seems to penetrate better. I've never tried this with applying the dye by the dauber method but it might help. It works on wood that's prone to blotching.
-

Musician's Belt With A Dobro Capo Case
Oldtoolsniper replied to Chief31794's topic in Musical Instruments
Chief, Thank-you. I'll be calling in my order in the morning. I have a bottle of that gel dye but never tried it after a couple of other disasters using some of the Tandy branded stuff. After seeing your results I am going to pound out a scrap and give it a go. I like the color, looks like it will go with brown and black shoes if you are a coordinating type of fellow. -

Musician's Belt With A Dobro Capo Case
Oldtoolsniper replied to Chief31794's topic in Musical Instruments
Chief, Thanks again for doing the you tube video on that belt pattern. I did my first one on a very poor piece of leather called a belt blank from Tandy and even that came out looking not bad. Even where I got it out of whack a little bit when you view the whole belt you don't notice it. I also do not have the exact tools you used but it still worked. I especially liked the tip on lining up the outside camouflage border, it was one of those "duh" moments. I have two squares on my table and that simple tip eluded me until you pointed it out. Couple more questions in regards to the belt you have here. Where do you get those mechanics buckles? What dye and top finish are you using on the belt in this post? -
The clips are spring steel as a few have rust and the shells must slide in from the top, you can't tip them forward without a great deal of force so the belt kind of needs to fit snug or you just tug the belt up when you attempt shell removal. They are held on by very skinny copper rivets wth no burrs. The clip is the burr.
-
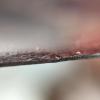
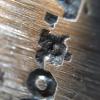
I just received and began working on another set of three Rose knives from W. Philadelphia. I thought I would do some informational posts as I rework them. The pictures show close ups of the edge and part of the face where the knife is etched Rose. This edge shot is a good reason why rust pits do not allow for sharpening to the level you want in a knife for cutting leather. The edges must come together to form the sharp edge we all need and as you can see a pit will prohibit that. All of that has to be ground out in order to obtain any sort of cutting edge. It takes a lot of time and patience to remove all of that even on a small knife like this one. The Rose knives are very hard tempered and that adds more to the work required to bring one back to life. They hold an edge really well but they are a bear to sharpen because of the temper and that makes getting pits out especially difficult. Some of the knives by other brands I've worked on are easy to clean up and that comes as a trade off because then you have to strop it of sharpen it all the time. I thought perhaps the first one of the Rose knives I bought was an anomaly and was unusually hard. This one is my seventh and they have all been hard tempered and challenging to bring back to user level when pits are present. I really like fixing these old tools up and using them. I'm not much on the Patina (rust) adding value to tool. I really doubt many of the craftsman who bought these tools a hundred years ago considerd rust an added value. I'm betting they took pride in keeping them in working order. Clearly you can see from the pit on the edge of this knife caused by patina that's just not going to happen until the patina is removed. The close up on RO part of Rose is interesting, looks like it may have been etched not stamped. It makes sense to me since the blades are so hard. I imagine pounding a steel stamp into a blade that hard might be a bad thing.
- 1 reply
-
- sharpening
- rose knife
-
(and 1 more)
Tagged with:
-
Trying to locate any information on this shotgun shell bandolier. My intention is to harvest the parts and make a new belt so I can put it back to use. I want to check first to see if there is any information out there on these types of belts and if there is any reason not to remake it into a serviceable piece of gear. It fits 12 gauge shells and has no makers mark or any indications as to who made or manufactured it.
-
I use a food dehydrator and stuff come out rock hard. Thrift stores have the round stacking ones for next to nothing. Need a deeper one just cut the plastic mesh out of a ring. They are not much good for food the top stays raw and the bottom bakes. The top is cooler than the bottom as the heat element is there. Clean the food grease out of it before use.
-

Iphone/smartphone Cases & Wallets
Oldtoolsniper replied to maritimemoose's topic in How Do I Do That?
eBay will provide you with dummy display phones for the IPhone series. They are exact replicas from China. I use them as forms for the cases I do.- 4 replies
-
- iphone
- smartphone
-
(and 2 more)
Tagged with:
-
I tried one, looks so simple and then, well poo, poo, and double poo. I ordered a bunch of tools from Japan and they sent me a blank as a freebie. It was a tease, it looked so simple, they must have known I couldn't tie my own shoes until late in kindergarten. That's why they sent it. Those look really nice, glad to see you leaping into the airbrush arena. It's a lot of fun to do and fast too.
- 32 replies
-
- mystery braidbracelet
- snaps
-
(and 3 more)
Tagged with:
-
This has been a very informative post. I'm I awe of some of those tools and having them explained is really helpful. Now I have to find some to restore so I can use them. I'm afraid this is going to be more expensive than tying flies to save money.
-
Chief, You do a great job on those videos and I'm sure it's mentioned in there and it's mostly common sense if you know what you are building and how to use it. If it were a rifle sling I'd have no issue, I've used one or two or them. I've never even had a guitar strap on. I run a security crew for concerts and never paid any attention to guitar straps, I've seen hundreds. Gary Allan's tech took sympathy on me this weekend and gave me a hands on course on them. Obviously at that level he has one for each of the many guitars he uses and each one fits different depending on the use or even the song. They are just like rifles only the music is different. I even thought they only attached one way, he showed me a multitude of different attachments. I certainly understand the custom nature of guitar straps now, before that class I just assumed they were all the same.
-
Thank you for taking the time to do and to post that video. I made my first guitar strap from a pattern from Joice at Black River Laser after watching one of your videos. I don't know anything about guitars or how a person fits a strap. I made a sample to test and it turns out fat fellers need a bit more cowhide so they are not wearing the guitar as a necklace.


